> ## Documentation Index
> Fetch the complete documentation index at: https://help.teable.ai/llms.txt
> Use this file to discover all available pages before exploring further.
# SSO Azure Entra ID
> Configurer Azure Entra ID comme fournisseur d’authentification SSO pour Teable
Disponible à partir du forfait Business
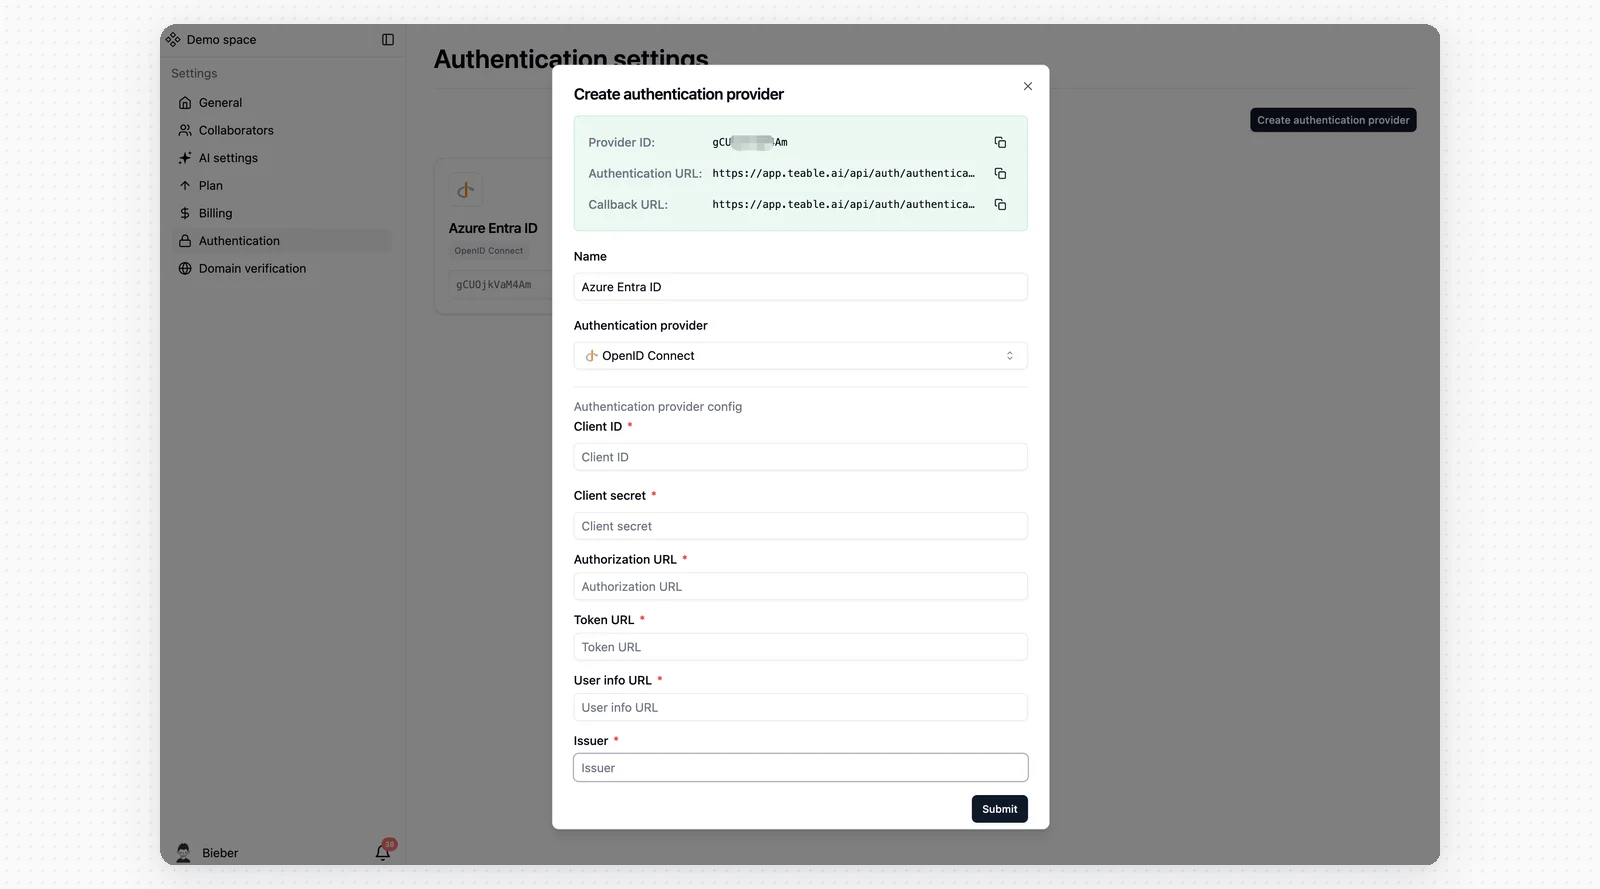
## Étape 1 : Créer un fournisseur d’authentification dans Teable
1. Accédez aux paramètres SSO de Teable.
2. Créez un fournisseur d’authentification, nommez-le **Azure Entra ID**, puis sélectionnez **OpenID Connect**.
 ## Étape 2 : Accéder à Azure Entra ID
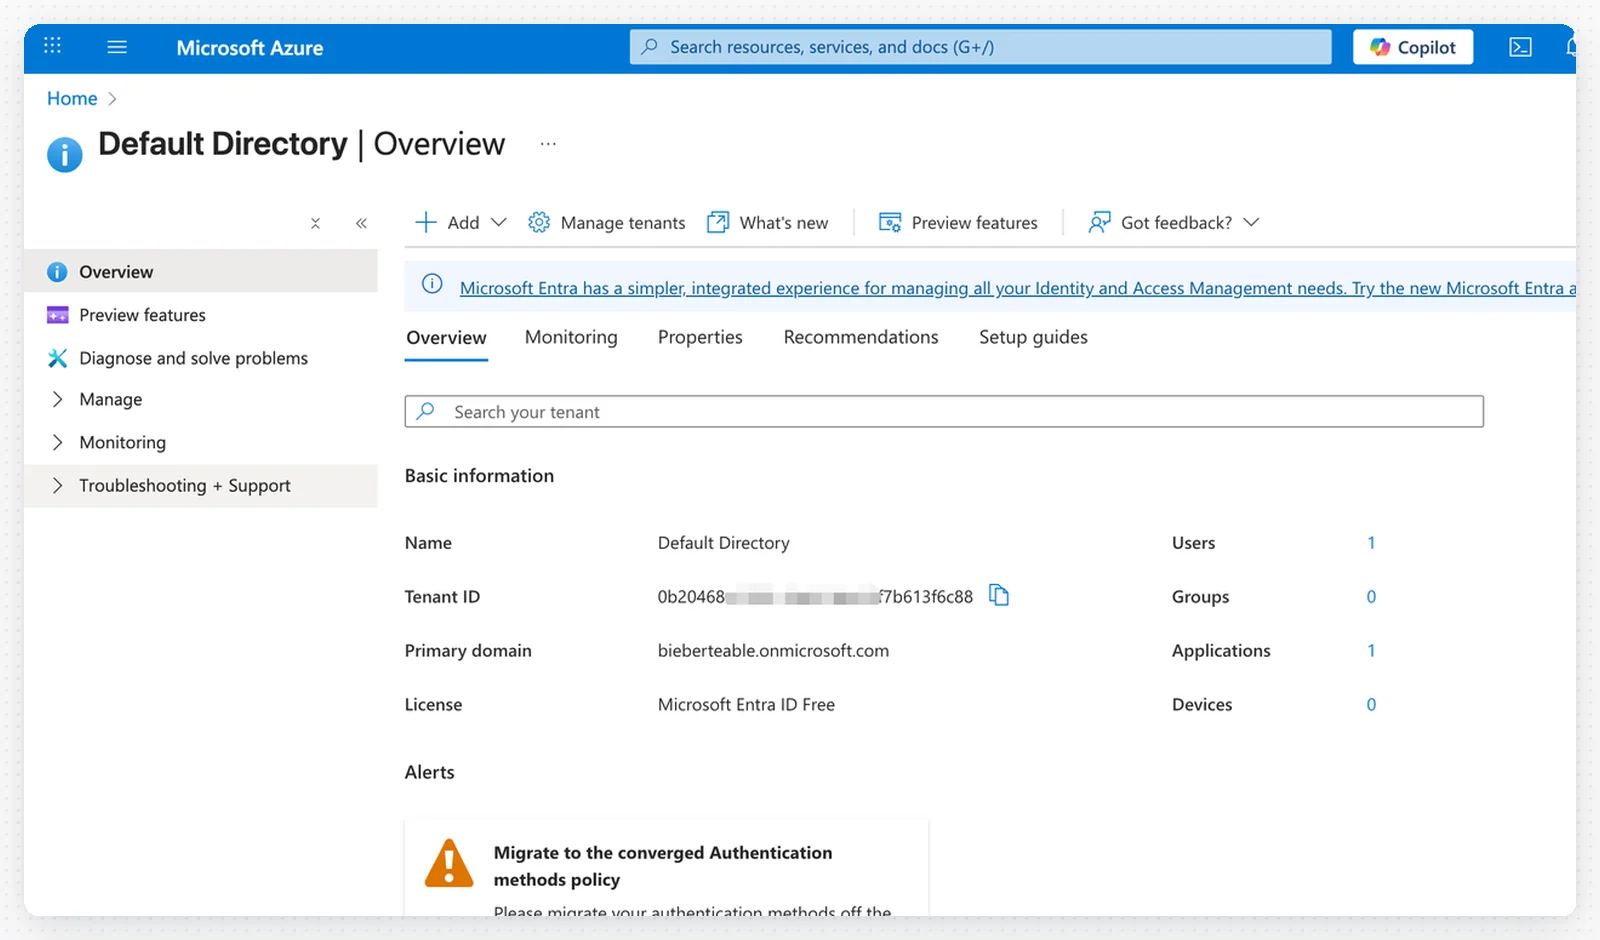
1. Connectez-vous à votre compte Azure.
2. Accédez à **Microsoft Entra ID** (anciennement Azure Active Directory).
## Étape 2 : Accéder à Azure Entra ID
1. Connectez-vous à votre compte Azure.
2. Accédez à **Microsoft Entra ID** (anciennement Azure Active Directory).
 ## Étape 3 : Configurer les points de terminaison OAuth
Renseignez les points de terminaison OAuth suivants dans Teable à l’aide de votre **Tenant ID** :
## Étape 3 : Configurer les points de terminaison OAuth
Renseignez les points de terminaison OAuth suivants dans Teable à l’aide de votre **Tenant ID** :
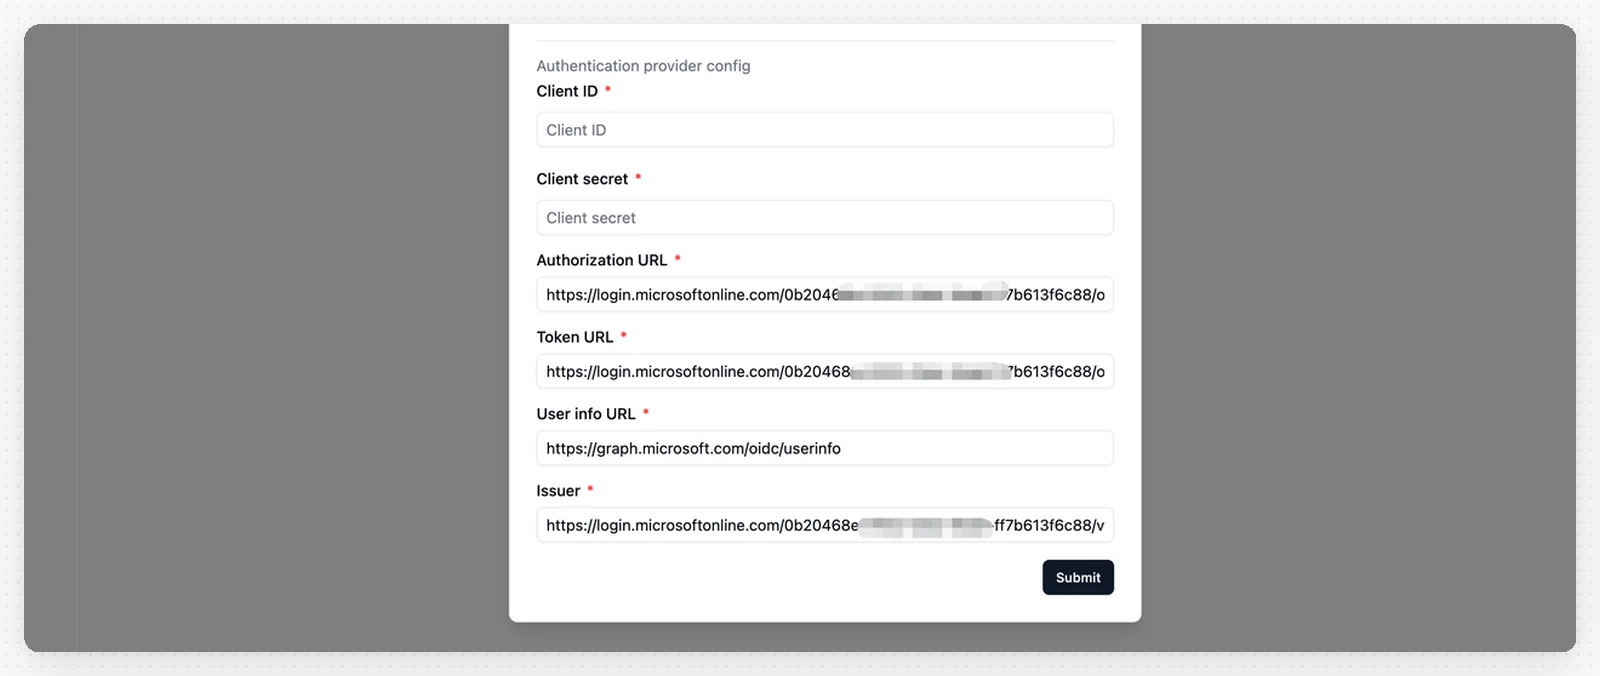 * **Authorization URL** : `https://login.microsoftonline.com/_YOUR_TENANT_ID_/oauth2/v2.0/authorize`
* **Token URL** : `https://login.microsoftonline.com/_YOUR_TENANT_ID_/oauth2/v2.0/token`
* **User Info URL** : `https://graph.microsoft.com/oidc/userinfo`
* **Issuer** : `https://login.microsoftonline.com/_YOUR_TENANT_ID_/v2.0`
Remplacez `_YOUR_TENANT_ID_` par votre ID de locataire Azure réel.
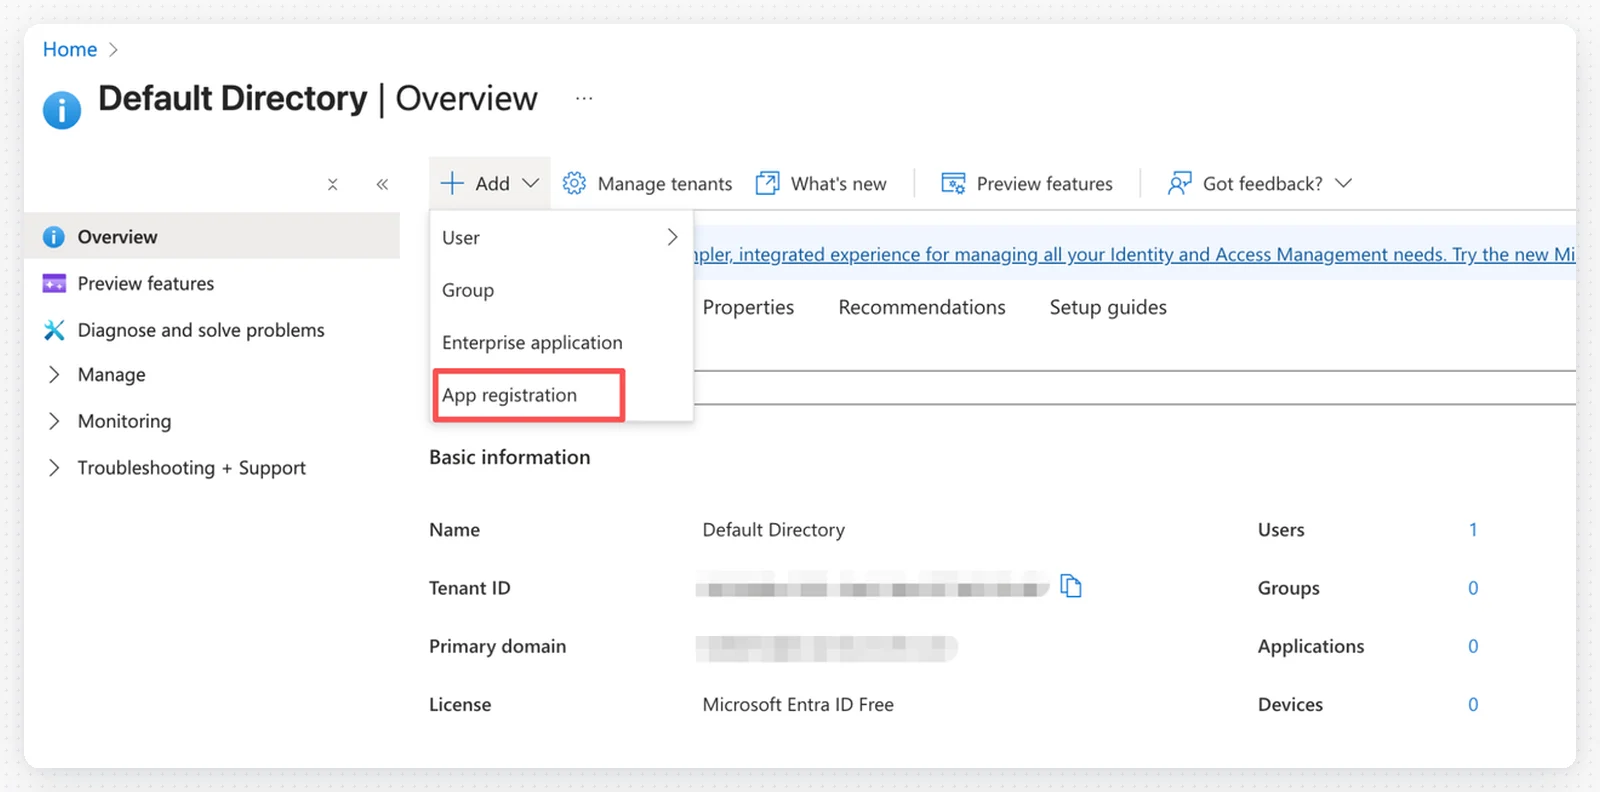
## Étape 4 : Enregistrer une nouvelle application
1. Dans Azure Entra ID, cliquez sur **App registrations** dans le menu de gauche.
2. Cliquez sur **+ New registration**.
* **Authorization URL** : `https://login.microsoftonline.com/_YOUR_TENANT_ID_/oauth2/v2.0/authorize`
* **Token URL** : `https://login.microsoftonline.com/_YOUR_TENANT_ID_/oauth2/v2.0/token`
* **User Info URL** : `https://graph.microsoft.com/oidc/userinfo`
* **Issuer** : `https://login.microsoftonline.com/_YOUR_TENANT_ID_/v2.0`
Remplacez `_YOUR_TENANT_ID_` par votre ID de locataire Azure réel.
## Étape 4 : Enregistrer une nouvelle application
1. Dans Azure Entra ID, cliquez sur **App registrations** dans le menu de gauche.
2. Cliquez sur **+ New registration**.
 ## Étape 5 : Configurer l’enregistrement de l’application
Remplissez le formulaire d’enregistrement de l’application :
## Étape 5 : Configurer l’enregistrement de l’application
Remplissez le formulaire d’enregistrement de l’application :
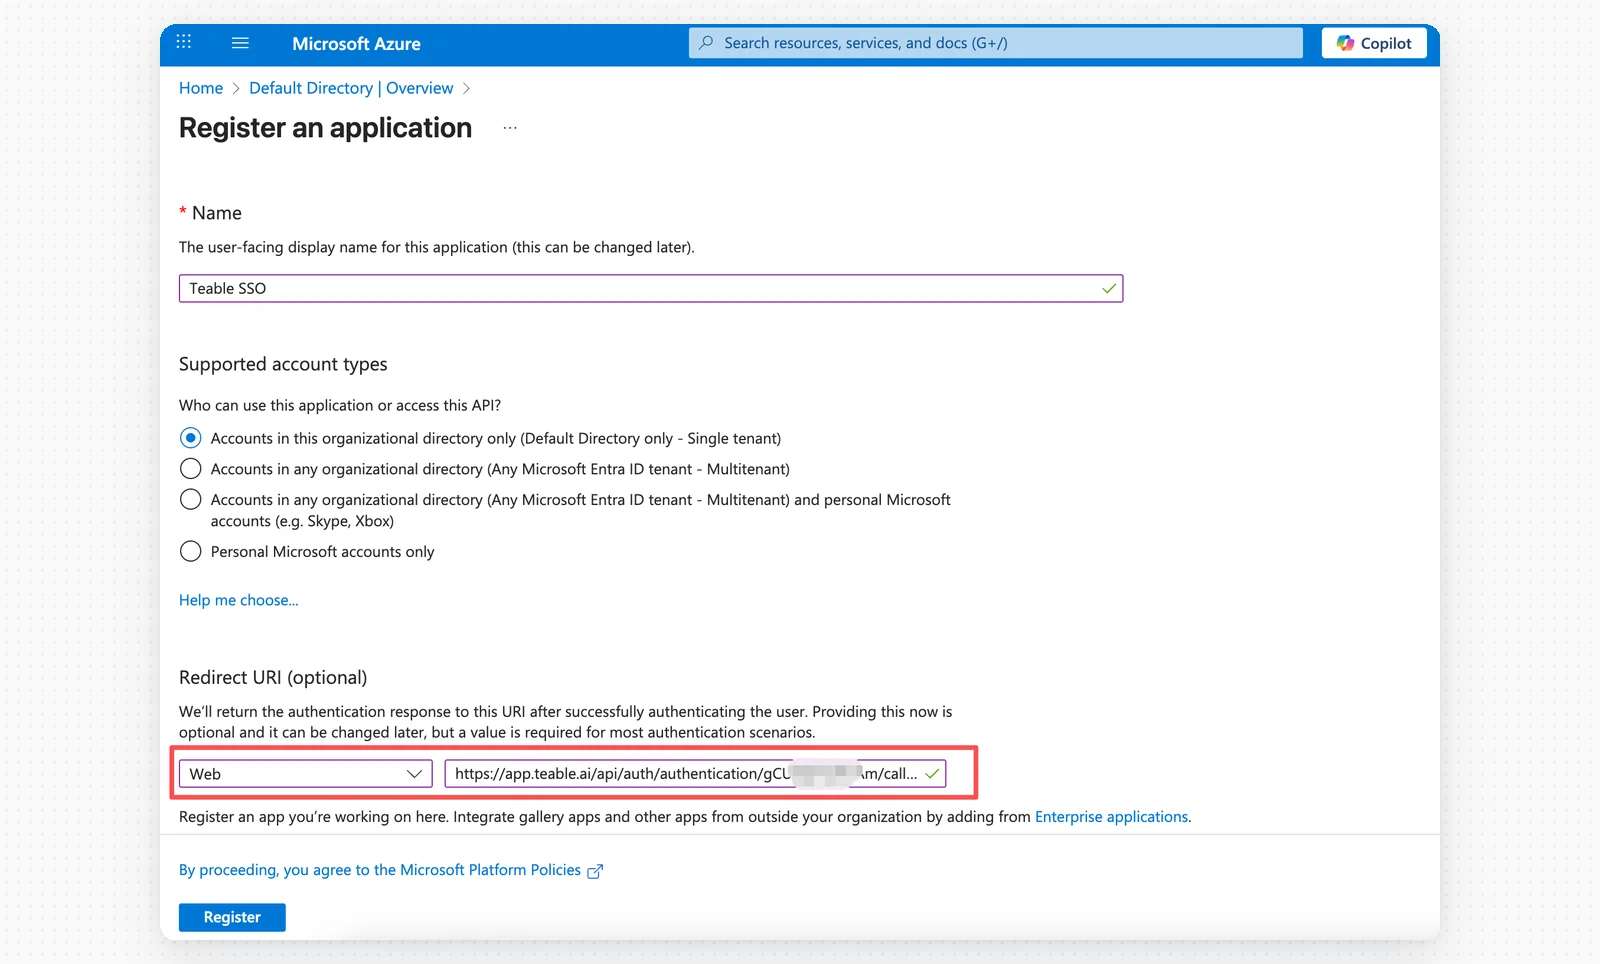
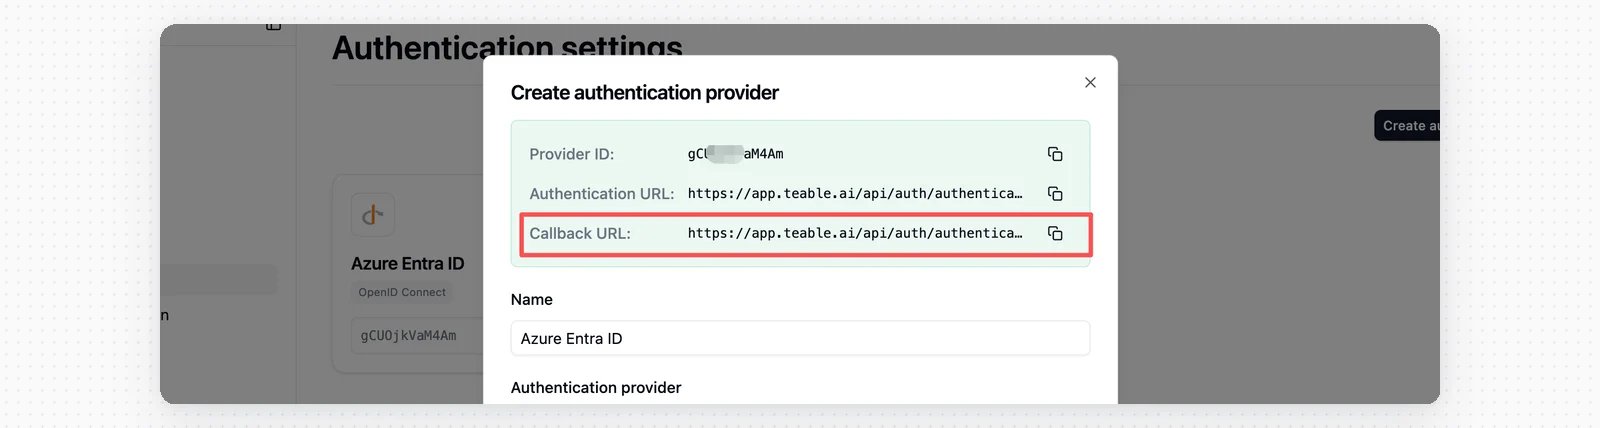 * **Name** : Teable SSO
* **Supported account types** : Sélectionnez selon vos besoins.
* **Platform** : Web
* **Redirect URI** : Collez l’**URL de rappel** depuis Teable.
Cliquez sur **Register** pour créer l’application.
## Étape 6 : Enregistrer l’ID client
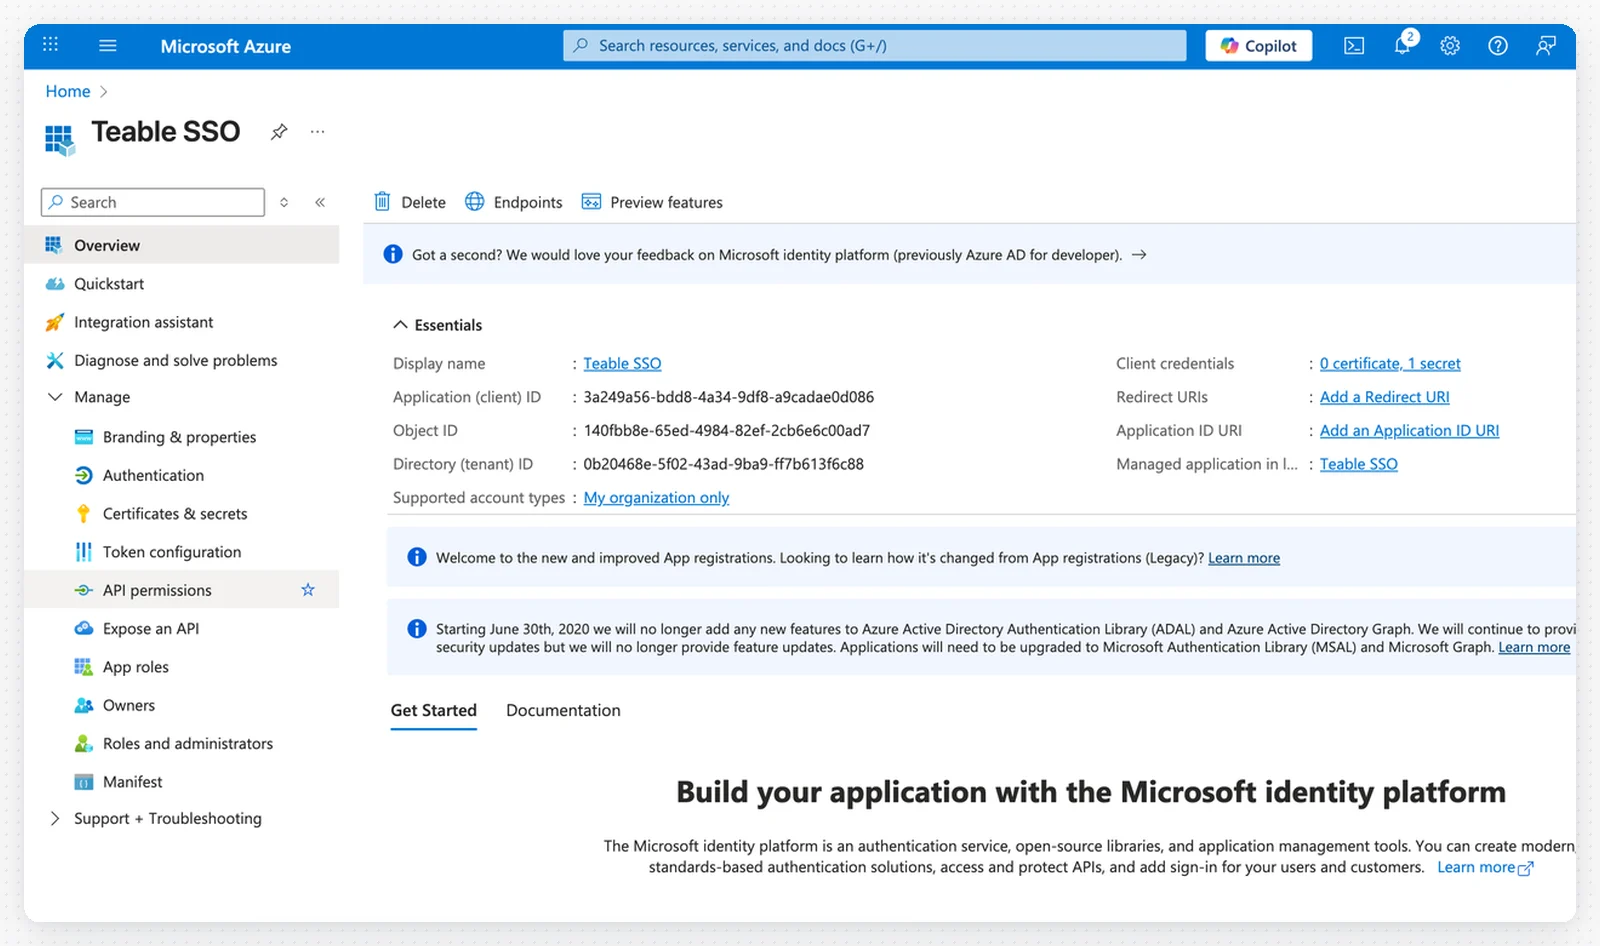
1. Copiez l’**Application (client) ID** depuis la page de présentation de l’application.
* **Name** : Teable SSO
* **Supported account types** : Sélectionnez selon vos besoins.
* **Platform** : Web
* **Redirect URI** : Collez l’**URL de rappel** depuis Teable.
Cliquez sur **Register** pour créer l’application.
## Étape 6 : Enregistrer l’ID client
1. Copiez l’**Application (client) ID** depuis la page de présentation de l’application.
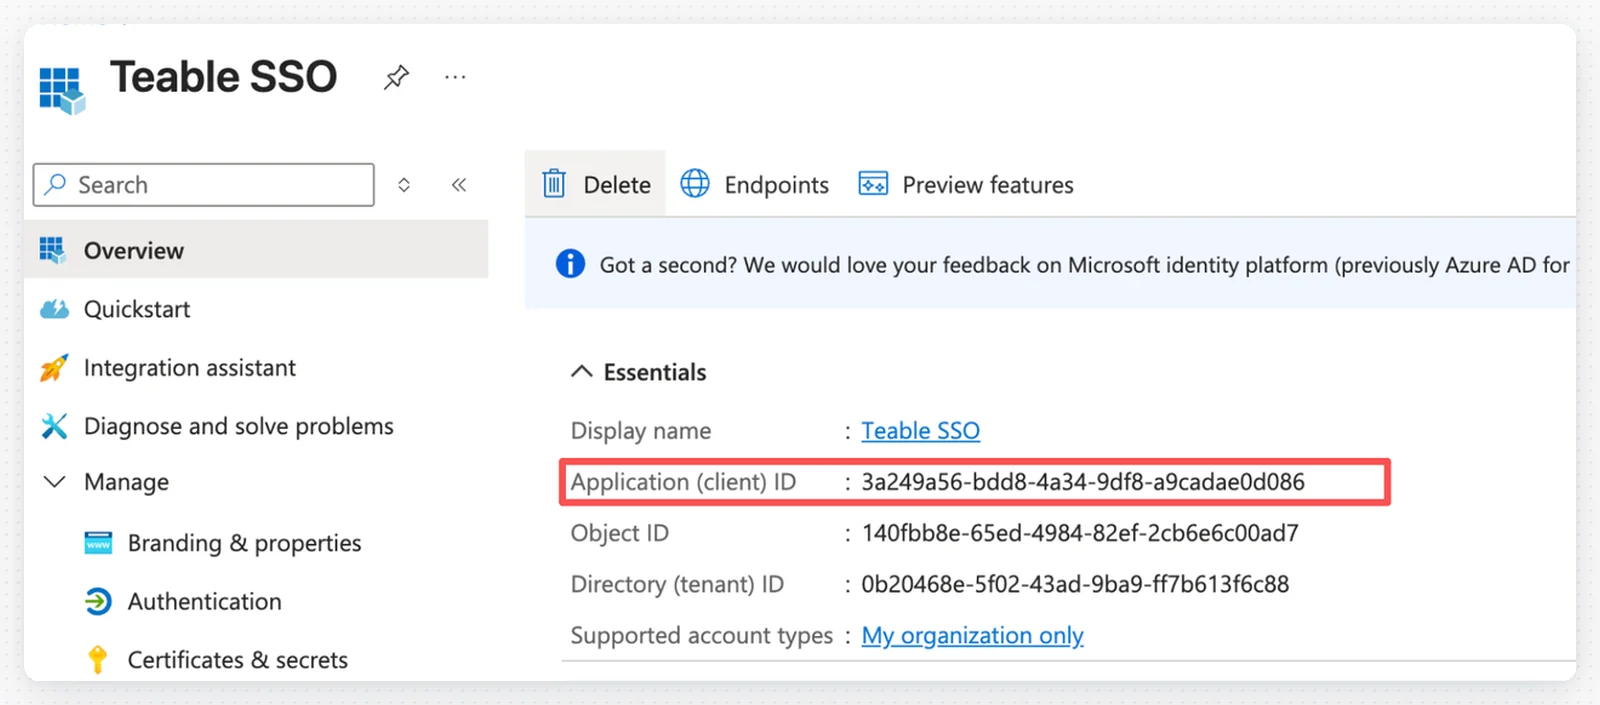 2. Collez l’ID client dans la configuration SSO de Teable.
 ## Étape 7 : Créer un secret client
1. Dans votre application, cliquez sur **Certificates & secrets** dans le menu de gauche.
## Étape 7 : Créer un secret client
1. Dans votre application, cliquez sur **Certificates & secrets** dans le menu de gauche.
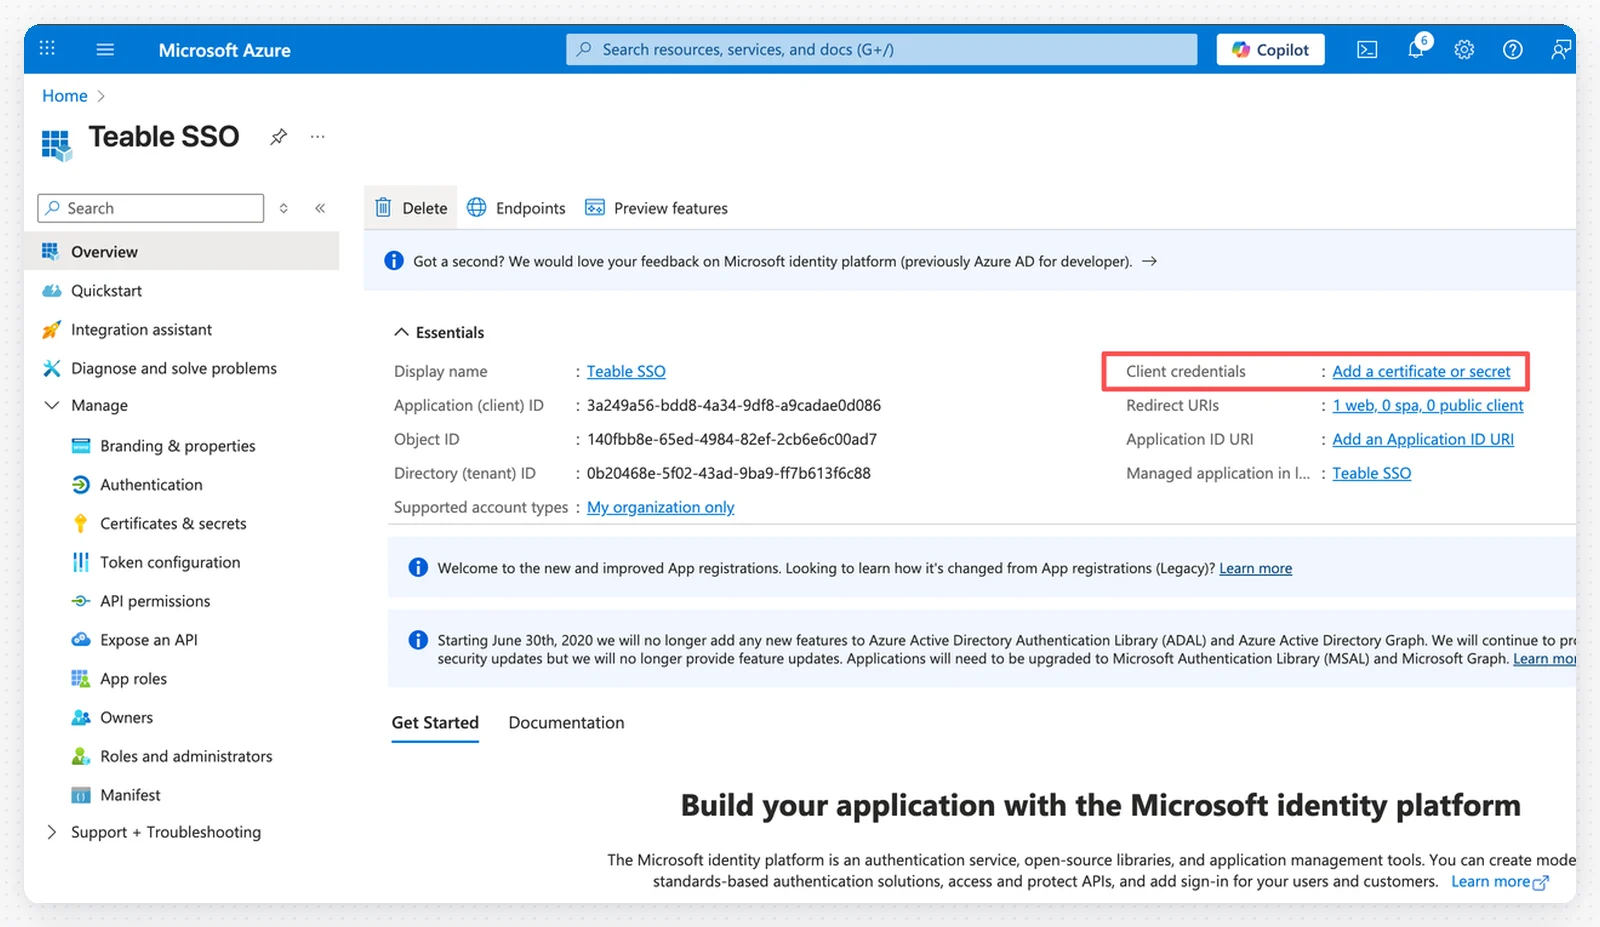 2. Cliquez sur **+ Add a certificate or secret**.
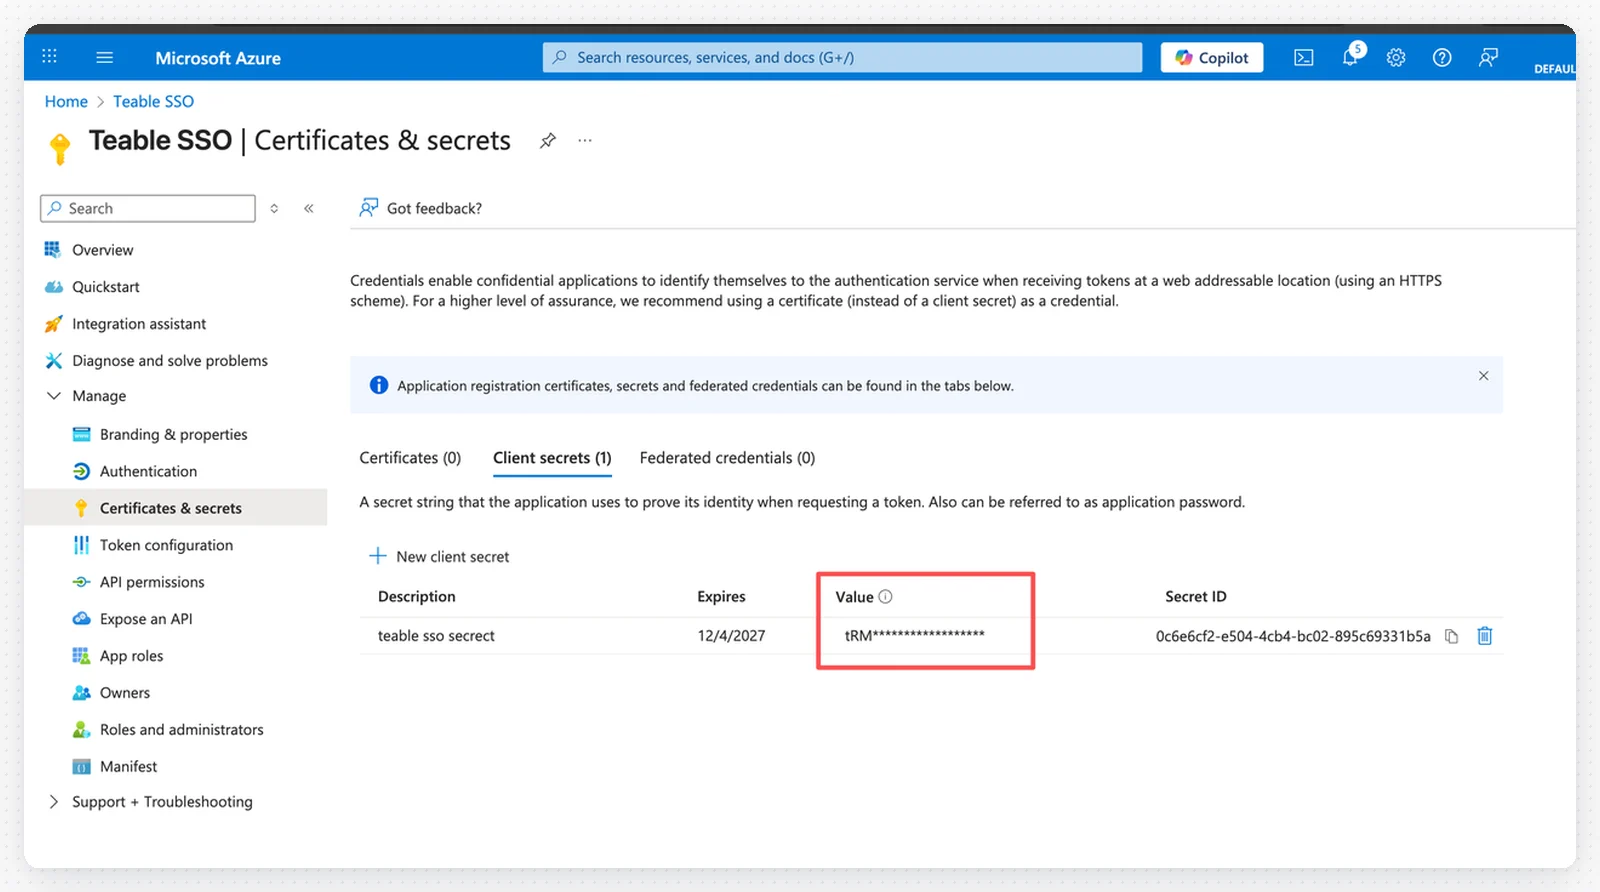 3. Ajoutez une description et définissez la période d’expiration.
4. Cliquez sur **Add**.
5. **Important** : copiez immédiatement la **Value** du secret et enregistrez-la comme secret client dans Teable.
3. Ajoutez une description et définissez la période d’expiration.
4. Cliquez sur **Add**.
5. **Important** : copiez immédiatement la **Value** du secret et enregistrez-la comme secret client dans Teable.
 La valeur du secret n’est visible qu’une seule fois. Veillez à l’enregistrer immédiatement.
## Étape 8 : Configurer les autorisations d’API
1. Cliquez sur **API permissions** dans le menu de gauche.
2. Cliquez sur **+ Add a permission**.
La valeur du secret n’est visible qu’une seule fois. Veillez à l’enregistrer immédiatement.
## Étape 8 : Configurer les autorisations d’API
1. Cliquez sur **API permissions** dans le menu de gauche.
2. Cliquez sur **+ Add a permission**.
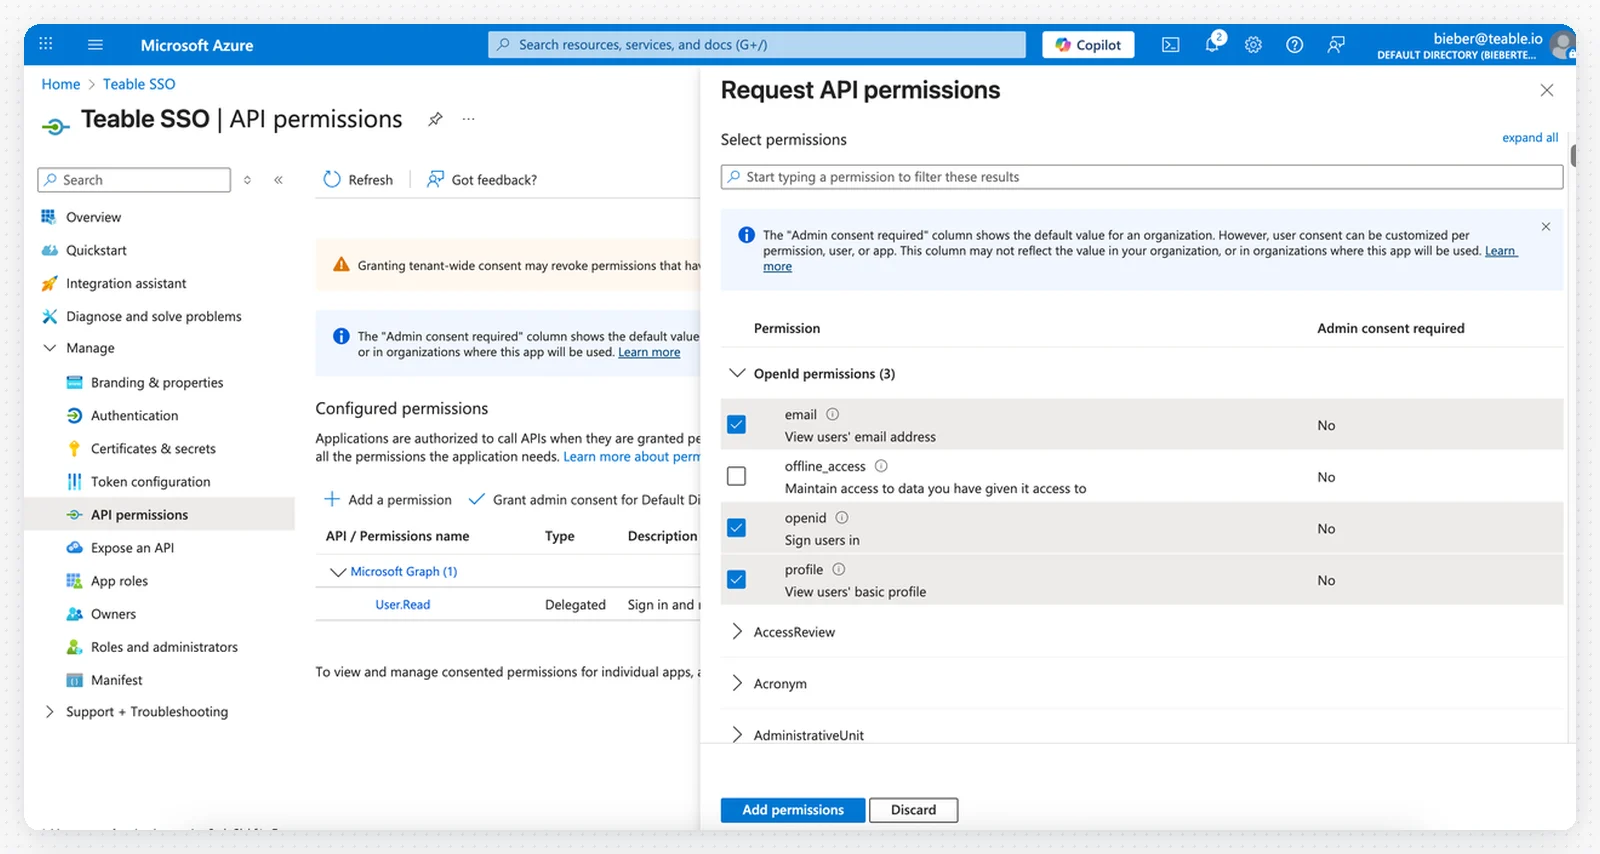 3. Sélectionnez **Microsoft Graph**.
4. Choisissez **Delegated permissions**.
5. Ajoutez les autorisations suivantes :
* `email`
* `openid`
* `profile`
6. Cliquez sur **Add permissions**.
3. Sélectionnez **Microsoft Graph**.
4. Choisissez **Delegated permissions**.
5. Ajoutez les autorisations suivantes :
* `email`
* `openid`
* `profile`
6. Cliquez sur **Add permissions**.
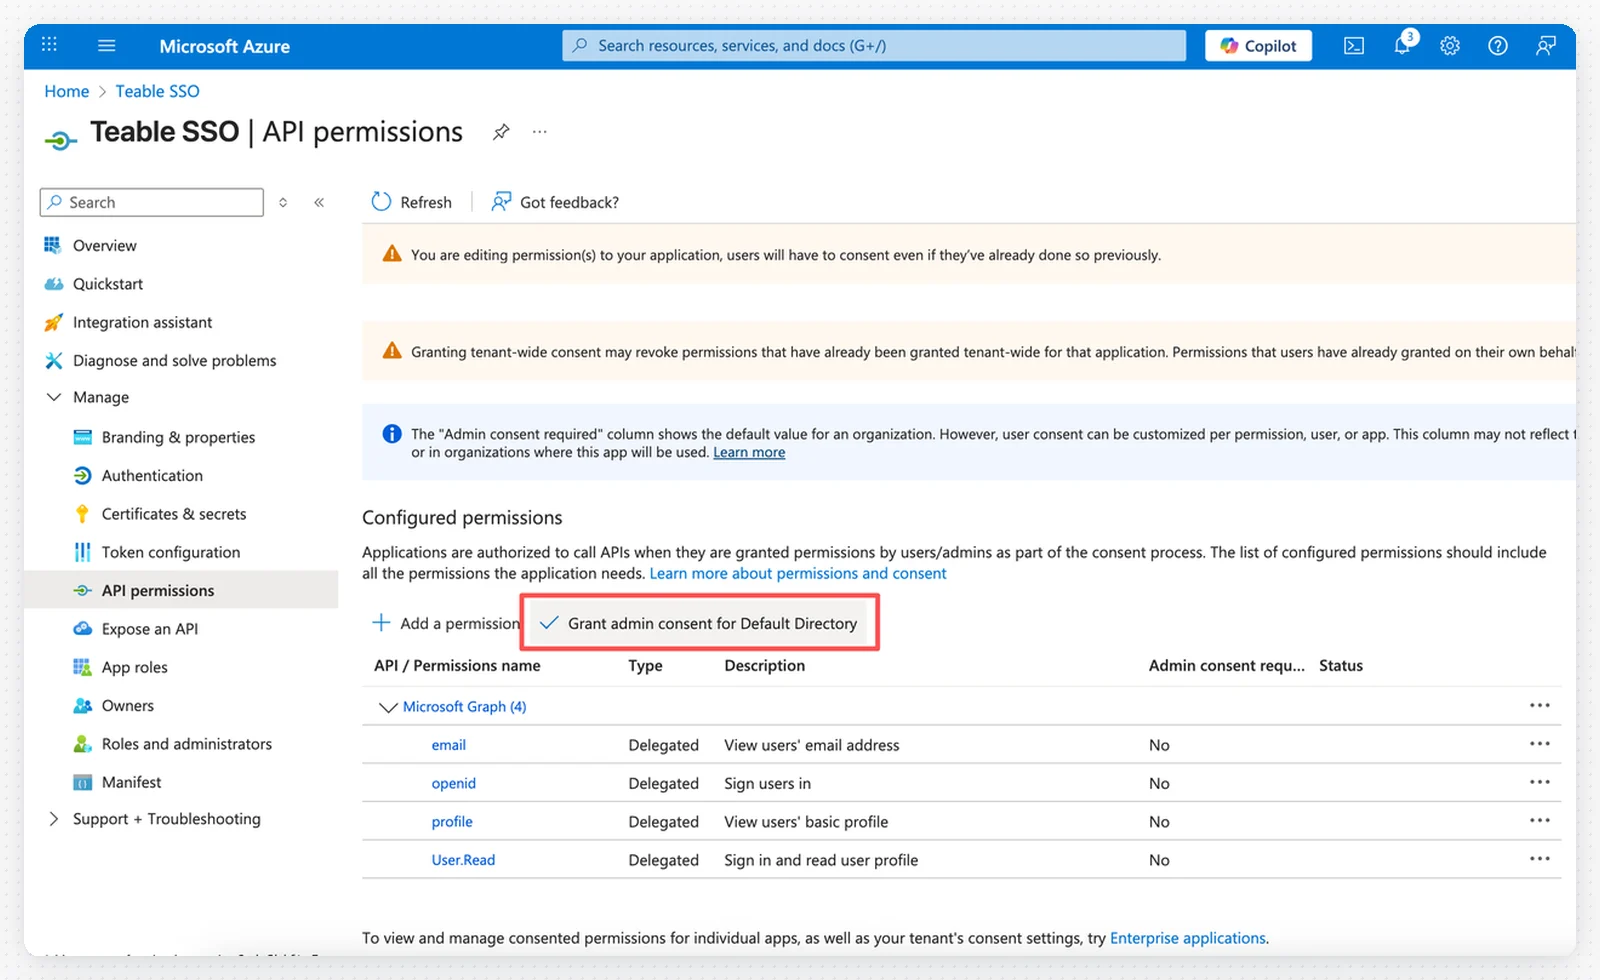 7. Cliquez sur **Grant admin consent for \[Votre annuaire]** pour approuver les autorisations.
## Étape 9 : Tester la connexion SSO
Vous disposez de deux options pour activer la connexion SSO :
7. Cliquez sur **Grant admin consent for \[Votre annuaire]** pour approuver les autorisations.
## Étape 9 : Tester la connexion SSO
Vous disposez de deux options pour activer la connexion SSO :
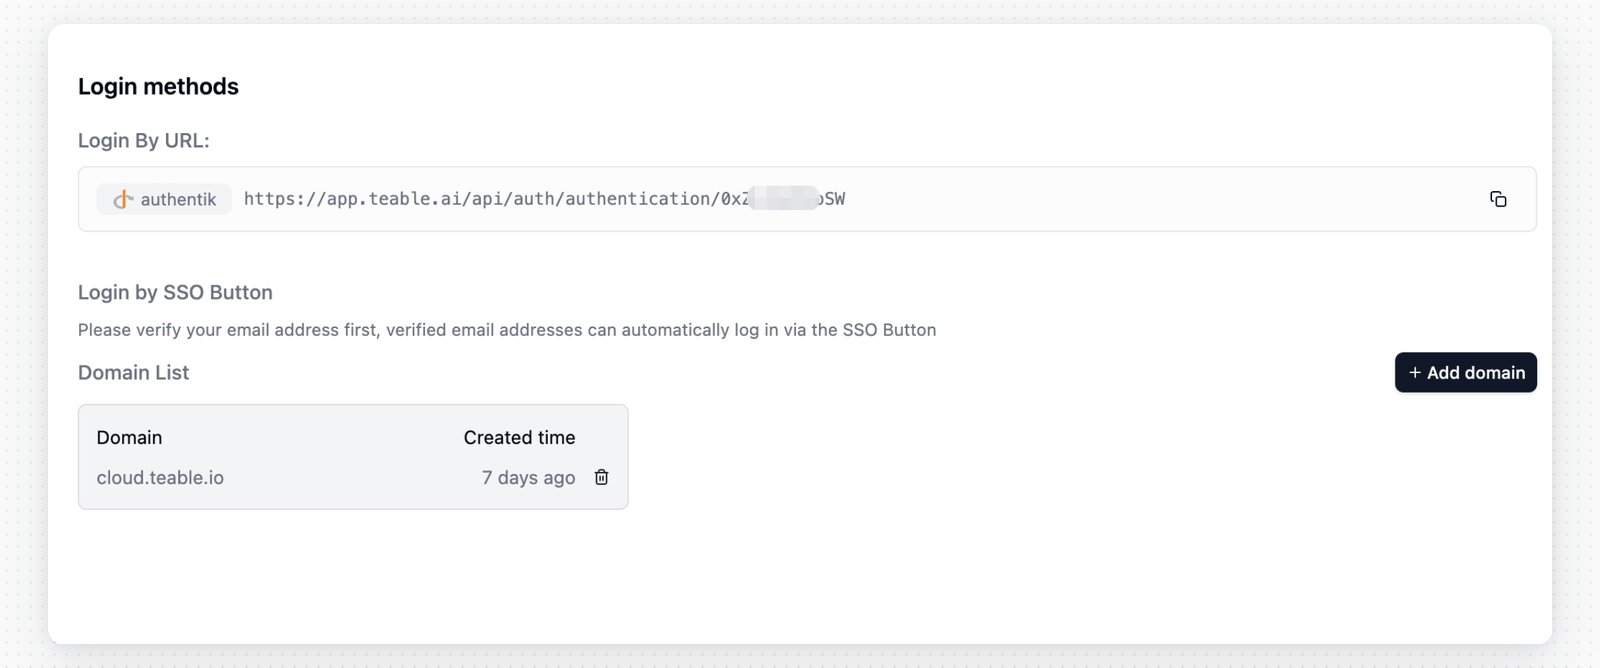 **Option 1 : URL d’authentification directe**
* Utilisez l’URL d’authentification comme URL de connexion SSO.
**Option 2 : Vérification de domaine**
1. Cliquez sur **Domain verification** dans le menu de gauche.
2. Vérifiez votre domaine personnalisé.
3. Ouvrez votre page de connexion Teable.
4. Cliquez sur le bouton de connexion SSO.
5. Saisissez votre adresse e-mail associée au domaine vérifié pour vous connecter.
**Option 1 : URL d’authentification directe**
* Utilisez l’URL d’authentification comme URL de connexion SSO.
**Option 2 : Vérification de domaine**
1. Cliquez sur **Domain verification** dans le menu de gauche.
2. Vérifiez votre domaine personnalisé.
3. Ouvrez votre page de connexion Teable.
4. Cliquez sur le bouton de connexion SSO.
5. Saisissez votre adresse e-mail associée au domaine vérifié pour vous connecter.