> ## Documentation Index
> Fetch the complete documentation index at: https://help.teable.ai/llms.txt
> Use this file to discover all available pages before exploring further.

# Azure Entra ID SSO

> Azure Entra ID を Teable の SSO 認証プロバイダーとして設定します

<Tip>Business プラン以上で利用できます</Tip>

## ステップ1：Teable で認証プロバイダーを作成する

1. Teable の SSO 設定を開きます
2. 新しい認証プロバイダーを作成し、名前を **Azure Entra ID** として、**OpenID Connect** を選択します
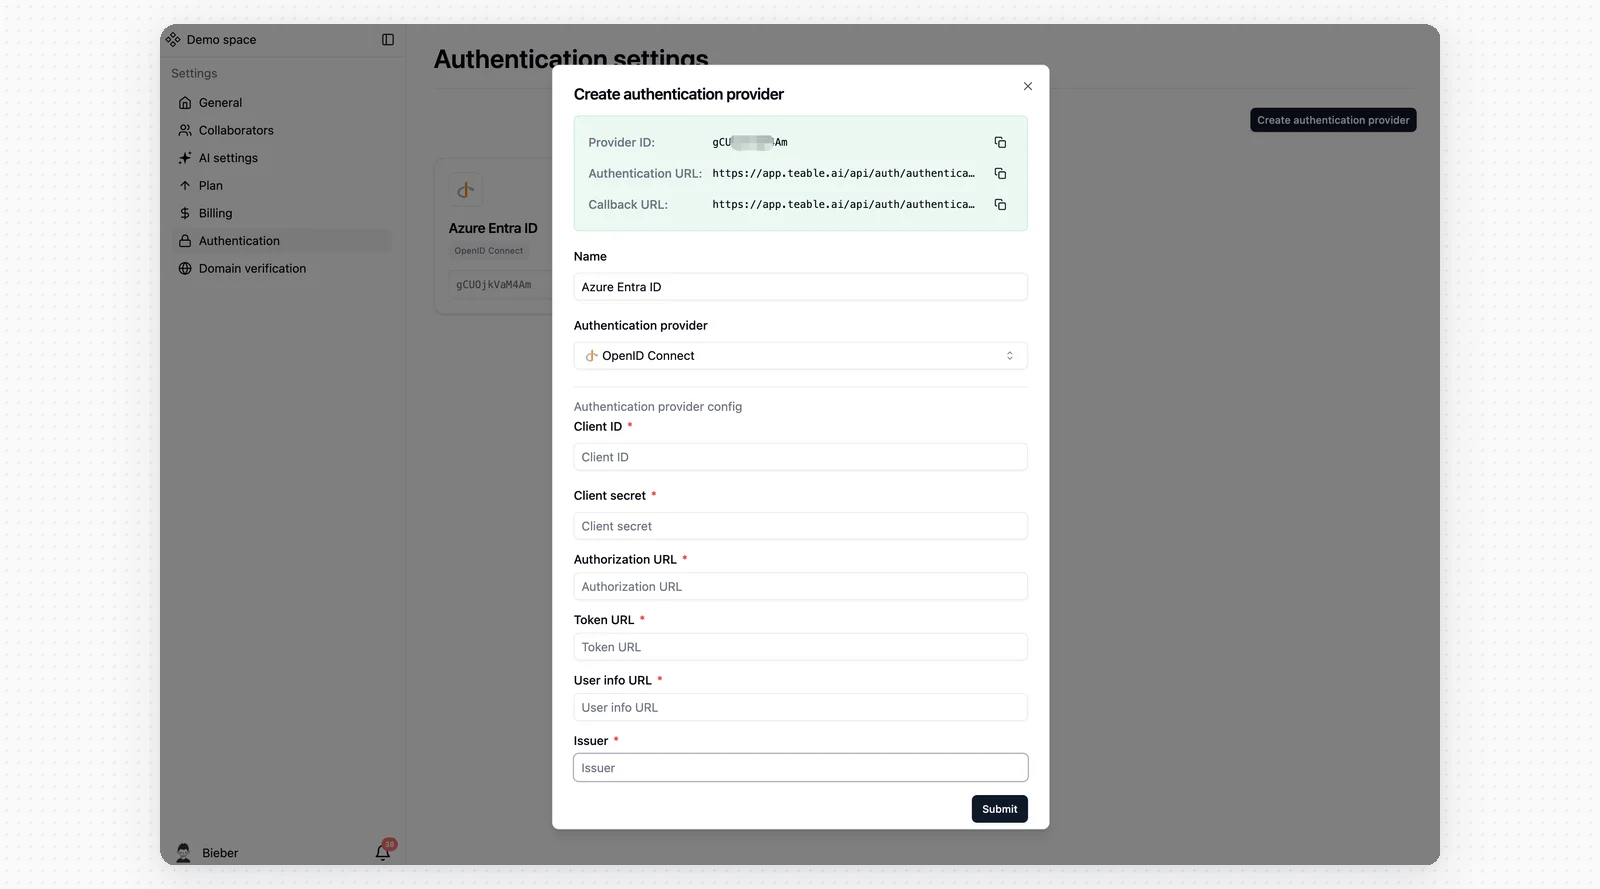
<img src="https://mintcdn.com/teablecn/2fL6t4BkcrsPNqnE/images/docs/sso/2026-05-11-azure-entra-id-create-provider.png?fit=max&auto=format&n=2fL6t4BkcrsPNqnE&q=85&s=1445ea984d0be1c7c3095205208818ef" alt="Azure Entra ID SSO 設定のステップ1" className="docs-screenshot" width="1600" height="889" data-path="images/docs/sso/2026-05-11-azure-entra-id-create-provider.png" />

## ステップ2：Azure Entra ID を開く

1. Azure アカウントにログインします
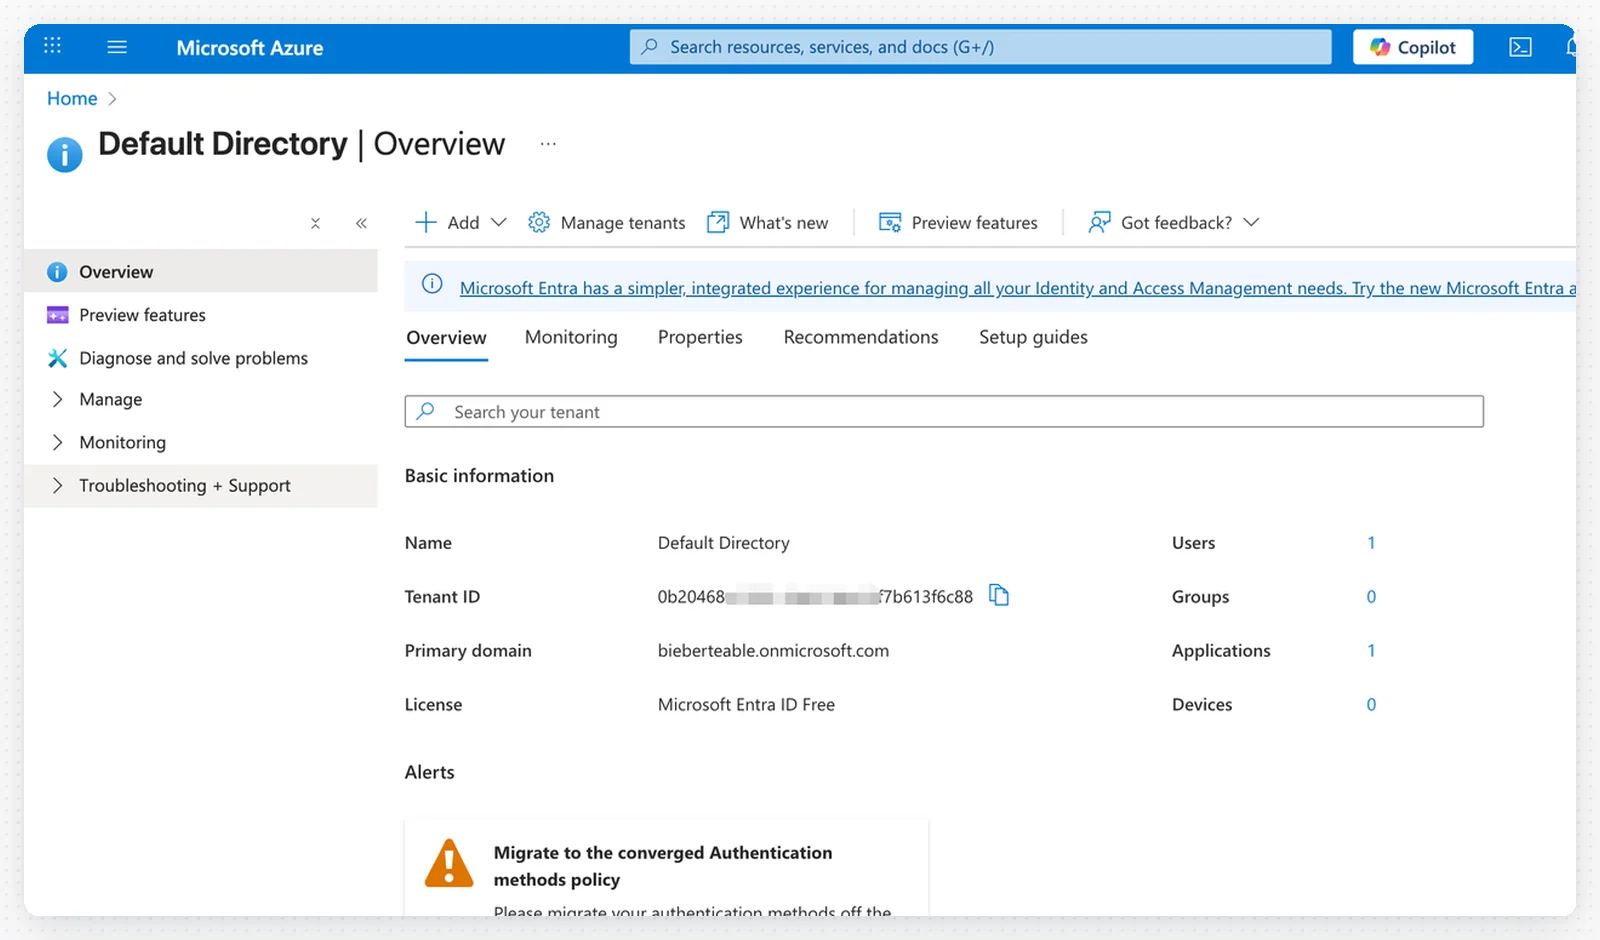
2. **Microsoft Entra ID**（旧 Azure Active Directory）を開きます

<img src="https://mintcdn.com/teablecn/2fL6t4BkcrsPNqnE/images/docs/sso/2026-05-11-azure-entra-id-open-entra-id.png?fit=max&auto=format&n=2fL6t4BkcrsPNqnE&q=85&s=81dfe786dfc577b5ce6f6af02e52db23" alt="Azure Entra ID SSO 設定のステップ2" className="docs-screenshot" width="1600" height="940" data-path="images/docs/sso/2026-05-11-azure-entra-id-open-entra-id.png" />

## ステップ3：OAuth エンドポイントを設定する

**テナントID**を使用して、Teable に次の OAuth エンドポイントを入力します。
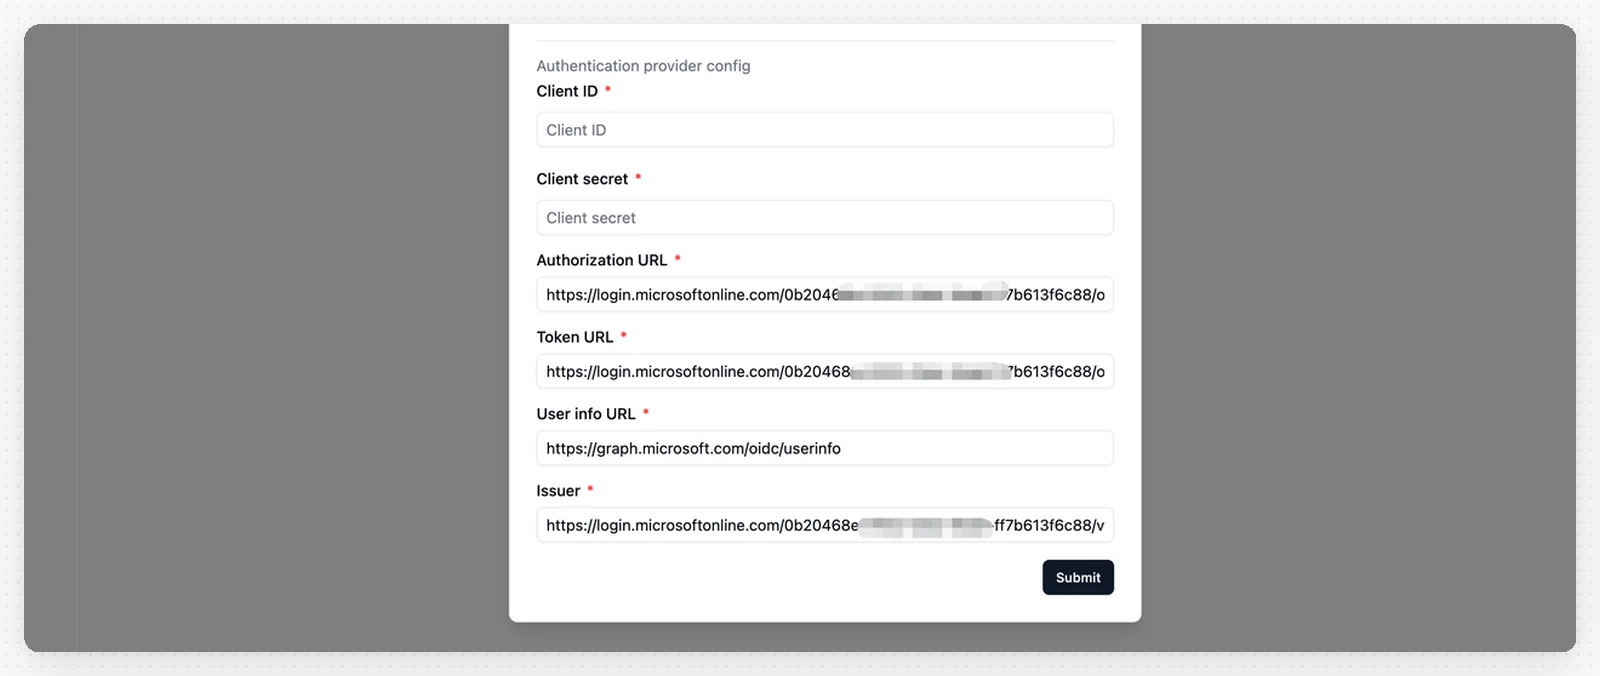
<img src="https://mintcdn.com/teablecn/2fL6t4BkcrsPNqnE/images/docs/sso/2026-05-11-azure-entra-id-oauth-endpoints.png?fit=max&auto=format&n=2fL6t4BkcrsPNqnE&q=85&s=72aa18f6ff230c3fbfdee9b7b32096cb" alt="Azure Entra ID SSO 設定のステップ3" className="docs-screenshot" width="1600" height="676" data-path="images/docs/sso/2026-05-11-azure-entra-id-oauth-endpoints.png" />

* **認可URL**：`https://login.microsoftonline.com/_YOUR_TENANT_ID_/oauth2/v2.0/authorize`
* **トークンURL**：`https://login.microsoftonline.com/_YOUR_TENANT_ID_/oauth2/v2.0/token`
* **ユーザー情報URL**：`https://graph.microsoft.com/oidc/userinfo`
* **発行者**：`https://login.microsoftonline.com/_YOUR_TENANT_ID_/v2.0`

<Note>`_YOUR_TENANT_ID_` を実際の Azure テナントIDに置き換えてください。</Note>

## ステップ4：新しいアプリケーションを登録する

1. Azure Entra ID の左側のメニューで**アプリの登録**をクリックします
2. **+ 新規登録**をクリックします
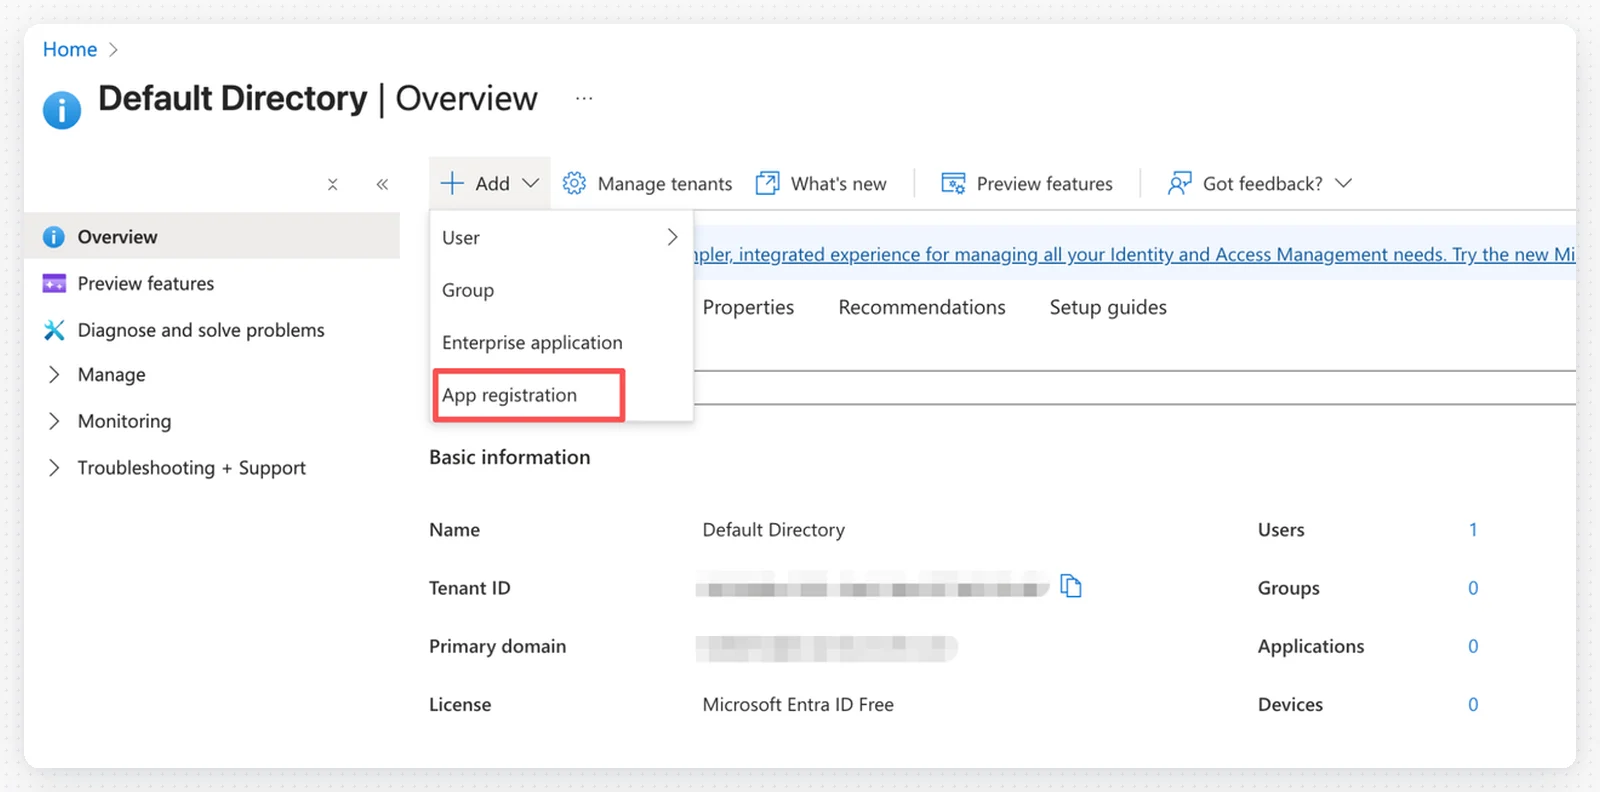
<img src="https://mintcdn.com/teablecn/2fL6t4BkcrsPNqnE/images/docs/sso/2026-05-11-azure-entra-id-app-registration-entry.png?fit=max&auto=format&n=2fL6t4BkcrsPNqnE&q=85&s=b35fe866107159c979016c6e17b89ea2" alt="Azure Entra ID のアプリ登録" className="docs-screenshot" width="1600" height="792" data-path="images/docs/sso/2026-05-11-azure-entra-id-app-registration-entry.png" />

## ステップ5：アプリケーション登録を設定する

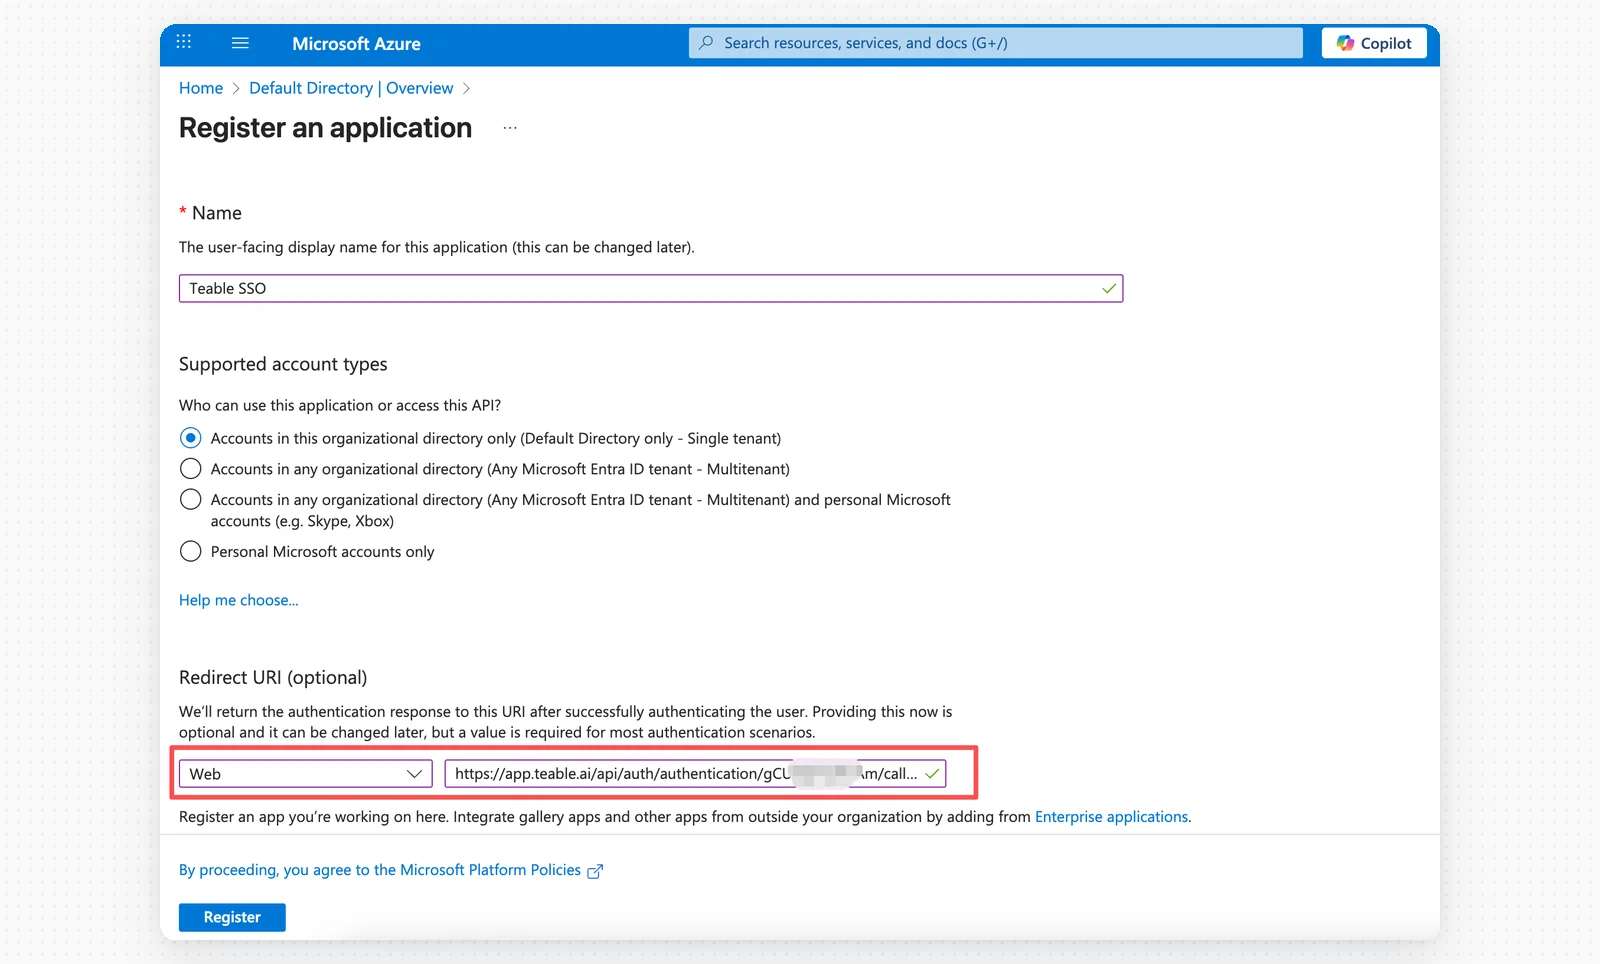
アプリケーション登録フォームに入力します。

<img src="https://mintcdn.com/teablecn/2fL6t4BkcrsPNqnE/images/docs/sso/2026-05-11-azure-entra-id-app-registration-form.png?fit=max&auto=format&n=2fL6t4BkcrsPNqnE&q=85&s=9391791f31e9de69a371d4c49e4fca15" alt="Azure Entra ID SSO 設定のステップ5" className="docs-screenshot" width="1600" height="964" data-path="images/docs/sso/2026-05-11-azure-entra-id-app-registration-form.png" />

<img src="https://mintcdn.com/teablecn/2fL6t4BkcrsPNqnE/images/docs/sso/2026-05-11-azure-entra-id-redirect-uri.png?fit=max&auto=format&n=2fL6t4BkcrsPNqnE&q=85&s=05367942b8d61a4ed0f74d4a95fca3ae" alt="Azure Entra ID SSO 設定のステップ6" className="docs-screenshot" width="1600" height="428" data-path="images/docs/sso/2026-05-11-azure-entra-id-redirect-uri.png" />

* **名前**：Teable SSO
* **サポートされているアカウントの種類**：必要に応じて選択します
* **プラットフォーム**：Web
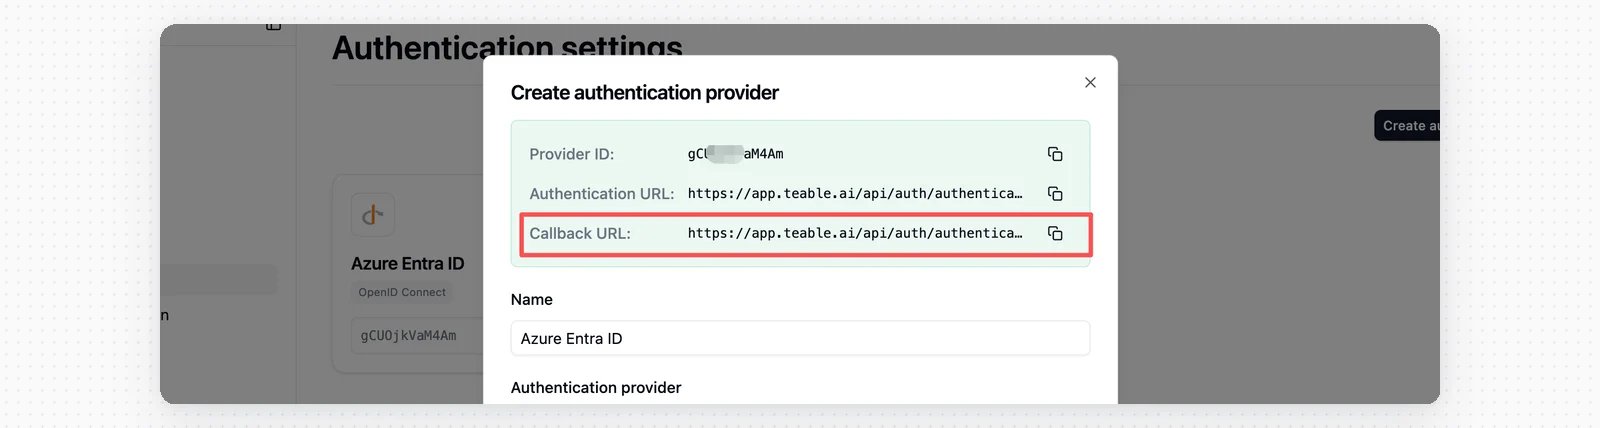
* **リダイレクト URI**：Teable の**コールバックURL**を貼り付けます

**登録**をクリックしてアプリケーションを作成します。

## ステップ6：クライアントIDを保存する

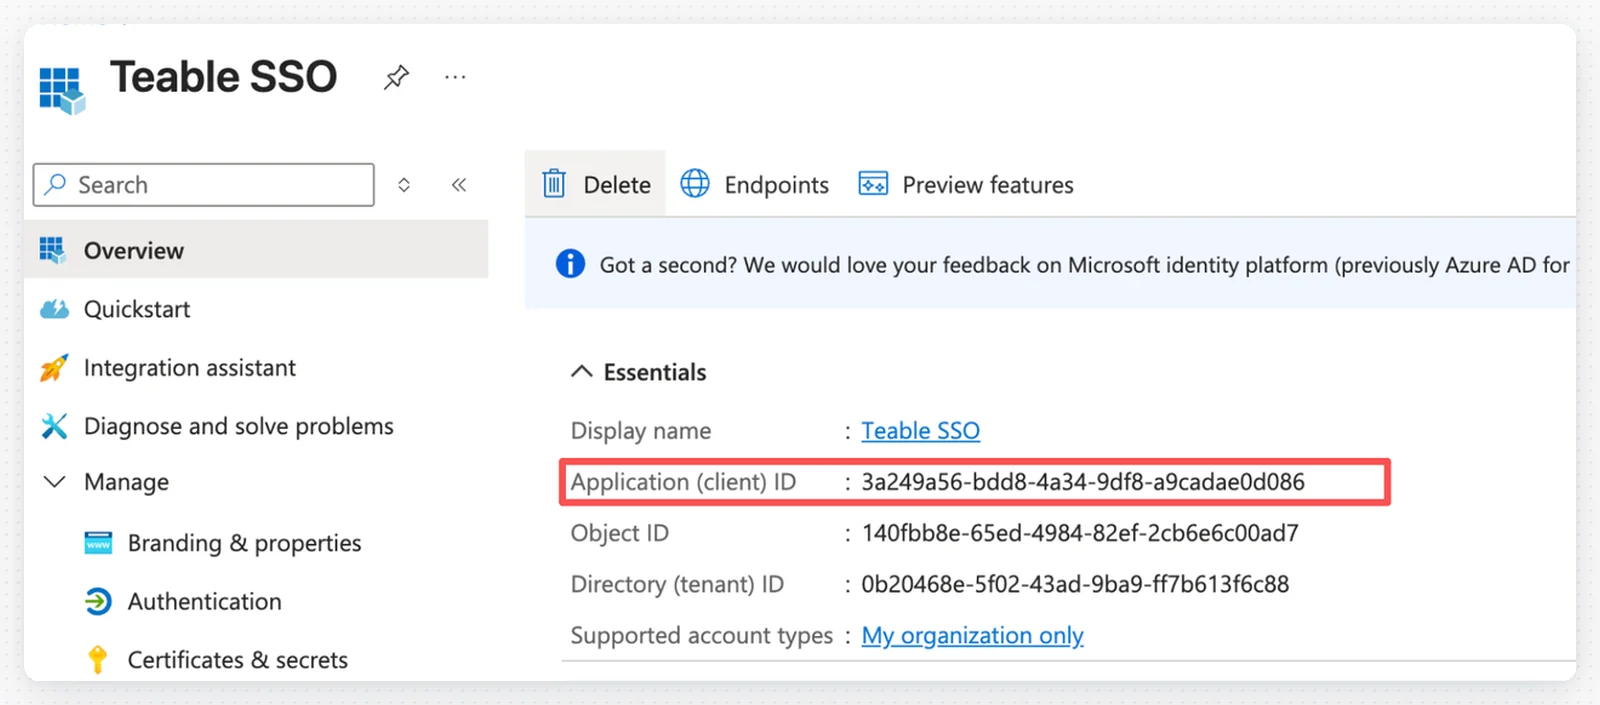
1. アプリケーションの概要ページから**アプリケーション（クライアント）ID**をコピーします

<img src="https://mintcdn.com/teablecn/2fL6t4BkcrsPNqnE/images/docs/sso/2026-05-11-azure-entra-id-application-client-id.png?fit=max&auto=format&n=2fL6t4BkcrsPNqnE&q=85&s=188610cb55bcd40954bc29a88e9328d9" alt="Azure Entra ID SSO 設定のステップ7" className="docs-screenshot" width="1600" height="705" data-path="images/docs/sso/2026-05-11-azure-entra-id-application-client-id.png" />

2. クライアントIDを Teable の SSO 設定に貼り付けます

<img src="https://mintcdn.com/teablecn/2fL6t4BkcrsPNqnE/images/docs/sso/2026-05-11-azure-entra-id-teable-client-id.png?fit=max&auto=format&n=2fL6t4BkcrsPNqnE&q=85&s=054af51f7e04f7ab292d01bd30233174" alt="Azure Entra ID SSO 設定のステップ8" className="docs-screenshot" width="1600" height="204" data-path="images/docs/sso/2026-05-11-azure-entra-id-teable-client-id.png" />

## ステップ7：クライアントシークレットを作成する

1. アプリケーションの左側のメニューで**証明書とシークレット**をクリックします
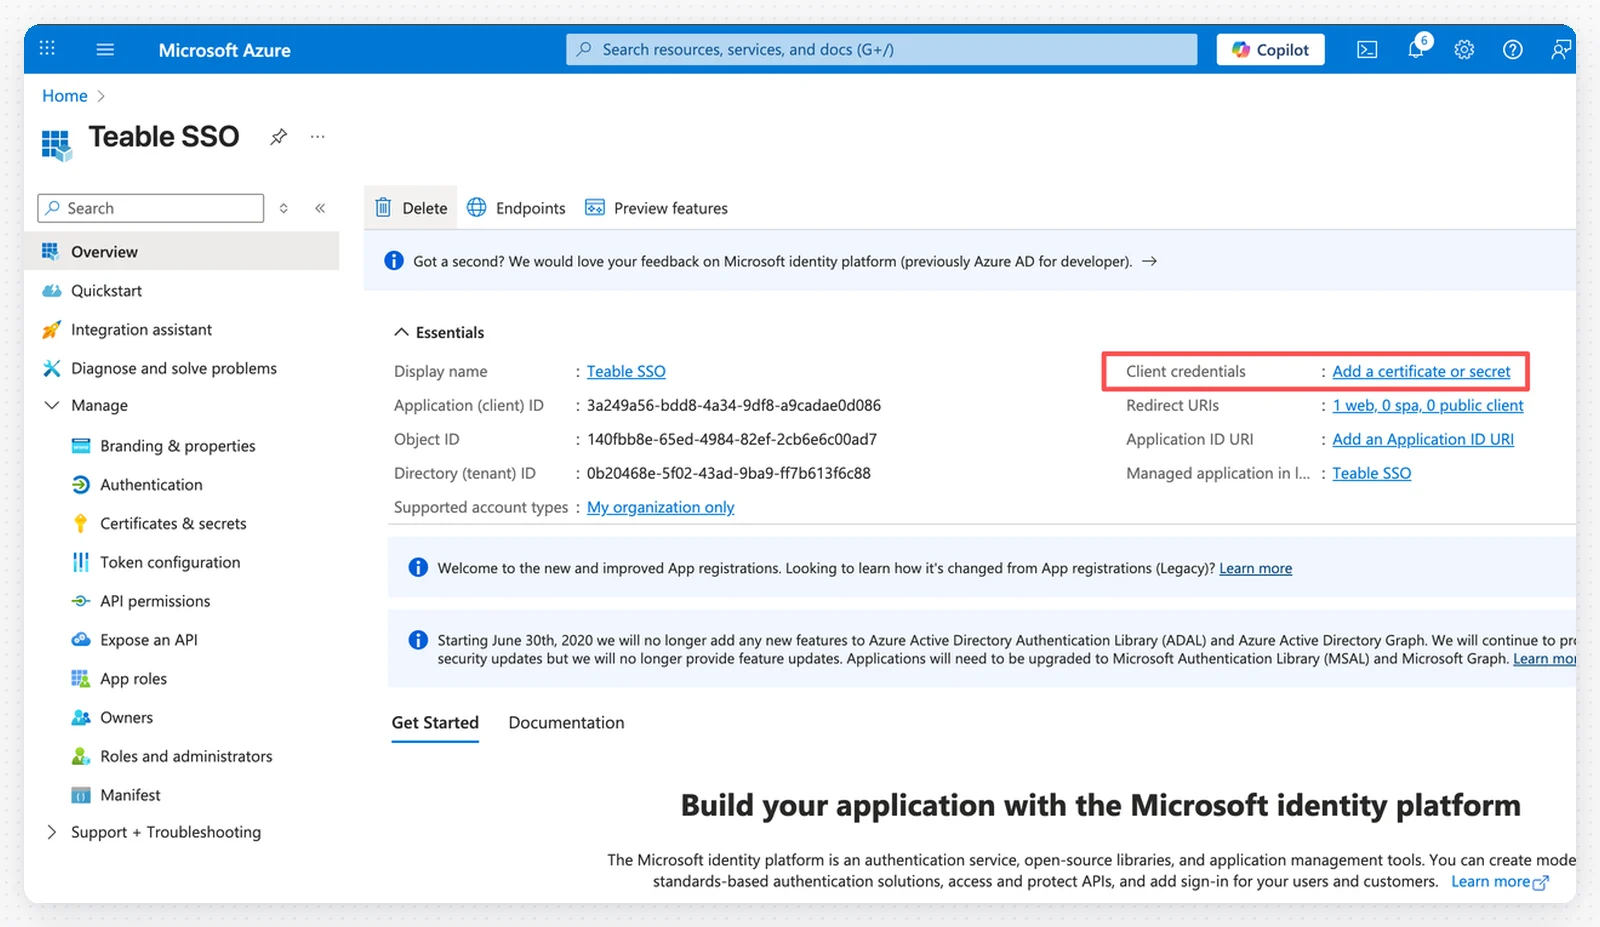
<img src="https://mintcdn.com/teablecn/2fL6t4BkcrsPNqnE/images/docs/sso/2026-05-11-azure-entra-id-certificates-secrets.png?fit=max&auto=format&n=2fL6t4BkcrsPNqnE&q=85&s=e832b5cebf55423cde301937bdfed371" alt="Azure Entra ID SSO 設定のステップ9" className="docs-screenshot" width="1600" height="927" data-path="images/docs/sso/2026-05-11-azure-entra-id-certificates-secrets.png" />

2. **+ 証明書またはシークレットの追加**をクリックします

<img src="https://mintcdn.com/teablecn/2fL6t4BkcrsPNqnE/images/docs/sso/2026-05-11-azure-entra-id-add-client-secret.png?fit=max&auto=format&n=2fL6t4BkcrsPNqnE&q=85&s=920ee1bd726ecd005c6fea76c8dcc1e1" alt="Azure Entra ID SSO 設定のステップ10" className="docs-screenshot" width="1600" height="892" data-path="images/docs/sso/2026-05-11-azure-entra-id-add-client-secret.png" />

3. 説明を追加し、有効期限を設定します
4. **追加**をクリックします
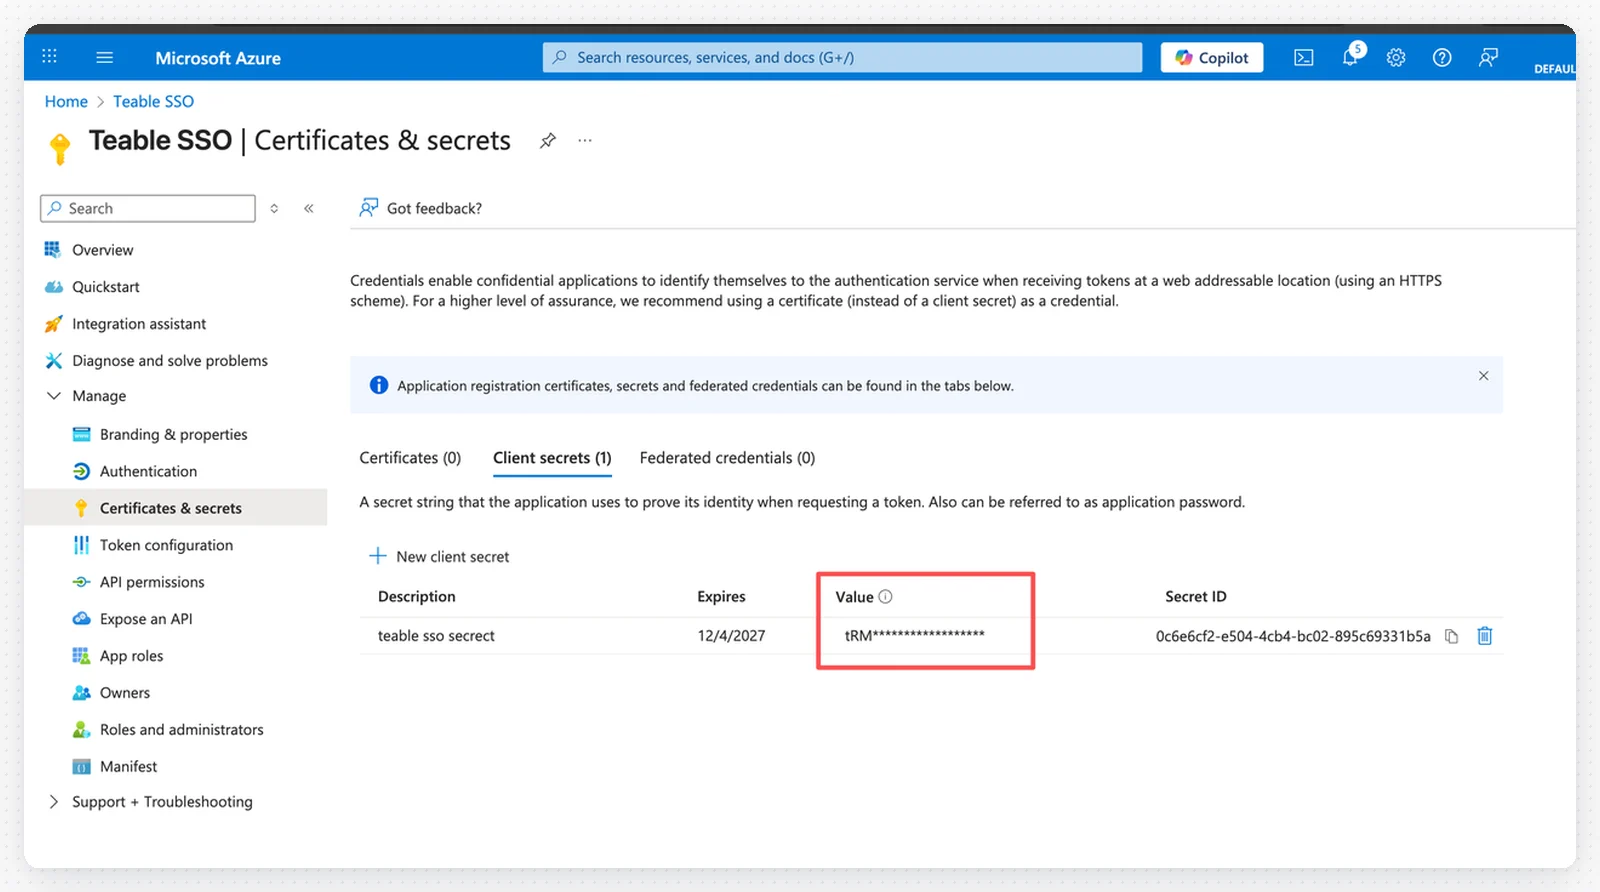
5. **重要**：シークレットの**値**をすぐにコピーし、Teable でクライアントシークレットとして保存します

<img src="https://mintcdn.com/teablecn/2fL6t4BkcrsPNqnE/images/docs/sso/2026-05-11-azure-entra-id-client-secret-value.png?fit=max&auto=format&n=2fL6t4BkcrsPNqnE&q=85&s=36cf385e849d5a204837c3a6e128ea78" alt="Azure Entra ID SSO 設定のステップ11" className="docs-screenshot" width="1600" height="537" data-path="images/docs/sso/2026-05-11-azure-entra-id-client-secret-value.png" />

<Warning>シークレットの値が表示されるのは一度だけです。すぐに保存してください。</Warning>

## ステップ8：API 権限を設定する

1. 左側のメニューで **API のアクセス許可**をクリックします
2. **+ アクセス許可の追加**をクリックします
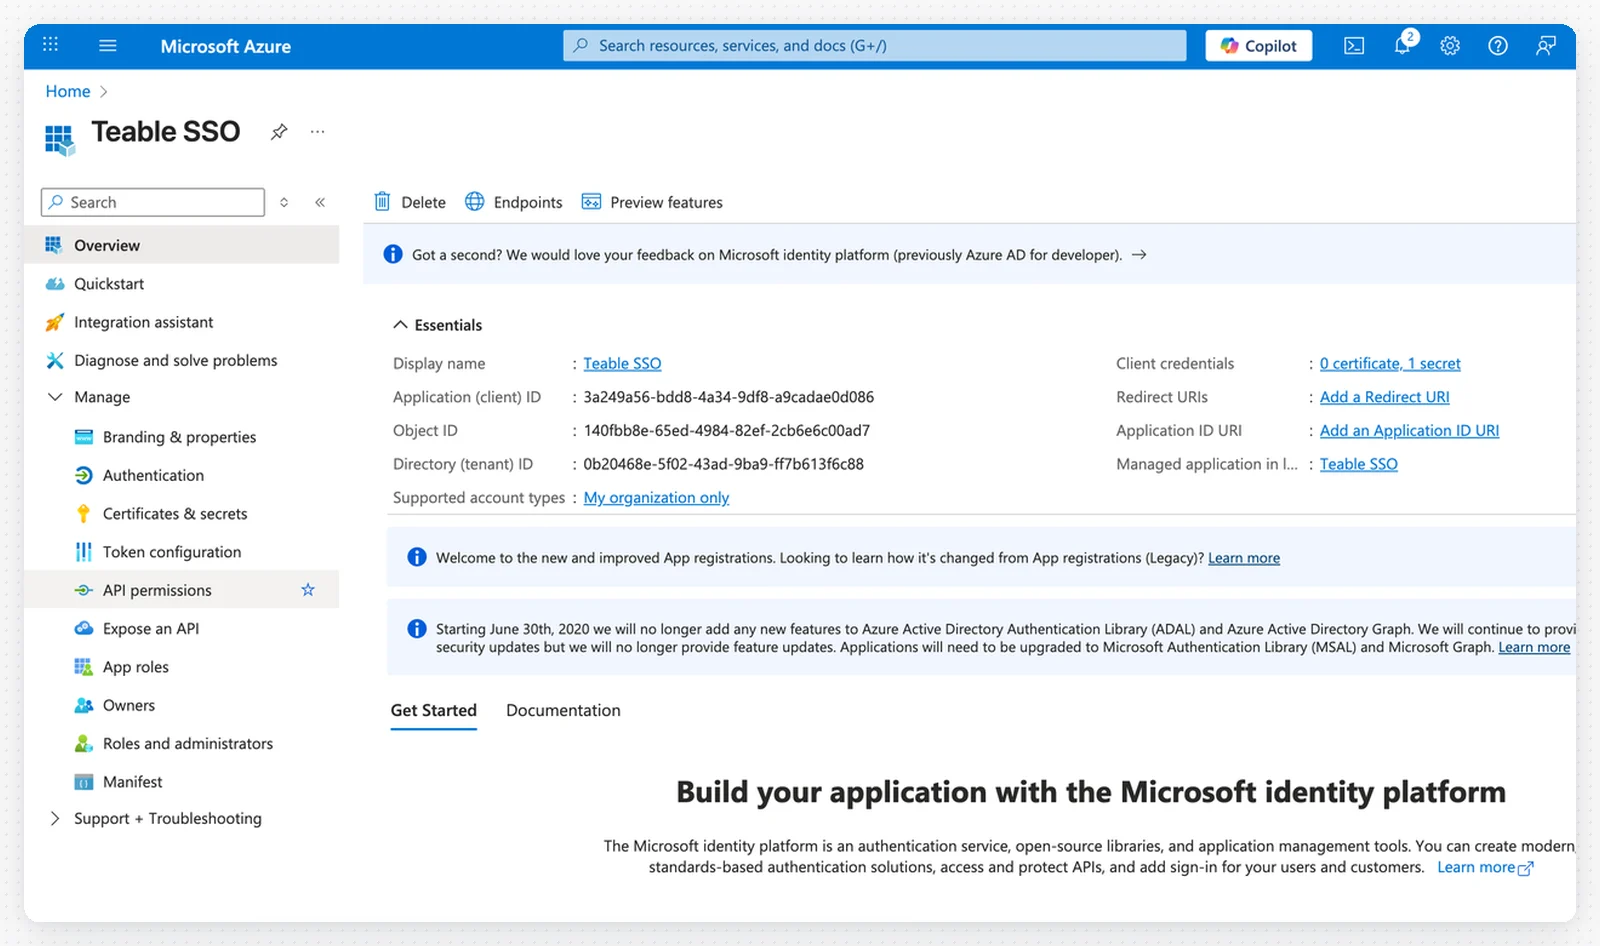
<img src="https://mintcdn.com/teablecn/2fL6t4BkcrsPNqnE/images/docs/sso/2026-05-11-azure-entra-id-add-api-permission.png?fit=max&auto=format&n=2fL6t4BkcrsPNqnE&q=85&s=d4312e99198ed2db31f2a78d8a17c1db" alt="Azure Entra ID SSO 設定のステップ12" className="docs-screenshot" width="1600" height="946" data-path="images/docs/sso/2026-05-11-azure-entra-id-add-api-permission.png" />

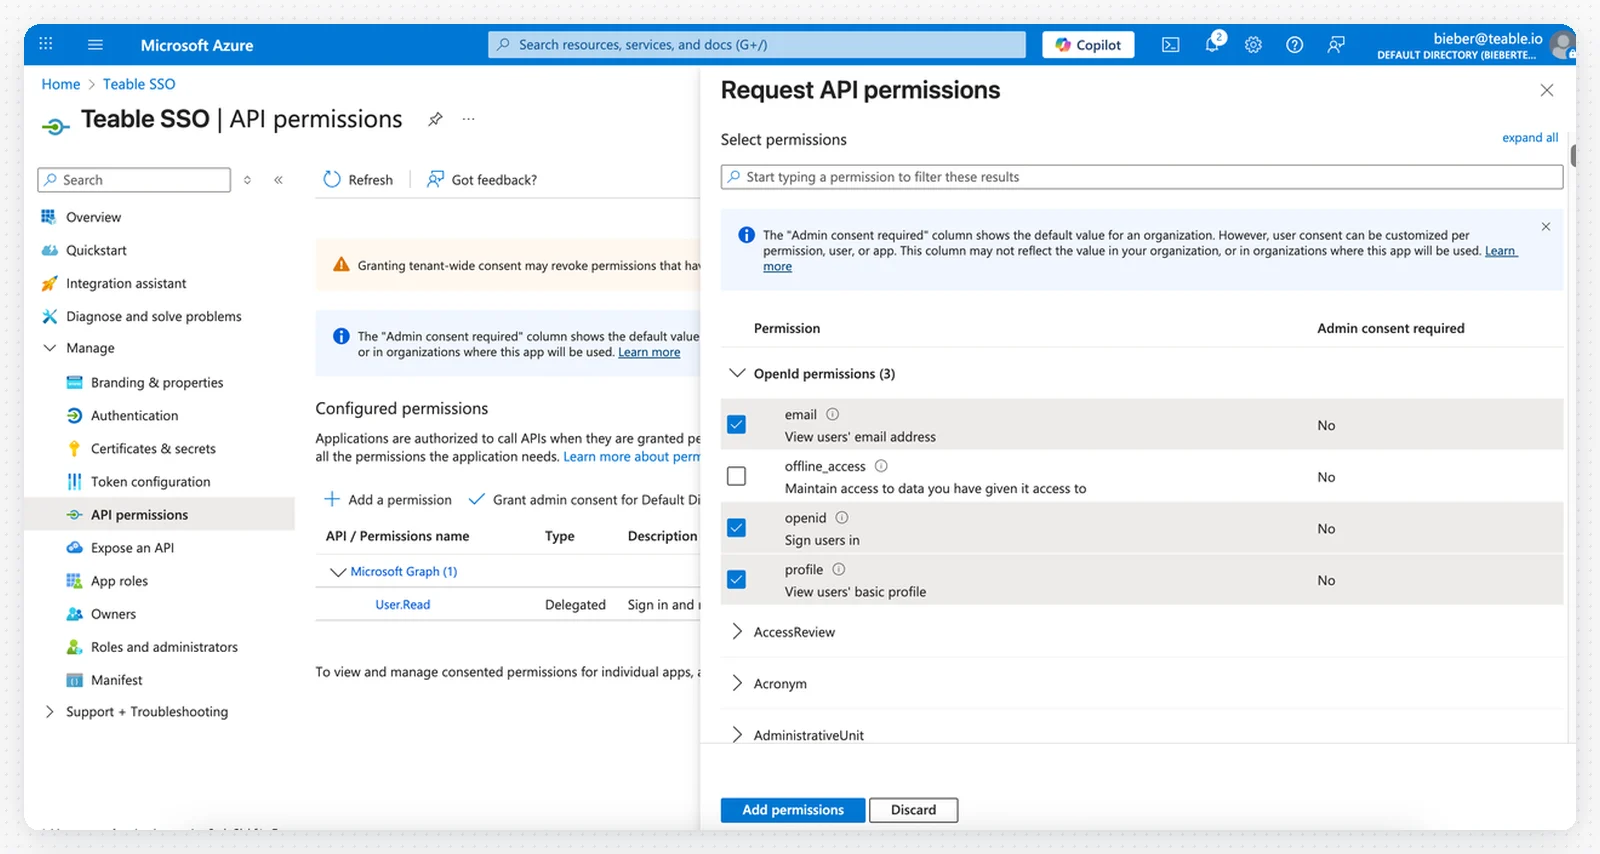
<img src="https://mintcdn.com/teablecn/2fL6t4BkcrsPNqnE/images/docs/sso/2026-05-11-azure-entra-id-microsoft-graph-permissions.png?fit=max&auto=format&n=2fL6t4BkcrsPNqnE&q=85&s=09df9fc81225a123819698c23bfec0b2" alt="Azure Entra ID SSO 設定のステップ13" className="docs-screenshot" width="1600" height="854" data-path="images/docs/sso/2026-05-11-azure-entra-id-microsoft-graph-permissions.png" />

3. **Microsoft Graph** を選択します
4. **委任されたアクセス許可**を選択します
5. 次の権限を追加します：
   * `email`
   * `openid`
   * `profile`
6. **アクセス許可の追加**をクリックします
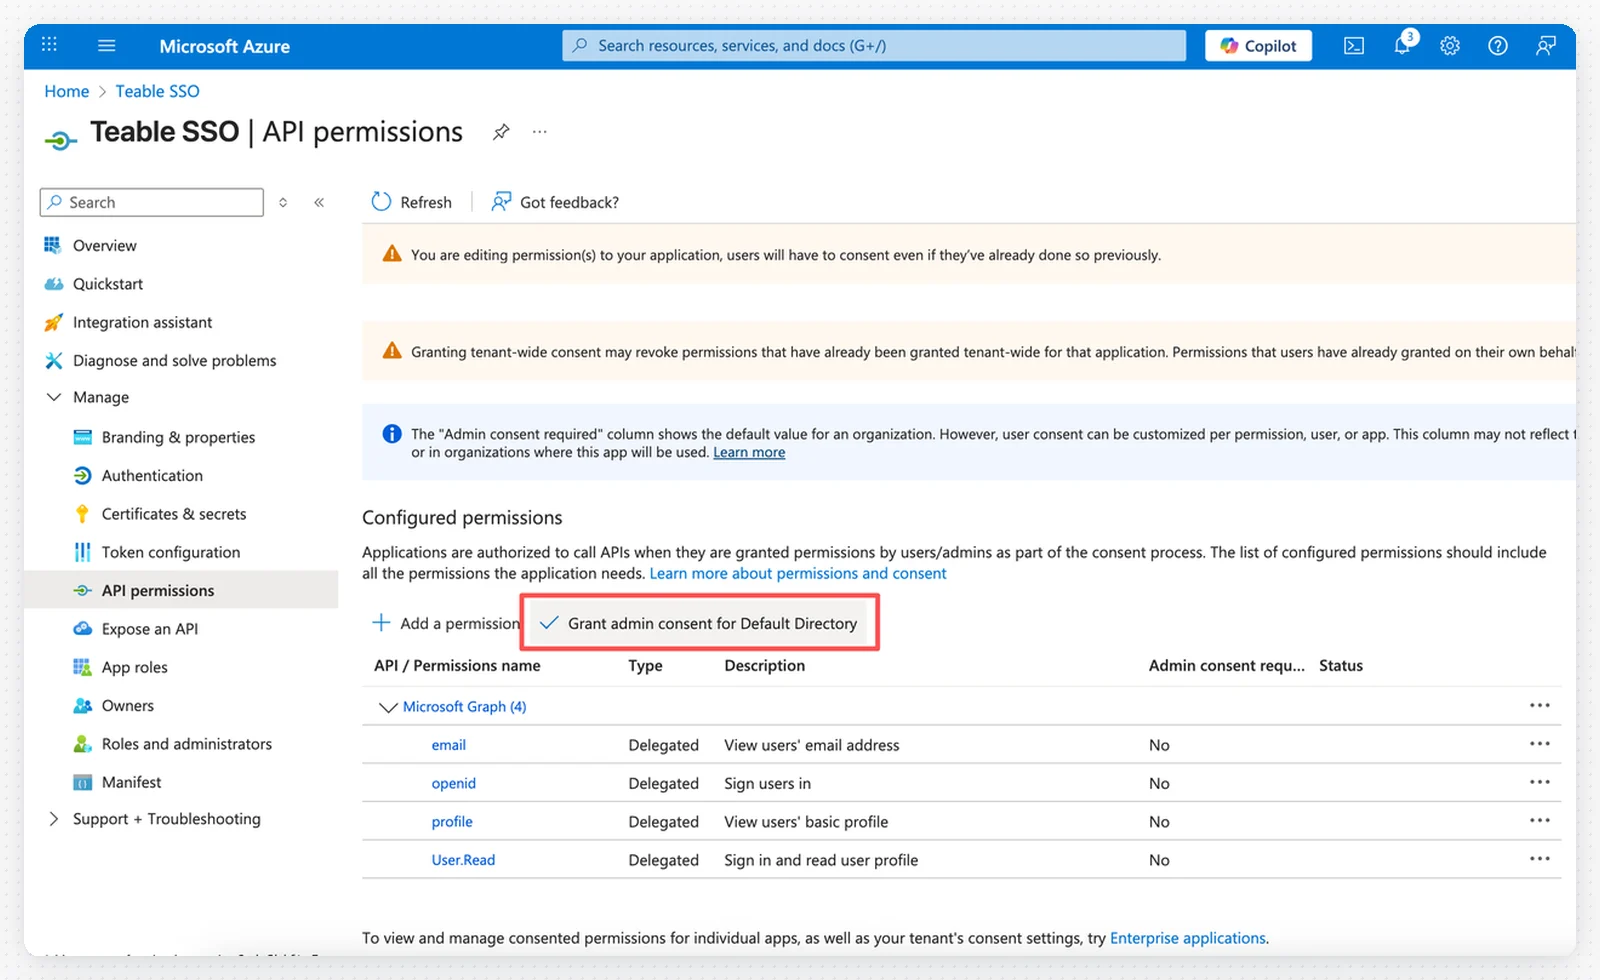
<img src="https://mintcdn.com/teablecn/2fL6t4BkcrsPNqnE/images/docs/sso/2026-05-11-azure-entra-id-delegated-permissions.png?fit=max&auto=format&n=2fL6t4BkcrsPNqnE&q=85&s=92702f413c47014cdc88b95619c4f285" alt="Azure Entra ID SSO 設定のステップ14" className="docs-screenshot" width="1600" height="980" data-path="images/docs/sso/2026-05-11-azure-entra-id-delegated-permissions.png" />

7. **\[自分のディレクトリ] に管理者の同意を与えます**をクリックして権限を承認します

## ステップ9：SSO ログインをテストする

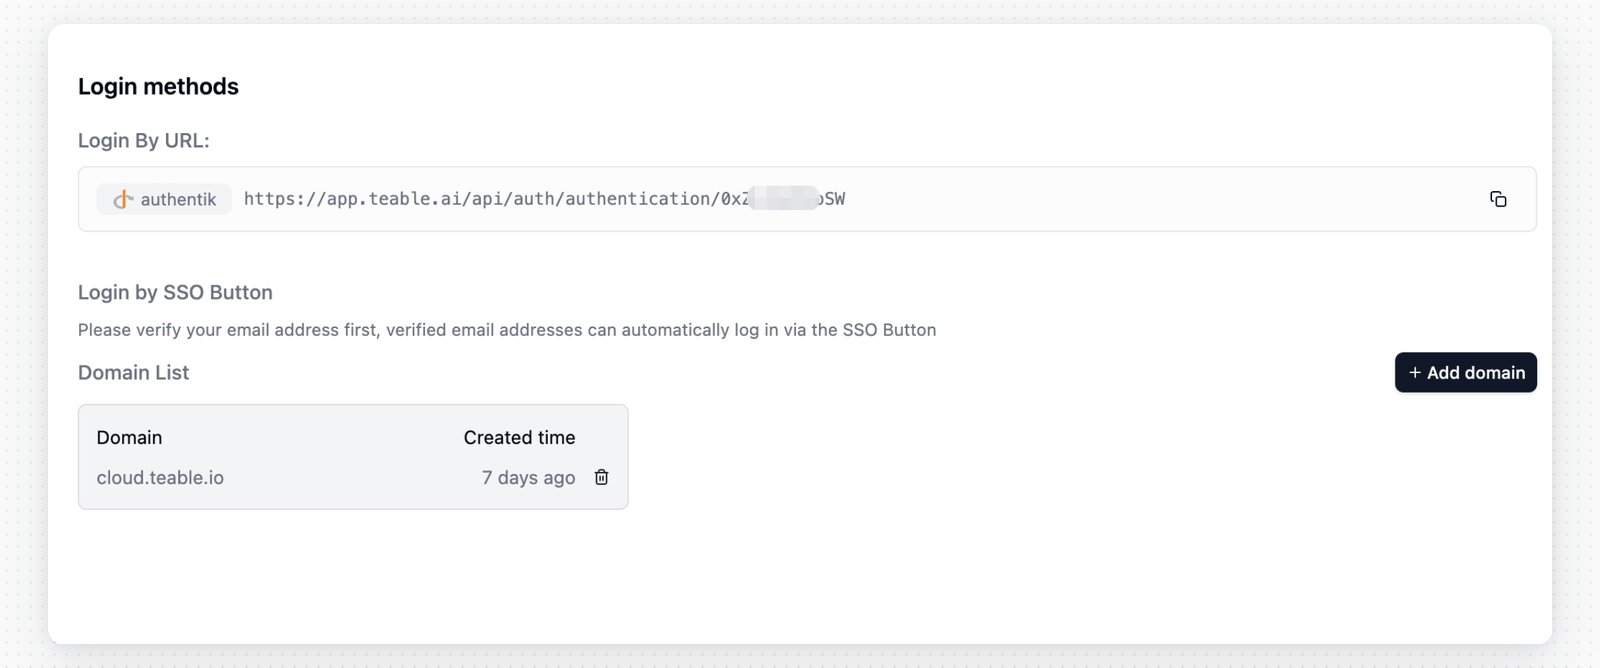
SSO ログインを有効にする方法は2つあります。
<img src="https://mintcdn.com/teablecn/2fL6t4BkcrsPNqnE/images/docs/sso/2026-05-11-azure-entra-id-login-options.png?fit=max&auto=format&n=2fL6t4BkcrsPNqnE&q=85&s=67f6ac478386e72b5aa8967c1378d32c" alt="Azure Entra ID SSO 設定のステップ15" className="docs-screenshot" width="1600" height="668" data-path="images/docs/sso/2026-05-11-azure-entra-id-login-options.png" />

**オプション1：認証URLを直接使用**

* 認証URLを SSO ログインURLとして使用します

**オプション2：ドメイン認証**

1. 左側のメニューで**ドメイン認証**をクリックします
2. カスタムドメインを認証します
3. Teable のログインページにアクセスします
4. SSO ログインボタンをクリックします
5. 認証済みドメインのメールアドレスを入力してログインします