# AI Chat
Source: https://help.teable.ai/en/basic/ai/ai-chat
Interact with your data using natural language for analysis, visualization, and creation.
Available on all Cloud plans; Self-Hosted requires Business or higher.
AI Chat helps analyze the current table, explain record content, generate charts and reports, and create or update tables, views, apps, and automations.
AI prioritizes the current page. To reference other tables, views, apps, automations, or folders, type `@` in the input box and select the related node.
## How to Open
Open a table or view, then click the in the top right corner to open AI Chat. Describe the question or task in the input box. If the task will modify data or create nodes, ask AI to list the plan first, then confirm before execution.
## What AI Can Reference
AI prioritizes information from the current page:
* **Current table and view**: The current table, current view, and the filtered or sorted results in that view.
* **Selected rows, columns, and cells**: If rows, columns, a single cell, or a cell range are selected in Grid view, AI uses that selection as key context.
* **Uploaded files**: Add PDFs, Excel files, Word documents, images, and other files to the conversation.
* **More nodes with `@`**: Type `@` in the input box to add tables, views, apps, automations, or folders from the tree.
Files can also be pasted or dropped directly into the input box. They appear as attachment chips first, then become available to AI after the message is sent.
When you paste a long block of plain text, Teable converts it to a Markdown attachment so the message input stays easy to read. You can preview text and Markdown attachments from their attachment chips.
## Input Controls
* **Voice input**: Click the microphone button in the input box and allow microphone access to start recording. While recording, choose **Finish voice input** or **Discard voice input**. After you choose finish, Teable transcribes the recording into the input box.
* **Model**: Use the model menu to choose the model tier for the conversation. The menu lists **Ultra**, **Smart**, **Standard**, and **Lite** from the most capable down, each showing the model behind it; your admin can swap that model at any time, or offer only some of the tiers, and you never have to pick again. Use a lower tier for simple queries, cleanup, or rewriting, and a higher tier for complex planning, cross-table analysis, and app building. In Cloud, the menu also marks each tier with its credit multiplier against the default tier (for example **2.5×**); a tier that costs about as much as the default, or no platform credit at all, shows no multiplier. Switching tiers during a conversation asks you to confirm once; the conversation is kept, and the new model takes over from your next message.
* **Intelligence**: Choose the **Intelligence** level separately in the model menu. It controls thinking depth; higher levels produce more thorough reasoning.
* **My secrets**: Open **+** → **More** → **My secrets** to store API keys or other credentials in **Settings** → **Integrations**. The values are yours, AI Chat can read them as environment variables at runtime, and you can grant them to individual apps and automations. See [Credentials and Integrations](/en/basic/credential).
* **Authorization cards**: When AI needs a third-party account or a secret, it pins a card to the conversation and waits for you before the turn goes on. When Cuppy needs the account to do the task itself, click **Connect** to run an OAuth flow; when an app or automation needs the credential at run time, choose **Connect my account** or grant a credential you already have. Click **Skip** to withhold it; AI continues with the parts it can complete without it. See [Credentials and Integrations](/en/basic/credential).
* **Scraper**: Open the **+** menu and choose **Scraper**, then pick a platform and a data type. Entries come in two kinds: some scrape a link you paste, such as **personal profile** on LinkedIn or **product reviews** on Amazon; others search by keyword, hashtag, or name, such as **video search** on TikTok or **posts of a subreddit** on Reddit. Teable prefills the matching instruction in the chat input and leaves the part you need to fill in at the end. **Any web page** takes a pasted link directly.
* **Skills**: Open the **+** menu and choose **Skills** to import, enable, disable, or try skills in the current chat. When you import one, choose who can use it: **Personal** keeps it to yourself, **Project** gives it to collaborators in this project, and **Space** gives it to everyone in this space. Type `/` in the input box to choose an enabled skill. To connect or migrate an external system, see [Connect & Migrate Everything](/en/basic/ai/connect-everything).
* **Context usage**: The ring next to the input box shows how much of the model's context window the conversation currently uses. Click it for the percentage and token counts. When the context fills up, Teable compacts the conversation; start a new chat if you want a clean context instead.
* **Manage files**: Open **+** → **More** → **Manage files** to view files in the current chat sandbox. You can preview supported files, download files, or delete files and folders you no longer need. A conversation must exist before its files can be managed.
* **Message queue**: Sending another message while AI is working does not interrupt it. The message waits in a queue above the input box and goes out when the current run ends. Queued items keep the same table, view, attachment, and selection chips as the chat input; **Remove** drops one, **...** → **Edit message** puts it back in the input box, and a text-only item also offers **Steer** to hand its text to the running turn instead of waiting. If the turn is parked on a card waiting for you (an authorization card, a question from AI), a text-only message does not queue: the card closes and is recorded as **Skipped**, and your message goes straight to that turn as its next instruction, so you do not have to deal with the card first. A message with attachments still goes to the queue.
## Manage Chats
Click **History** at the top right of the chat panel to see your chats in the current project, and search them by name.
The dot next to a chat name marks which chats need you. **Waiting for your reply** means the turn has stopped at a point that needs you: a question from the agent, an authorization, a table to pick, or a credential request. It will not continue until you answer. **Reply failed** means the last reply did not finish properly; open it and ask again. **Generating…** and the unread dot only report progress and new replies, and need nothing from you.
The **...** menu on a chat offers **Pin**, **Rename**, **Archive**, and delete. Deleting also removes all of its messages and cannot be undone.
History shows the 100 most recent chats. Pin the ones you use often: a pinned chat leads the list and is exempt from that limit, so it is never pushed out as new chats pile up. You can also drag a chat to reposition it.
App Builder chats are named after their app and cannot be archived.
### Archived Chats
Archiving takes a chat out of the history list without deleting anything. Open your avatar at the bottom left → **Settings** → **Archived chats** to see chats you archived across projects. **Restore** brings one back to its project's chat history, and you can delete it here once you are sure you no longer need it.
## Common Uses
Plan a business database, create tables, views, apps, automations, or update existing records.
Summarize data in the current table or view, or analyze across multiple related nodes.
Turn queried data into a chart, report, or small interactive page you can reopen and share.
Answer questions using PDFs, Excel files, Word documents, images, and other attachments.
### Create Tables and Automations
AI Chat can help create, update, and organize data, not only answer questions. For a new business workflow, discuss the data structure first, then ask AI to create the tables, views, apps, and automations.
Suitable prompts include:
* Help me plan a customer follow-up system. What tables and fields do I need?
* Based on the plan above, create these tables, views, and fields.
* Add priority, assignee, due date, and status fields to the task table, then create common views.
* Change the selected records to Completed.
* Create a new table from this Excel file and check whether the field types are appropriate.
* Create a CRM app from this customer table, with customer list, customer detail, and follow-up record pages.
* When a new order is created, notify the owner and include the order number, customer name, and amount.
For a complete business database, start by asking AI to plan the table structure. After reviewing the plan, continue with table, view, app, and automation creation.
Describe the business goal, such as building a customer follow-up system, and ask AI to outline the required tables, fields, views, and automations.
Review the proposed tables, fields, field types, and relationships. Add any missing rules or workflow details.
Ask AI to create the confirmed tables and views, then continue with apps or automations.
**Changes this turn**, below each answer, lists what the turn changed, resource by resource: fields, views, and record counts added, updated, or deleted, and apps and automations published or switched on and off. Click an entry to open that resource and check it.
For app creation details, see [App Builder](/en/basic/ai/app-builder). For automation details, see [Automation](/en/basic/automation).
### Analyze Data
Ask questions about data in the current table, for example:
* Count completed tasks this month by assignee.
* Find the customers with the highest sales in the past 30 days.
* Analyze unusual records in this view.
If the question involves multiple tables, use `@` to add the related tables or views to the conversation.
In Grid view, you can also select rows, columns, a single cell, or a cell range, then use **Add to Chat** from the context menu. The selection appears as a chip in the input box, and clicking the chip highlights the related grid area again. Column chips use field names when available and shorten long selections after the first few names.
### Create Charts and Reports
Ask AI to turn queried data into a chart, a written report, or a small interactive page:
* Generate a weekly sales trend chart.
* Turn this query result into a pie chart.
* Create a summary report from these records.
AI builds these as **artifacts**: they appear as a card in the conversation, open in their own viewer, and stay available after the conversation ends. See [Artifacts](#artifacts) for what you can do with one.
An artifact holds the data AI put into it when it was created, so it does not refresh on its own. For a page that keeps reading live table data, or that collects input and stores state, create an app with [App Builder](/en/basic/ai/app-builder).
### Generate Images
Have the AI produce images directly — product concepts, article artwork, poster drafts:
* Draw a scene showing this product in use.
* Generate a cover image from the description in this record.
* Take this image and give me three more in winter colours.
Add an existing image to the chat to use it as a reference, as long as the chosen model supports image-to-image.
A generation card appears in the chat: it shows which model is running and how many images are left, then presents the finished set as a gallery you can click to enlarge. The images are kept in the chat's sandbox and can be downloaded from **Manage files**. Stopping the turn cancels whatever is still unfinished.
AI Chat, the [App Builder](/en/basic/ai/app-builder), and [routines](/en/basic/ai/routine) can all generate images; chatting with Cuppy in an IM cannot.
### Read Files
After uploading files, AI can answer questions using both file content and table data:
* Summarize this PDF and connect it with the current customer record.
* Read this Excel file and identify the fields that should be imported.
* Generate a product description from this image.
Files uploaded to the conversation and files generated during the conversation are saved in the current chat sandbox. Use **Manage files** to inspect them later.
When a reply presents several files at once, use **Download all** below the file cards to save them as one zip.
### Memory
Memory stores information you explicitly ask Cuppy to remember. Memory is scoped by user and Project: each user in each Project has an independent memory context, and memory saved in another Project will not automatically appear in the current one.
* Save memory in the current Project
Say what Cuppy should remember in the conversation:
```text theme={null}
Please remember xxx.
```
* Reuse memory from another Project
Ask Cuppy to read another Project and save the relevant parts into the current Project:
```text theme={null}
Cuppy, please read the memory for Project ID bsexxxxxxxxxxxx and save the relevant memory into this current Project.
```
### Handle Long Tasks
AI Chat can keep a single conversation environment available for about 24 hours, which is enough for most data analysis, file processing, and app-building tasks. Keep long-running work in the current conversation so you can follow its progress and provide input when needed.
If the interface shows `Thinking` or continues to return progress updates, the task is still running. If it shows `Completed`, the current run has finished.
For work with multiple stages, ask Cuppy to write results back to Teable, export them, or generate a downloadable file at key checkpoints. Saved work remains available even if the conversation environment is released later.
A single conversation environment has an approximate maximum lifetime of 24 hours. After foreground execution ends, an idle environment is released after about 30 minutes. Temporary files and unsaved intermediate results are not preserved if the environment restarts.
For long-running or repeatable work, use the feature that matches the workflow:
Use for record-by-record work, such as large table processing, batch classification, content processing, or field filling.
Use for repeatable work after records are created or updated, notifications, or scheduled data processing.
## Artifacts
When AI builds a chart, report, dashboard-style page, or small interactive tool, it saves the result as an **artifact**: a self-contained page that renders outside the conversation. Artifacts appear as a card in the chat and stay available afterwards. Each one is either an interactive HTML page or a Markdown report.
Click the card to open the artifact. From the viewer you can:
* **Fullscreen** or **Open in new page** to give the artifact more room.
* **Download** the current version as a file.
* Open the version list to look at an earlier version and **Restore this version** to make it current again.
* **Delete** the artifact. Its cards in the conversation turn into a deleted placeholder, so delete only when you no longer need the result.
To change an artifact, ask AI in the same conversation. Each revision becomes a new version of the same artifact rather than a separate one, so the share link keeps working and you can still go back. If the page fails to run, the viewer shows the error and offers **Fix with AI**, which sends the error back to the chat so AI can correct it.
### Share an Artifact
Artifacts are private to the person who created them, so use a share link to let anyone else open one.
Click **Share** in the viewer and enable **Enable sharing**. Teable generates the link.
Set **Who can view** to **Anyone with the link**, or to **Space members** so only signed-in members of the space can open it.
Under the advanced settings, turn on **Password protection**. Teable generates a password automatically, and viewers must enter it before the artifact loads. Click **Copy link and password** to copy both together.
Use **Copy link** to copy it. If the link has spread too far, **Reset link** issues a new one and stops the old link from working.
### Find Artifacts Later
Open **+** → **More** → **Manage artifacts** to browse everything you have created across your chats. Search by name, then open one to view or reshare it.
## Prompting Tips
* **State the goal first**: In the first message, describe what to do, the relevant conditions, and the expected output. For example, analyze weekly sales trends over the past 3 months, grouped by region, and return a trend table with a short conclusion.
* **Use field names**: For example, sort by `Created Time`, so AI can identify the target column.
* **Provide several examples**: For fixed-format output, provide 3-5 input -> expected output examples.
* **Use `@` to select nodes**: When AI needs to reference tables, views, apps, automations, or folders, type `@` and select them directly.
* **Confirm before execution**: For tasks that modify data, create tables, create apps, or enable automations, ask AI to describe the changes before running them.
* **Choose the tier by task**: A lower tier costs less credit on simple queries, cleanup, and rewriting; move up a tier for complex planning, cross-table analysis, and app building.
* **Adjust the Intelligence level**: **Intelligence** controls thinking depth; higher levels produce more thorough reasoning.
* **Start a new chat when the topic changes**: A new chat is recommended when the topic changes, the conversation becomes too long, or context usage should be reduced.
## FAQ
Type `@` in the input box and select the node you want AI Chat to reference. For Grid view selections, you can also select rows, columns, a single cell, or a cell range, then use **Add to Chat** from the context menu.
Yes. AI is not limited to the project the chat belongs to; it can look up the other projects you have access to and work in them. Name the project in your request, for example "compare this table with the orders table in the Sales project". `@` only lists nodes in the current project, and anything you do not point elsewhere still happens in the chat's own project.
Yes. They are saved as artifacts, with version history and an optional share link, and you can reopen them from **+** → **More** → **Manage artifacts**. An artifact keeps the data it was built with and does not refresh on its own. For a page that reads live table data, create an app with [App Builder](/en/basic/ai/app-builder).
Not by default. Only you can open your own artifacts. Turn on **Enable sharing** in the viewer and send the link, choosing **Space members** if the artifact should stay inside the space.
Five by default. Ask the AI to work in several rounds when you need more. The number of images a space can have in flight at once is capped as well, and anything beyond it waits in the queue.
The available image models come from the project's AI configuration: the space's own models first, then the models Teable provides. When the project has no image model available, the AI does not offer image generation at all.
An image counts against credits only once it is saved; images that fail or are cancelled cost nothing. In **Credit usage summary** on the billing page, these charges appear under the type **AI image generation**. When the space has its own models (BYOK), generating with them is not blocked by exhausted credits.
No. Memory is scoped by user and Project. If you want to reuse memory from another Project, ask Cuppy to read that Project's memory and save the relevant parts into the current Project.
Do not use AI Chat as a background task runner. Keep working in the visible conversation, and ask Cuppy to write results back to Teable, export results, or generate a downloadable file.
Each user can run up to 3 Agents at the same time, including AI Chat and App Builder. If you see `Agent is busy in another conversation. Please wait.`, another task is still running. Wait for Cuppy to finish the previous task before continuing.
One AI Chat turn can include multiple processing steps. The conversation and billing page both show the total credits for that turn. Work that Cuppy already completed and saved can still be used. If the final step is interrupted by an unexpected error, credits for that interrupted step are refunded automatically. You can continue working in the same conversation.
It joins the send queue above the input box rather than interrupting the run, and Teable sends the whole queue as one message when the run ends. The queue lives on the server, so it survives a refresh and looks the same in every tab or device where that conversation is open.
While an item waits you can **Remove** it or use **Edit message** to bring it back into the input box. A text-only item can also be steered: **Steer** hands it to the running turn right away, and it then appears in the conversation labelled **Steered conversation**.
A conversation holds up to 30 queued messages. Past that, the message is not queued and Teable replies `The send queue is full. Wait for Cuppy to catch up.`
Stopping a run also holds the queue, so nothing you queued is sent by a stop you meant for the current answer. The queue header then reads `Queue paused because you interrupted`. Click **Resume** to release it, or just send your next message: starting a new run releases the queue as well.
Open the **+** menu and choose **Skills** to import or manage skills, or type `/` in the input box to choose an enabled skill. Choose who can use the skill when you import it: personal for your own chats, project when collaborators in the same project need it, and space when everyone in the space does. Users who can manage the project can add project skills, and space owners and creators can add space skills. If AI Chat presents a `.skill` file, use **Install** on the file card to add it.
Only one version is ever in effect, and the shared team version wins over a personal copy: a project skill beats a space skill, and a space skill beats a personal one. In an app or bot conversation, the skill added for that app or bot comes first. To move everyone to a new version, update the copy in the project or space.
**Manage files** holds two folders: `uploads` for the files you added, and `outputs` for the files produced in the conversation. Both use their own storage, so they survive the sandbox being released or rebuilt and you can come back later to preview, download, or delete them.
Anything Cuppy writes outside those two folders is temporary, such as intermediate results from a script. It does not appear in **Manage files** and is gone after the sandbox restarts. For results you need to keep, ask Cuppy to write them into `outputs` or back into Teable, or download them while the conversation is open, using **Download all** when a reply produced several files.
When you copy a user message, tables, views, apps, automations, folders, selections, and attachments are kept as marker text. When you paste the text back into AI Chat, Teable restores the markers it can recognize as chips.
Use **+** → **More** → **My secrets** in the chat input. AI Chat can use those values during the conversation without putting the plaintext in your prompt.
The menu holds the common platforms. Just describe in plain language which site and what content you want, and the AI will find a matching data source.
For list content such as search results, feeds, and comments, each link or keyword returns at most 10 records by default. Ask for a specific number if you need more, up to 50. Scraping a single page returns that one record and is not affected by this limit.
# App Builder
Source: https://help.teable.ai/en/basic/ai/app-builder
Transform your data into custom web applications using AI.
Available on all Cloud plans; Self-Hosted requires Business or higher.
Teable App Builder allows you to turn your projects into fully functional, customized web applications without writing code. By combining the power of your data structure with AI-driven design, you can launch internal tools, customer portals, and data dashboards in minutes.
## Overview
The App Builder follows a "Prompt to App" workflow. You describe what you want, and AI builds the application structure, pages, and logic for you. You can then fine-tune every detail using the visual editor or code.
Use App Builder to create custom interfaces and standalone apps. For interactive data analysis and ad-hoc questions inside the project, use [AI Chat](/en/basic/ai/ai-chat).
## Creating an App
There are two main ways to create an app:
1. **From Project**: In any Project, click "Create App" to generate an application linked to your current data.
2. **From Chat**: Open AI Chat and say "Create a CRM app for this customer table".
## The App Editor Interface
The App Builder provides a dual-interface for both non-technical users and developers.
### 1. Chat Interface (AI-Driven)
The command center for your app.
* **Natural Language Editing**: Describe changes like *"Make the header blue"* or *"Add a submission form for new records"*.
* **Auto-Routing**: The AI understands which component or page you are referring to and modifies it directly.
* **Credential requests**: When the app needs access to a third-party account or a secret at run time, App Builder pins a card to the chat panel, such as **This app needs your Slack connection**. Click **Connect my account** to run an OAuth flow; the new connection is granted to this app right away. If you already have a usable connection or secret, just grant it; there is no need to connect again. Click **Skip** to withhold the credential; AI continues with the parts it can complete without it.
* **Skills**: Open the **+** menu and choose **Skills** to manage skills for this app conversation. A skill added here is only available to the current app, and the skills shared with the app's project and space can be used here as well. Type `/` in the input box to choose an enabled skill.
* **Manage files**: Open **+** → **More** → **Manage files** to view files in the app sandbox. Use it to preview supported files, download generated files, or delete files and folders you no longer need.
* **Clear Conversation**: If the current conversation has drifted, click **Clear Chat** in the bottom-right corner of the panel to start a new session. This clears the chat history for the current conversation but does not delete the app itself. The first use shows a confirmation, and you can choose not to show it again next time.
### 2. Preview Panel
* **Preview and Live**: The panel has two tabs. **Preview** runs the version you are building, including changes that are not published yet. **Live** loads the published app from its public address, so you can compare what your users see with what you are working on. Until the app is published, **Live** shows a publish prompt instead. App Builder opens a published app on **Live** and an unpublished one on **Preview**, and afterwards remembers the tab you last used for that app.
* **Multi-Device Simulation**: Use the switcher at the top to toggle **Desktop**, **Tablet**, and **Mobile** views.
* **Live Generation**: The preview panel can show the app taking shape while App Builder is generating.
* **Instant Feedback**: After App Builder finishes a change, the preview refreshes with the latest saved version.
On the **Preview** tab, use the floating toolbar at the bottom to make targeted changes:
* Choose **Select an element to edit**, then click an element in the preview. App Builder adds the element to the chat input. Add your instruction and send the message so AI can update that specific part of the app.
* Choose **Edit text directly**, then click static text in the preview and type your replacement. You can edit more than one text element before clicking **Save**. Click **Discard edits** to undo the pending text changes.
Dynamic text, such as content loaded from data or calculated by the app, cannot be edited directly. Select the element and describe the change in chat instead. Element selection and direct text editing pause while AI is generating. Press `Esc` to exit either mode.
### 3. Developer Mode (Code Editor)
For infinite customization, you have direct access to the code.
* **Monaco Editor**: A VS Code-like experience right in the browser.
* **React Components**: Edit the underlying React code, Tailwind CSS classes, and logic.
* **File Tree**: Navigate through the project structure.
#### Download Code
You can download the entire app as a ZIP archive at any time:
1. Switch to the **Code** tab in the editor.
2. Click the **`...`** menu in the tab bar.
3. Select **Download code** to save a ZIP archive that includes all source files.
The archive holds a root `.env` file with the platform-injected runtime variables only, including the access token; credentials granted to the app are not part of it. Review the contents before sharing the ZIP.
#### Import Code
You can update the app's code by importing a ZIP:
1. Switch to the **Code** tab in the editor.
2. Click the **`...`** menu in the tab bar.
3. Select **Import code** and choose a ZIP file up to 20 MB.
* Include source files only. `node_modules`, `.next`, and other build artifacts are ignored automatically.
* The ZIP replaces the existing project. Files you leave out are removed from the new version.
* If the ZIP contains one wrapper folder, Teable strips that folder. You can compress the outermost project folder directly.
* The imported project must include `package.json` at the project root.
* Custom variables in a root `.env` file are stored as your secrets and granted to the app under the same names. Other `.env*` variants, such as `.env.local`, are ignored.
#### Credentials and Config
Keep API keys, credentials, and configuration out of your source. An app uses **your credentials**: an OAuth connection or a secret you store. In the App Builder chat panel, open **+** → **More** → **Credentials & config** and grant a credential to the app.
| Detail | Behavior |
| - | - |
| Availability | Credentials granted to the app are available in the app preview environment and the published app |
| Variable name | The alias you enter when granting; it must start with an uppercase letter and can contain uppercase letters, digits, and underscores |
| Reading a secret | Server-side app code reads environment variables such as `process.env.MY_API_KEY` |
| Reading a connection | Server-side app code calls `getConnectionToken('ALIAS')` for an access token |
| Saved values | Values are write-only after saving; enter a new value to replace one |
After you add a grant, remove one, or replace a credential value, the app preview environment uses the new value. The published app uses it only after you republish.
Copying an app does not copy its credentials: the panel keeps **Not bound yet** placeholders, and **Bind mine** supplies your own. See [Credentials and Integrations](/en/basic/credential) for managing credentials and checking where they are used.
#### Manage App Files
App Builder stores uploaded files, generated outputs, and runtime files in the app sandbox. In the chat panel, open **+** → **More** → **Manage files** to inspect them. Supported file types open in preview. You can also download files or delete files and folders you no longer need.
#### Add AI Features to an App
Add AI when your app needs to summarize records, classify requests, draft replies, or answer questions for app users.
You can tell App Builder what you want, such as: "Add an AI reply assistant for support tickets" or "Summarize each form submission." App Builder can turn on **AI access** and add the code for the feature.
After App Builder adds the AI feature, the app preview uses the new version. The published app uses it only after you republish.
## Sync Code with GitHub
Available on Cloud Business plans and above.
Link an app to a private GitHub repository when you want to review code in pull requests, keep a copy outside Teable, or work on the app in your local editor. Once linked, the app and the repository sync in both directions: every new app version is pushed to GitHub, and commits you push to GitHub become new app versions.
### Connect an Account and Create the Repository
Generate the app at least once first. Until the app has code, the GitHub button shows **Generate the app first to connect GitHub** and does nothing.
Click the GitHub icon in the app header to open **GitHub sync**. You need edit access to the app.Click **Connect GitHub** and complete the installation in the popup window. Choose your personal account or an organization you administer. Allow popups if your browser blocks the window.Select the connected account under **GitHub account**. Click **+** to connect another one.**Repository name** is prefilled from the app name. Names may contain letters, digits, `.`, `-`, and `_`, up to 100 characters.Click **Create repository & link**. For a personal account, GitHub asks you to authorize the creation in one more popup.
Teable creates a new private repository and commits the current app code to the `main` branch, along with a README that points back to the app and explains how the two stay in sync. You cannot link an app to a repository that already exists.
By default a connection belongs to whoever created it. To let collaborators build on the same organization account, select the connection and turn on **Allow other members to use this connection**. Other members with app editing access can then create repositories for their own apps under that organization. Personal connections cannot be shared, because GitHub requires the account owner's own authorization to create a repository.
### How Syncing Works
| Direction | What happens |
| - | - |
| App → GitHub | Each new app version is pushed to the `main` branch of the repository. |
| GitHub → app | Commits pushed to `main` become a new app version. A message in the chat panel reports what was synced, and an open preview reloads on the new code. |
Environment files are never pushed. See **Environment Variables and Local Development** below.
The panel shows the current state next to the repository name:
| Status | Meaning | What to do |
| - | - | - |
| **Synced** | The repository matches the latest app version. | No action needed. |
| **Syncing** | A push is in flight. | Wait; the panel updates on its own. |
| **Conflict** | The `main` branch has commits Teable did not produce, and they cannot be combined automatically. | Merge the `teable-sync` branch on GitHub. See below. |
| **Paused** | Teable stopped syncing because the GitHub App was uninstalled or suspended. | The panel says which. Lifting a suspension resumes syncing on its own. |
| **Error** | The last sync attempt failed. | Read the reason in the panel and click **Retry**. |
### Resolve a Conflict
Teable never force-pushes your branch. When the histories diverge, it parks the latest app version on a branch named `teable-sync` and marks the link **Conflict**. Merge `teable-sync` into `main` on GitHub; the merge comes back as a new app version and the link returns to **Synced**. While the conflict lasts, later app versions keep moving the `teable-sync` branch forward, so merging it always brings in the newest work.
### Environment Variables and Local Development
The repository holds source only. Teable never pushes a file whose name starts with `.env`: not at the project root, not in a subfolder, and not in the commit history. Environment values come from the credentials granted to the app, live in **Credentials & config**, and never enter git. The repository's `.gitignore` already lists `.env*`, so a local clone will not commit one by accident.
To run the app on your own machine:
Clone the repository and run `pnpm install`.In the GitHub panel, click **Copy local env variables**, then paste the clipboard into a `.env` file at the project root.Run `pnpm dev`.
The copied content matches what the app receives in Teable's own sandbox: the credentials granted to the app, plus the variables the platform injects for the app's API endpoint, access token, and AI access.
The `TEABLE_APP_TOKEN` line in that file grants access to the app's data, which is why only members with edit access to the app can copy it. Never commit the file, and never paste it into an issue or a pull request.
To add or replace a credential the app uses in production, use **Credentials & config** in Teable; editing the local file or committing a `.env` to GitHub has no effect. After a platform variable changes, such as a regenerated access token, copy the variables again to refresh your local `.env`.
### Unlink the Repository
Click the delete icon next to the repository name and confirm. Syncing stops, and the repository and its code stay on GitHub. Linking the same app again later creates a new repository rather than reconnecting to the old one.
## Publishing & Management
### Publishing Your App
When your app is ready, click the **Publish** button (arrow icon) in the top right corner.
* **Public URL**: Teable generates a secure, publicly accessible URL for your app.
* **Custom Domain**: Map your own domain to the app.
* **Show branding**: Use **Show branding** in the **Publish** menu to control whether the published app shows the **Build with Teable** badge. If you change this setting after publishing, click **Redeploy** to apply it.
* **Unpublish**: For a published app, use **Unpublish** in the publish menu to take the public link offline.
* **App configuration changes**: When the publish menu shows **Runtime configuration changed. Redeploy to apply it to the live app** or **Branding setting changed. Redeploy to apply it to the live app**, click **Redeploy**.
* **Open published app**: Once an app is published, the icon next to **Publish** opens the live app in a new tab.
Hiding the **Build with Teable** badge requires the Business plan or above.
### Unpublish an App
To take a published app offline, open the **Publish** menu and click **Unpublish**. After you confirm, the public app URL can no longer be accessed.
Unpublishing does not delete the app or its edit history. You can keep editing the app and publish it again later.
### Custom Domains
Custom domains require the Business plan or above.
Use **Custom domain** to bind a domain to the published app. A subdomain is recommended, such as `app.yourdomain.com`. After you enter the domain, Teable shows the DNS records to add. Add the records with your DNS provider, wait for propagation, then verify the domain in Teable.
You can also use an available subdomain under `teable.app` and edit the `teable.app` prefix, such as `your-name.teable.app`.
When the space's Business plan expires, Teable notifies the space owners that the custom domain will stop resolving. Renew before then to keep the domain. If the plan isn't renewed, the custom domain stops resolving and the app's public link reverts to the default Teable address. If you upgrade to Business again later, you need to bind the custom domain again manually.
### Custom Site Info
Use **Custom site info** in the **Publish** menu to set the browser tab icon, page title, and description of the published app. The dialog previews how they look together as you edit.
| Setting | What it controls |
| - | - |
| **Favicon** | The icon shown in the browser tab. Upload a PNG, JPEG, WebP, SVG, or ICO file up to 5 MB; 32×32 is the recommended size. Remove the uploaded file to return to the default Teable icon. |
| **Title** | The page title, up to 120 characters. |
| **Description** | The site description in the page metadata, up to 500 characters. |
Leave a field empty to keep the value App Builder wrote for you. Saving applies the change to the app preview environment; the published app uses it only after you republish.
### App Login
Click **Add login** in the app header to require visitors to sign in before they can use the app. Once login is configured, the button changes to **Login settings**.
When you enable login:
1. Choose where to store app users. You can create a **Users** table or reuse an existing table with an email field. Each signed-in user is stored as one record, and the same user table can be reused by multiple apps.
2. Choose at least one sign-in method, such as **Email OTP**, **Google**, or **Teable**. Available methods depend on your instance's authentication settings.
3. Choose an access policy: **Anyone can sign up**, **Allowed email domains**, or **Invite only**.
Login changes appear in the app preview environment after it reloads. Publish the app again to apply those changes to the published app.
### Version History & Rollback
Teable automatically tracks every deployment.
* Click the **History** (clock icon) button to view a list of all deployed versions.
* **One-Click Rollback**: If a new update causes issues, you can instantly revert the live app to any previous stable version.
App Builder saves the changes of each round as a new version. When saving fails, a card appears in the chat.
The changes from the failed round stay in the sandbox only; they are lost when the sandbox is reclaimed, and regenerating the reply does not save them again. Act on the card promptly.
* **Version save failed**: this version was not saved. Let App Builder keep working, and the next successful save carries these changes along.
* **Changes too large to save**: this round exceeds the save size limit. Click **Send to AI** on the card and App Builder looks for oversized test artifacts, debug files, or attachments, cleans them up, and saves again. Such files may already be in the unsaved commit history, so deleting them may not be enough; let App Builder tidy that up as well.
### Auto-fix
If your custom code changes cause a build error, the deployment will fail.
* Teable provides an **Auto-fix** button alongside the error log.
* Clicking this lets AI analyze the compilation error and automatically patch the code to resolve the issue.
### Deleting an App
To delete an app, click the **Settings** (gear icon) button in the header and select **Delete**.
## Best Practices
For prompt patterns, build tips, rollback advice, and common troubleshooting, see [App Builder Practical Guide](/en/basic/ai/app-builder-practical-guide).
## FAQ
No. Clearing the conversation only removes the chat history for the current app conversation. It does not delete the app itself. Use it when the conversation has drifted and you want to start again.
Switch to the **Code** tab in the editor, click the **`...`** menu in the tab bar, then choose **Download code** or **Import code**. Imported ZIP files can be up to 20 MB and replace the existing project, so include every source file you want to keep. The imported project must include a root `package.json`. Custom variables in a root `.env` file are stored as your secrets and granted to the app under the same names.
Login settings appear in the app preview environment after it reloads. Publish the app again to apply those changes to the published app.
Tell App Builder what AI feature you want, such as a reply assistant, submission summary, or request classifier. App Builder can enable **AI access** and add the code for the feature. The app preview uses the new version after App Builder finishes the change. The published app uses it only after you republish. AI calls made through this app appear as **App AI** in the credit usage details.
**Built-in AI** includes AI features available directly in Teable, such as AI Field generation, AI Chat, IM Bot, and App Builder. These features currently use credits at a significantly discounted rate.
**In-app AI** refers to AI features used inside apps created with App Builder. Usage is charged at the selected model provider's [official API price](https://vercel.com/ai-gateway/models), with no markup or discount. US\$1 of API usage equals 100 credits.
Click the **History** (clock icon) button to view deployed versions, then restore the live app to a previous stable version.
Each user can run up to 3 Agents at the same time, including AI Chat and App Builder. If App Builder says an Agent is busy in another conversation, another task is still running. Wait for the previous task to finish before continuing.
One App Builder run can include multiple processing steps. The conversation and billing page both show the total credits for that run. Work that Cuppy already completed and saved can still be used. If the final step is interrupted by an unexpected error, credits for that interrupted step are refunded automatically. You can continue working in the same app conversation.
If you are running Teable self-hosted, follow the setup on the [AI Settings](/en/basic/admin-panel/ai-setting) page. If App Builder uses your own key (BYOK), the chat model must come from an **OpenAI Compatible** or **Anthropic** provider. For deployment support, contact Teable at **[support@teable.ai](mailto:support@teable.ai)**.
If you select **Vercel** under **Deployment Engine**, make sure both your Teable instance and object storage (MinIO / S3) are publicly accessible, then use **Test Public Access** on the [AI Settings](/en/basic/admin-panel/ai-setting) page. This check is not required when you select **Teable Infra**.
# App Builder Best Practices
Source: https://help.teable.ai/en/basic/ai/app-builder-practical-guide
Practical tips and patterns for getting the most out of Teable App Builder.
## Building Tips
### 1. Define data first
Teable App Builder works on top of your existing Teable tables — **your tables and fields are your schema**, and the AI reads them directly when generating UI and logic.
So before you start building, define your data model clearly. The more precise your field types, links, and read/write paths are, the higher the quality of what the AI produces.
### 2. Plan before you build
Once your data model is in place, still resist the urge to jump straight into building the UI. Run a planning pass with the AI first.
Say something like: *"Let's not write code yet — let's make a plan."* Describe the problem you're solving, the target users, and the rough feature set. Let the AI draft a structured proposal. Review it, adjust it, and only start building once you agree the plan makes sense.
A few extra minutes aligning on direction up front saves hours of rework later.
### 3. Start small
Don't try to cram every feature into a single prompt. Describe the core functionality first, get a minimal working version running, then add one thing at a time: one interaction, one style tweak, one piece of logic.
Verify each change before moving on. When something breaks, you only need to roll back one small change instead of starting over.
### 4. Be specific, not abstract
Descriptions like *"make it prettier"* or *"make the interactions feel more natural"* carry almost no information for the AI.
Effective prompts are concrete: **which page, which area, what behavior you want, what you don't want**. Attaching screenshots or reference UIs helps a lot.
Treat your prompt like a brief for a smart person who knows nothing about your project. The more precise the instructions, the closer the output gets to what you imagined.
### 5. Diagnose before fixing
When the app behaves unexpectedly, resist the urge to tell the AI to *"just fix it."* Vague fix instructions push the AI into blindly patching things, often introducing new bugs along the way.
A better approach is two steps:
Describe the symptoms and ask the AI to list likely causes and possible approaches — without touching the code yet.
Decide which explanation is most plausible, and tell the AI to proceed along that path.
If several fix attempts in a row fail, roll back to the last known-good version and start fresh. It's usually faster than patching on top of patches.
### 6. Lean on version rollbacks
Every conversation with the AI produces changes. The recommended rhythm: finish one feature module, confirm it works, then move on. **Don't juggle multiple unfinished features at once.**
Later change broke something? Roll back to the last stable version and try again with a clearer prompt.
## FAQ
### App Builder only supports Next.js
App Builder's runtime environment (sandbox, preview, and build) is built on **Next.js** and currently **does not support** other frontend frameworks, including Astro, Vite, Create React App, Vue, Svelte, etc.
If you ask the AI to use a non-Next.js framework, it may not consistently refuse and might even attempt to generate the corresponding code. However, since the underlying environment is incompatible, **the preview will fail to start** — you'll be stuck on "Preview is starting..." indefinitely, and conversations will continue to consume credits during this time.
If you need to use a framework other than Next.js, we recommend developing in your own local environment and connecting to your data via the Teable API.
### Handling 429 errors
The Teable API is currently limited to **10 QPS** (10 requests per second). Apps generated by App Builder can hit 429 errors during normal use if request handling isn't optimized. Our engineering team is actively working on optimizing API performance, and we may adjust this limit in the future.
There are four broad strategies to address this:
Reduce duplicate requests
Shrink per-request payloads
Lower request frequency
Reduce preview errors
Each section below lists common scenarios, the fix, and a reference prompt you can reuse.
**Caching — reduce duplicate requests**
**Scenario**: A dashboard page has multiple charts, stat cards, and lists, each querying a different table. Or the page is mainly for display, but every visit still hits the API directly. In both cases, page-load concurrency can spike, and traffic surges are more likely to trigger 429 errors.
**Fix**: Prefer cache-friendly rendering patterns. Cache data in app memory after loading (a 1–3 minute TTL is a good starting point) and reuse it on later visits. Lazy-load below-the-fold components to stagger requests. If the page still re-fetches on every visit, explicitly ask the AI to strengthen the caching strategy.
**Reference prompt**: "This is a display-heavy page. Prefer a cache-friendly rendering approach. Cache data locally after page load with a 1-minute TTL, don't re-request the API within the TTL window, and delay below-the-fold components by 500 ms."
**Scenario**: Three components on the same page each need data from the same table and each fires its own request — when one would have been enough.
**Fix**: Centralize data fetching so the same dataset is loaded once and shared across components.
**Reference prompt**: "If multiple components need data from the same table, fetch it once and share it across all of them. Do not fire duplicate requests."
**Scenario**: Users move back and forth between pages. Each return triggers a fresh fetch, even when nothing has changed.
**Fix**: Within the cache TTL, reuse the previously loaded data instead of re-requesting.
**Reference prompt**: "When a user returns to a page, if it's been less than 1 minute since the last load, use the cached data. Do not re-request the API."
**Scenario**: A dropdown shows every record from a table as an option. With many records, that single request alone is heavy.
**Fix**: Convert it into a search-style picker — only fetch matching records after the user types. Alternatively, cache the option list.
**Reference prompt**: "Dropdowns should not load all options upfront. Switch to a keyword search that fetches matching records on input, with debounce applied."
**Scenario**: Choosing one field triggers a load for the next level's options. Multi-level cascades rack up several requests per interaction.
**Fix**: Preload the related data once and filter locally, or cache cascade data after the first load.
**Reference prompt**: "Cache cascading selector option data locally after loading. When the user changes a parent option, filter from the cache instead of re-requesting."
**Scenario**: Poor state management causes components to re-fetch data on every render.
**Fix**: Trigger data fetching on specific events (initial mount, explicit user action), not on every render. Use caching as a safety net.
**Reference prompt**: "Only fetch data on first page load or explicit user actions. Do not re-fetch on re-renders — use cached data instead."
**Pagination & batching — shrink per-request payloads**
**Scenario**: Loading all records at once produces a flood of API calls when the dataset grows.
**Fix**: Paginate. Only fetch the current page's data.
**Reference prompt**: "Show 20 rows per page. Only load the next page when the user navigates to it. Do not load everything at once."
**Scenario**: After loading a list, you fetch linked-table details for each record one at a time. Loading 50 projects and then 50 owner lookups = 50 extra requests in an instant.
**Fix**: Fetch all linked data in one batch, not row by row.
**Reference prompt**: "When loading a list, batch-fetch all linked data in a single request. Do not loop through records to fetch their linked information individually."
**Scenario**: Bulk-updating multiple records by sending one update request per record instead of a single batch request.
**Fix**: Use the batch update API to submit all changes in one call.
**Reference prompt**: "For bulk operations, merge multiple record changes into a single batch request. Do not send one update per record."
**Scenario**: A `for` loop processes records one at a time, calling the API each iteration.
**Fix**: Collect all the IDs first, then issue a single batch request.
**Reference prompt**: "Do not call the API inside a loop. Collect all required IDs first, then issue a single batch request."
**Debounce & throttle — lower request frequency**
**Scenario**: Every keystroke in a search box fires a request. Typing a 4-character query produces 4 requests.
**Fix**: Debounce the input — wait 300–500 ms after the user stops typing before firing the request.
**Reference prompt**: "Debounce the search input. Only send a request 300 ms after the user stops typing. Do not send requests mid-typing."
**Scenario**: Rapid-fire submit clicks, quick filter toggling, fast pagination — each action fires a request immediately.
**Fix**: Apply debounce or throttle. Disable submit buttons until the request completes to prevent double-submits.
**Reference prompt**: "Disable the submit button after click and re-enable it once the request resolves. Debounce filter changes so rapid changes within 300 ms fire only one request."
**Scenario**: Every field change saves immediately. Filling out a form can trigger a dozen writes.
**Fix**: Switch to explicit save on button click, or debounce auto-save so it fires once after a pause in editing.
**Reference prompt**: "Do not save on every field change. Save on explicit button click, or auto-save once after the user has paused editing for 2 seconds."
**Scenario**: Data refreshes every few seconds, producing sustained high-frequency traffic.
**Fix**: Lengthen the poll interval to something reasonable (30 seconds or more), or switch to manual refresh.
**Reference prompt**: "Set the auto-refresh interval to 60 seconds. Add a manual refresh button so users can pull the latest data on demand."
**Scenario**: Several components on a page each set up their own poll timer. The combined load easily exceeds the limit.
**Fix**: Centralize polling. Run one periodic fetch, then fan the result out to every component that needs it.
**Reference prompt**: "Don't let each component set up its own poll timer. Use a single refresh mechanism that fetches everything on a schedule and distributes the data to the components."
**Rendering compatibility — reduce preview errors**
**Scenario**: The page uses charts, maps, or libraries that depend on `window`, DOM measurements, or other browser-only APIs, and the preview shows errors, a blank screen, or hydration mismatches.
**Fix**: These components are often safer to load in the browser instead of rendering them directly on the server. If preview issues persist, explicitly ask the AI to switch them to a browser-only loading pattern.
**Reference prompt**: "This component depends on the browser environment. Load it only on the client to avoid preview rendering errors or hydration mismatches."
AI can make mistakes. Please double-check responses.
# Connect & Migrate Everything
Source: https://help.teable.ai/en/basic/ai/connect-everything
Use Teable AI Chat to connect and migrate Airtable, Baserow, SmartSuite, NocoDB, APIs, databases, and project data from Jira, Asana, monday.com, or ClickUp.
**Connect Everything** is a [Teable AI Chat](/en/basic/ai/ai-chat) skill for connecting external systems and migrating their data into Teable.
Move token-accessible Airtable data and structure into Teable.
Connect a Baserow instance and migrate accessible databases.
Connect SmartSuite with an API key and Workspace ID.
Connect a NocoDB instance and migrate accessible bases.
Move projects from Jira, Asana, monday.com, ClickUp, Smartsheet, Trello, Notion, Linear, or Microsoft Planner.
Connect another API, database, SaaS tool, or authorized data source.
## How it works
1. Open [Teable AI Chat](/en/basic/ai/ai-chat).
2. Type `/` and select **Connect Everything**.
3. Provide the source URL and required token or credentials.
4. Tell Teable AI what to migrate, then review the result.
Depending on what the source exposes, Teable AI can migrate data, records, tables, field types, and relationships. Coverage depends on the source API and the permissions granted to the connection.
# Migrate Airtable
Source: https://help.teable.ai/en/basic/ai/connect-everything/migrate-airtable
Migrate token-accessible Airtable data, table structure, field types, and relationships into Teable with Connect Everything.
In [**Teable AI Chat**](/en/basic/ai/ai-chat), type `/` and select the **Connect Everything** skill, then provide your Airtable Token. Teable AI can use that authorized connection to migrate all token-accessible data, table structure, field types, and relationships into Teable, so you do not have to rebuild the workspace manually.
## Start the migration
1. Create an [Airtable Personal Access Token](https://airtable.com/create/tokens) with access to the bases you want to migrate.
2. Open the target Teable project and launch AI Chat.
3. Type `/`, select **Connect Everything**, and provide the token.
4. Ask Teable AI to migrate the Airtable base, then review the result.
Migration coverage depends on the Airtable API and the token's scopes and resource access. Revoke the token after the migration is complete.
## Compare before you switch
Review the differences in data modeling, automation, AI, deployment, and pricing in the [Teable vs Airtable comparison](https://teable.ai/compare/airtable-alternative).
# Migrate Baserow
Source: https://help.teable.ai/en/basic/ai/connect-everything/migrate-baserow
Migrate accessible Baserow tables, fields, records, and relationships into Teable with Connect Everything.
Use **Connect Everything** in [Teable AI Chat](/en/basic/ai/ai-chat) to connect a Baserow instance and migrate accessible data into Teable.
## Start the migration
1. Copy the Baserow instance URL and create a [Baserow database token](https://baserow.io/user-docs/personal-api-tokens) with read access to the source tables.
2. Open the target Teable project and launch AI Chat.
3. Type `/`, select **Connect Everything**, and provide the instance URL and database token.
4. Ask Teable AI to migrate the Baserow database, then review the result.
Migration coverage depends on the Baserow API and the tables and permissions assigned to the database token.
## Compare before you switch
Review the differences in data modeling, automation, AI, deployment, and pricing in the [Teable vs Baserow comparison](https://teable.ai/compare/baserow-alternative).
# Migrate ClickUp
Source: https://help.teable.ai/en/basic/ai/connect-everything/migrate-clickup
Migrate API-accessible ClickUp Workspaces, Spaces, Folders, Lists, tasks, subtasks, fields, comments, and attachments into Teable with Connect Everything.
In [**Teable AI Chat**](/en/basic/ai/ai-chat), type `/` and select **Connect Everything**, then provide your ClickUp personal API token. Teable AI can use that authorized connection to migrate API-accessible Workspaces, Spaces, Folders, Lists, tasks, subtasks, fields, comments, and attachments into Teable, so you do not have to rebuild the workspace manually.
## Start the migration
1. In ClickUp, open **Settings → Apps**, then copy your personal API token. See ClickUp's [authentication guide](https://developer.clickup.com/docs/authentication).
2. Open the target Teable project and launch AI Chat.
3. Type `/`, select **Connect Everything**, and provide the personal API token.
4. Ask Teable AI to migrate the accessible ClickUp Workspaces and build the project views, dashboards, and automations your team needs.
Migration coverage depends on the ClickUp API, plan limits, rate limits, and token-authorized resources. Dashboards, automations, permissions, and unsupported assets may require separate handling. Rotate a migration-only credential after the migration is complete.
## Compare before you switch
Review the differences in project structure, workflow automation, reporting, AI, and pricing in the [Teable vs ClickUp comparison](https://teable.ai/compare/clickup-alternative).
# Migrate Jira
Source: https://help.teable.ai/en/basic/ai/connect-everything/migrate-jira
Migrate API-accessible Jira projects, work items, fields, users, sprints, comments, relationships, and attachments into Teable with Connect Everything.
In [**Teable AI Chat**](/en/basic/ai/ai-chat), type `/` and select **Connect Everything**, then provide your Jira Cloud site URL, Atlassian account email, and API token. Teable AI can use that authorized connection to migrate API-accessible projects, work items, fields, users, statuses, sprints, comments, relationships, and attachments into Teable, so you do not have to rebuild the workspace manually.
## Start the migration
1. Create an [Atlassian API token](https://id.atlassian.com/manage-profile/security/api-tokens) for an account with access to the Jira projects you want to migrate. See Atlassian's [Basic auth for REST APIs](https://developer.atlassian.com/cloud/jira/platform/basic-auth-for-rest-apis/).
2. Open the target Teable project and launch AI Chat.
3. Type `/`, select **Connect Everything**, and provide the Jira Cloud site URL, account email, and API token.
4. Ask Teable AI to migrate the accessible Jira projects and build the project views, dashboards, and automations your team needs.
Migration coverage depends on the Jira API, account permissions, and token access. Jira automation rules, Marketplace app data, dashboards, and permission schemes may require separate handling. Revoke a migration-only token after the migration is complete.
## Compare before you switch
Review the differences in project structure, workflow automation, reporting, AI, and pricing in the [Teable vs Jira comparison](https://teable.ai/compare/jira-alternative).
# Migrate monday.com
Source: https://help.teable.ai/en/basic/ai/connect-everything/migrate-monday
Migrate API-accessible monday.com workspaces, boards, groups, items, subitems, columns, users, updates, and files into Teable with Connect Everything.
In [**Teable AI Chat**](/en/basic/ai/ai-chat), type `/` and select **Connect Everything**, then provide your monday.com personal API token. Teable AI can use that authorized connection to migrate API-accessible workspaces, boards, groups, items, subitems, columns, users, updates, and files into Teable, so you do not have to rebuild the workspace manually.
## Start the migration
1. In monday.com, open your profile menu, choose **Developers**, and copy your personal API token. See monday.com's [API authentication guide](https://developer.monday.com/api-reference/docs/authentication).
2. Open the target Teable project and launch AI Chat.
3. Type `/`, select **Connect Everything**, and provide the personal API token.
4. Ask Teable AI to migrate the accessible monday.com workspaces and build the project views, dashboards, and automations your team needs.
Migration coverage depends on the monday.com API and the user's token permissions. Dashboards, automation recipes, integrations, apps, and inaccessible private boards may require separate handling. Rotate a migration-only credential after the migration is complete.
## Compare before you switch
Review the differences in project structure, workflow automation, reporting, AI, and pricing in the [Teable vs monday.com comparison](https://teable.ai/compare/monday-alternative).
# Migrate NocoDB
Source: https://help.teable.ai/en/basic/ai/connect-everything/migrate-nocodb
Migrate accessible NocoDB bases, tables, fields, records, and relationships into Teable with Connect Everything.
Use **Connect Everything** in [Teable AI Chat](/en/basic/ai/ai-chat) to connect a NocoDB instance and migrate accessible data into Teable.
## Start the migration
1. Copy the NocoDB instance URL and create a [NocoDB API token](https://nocodb.com/docs/product-docs/account-settings/api-tokens) with access to the source base.
2. Open the target Teable project and launch AI Chat.
3. Type `/`, select **Connect Everything**, and provide the instance URL and API token.
4. Ask Teable AI to migrate the NocoDB base, then review the result.
Use a fine-grained API token when available. Migration coverage depends on the NocoDB API and the token's base access and permissions.
## Compare before you switch
Review the differences in data modeling, automation, AI, deployment, and pricing in the [Teable vs NocoDB comparison](https://teable.ai/compare/nocodb-alternative).
# Migrate Smartsheet
Source: https://help.teable.ai/en/basic/ai/connect-everything/migrate-smartsheet
Migrate API-accessible Smartsheet workspaces, folders, sheets, reports, columns, rows, discussions, and attachments into Teable with Connect Everything.
In [**Teable AI Chat**](/en/basic/ai/ai-chat), type `/` and select **Connect Everything**, then provide your Smartsheet API access token and account environment. Teable AI can use that authorized connection to migrate API-accessible workspaces, folders, sheets, reports, columns, rows, discussions, and attachments into Teable, so you do not have to rebuild the workspace manually.
## Start the migration
1. In Smartsheet, open **Account → Personal Settings → API Access**, then generate an access token. See Smartsheet's [API getting-started guide](https://developers.smartsheet.com/api/smartsheet/guides/getting-started).
2. Open the target Teable project and launch AI Chat.
3. Type `/`, select **Connect Everything**, and provide the access token and account environment: standard, Regions Europe, or Gov.
4. Ask Teable AI to migrate the accessible Smartsheet workspaces and build the project views, dashboards, and automations your team needs.
Migration coverage depends on the Smartsheet API, account permissions, and account environment. Tokens are not interchangeable between Smartsheet environments. Revoke a migration-only token after the migration is complete.
## Compare before you switch
Review the differences in project structure, workflow automation, reporting, AI, and pricing in the [Teable vs Smartsheet comparison](https://teable.ai/compare/smartsheet-alternative).
# Migrate SmartSuite
Source: https://help.teable.ai/en/basic/ai/connect-everything/migrate-smartsuite
Migrate accessible SmartSuite solutions, tables, fields, records, and relationships into Teable with Connect Everything.
Use **Connect Everything** in [Teable AI Chat](/en/basic/ai/ai-chat) to connect SmartSuite and migrate accessible data into Teable.
## Start the migration
1. Get your [SmartSuite API key and Workspace ID](https://help.smartsuite.com/en/articles/6096587-retrieving-your-api-key-and-workspace-id).
2. Open the target Teable project and launch AI Chat.
3. Type `/`, select **Connect Everything**, and provide the API key and Workspace ID.
4. Ask Teable AI to migrate the SmartSuite solution, then review the result.
The API key uses the permissions of the SmartSuite member who created it. Use an account with only the access required for the migration.
## Compare before you switch
Review the differences in data modeling, automation, AI, deployment, and pricing in the [Teable vs SmartSuite comparison](https://teable.ai/compare/smartsuite-alternative).
# Connect & Migrate More Sources
Source: https://help.teable.ai/en/basic/ai/connect-everything/more-sources
Use Connect Everything to connect APIs, databases, SaaS tools, and other authorized data sources to Teable.
Connect Everything is not limited to Airtable, Baserow, SmartSuite, or NocoDB. It can work with other systems that expose data through an API or another authorized connection.
## What to provide
* The source system name and URL
* API documentation or endpoint information
* A token or credential with the minimum required access
* A short description of what you want to connect or migrate
In [Teable AI Chat](/en/basic/ai/ai-chat), type `/`, select **Connect Everything**, provide the connection details, and tell Teable AI what to migrate.
Available data and migration coverage depend on the source system, its API, and the permissions granted to the connection.
# Custom AI Model
Source: https://help.teable.ai/en/basic/ai/custom-model
Add custom model providers for AI Fields, Automations, AI Chat, App Builder, and other supported AI features.
Available for Pro plan and above
## Where to Configure It
1. Open the target space.
2. Click **Settings** in the top right corner.
3. Go to **AI settings**.
## Setup Steps
Under **AI Capabilities**, turn on what you need:
* **AI Field**
* **AI Chat**
Enabling **AI Chat** controls whether the chat feature is available in the space.
The **Concurrency** row beneath **AI Field** sets how many AI field generations this space runs at the same time; the rest wait in the queue. Lower it when this space's bulk AI fills are slowing down other people's work, and raise it when you want a large fill to finish faster.
### Add LLM Provider
When you add a new LLM provider, choose **OpenAI**, **Anthropic**, or **OpenAI Compatible** as the provider type. Use **OpenAI Compatible** for services that expose an OpenAI-compatible API endpoint. If a task uses images, screenshots, or other visual input, choose a model with vision support. Models without vision support will fail on these multimodal tasks.
Click **Add LLM provider** and fill in the following:
* **Name**: Used to distinguish different providers.
* **Provider type**: Select the provider type.
* **Base URL**: Enter the provider's API endpoint.
* **API Key**: Enter the API key from the provider.
* **Models**: Enter the model names you want to connect. Separate multiple models with English commas.
### Test Model Capabilities
There are currently three ways to test:
* Click **Test** on the LLM provider row.
* Click **Test** on an individual model row.
* Click **Test Model Capabilities** in the top-right corner of the list to batch-test all configured models.
If a model is meant for image generation, check **Image Generation Model** before running the test. Once checked, Teable tests it as an image model for text-to-image and image-to-image capabilities. If it is not checked, the model is tested as a regular text model.
## Configuration Tips
### Base URL and Models
Some Coding Plan keys may only work in designated coding tools and may not be standard API keys. Check the provider's terms before using them with third-party services. To connect Teable, use a standard API key created in the provider dashboard.
Common examples:
| Provider type | Base URL format | Example models |
| - | - | - |
| OpenAI | `https://api.openai.com/v1` | `gpt-5.5,o3,gpt-5-mini` |
| Anthropic | `https://api.anthropic.com/v1` | `claude-opus-4-8,claude-sonnet-5,claude-haiku-4-5` |
| OpenAI Compatible | The provider's OpenAI-compatible `/v1` endpoint | `gpt-5.5,gpt-5.4,o3,gpt-5-mini` |
Model names must match the provider documentation exactly and are case-sensitive. Separate multiple models with English commas.
Notes:
* Model names are case-sensitive. Use the exact names from the provider documentation.
* Some providers require no spaces after commas, for example `gpt-5.5,o3`.
* For **OpenAI Compatible** providers, use the model naming format required by that provider. Some services use `provider/model-name`.
## FAQ
Check whether the **Base URL** is correct, whether it was mistakenly filled with the provider homepage URL, or whether it has an extra trailing `/`. If you are using an OpenAI-compatible endpoint, also confirm that `/v1` is not missing.
Check whether the **API Key** is valid and whether the account still has credits or permission to call the model.
Check whether the **Base URL** is correct and whether your current environment can reach that address.
Make sure the **Models** value matches the provider documentation exactly, including case and separator format.
This kind of key may not support standard API calls, or the provider's terms may not allow third-party service use. Check the provider's Coding Plan terms first. To connect Teable, use a standard **API Key** created in the provider dashboard.
If the model is meant for image generation, check **Image Generation Model** first and then test again. Once checked, Teable tests text-to-image and image-to-image capabilities instead.
# Overview
Source: https://help.teable.ai/en/basic/ai/overview
Explore Teable's AI capabilities for intelligent data processing, automation, and analysis.
Available on all Cloud plans; Self-Hosted requires Business or higher.AI can make mistakes. Please double-check responses.
Teable integrates powerful AI capabilities throughout the platform to help you work smarter with your data. From intelligent field processing to automated workflows, AI features streamline your data operations.
## AI Capabilities
Context-aware intelligent assistant for data analysis, visualization, and creation.
Transform your data into custom web applications using AI.
Write custom AI-powered scripts to extend automation capabilities.
Automatically generate, summarize, translate, and extract information from your data using AI-powered fields.
Integrate AI processing into your automation workflows for intelligent data handling.
## Configuration
Integrate custom AI models and third-party API providers.
Configure AI Chat, AI fields, AI automation, and App Builder for a self-hosted instance.
## Getting Started
1. **Enable AI** (Self-hosted only) - Teable Cloud comes with built-in AI ready to use. Self-hosted users should complete [AI Settings](/en/basic/admin-panel/ai-setting) first. If you want to connect your own models, continue with [Custom AI Model](/en/basic/ai/custom-model).
2. **Use AI Chat** - Ask questions about your data or generate charts
3. **Build Apps** - Turn your Project into a web app with a simple prompt
4. **Create AI Fields** - Add AI-powered fields to automatically process your data
5. **Build Automations** - Use AI generate and Run script actions in your workflows
# Routine
Source: https://help.teable.ai/en/basic/ai/routine
Let Cuppy run a prompt on a schedule and review the result of every run.
Available on all Cloud plans; Self-Hosted requires Business or higher.
A routine hands a prompt to Cuppy and repeats it, either on a schedule or whenever a connected third-party app reports an event. That suits work nobody needs to trigger by hand: a daily report, a periodic cleanup of expired records, filing a new email as it arrives. Every run is a full AI chat, so a routine can do everything AI chat can, including reading and writing tables, calling skills, and producing files.
A routine is a resource inside a project and sits in the left sidebar next to tables, apps, and automations.
An automation runs the steps you configured in advance, while a routine runs a prompt the agent interprets itself. Both can fire on a schedule, and both can fire on an event from a connected third-party app. Use an automation when you need fixed steps and predictable output; use a routine when you want the agent to decide what to do with the current data each time.
## Create a Routine
In the left sidebar, click **+** and choose **New routine**.
Describe what each run should do in **Prompt**. The prompt is the entire instruction for a run, so state where the data comes from, how to process it, and where the result goes. For example, "Summarize records added to the Tasks table yesterday, group them by owner, and write the summary to the Daily Report table."
Under **Trigger**, choose **On a schedule** or **On a connector event**, then fill in the settings that kind needs.
Click **Activate**. The configuration must be saved first: **On a schedule** needs a future occurrence, and **On a connector event** needs a usable account.
## Settings
Besides the prompt and the trigger, the form carries these settings:
| Setting | Description |
| - | - |
| **Model** | The model and effort level this routine runs on. Leave **Default model** to use the space's default chat model |
| **Chat** | **New chat for every run** keeps runs independent of each other; **Continue the previous run's chat** carries the context of earlier runs forward, which suits work that needs to refer to the last result |
| **Starting** / **Ending (optional)** | The bounds of the schedule, used by **On a schedule** only. Without an end time the routine keeps running indefinitely |
The model and effort level are recorded when you save, so run history shows what each run actually used.
### Trigger
**On a schedule** runs the routine at the times you set, configured under Schedule below.
**On a connector event** runs it once whenever a connected third-party app reports an event, such as a new email or a new issue. Pick the app, the event, the **Account** that receives it, and whatever parameters the event takes; it is configured exactly like the automation trigger, described in [When Connector Event Received](/en/basic/automation/trigger/external/connector-event). A routine on this trigger has no **Next run** time and uses neither the schedule nor the bounds.
If the account grant is revoked, the connected account is removed, or the app stops the subscription, the routine reports **Subscription disconnected** and stops receiving events, and Teable notifies the member who last updated it. Reconnecting the same account rebuilds the subscription on its own; to use a different one, pick another account and save.
### Schedule
The schedule is used by **On a schedule** only. Pick a frequency from the presets: **Hourly** at a given minute, **Daily** and **Weekdays** at a given time, **Weekly** on a weekday and time, **Monthly** on a day and time.
For anything more specific, choose **Custom (RRULE)** and write an RFC 5545 rule, such as `FREQ=DAILY;BYHOUR=9;BYMINUTE=0`. A custom rule has these limits:
* The frequency must be `HOURLY`, `DAILY`, `WEEKLY`, `MONTHLY`, or `YEARLY`, and two runs must be at least 1 hour apart.
* You can use `INTERVAL`, `COUNT`, `BYDAY`, `BYMONTHDAY`, `BYMONTH`, plus one `BYMINUTE` and one `BYHOUR`. `COUNT` tops out at 1000, and `COUNT` or `INTERVAL` requires a **Starting** time.
* The timezone and the bounds come from the form, so `TZID`, `DTSTART`, `UNTIL`, and `BYSECOND` are rejected.
For a schedule that runs only once, use a custom rule with `COUNT=1`.
A schedule is evaluated in the timezone of whoever created the routine and does not follow the viewer. The **Next run** time shown in the interface is already converted to your local time.
## Drafts, Updates, and Running Now
A new routine is a draft and does not run by itself until you activate it. When you edit an active routine, the change is also saved as a draft while the live version keeps running on the old configuration: click **Update** to apply it, or **Discard changes** to drop it.
**Run now** executes once without waiting for the trigger, which is useful for checking a prompt. A routine cannot be run by hand again until its previous run has finished.
On a connector-event routine that is not yet active, **Run now** shows **Waiting for an event** instead: go into the app and do something that fires the event, and Teable uses the one it receives for a single run, which then appears in run history. Click **Stop waiting** to end the wait early. An active routine already receives its events, so it neither needs nor allows this.
Turn the switch off to deactivate. The routine stops firing, and existing run history is kept.
## Run History
Open the routine and switch to **Run history**. The run list can be filtered by status and time range, which helps locate a particular failure; selecting a run shows its **Run ID**, its **Trigger**, and the full conversation of that run. **Trigger** reads **Scheduled**, **Event**, or **Manual**, and a **Scheduled** run also shows the **Planned** time it served.
Runs are reported as **Queued**, **Running**, **Completed**, **Failed**, or **Canceled**. **Canceled** appears when someone interrupted that run, or when the routine or its project has been deleted.
A **Failed** run states its reason, and each reason calls for a different response:
| Message | Meaning | What to do |
| - | - | - |
| **Run failed** | The run started but hit an error | Open the conversation for that run and judge from the failure point whether the prompt or the data is at fault |
| **Skipped: not enough credits** | Credits ran out, so the run never started | Top up the space's credits |
| **Skipped: the previous run was still in progress** | The previous run had not finished, so this occurrence was skipped | Lower the frequency, or reduce how much one run processes |
| **Skipped: timed out waiting in the queue** | The run waited too long in the queue and was skipped | Occasional occurrences need no action; a recurring one means too much is scheduled at the same time, so stagger the schedules |
The conversation of a run is read-only. Members who can edit the routine may continue it at the end to investigate how a particular run proceeded.
Each run's conversation also appears in the chat history, owned by whoever last updated the routine. Scheduled and manual runs carry the routine's name; event-triggered runs are renamed automatically based on the prompt and the event received, so each event is easy to tell apart in the history. Deleting a routine does not delete these conversations: they keep their names and become ordinary chats.
Run history requires permission to edit the routine. A project's owner and creator can create, edit, and delete routines; other collaborators have read access.
## Failure Alerts and Automatic Deactivation
Teable sends a notification when a run fails or credits run out. It goes to the member who last updated the routine, named under **Notifications will be sent to** at the top of run history. Failure notifications are not sent every single time, so that a long run of failures does not flood the recipient.
After 5 consecutive failures the routine is deactivated automatically and a separate notification goes out. Turn the switch back on once the problem is fixed; the count resets after the next successful run.
Not every unsuccessful run counts toward that total: runs skipped because the previous run was still in progress or because they timed out in the queue, along with **Canceled** runs, are not failures and produce no notification. A credit shortfall does count, so leaving credits unfunded eventually deactivates the routine.
## FAQ
Yes. Every run is an AI chat and is billed against the space's credits by actual usage, listed under type **Routine** in **Credit usage summary** on the billing page. When credits run out the run is skipped and a notification is sent, and repeated skips eventually deactivate the routine.
No. The change is saved as a draft and only reaches the live version when you click **Update**. A run already under way keeps the configuration it started with.
Scheduled ones do. After a template install they are switched on the way its workflows are, and a schedule with no future occurrence stays a draft. Connector-event routines are not switched on: credentials do not come over with a template, so pick one of your own accounts before activating.
When the context approaches its limit, Teable compacts the conversation, so runs are not interrupted by it. Choose **New chat for every run** when each run should start from a clean context.
# Connect AI Agents to Teable
Source: https://help.teable.ai/en/basic/ai/teable-skill
Query and update data, manage tables, and create automations or apps from your AI agent.
## Install Teable Skill
Copy this prompt into your AI agent:
```text wrap theme={null}
Please read https://github.com/teableio/agent-skills, follow the guide to help me install the Teable agent skill, and complete Teable CLI authentication.
```
Or install it directly:
```bash theme={null}
npx skills add https://github.com/teableio/agent-skills
```
## Try Teable Skill
After the skill is installed, try these prompts.
```text Simple Starter Prompts wrap theme={null}
Create a simple CRM table in {paste project URL}.
```
```text Local Files → Teable wrap theme={null}
Upload all invoices in this local folder to {paste table URL} and extract key fields.
```
```text Cross-Platform Data → Teable wrap theme={null}
Import new GitHub issues into {paste table URL}.
```
```text Clean Or Organize Teable Data wrap theme={null}
Check {paste table URL} and mark overdue tasks.
```
# Overview
Source: https://help.teable.ai/en/basic/automation
Create automation workflows with AI or manual configuration.
Teable Automation makes powerful workflows simple. No code, no drag-and-drop, no complicated setup. Just tell AI what you need in plain language, and Teable takes care of the repetitive work for you.
## Build with AI (from scratch)
The easiest way to get started. Open any table, click the **AI chat** on the right sidebar, and describe what you want:
* *"When a new order comes in, send a Slack notification with the customer name and amount."*
* *"Every Monday morning, email me a summary of tasks that are overdue."*
* *"When someone submits the feedback form, classify it and update the category field."*
AI creates and tests the entire automation for you - trigger, actions, and field mappings. Review the results in the Automation panel and enable.
## Build with AI (from trigger)
You can also start from a specific trigger and let AI build the actions:
1. **Add a trigger** — choose a trigger type (e.g. "When Record Created") and configure it.
2. **Add an action** — click **+**, go to **Build with AI**, and select **Run Script**.
3. In the configuration panel, click **Open Editor**.
4. Pick from the **suggestions** to get started quickly, or describe what you need in your own words.
5. AI generates the JavaScript code. Review it, click **Apply**.
6. Click **Test** to run the script with real data, then **Enable** the workflow.
## Build manually
You can also build automations step by step using the built-in actions:
1. **Add a trigger** — choose a trigger type, select the table, configure fields. Click **Test**.
2. **Add an action** — choose an action type (Create Record, Send Email, HTTP Request, etc.), map field values using **+** to insert dynamic variables. Click **Generate Preview** or **Run as Configured**.
3. **Enable** — click the toggle in the top-left corner.
## Editing a live workflow
Changes are saved as a draft. The live workflow keeps running on the previous version until you click **Apply Update**.
## Credentials and Config
An automation calls external services with your credentials: an OAuth connection or a secret you store. Open the workflow on the editing tab, click **Credentials & config** next to the test controls, grant a credential to this automation, and give it a **Variable name**.
Script actions read that name from an environment variable such as `process.env.EXTERNAL_API_KEY`; other actions can click **Insert secret** beside an input field to insert a reference. Values are never shown in plaintext, and test results mask them.
Credentials themselves live in **Settings** → **Integrations**. See [Credentials and Integrations](/en/basic/credential).
## Run history
Open a workflow → **Run history**. The history panel lists each run with its status, time spent, and step details. Click a run to inspect per-step input/output.
Use the history filters to narrow the list by status, duration, or date range. For failed runs, use the run detail panel to diagnose or rerun:
* **Diagnose** opens AI Chat with the failed run as context, so you can ask Cuppy to explain the failure.
* **Full rerun** runs every step again and may create duplicate records, emails, or notifications.
* **Resume from failed step** is available when Teable can safely continue from the failed step.
When **Resume from failed step** is unavailable, Teable explains why only **Full rerun** can be used. This can happen when the workflow was modified after the failed run, the workflow is disabled, no step finished successfully before the failure, or control-step data is missing.
Rerun attempts are marked as retries and link back to the original run.
## Limits
| Item | Limit |
| - | - |
| Email sending rate | 5 / second / project |
| Webhook receiving rate | 50 / second / project, 2 / second / workflow |
| Webhook payload size | 4 MB |
| Run quota & history retention | Varies by plan |
## FAQ
In Teable Cloud, Teable sends automation run usage notifications to Space Owners when a space is close to or over its run quota, or when runs increase sharply in a short time.
For quota reminders, Teable sends a notification when the current billing period reaches 80% or 90% of the available run quota.
Pro and above plans may receive alerts after automation runs go over the quota. Teable may remind you about every 6 hours.
Teable Cloud may also send critical notifications for unusual usage, such as a large daily increase or a sudden burst in a short time. The system uses recent daily and hourly run patterns, and the exact thresholds may change.
The notification opens **Space Settings** → **Billing**. When available, it shows which workflow and Project contributed the most runs. Quota reminders are based on runs counted toward your plan limit; unusual usage checks may also consider recent runs with **success**, **failed**, or **pending** status.
If the usage is expected, consider buying extra automation quota or changing your plan. If it is unexpected, review the top workflow and adjust or pause the related automation.
# AI generate
Source: https://help.teable.ai/en/basic/automation/actions/ai/ai-generate
Use AI models to generate text or structured data in a workflow
We strongly recommend using Run script to build automations, because it can cover all action behaviors, including actions that would otherwise need to be built manually. Just describe your requirements to AI in chat.
Please note: if you add actions manually, AI will not recognize or modify them later.
## Build with AI
Open the AI Chat in your table's right sidebar and describe what you want.
AI handles everything: it picks the right trigger, chooses the appropriate actions, maps the fields, and configures the entire workflow automatically.
Describe the goal once, and the workflow is ready — no manual setup needed.
Sends a prompt to a large language model and returns text or structured JSON. Use it to classify, extract, summarize, or generate data based on your records.
## Configuration
| Setting | Required | Description |
| - | - | - |
| Prompt | Yes | Your instruction to the AI. Click **+** to insert dynamic variables from previous steps |
| Model | No | Choose a model. Defaults to the system model. Vision and Reasoning models are also available |
| Temperature | No | Controls randomness: 0 = most deterministic, 1 = most creative. Default is usually around 0.7 |
| Output Type | No | **Text** (default) — returns free-form text. **JSON** — returns structured JSON matching a schema you define |
| Attachments | No | Upload images, PDFs, Word docs, or Excel files. Requires a vision-capable model |
## Model capabilities
| Tag | Meaning |
| - | - |
| **Vision** | Can read and analyze images, PDFs, Word documents, and Excel files attached to the prompt |
| **Reasoning** | Returns both the answer and step-by-step reasoning (chain of thought), useful for complex analysis |
You can connect third-party AI models via **Space → Settings → Integrations**. This lets you use models from OpenAI, Anthropic, Google, and other providers.
## How to set it up
1. Add an **AI Generate** action to your workflow.
2. Write your **Prompt**. This is the instruction the AI will follow. Click **+** to insert dynamic values — for example, the text of a support ticket, the contents of a form submission, or a product description.
3. (Optional) Select a **Model** if you want to use a specific one instead of the default.
4. (Optional) Adjust **Temperature**. Lower values (0–0.3) give more consistent, predictable outputs. Higher values (0.7–1.0) give more varied, creative outputs.
5. (Optional) Switch **Output Type** to **JSON** if you need structured data. Define the JSON schema so the AI knows what format to return.
6. (Optional) Add **Attachments** if you want the AI to read documents or images (requires a vision model).
7. Save the action. The AI's response will be available to subsequent steps via the **+** variable picker.
## Prompt writing tips
The quality of the AI output depends heavily on your prompt. Here are practical guidelines:
* **Be specific.** Instead of "Classify this", write "Classify this support ticket into one of these categories: Billing, Technical, Account, Other."
* **Give examples in the prompt.** Show the AI what you expect:
```
Classify the following support ticket. Return only the category name.
Categories: Billing, Technical, Account, Other
Examples:
- "I can't log in to my account" → Account
- "My invoice amount is wrong" → Billing
- "The API returns a 500 error" → Technical
Ticket: {{Ticket Description}}
```
* **Define the output format.** If you want a specific format, say so: "Return only the category name, nothing else" or "Return a JSON object with keys: category, confidence, reason."
* **Keep it focused.** One task per prompt works better than asking the AI to do multiple things at once.
## JSON output
When you set Output Type to **JSON**, the AI returns structured data instead of free text. This is useful when you need to extract multiple pieces of information and use them separately in later steps.
Example prompt for JSON output:
```
Extract the following information from this invoice email. Return JSON with these keys:
- vendor_name (string)
- invoice_number (string)
- amount (number)
- due_date (string in YYYY-MM-DD format)
Email body: {{Email Body}}
```
The AI returns something like:
```json theme={null}
{
"vendor_name": "Acme Corp",
"invoice_number": "INV-2024-001",
"amount": 1250.00,
"due_date": "2024-03-15"
}
```
Each key in the JSON is then available as a separate variable in subsequent steps, so you can map `vendor_name` to one field, `amount` to another, and so on.
## Vision models and attachments
Vision models can analyze images and documents. Attach files to the prompt and the AI will "read" them:
* **Images:** screenshots, photos, diagrams, charts.
* **PDFs:** invoices, contracts, reports.
* **Word / Excel files:** documents and spreadsheets.
Use cases: extract text from scanned documents, read data from invoice images, analyze chart images, process uploaded forms.
Make sure to select a model with the **Vision** tag. Non-vision models will ignore attachments.
## Credit system
Each AI Generate call consumes credits based on:
* The **model** used (more powerful models cost more credits per token).
* The **number of tokens** processed (both input and output).
The exact credit cost is shown in the test panel after a test run. Monitor your credit usage in your account settings, especially if you are using AI Generate inside a Loop over many records.
## Concrete prompt examples
### Classification
```
Classify this customer feedback into: Positive, Negative, or Neutral.
Return only the classification.
Feedback: {{Feedback Text}}
```
### Data extraction
```
Extract all email addresses mentioned in the following text.
Return them as a JSON array of strings.
Text: {{Message Body}}
```
### Summarization
```
Summarize the following meeting notes in 3 bullet points.
Focus on action items and decisions made.
Notes: {{Meeting Notes}}
```
### Content generation
```
Write a professional follow-up email to {{Customer Name}} regarding their inquiry about {{Product Name}}.
Keep it under 150 words. Mention that we will respond within 24 hours.
```
### Translation
```
Translate the following text from {{Source Language}} to {{Target Language}}.
Preserve the original formatting.
Text: {{Content}}
```
## When to use
* **Classify support tickets by topic.** Automatically categorize incoming tickets so they can be routed to the right team.
* **Extract structured data from invoices or emails.** Pull out amounts, dates, names, and reference numbers into separate fields.
* **Summarize long text fields.** Condense meeting notes, descriptions, or comments into brief summaries.
* **Generate personalized email content.** Create custom email body text based on record data.
* **Analyze images and documents.** Use vision models to read uploaded invoices, receipts, or screenshots.
## Tips
* Use the **test panel** to iterate on your prompt before activating the automation. Run tests with real data to verify the output format and quality.
* For consistent results (especially classification), set Temperature to 0 or near 0.
* JSON output mode is more reliable when you provide a clear schema in your prompt. Always list the expected keys and their types.
* If you are processing many records in a [Loop](../logic/loop-run), keep your prompts concise to reduce token usage and credit costs.
* Connect additional AI providers via **Space → Settings → AI settings** if the default models do not meet your needs. For details, see [Custom AI Models](/en/basic/ai/custom-model).
Connect third-party AI models via **Space → Settings → AI settings**.
## Related
* [Loop (batch)](../logic/loop-run) — process multiple records with AI in a single automation run
* [Run script](/en/basic/automation/ai/scripting/runscript) — for custom logic that goes beyond prompt-based generation
* [Send email](/en/basic/automation/actions/communication/send-email-overview)
* [Update record](/en/basic/automation/actions/records/update-record)
# Run script
Source: https://help.teable.ai/en/basic/automation/actions/ai/ai-script
Describe what you need in plain language and let AI write the automation logic for you
We strongly recommend using Run script to build automations, because it can cover all action behaviors, including actions that would otherwise need to be built manually. Just describe your requirements to AI in chat.
Please note: if you add actions manually, AI will not recognize or modify them later.
The most powerful way to build automation actions. Describe what you need, and AI writes the code. No programming experience required.
## Build with AI
Open the AI Chat in your table's right sidebar and describe what you want.
AI handles everything: it creates the trigger, writes the script, maps the fields, and configures the entire workflow automatically.
Describe the goal once, and the workflow is ready — no manual setup needed.
**Example:** *"When a new support ticket comes in, classify it by topic and assign it to the right team."*
## How to use
* **Add a trigger** — choose a trigger type (e.g. "When Record Created") and configure it
* **Add an action** — click **+**, go to **Build with AI**, select **Run script**
* **Edit manually** — in the configuration panel, click **Edit manually**
* **Describe or pick** — choose a built-in suggestion, or type your own request in the AI panel on the right
* **Apply** — AI generates the code and shows a visual flowchart on the left. Click **Apply**
* **Test and enable** — click **Test** to run with real data, then **Enable** the workflow
## Built-in suggestions
The AI panel offers ready-made prompts you can click to use directly:
* Send message to Slack when the record is updated
* Send to Teams bot upon record is created
* Send me email when status changes
* Update records when status changes
* Send HTTP request to Zapier
You can also describe your own task in plain language:
* *"Calculate order total with 10% tax and update the record"*
* *"When a new support ticket is created, classify it by topic and assign it to the right team"*
* *"Every morning, check for overdue invoices and send reminder emails to customers"*
## Connecting third-party services
If your script needs a service such as Slack, Airtable, or Google Sheets, click the integration buttons at the top of the AI panel to connect your accounts. The AI will use these connections when generating code.
# Send email overview
Source: https://help.teable.ai/en/basic/automation/actions/communication/send-email-overview
Send customized emails from a workflow
We strongly recommend using Run script to build automations, because it can cover all action behaviors, including actions that would otherwise need to be built manually. Just describe your requirements to AI in chat.
Please note: if you add actions manually, AI will not recognize or modify them later.
## Build with AI
Open the AI Chat in your table's right sidebar and describe what you want.
AI handles everything: it picks the right trigger, chooses the appropriate actions, maps the fields, and configures the entire workflow automatically.
Describe the goal once, and the workflow is ready — no manual setup needed.
This action sends an email to one or more recipients. You can customize recipients, subject, body, and reply-to address, and use dynamic values from previous steps to personalize each message.
By default, emails are sent from Teable's built-in mail service. If you need to send from your own domain, configure a [custom SMTP server](/en/basic/automation/actions/communication/smtp-sender).
## Configuration
| Setting | Required | Description |
| - | - | - |
| To | Yes\* | Recipient email address(es). Separate multiple addresses with commas |
| Subject | Yes | The subject line. Supports dynamic variables via **+** |
| Body | Yes | The email body. Supports Markdown, HTML, and dynamic variables |
| Sender Name | No | The display name shown in the recipient's inbox (e.g., "Acme Support") |
| CC | No | Carbon copy recipients |
| BCC | No | Blind carbon copy recipients |
| Reply-To | No | The address recipients reply to (if different from the sender) |
| Custom email server | No | Sends this action through a specific SMTP account, leaving other automations untouched |
\* At least one of **To** or **BCC** is required.
**Rate limit:** 5 emails / second / project.
## How to set it up
1. Add a **Send Email** action to your workflow.
2. In the **To** field, enter a static email address or click **+** to insert a dynamic value (e.g., the Email field from the trigger record).
3. Write the **Subject**. Click **+** to include dynamic values like the record's name or a status. Example: `New order from {{Customer Name}} — #{{Order ID}}`.
4. Write the **Body**. You can use:
* **Plain text** — just type your message.
* **Markdown** — use `**bold**`, `*italic*`, `- lists`, `[links](url)`, etc.
* **HTML** — for full control over formatting, write HTML tags directly.
* **Dynamic variables** — click **+** anywhere in the body to insert values from previous steps.
5. (Optional) Set **Sender Name**, **CC**, **BCC**, or **Reply-To** as needed.
6. Save the action.
### Give this action its own SMTP
To send this one action through a different SMTP account, click **Add config** under **Custom email server** and fill in the host, port, username, and sender details.
The password is no longer typed in. Click **Select a secret** to pick one of the secrets granted to this automation, or **Add secret** to create one (default variable name `SMTP_PASSWORD`; a second SMTP account in the same workflow is numbered `SMTP_PASSWORD_2`). The action stores a reference, so the plain value never enters the workflow configuration and run history and exports show it masked.
**Reset** clears the config, and the action goes back to the default email server.
This dialog does not send a test email. Once it is configured, run the workflow once to confirm delivery.
## Using variables in subject and body
Variables let you personalize each email. Click the **+** button in any text field to open the variable picker. You can reference:
* **Trigger data:** fields from the record that triggered the automation (e.g., customer name, email, order amount).
* **Previous action output:** data from earlier steps, like a newly created Record ID or AI-generated text.
Example body with variables:
```
Hi {{Customer Name}},
Your order #{{Order ID}} has been confirmed.
**Total:** ${{Order Amount}}
**Estimated delivery:** {{Delivery Date}}
Thank you for your purchase!
```
## Body formatting options
| Format | How to use | Best for |
| - | - | - |
| Plain text | Just type your message | Simple notifications |
| Markdown | Use Markdown syntax (`**bold**`, `# heading`, etc.) | Structured messages with formatting |
| HTML | Write HTML tags (`
`, `
`, `
`, etc.) | Fully designed emails with custom layouts |
You can mix Markdown and dynamic variables in the same body. For complex email designs, HTML gives you the most control.
## When to use
* **Send order confirmations.** When a new order is created, send an email with the order details and a thank-you message.
* **Notify team members of status changes.** When a task moves to "Blocked", email the assignee and their manager.
* **Deliver scheduled reports.** Combine with a scheduled trigger and Get Records to email a weekly summary.
* **Send personalized outreach.** Use record data to customize subject and body for each recipient.
* **Confirm form submissions.** After a form is submitted, send the submitter a confirmation with their responses.
## Deliverability tips
* **Use a custom SMTP** if you are sending high-volume or business-critical emails. Teable's built-in service works for basic notifications, but emails from your own domain are more likely to land in the recipient's inbox.
* **Avoid spammy content** in your subject and body — excessive capitalization, exclamation marks, or link-heavy messages can trigger spam filters.
* **Set a Reply-To address** so recipients can respond to a real inbox rather than a no-reply address.
* **Test your emails** before activating the automation in production. Run the automation manually with test data to verify formatting and delivery.
## Related
* [Set up SMTP and sender](/en/basic/automation/actions/communication/smtp-sender) — send emails from your own domain
* [Loop (batch)](../logic/loop-run) — send emails in bulk by looping through a list of records
* [AI generate](/en/basic/automation/actions/ai/ai-generate) — generate personalized email content with AI
# Set up SMTP and sender
Source: https://help.teable.ai/en/basic/automation/actions/communication/smtp-sender
Configure a custom SMTP server and sender identity for automation emails
By default, automation emails are sent from Teable's built-in mail service. While this works for basic notifications, you may want to send emails from your own domain for branding, deliverability, or compliance reasons. Custom SMTP configuration lets you do exactly that.
When you configure a custom SMTP server, all emails sent by that action come from your own mail server and your own sender address — recipients see your domain, not Teable's.
## When to use custom SMTP
* **Send emails from your company domain** (e.g., `noreply@yourcompany.com` or `support@yourcompany.com`) so recipients recognize the sender.
* **Improve deliverability.** Emails from your own domain with proper SPF, DKIM, and DMARC records are less likely to land in spam.
* **Meet compliance requirements.** Some industries require that automated emails originate from an organization-controlled domain.
* **Use your existing email infrastructure.** Route emails through your company's mail server for logging, archival, or security scanning.
* **Higher sending limits.** Teable's built-in service has rate limits. Your own SMTP server may support higher throughput.
## Configuration
In the **Send Email** action, click the transport configuration option to set up a custom SMTP server:
| Setting | Required | Description |
| - | - | - |
| SMTP Host | Yes | Your mail server address (e.g., `smtp.gmail.com`) |
| Port | Yes | The SMTP port — usually 465 (SSL) or 587 (STARTTLS) |
| Username | Yes | SMTP account username (often your email address) |
| Password | Yes | SMTP account password or app-specific password |
| From Address | Yes | The sender email address shown to recipients |
## How to set it up
1. Open your automation and go to the **Send Email** action.
2. Click the **transport configuration** option (gear icon or link near the sender settings).
3. Enter your SMTP server details:
* **Host:** Your email provider's SMTP server address.
* **Port:** Use 465 for SSL/TLS or 587 for STARTTLS. If unsure, try 465 first.
* **Username:** Your email account or SMTP username.
* **Password:** Your email password or, for providers like Gmail, an app-specific password.
4. Set the **From Address** — this is what recipients see as the sender.
5. Click **Test** to verify the connection. Teable will attempt to send a test email through your SMTP server.
6. If the test succeeds, save the configuration. All emails from this action will now use your SMTP server.
## Common SMTP settings by provider
| Provider | Host | Port | Notes |
| - | - | - | - |
| **Gmail** | `smtp.gmail.com` | 465 | Requires an App Password (not your account password). See [Set up Gmail IMAP](../../trigger/email/gmail-imap) |
| **Outlook / Microsoft 365** | `smtp.office365.com` | 587 | Use your Microsoft account credentials |
| **Amazon SES** | `email-smtp.{region}.amazonaws.com` | 465 | Use SES SMTP credentials (not IAM credentials) |
| **SendGrid** | `smtp.sendgrid.net` | 465 | Username is `apikey`, password is your API key |
| **Mailgun** | `smtp.mailgun.org` | 465 | Use the SMTP credentials from your Mailgun domain settings |
| **Zoho Mail** | `smtp.zoho.com` | 465 | Use your Zoho account credentials |
| **Yahoo Mail** | `smtp.mail.yahoo.com` | 465 | Requires an App Password |
| **Postmark** | `smtp.postmarkapp.com` | 587 | Use your Postmark server API token as both username and password |
| **Custom / Self-hosted** | Your server address | Varies | Check with your IT team for host, port, and credentials |
## Common errors and fixes
When a run fails to send, open the workflow's **Run history** and check the output of the **Send Email** step. For a custom SMTP server, the step reports the rejection your mail server returned: its reply code, the SMTP command that failed, the rejected recipients, and the host. Match that against the causes below.
| Error | Likely Cause | Fix |
| - | - | - |
| **Connection refused** | Wrong host or port | Double-check the SMTP host and port. Try switching between 465 and 587 |
| **Authentication failed** | Wrong username or password | Verify credentials. For Gmail/Yahoo, use an App Password instead of your account password |
| **Certificate error / TLS handshake failed** | Port/encryption mismatch | Port 465 expects SSL; port 587 expects STARTTLS. Make sure the port matches your server's encryption |
| **Sender address rejected** | From Address does not match SMTP account | Some providers require the From Address to match the authenticated account. Check your provider's policy |
| **Rate limit exceeded** | Too many emails sent too quickly | Reduce sending frequency or upgrade your email plan. Use batch sending with delays if needed |
| **Timeout** | Firewall or network issue | Ensure your network allows outbound connections on the SMTP port. Self-hosted Teable users: check server firewall rules |
## Tips
* **Test before going live.** Always send a test email after configuring SMTP to confirm everything works.
* **Use app-specific passwords** for Gmail, Yahoo, and other providers that support two-factor authentication. Your regular account password will not work if 2FA is enabled.
* **Set up SPF, DKIM, and DMARC** on your domain's DNS records to improve email deliverability and prevent your emails from being flagged as spam.
* **Keep credentials secure.** SMTP passwords are stored encrypted in Teable, but avoid sharing automation configurations with sensitive credentials. When a single action is configured with its own SMTP account, its password is a secret granted to that automation; see [Send email](/en/basic/automation/actions/communication/send-email-overview).
* **Monitor delivery.** If emails stop arriving, check your SMTP provider's dashboard for bounced messages, rate limit warnings, or account issues.
For Gmail, use an App Password instead of your account password. See [Set up Gmail IMAP](../../trigger/email/gmail-imap) for how to create one.
## Related
* [Send email action](/en/basic/automation/actions/communication/send-email-overview) — the action that uses SMTP configuration
* [Set up Gmail IMAP](../../trigger/email/gmail-imap) — instructions for Gmail App Passwords
# HTTP request
Source: https://help.teable.ai/en/basic/automation/actions/logic/http-request
Call any external API from a workflow
We strongly recommend using Run script to build automations, because it can cover all action behaviors, including actions that would otherwise need to be built manually. Just describe your requirements to AI in chat.
Please note: if you add actions manually, AI will not recognize or modify them later.
## Build with AI
Open the AI Chat in your table's right sidebar and describe what you want.
AI handles everything: it picks the right trigger, chooses the appropriate actions, maps the fields, and configures the entire workflow automatically.
Describe the goal once, and the workflow is ready — no manual setup needed.
Sends an HTTP request to any URL and returns the response. Use it to call REST APIs, send notifications to Slack or Discord, push data to CRMs, or interact with any service that has an HTTP API.
## Configuration
| Setting | Required | Description |
| - | - | - |
| URL | Yes | The target endpoint. Supports dynamic variables via **+** |
| Method | Yes | GET, POST, PUT, PATCH, DELETE, or HEAD |
| Headers | No | Custom HTTP headers as key-value pairs |
| Content-Type | No | The format of the request body (see below) |
| Body | No | The request payload — text or key-value pairs depending on Content-Type |
## How to set it up
1. Add an **HTTP Request** action to your workflow.
2. Enter the **URL** of the API endpoint. You can use **+** to insert dynamic values (e.g., include a Record ID in the URL path).
3. Choose the **Method**:
* **GET** — retrieve data.
* **POST** — send data to create something.
* **PUT / PATCH** — update existing data.
* **DELETE** — remove data.
4. Add **Headers** if the API requires them (e.g., authorization tokens, custom headers).
5. Choose a **Content-Type** and write the **Body** if needed (for POST, PUT, PATCH).
6. Save the action.
## Content-Type options explained
| Content-Type | When to use | Body format |
| - | - | - |
| `application/json` | Most REST APIs. Send structured data | JSON text (e.g., `{"key": "value"}`) |
| `application/x-www-form-urlencoded` | Traditional form submissions, some legacy APIs | Key-value pairs, URL-encoded automatically |
| `multipart/form-data` | File uploads or mixed data | Key-value pairs with file support |
| `text/plain` | Simple text payloads | Plain text string |
If you are unsure which Content-Type to use, choose `application/json`. Most modern APIs use JSON.
If you are unsure which to use, `application/json` is the right choice for most modern APIs.
## Authentication examples
Many APIs require authentication. Here are common patterns you can set up in the Headers section:
### Bearer Token
Add a header:
* **Key:** `Authorization`
* **Value:** `Bearer your-api-token-here`
This works for APIs like Slack, GitHub, Notion, and many others.
### API Key in header
Add a header:
* **Key:** `X-API-Key` (or whatever the API expects, e.g., `api-key`, `x-api-token`)
* **Value:** `your-api-key`
### Basic Authentication
Add a header:
* **Key:** `Authorization`
* **Value:** `Basic base64encoded(username:password)`
You will need to Base64-encode your credentials outside of Teable or use a Script action to generate the header value.
## Concrete example: send a Slack notification
Goal: Post a message to a Slack channel when a new record is created.
1. **Trigger:** When record created.
2. **Action:** HTTP Request with:
* **URL:** `https://hooks.slack.com/services/T00/B00/xxxx` (your Slack webhook URL)
* **Method:** POST
* **Content-Type:** `application/json`
* **Body:**
```json theme={null}
{
"text": "New task created: {{Task Name}} — Priority: {{Priority}}"
}
```
Replace `{{Task Name}}` and `{{Priority}}` with dynamic variables from the trigger by clicking **+**.
## Using response data in next steps
After the HTTP request runs, the response is available to subsequent actions:
* **Status code** — the HTTP status (200, 201, 404, etc.).
* **Response body** — the data returned by the API, parsed as JSON if applicable.
You can reference specific fields from the response using the **+** variable picker in later steps. For example, if the API returns `{"id": "abc123", "status": "created"}`, you can reference `id` and `status` individually. When inserting dynamic values with **+**, you can also use field paths and formatting options when an external API requires a specific request format.
This is useful for chaining API calls — for example, create something via POST, get back an ID, then use that ID in a subsequent Update Record or another HTTP request.
## When to use
* **Post messages to Slack or Discord.** Send notifications to channels using incoming webhook URLs.
* **Sync data with a CRM or ERP.** Push new or updated records to Salesforce, HubSpot, or any system with an API.
* **Call any third-party API.** Interact with payment processors, shipping services, analytics tools, or custom internal APIs.
* **Trigger external workflows.** Call Zapier webhooks, Make (Integromat) scenarios, or other automation platforms.
* **Fetch data from external sources.** Use GET requests to pull exchange rates, weather data, or any public API data into your workflow.
## Tips
* Always check the API's documentation for required headers, authentication, and expected body format.
* Use `application/json` as the Content-Type for most modern APIs. If the API expects form data, switch to `x-www-form-urlencoded`.
* If the API returns an error (4xx or 5xx status), the action still completes — but subsequent steps will see the error response. Check the status code in your workflow if you need conditional handling.
* For APIs that return large responses, only reference the specific fields you need in subsequent steps.
* Combine with [Loop (Batch)](/en/basic/automation/actions/logic/loop-run) to make multiple API calls, one per record. Be mindful of the external API's rate limits.
* Use the [HTTP Array Body](/en/basic/automation/actions/logic/loop-run) feature when you need to send multiple items in a single request instead of one request per item.
## Related
* [Loop (batch)](/en/basic/automation/actions/logic/loop-run) — make HTTP requests for each item in an array
* [When webhook received](/en/basic/automation/trigger/external/webhook-received) — the inbound counterpart: receive HTTP requests from external systems
* [Run script](/en/basic/automation/ai/scripting/runscript) — for more complex API interactions with custom code
# Loop (batch)
Source: https://help.teable.ai/en/basic/automation/actions/logic/loop-run
Process multiple items in one action by iterating over an array
We strongly recommend using Run script to build automations, because it can cover all action behaviors, including actions that would otherwise need to be built manually. Just describe your requirements to AI in chat.
Please note: if you add actions manually, AI will not recognize or modify them later.
Loop lets you run an action **once per item** in an array. Instead of processing a single record or sending a single email, Loop repeats the action for every item in a list — creating records in bulk, sending personalized emails to a list of contacts, or making API calls for each item.
Items are processed in order, and the results from all iterations are returned as an array that subsequent steps can use.
## Supported actions
| Action | Loop Support |
| - | - |
| Create Record | Yes |
| Update Record | Yes |
| Send Email | Yes |
| HTTP Request | Yes |
| AI Generate | Yes |
## Where arrays come from
To use Loop, you need an array as input. Common sources include:
| Source | What you get |
| - | - |
| **Get Records** action | An array of records from a table query |
| **Webhook received** trigger | The JSON body may contain arrays (e.g., a list of order items) |
| **AI Generate** action (JSON output) | The AI can return an array of structured items |
| **HTTP Request** action | An API response that contains an array |
| **Script** action | A script can output any array via `output.set()` |
## How to set it up
1. Open a supported action (e.g., Create Record, Send Email).
2. Click **Loop Run** below the table selector (or in the action configuration area).
3. In the data source picker, select an **array variable** from a previous step. For example, the records array from a Get Records step.
4. The field mapping area now shows the properties of each individual item (not the full array). Click **+** to reference properties of the **current item** — for example, the current record's Name, Email, or Status.
5. Save the action. When the workflow runs, the action executes once per item in the array.
## How to reference the current item
When Loop is active, the **+** variable picker shows properties of the current item in the iteration. For example:
* If looping over Get Records output, you can reference `current item → fields → Name`, `current item → fields → Email`, etc.
* If looping over a webhook array, you can reference `current item → product_name`, `current item → quantity`, etc.
This is different from non-loop mode, where you reference the full array or a specific index.
## Concrete example: send reminder emails to overdue tasks
1. **Trigger:** At scheduled time — every day at 9:00 AM.
2. **Action 1:** Get Records — from Tasks table, filter: Due Date is before today AND Status is not "Done".
3. **Action 2:** Send Email with **Loop** enabled, data source = Action 1's records array.
* **To:** current item's Assignee Email field.
* **Subject:** `Reminder: "{{current item → Task Name}}" is overdue`
* **Body:** `Hi {{current item → Assignee Name}}, your task "{{current item → Task Name}}" was due on {{current item → Due Date}}. Please update it.`
Result: one personalized email per overdue task.
## HTTP Array Body
For HTTP Request actions, Loop offers a special **Array Body** mode. Instead of sending one HTTP request per item (which can be slow and hit rate limits), Array Body sends the **entire array as a single JSON array** in one request.
This is useful when the external API supports batch operations — for example, creating multiple records in one API call or sending a batch of events to an analytics service.
To use Array Body:
1. Enable Loop on an HTTP Request action.
2. Choose **Array Body** mode instead of the default per-item mode.
3. The entire array is serialized as a JSON array and sent in the request body.
## Performance considerations
* Loop processes items **sequentially**, not in parallel. A loop over 100 items will take roughly 100 times as long as a single execution.
* For large arrays (hundreds or thousands of items), consider whether the external action can handle batch input. Use HTTP Array Body when the API supports it.
* If you are looping over Get Records output and making HTTP requests for each record, be mindful of the external API's rate limits.
* For very large datasets, consider breaking the work into smaller batches using pagination in Get Records (Skip/Take), with multiple automation runs.
## When to use
* **Bulk-create records.** Get records from one table, loop to create corresponding records in another table.
* **Send personalized emails to a list.** Get a list of contacts, loop to send each one a customized email.
* **Update multiple records.** Get records that match a condition, loop to update each one (e.g., mark all overdue tasks as "Escalated").
* **Make API calls for each record.** Push each record's data to an external system, one at a time.
* **AI-process a batch of records.** Loop over records and use AI Generate to classify, summarize, or extract data from each one.
## Tips
* Always check the size of your array before enabling Loop. If Get Records returns 1,000 records, your loop will run 1,000 times.
* If your loop creates or updates records in the same table that triggered the automation, be careful about re-triggering the automation. Use filters on the trigger to avoid loops.
* The results of all loop iterations are available as an array in subsequent steps, but for very large loops, this array can be large. Reference only what you need.
## Related
* [Get records](/en/basic/automation/actions/records/get-records) — the most common source of arrays for Loop
* [Create record](/en/basic/automation/actions/records/create-record) — commonly used inside a Loop to bulk-create records
* [HTTP request](/en/basic/automation/actions/logic/http-request) — commonly used inside a Loop for per-item API calls
* [Send email](/en/basic/automation/actions/communication/send-email-overview) — commonly used inside a Loop for bulk email sends
# Conditional logic
Source: https://help.teable.ai/en/basic/automation/actions/manual/conditional-logic
Add if/else branching to control which actions run
We strongly recommend using Run script to build automations, because it can cover all action behaviors, including actions that would otherwise need to be built manually. Just describe your requirements to AI in chat.
Please note: if you add actions manually, AI will not recognize or modify them later.
Conditions let you add decision points. The workflow splits into a **true** path and a **false** path.
## How to Use
1. Add a **Condition** node between steps.
2. Define one or more rules.
3. Click **Test** to validate.
## Operators by Field Type
### Text
| Operator | Meaning |
| - | - |
| is / is not | Exact match |
| contains / does not contain | Substring match |
| is empty / is not empty | Null check |
### Number
| Operator | Meaning |
| - | - |
| = / ≠ | Equal / not equal |
| > / ≥ / \< / ≤ | Comparison |
| is empty / is not empty | Null check |
### Date
| Operator | Meaning |
| - | - |
| is / is not | Exact date |
| is before / is after | Comparison |
| is on or before / is on or after | Inclusive |
| is within | Relative range |
| is empty / is not empty | Null check |
**Relative dates:** today, tomorrow, yesterday, one week ago/from now, one month ago/from now, X days ago/from now.
**Ranges (for "is within"):** past/next week, past/next month, past/next year, past/next N days.
### Single Select / Multiple Select
| Operator | Meaning |
| - | - |
| has any of / has all of / has none of | Set membership |
| is exactly / is not exactly | Exact match |
| is empty / is not empty | Null check |
### Boolean
| Operator |
| - |
| is (true / false) |
## Combining Rules
* **AND** — all rules must be true
* **OR** — any rule can be true
* **NOT** — negate a rule or group
Groups can be nested:
```
(status is "Active" OR status is "Pending")
AND amount > 1000
```
# Create record
Source: https://help.teable.ai/en/basic/automation/actions/records/create-record
Create a new record in any table as part of a workflow
We strongly recommend using Run script to build automations, because it can cover all action behaviors, including actions that would otherwise need to be built manually. Just describe your requirements to AI in chat.
Please note: if you add actions manually, AI will not recognize or modify them later.
## Build with AI
Open the AI Chat in your table's right sidebar and describe what you want.
AI handles everything: it picks the right trigger, chooses the appropriate actions, maps the fields, and configures the entire workflow automatically.
Describe the goal once, and the workflow is ready — no manual setup needed.
Creates a new record in a specified table. You can map data from previous steps into the new record's fields. After creation, the new Record ID and all field values are available to subsequent steps.
## Configuration
| Setting | Required | Description |
| - | - | - |
| Table | Yes | The target table where the new record will be created |
| Fields | Yes | Map each field to a value — static text/numbers or dynamic variables from previous steps |
## How to set it up
1. Add a **Create Record** action to your workflow.
2. Choose the **Table** where you want the record created. By default this is a table in the same project, but you can use [Cross-Project Access](/en/basic/automation/actions/records/cross-base) to target a table in another project.
3. The field mapping area shows all fields in the target table. For each field you want to fill:
* **Static value:** Type a value directly into the field (e.g., type "New" for a Status field).
* **Dynamic value:** Click the **+** button next to the field to insert a variable from a previous step. For example, insert the trigger's "Name" field to copy the name from the triggering record.
4. You can mix static and dynamic values. For example, set Status to the static value "Pending" while setting Customer Name to a dynamic value from the trigger.
5. Save the action.
You can combine multiple variables in a single text field. For example, insert `Trigger record's Customer Name - Trigger record's Order ID` into a "Summary" field.
## What happens with required fields
If a required field has a default value and you leave it unmapped, Teable fills the default value when the record is created. If a required field has no default value, or a mapped value is empty at runtime, the action fails.
To check which fields are required, look at the field configuration in your target table. Required fields are typically marked with an asterisk or a "Required" label.
## Output: using the created record in later steps
After the Create Record action runs, the newly created record is available to all subsequent steps. This includes:
* **Record ID** — the unique identifier assigned to the new record.
* **All field values** — every field value of the created record, including any auto-calculated or default values.
This is useful when you need to chain actions. For example: create a record, then immediately send an email that includes a link to that record, or update a related record with the new Record ID.
## When to use
* **Log form submissions into a separate table.** When a form is submitted, create a record in a "Submissions Log" table with the submitted data plus a timestamp.
* **Create follow-up tasks automatically.** When a project is created, create a set of default tasks in a related Tasks table.
* **Duplicate records across tables.** Copy data from one table to another — for example, moving a lead from "Prospects" to "Active Clients" when a deal closes.
* **Generate records from external data.** When a webhook delivers order data, create a new record in your Orders table with the order details.
* **Create audit trail entries.** After any automation runs, create a record in an Audit Log table documenting what happened.
## Tips
* If you are creating records in the same table that has a **When record created** trigger, be careful about infinite loops. Use a filter on the trigger to exclude automation-created records (e.g., check for a "Source" field set to "Automation").
* You can create records in bulk by combining this action with [Loop (Batch)](../logic/loop-run). For example, get 50 records from one table and create 50 corresponding records in another.
* Fields you do not map will use the table's default values (if any) or remain empty.
* Linked record fields expect Record IDs, not display values. If you need to link to a record, make sure you are passing the Record ID, not the record's name.
* Use [Cross-Project Access](/en/basic/automation/actions/records/cross-base) when the target table is in a different project than the automation.
## Related
* [Update record](/en/basic/automation/actions/records/update-record) — modify existing records instead of creating new ones
* [Get records](/en/basic/automation/actions/records/get-records) — retrieve records to use as input for creating new ones
* [Cross-project access](/en/basic/automation/actions/records/cross-base) — create records in tables outside the current project
* [Loop (batch)](../logic/loop-run) — create multiple records in a single action step
# Cross-project access
Source: https://help.teable.ai/en/basic/automation/actions/records/cross-base
Read and write data across different projects in a single workflow
We strongly recommend using Run script to build automations, because it can cover all action behaviors, including actions that would otherwise need to be built manually. Just describe your requirements to AI in chat.
Please note: if you add actions manually, AI will not recognize or modify them later.
By default, automation actions operate on tables within the workflow's own project. Cross-Project Access lets a workflow read from and write to another project. Use it for workflows that span departments, projects, or datasets.
For example, a Sales project automation can create a fulfillment record in a separate Operations project, or a reporting workflow can pull data from multiple projects into a single summary.
## Supported actions
| Action | Cross-Project Support |
| - | - |
| Create Record | Yes |
| Update Record | Yes |
| Get Records | Yes |
These are the three record-oriented actions. Other actions (Send Email, HTTP Request, etc.) do not need cross-project access because they do not target a specific table.
## How to set it up
1. Open a supported action (Create Record, Update Record, or Get Records) in your workflow.
2. Next to the **Table** selector, click **Cross-Project Access**.
3. A panel opens showing all spaces and projects your account can access. Select the target **Space**, then the target **Project**.
4. Choose the **Table** within that project. If the action supports it, you can also select a specific **View**.
5. Map fields and configure the action as usual. The field list now reflects the target table's fields, not the current project's fields.
6. Save the action.
## Concrete example: Sales to Fulfillment
Imagine you have two projects:
* **Sales Project** — contains a "Deals" table where the sales team tracks closed deals.
* **Operations Project** — contains a "Fulfillment" table where the ops team manages shipping.
You want to automatically create a fulfillment record when a deal closes:
1. **Trigger:** In the Sales Project, use "When record matches conditions" with filter: `Stage` equals `Closed Won`.
2. **Action:** Create Record with Cross-Project Access pointing to the Operations Project > Fulfillment table.
3. **Field mapping:** Map the deal's Customer Name, Product, Quantity, and Shipping Address to the corresponding fields in the Fulfillment table.
Now, every time a deal closes, a fulfillment record is automatically created in the Operations Project — no manual handoff needed.
## Permission model
When you create, edit, or apply workflow updates, Teable checks each cross-project action against the current editor's permissions:
| Action | Required permission on the target project |
| - | - |
| Get Records | Read fields and records |
| Create Record | Read fields and records, plus create records |
| Update Record | Read fields and records, plus update records |
Active workflow runs use Teable's automation runtime identity for the target project. Records created or updated by a cross-project action appear as **Automation Robot** in record metadata and audit surfaces.
### What happens when access changes
If the current editor does not have the required permission on the target project, Teable blocks that editor from adding or changing cross-project actions that point to that project. If a draft already contains cross-project actions the editor cannot access, Teable also blocks applying that draft. The already active version keeps running; Teable checks permissions again the next time someone edits or applies the workflow.
To fix a permission error while editing or applying a workflow:
1. Ask someone with access to both projects to edit and apply the workflow.
2. Or restore the required permissions on the target project, then apply the workflow again.
## Tips
* Cross-project access can reach projects in different **Spaces**. The editor configuring or applying the workflow must have the required target-project permissions.
* When mapping fields across projects, field types must be compatible. For example, you cannot map a text field to an attachment field.
* If you restructure a target project (rename tables, delete fields), the cross-project actions referencing those tables and fields will break. Update your workflow after making structural changes.
* For complex cross-project workflows, consider centralizing your automations in one "hub" project to keep things organized.
## Related
* [Create record](/en/basic/automation/actions/records/create-record) — create records in the current or another project
* [Update record](/en/basic/automation/actions/records/update-record) — update records in the current or another project
* [Get records](/en/basic/automation/actions/records/get-records) — retrieve records from the current or another project
# Get records
Source: https://help.teable.ai/en/basic/automation/actions/records/get-records
Retrieve records from a table with optional filters and pagination
We strongly recommend using Run script to build automations, because it can cover all action behaviors, including actions that would otherwise need to be built manually. Just describe your requirements to AI in chat.
Please note: if you add actions manually, AI will not recognize or modify them later.
## Build with AI
Open the AI Chat in your table's right sidebar and describe what you want.
AI handles everything: it picks the right trigger, chooses the appropriate actions, maps the fields, and configures the entire workflow automatically.
Describe the goal once, and the workflow is ready — no manual setup needed.
Retrieves records from a table and returns them as an array. Use the results in later steps to loop through records, pass data to a script, or feed into other actions.
## Configuration
| Setting | Required | Description |
| - | - | - |
| Table | Yes | The table to query |
| View | No | Limit results to records visible in a specific view (inherits the view's filters, sorts, and hidden fields) |
| Filter | No | Additional filter conditions applied on top of any view filter |
| Skip | No | Number of records to skip from the beginning (for pagination) |
| Take | No | Maximum number of records to return (for pagination) |
## How to set it up
1. Add a **Get Records** action to your workflow.
2. Choose the **Table** you want to query. Use [Cross-Project Access](/en/basic/automation/actions/records/cross-base) if the table is in a different project.
3. (Optional) Select a **View** to inherit that view's filter, sort, and field visibility settings.
4. (Optional) Add **Filter** conditions to narrow the results. For example, `Status` equals `Active` and `Due Date` is before today.
5. (Optional) Set **Skip** and **Take** for pagination. For example, Skip 0 and Take 100 to get the first 100 records.
6. Save the action. When the workflow runs, the results will be available as an array for subsequent steps.
## Output: working with the results
The output is an **array of records**. Each record in the array contains:
* **Record ID** — the unique identifier.
* **All field values** — every field in the table (or view, if you selected one).
### Using results in the next step
* **Reference a single record:** If you only expect one result (or want the first one), you can reference fields from the first record directly using the **+** variable picker.
* **Loop through all records:** Add a [Loop (Batch)](../logic/loop-run) action after Get Records and select the results array as the data source. Inside the loop, reference each item's fields.
* **Process in a script:** Pass the array to a [Run script](/en/basic/automation/actions/ai/ai-script) step for custom processing, filtering, or transformation.
## Pagination
If you do not set **Skip** and **Take**, the action returns records up to the system default limit. For large tables, use pagination to control the result size:
| Setting | Purpose | Example |
| - | - | - |
| Skip | How many records to skip from the start | `0` (start from the beginning) |
| Take | How many records to return | `100` (return 100 records) |
To process an entire large table, you could use multiple Get Records steps with increasing Skip values, or handle pagination in a script.
## When to use
* **Find overdue tasks to send reminders.** Filter for tasks where Due Date is before today and Status is not "Done". Loop through the results and send an email for each.
* **Gather data for a daily digest.** Retrieve all records updated in the last 24 hours and compile them into a summary email.
* **Look up related records before creating or updating.** Before creating a duplicate, check if a record with the same email already exists.
* **Feed data into an AI action.** Get records with long text fields, then use AI Generate in a loop to summarize or classify each one.
* **Sync records to an external system.** Get all records that have changed since the last sync, then push them to a CRM or data warehouse via HTTP requests.
## Tips
* **Use filters.** The more specific your filter, the fewer records are returned and the faster the action runs.
* **Limit results with Take.** If you only need the first 10 records, set Take to 10. There is no need to retrieve thousands of records when you only need a few.
* **Select a View** that already filters and sorts the data you need. This keeps your automation configuration simpler.
* **Avoid fetching the entire table** unless you genuinely need all records. Large result sets take longer to process and use more resources, especially when combined with Loop.
* Get Records does not modify any data — it is read-only.
* If the query returns zero records, subsequent steps referencing the results will receive an empty array. Make sure your workflow handles this gracefully (e.g., do not send an email saying "here are your results" when there are no results).
* Filters in Get Records work the same as view filters: you can combine conditions with AND/OR logic.
* When using Cross-Project Access, the query runs under the workflow creator's permissions. If the creator loses access to the target project, the step will fail.
## Related
* [Cross-project access](/en/basic/automation/actions/records/cross-base) — query tables in other projects
* [Loop (batch)](../logic/loop-run) — iterate over the results array
* [Create record](/en/basic/automation/actions/records/create-record) — create records based on retrieved data
* [Update record](/en/basic/automation/actions/records/update-record) — update records found by Get Records
# Update record
Source: https://help.teable.ai/en/basic/automation/actions/records/update-record
Modify fields in an existing record as part of a workflow
We strongly recommend using Run script to build automations, because it can cover all action behaviors, including actions that would otherwise need to be built manually. Just describe your requirements to AI in chat.
Please note: if you add actions manually, AI will not recognize or modify them later.
## Build with AI
Open the AI Chat in your table's right sidebar and describe what you want.
AI handles everything: it picks the right trigger, chooses the appropriate actions, maps the fields, and configures the entire workflow automatically.
Describe the goal once, and the workflow is ready — no manual setup needed.
Updates one or more fields in an existing record. Only the fields you map will change — everything else stays the same.
## Configuration
| Setting | Required | Description |
| - | - | - |
| Table | Yes | The table containing the record to update |
| Record ID | Yes | Which record to update. Supports dynamic variables and comma-separated IDs for multiple records |
| Fields | Yes | Map each field to its new value — static or dynamic |
## How to set it up
1. Add an **Update Record** action to your workflow.
2. Choose the **Table** that contains the record you want to modify.
3. Set the **Record ID**. Click **+** to insert a dynamic variable:
* From a **record trigger** (created, updated, button clicked): the trigger provides the Record ID directly.
* From a **Get Records** action: reference the Record ID from the retrieved results.
* You can also type a static Record ID or use a comma-separated list to update multiple records at once (e.g., `rec123,rec456,rec789`).
4. Map the fields you want to change. For each field:
* **Static value:** Type the new value directly.
* **Dynamic value:** Click **+** to insert a value from a previous step.
5. Leave fields you do not want to change unmapped — they will keep their current values.
6. Save the action.
## How to get the Record ID
The Record ID is the key piece of information this action needs. Here is where to find it depending on your trigger:
| Trigger / Previous Step | How to get Record ID |
| - | - |
| When record created | Available directly as a trigger output variable |
| When record updated | Available directly as a trigger output variable |
| When button clicked | Available directly — it is the row where the button was clicked |
| When form submitted | Available directly — it is the record created by the submission |
| Get Records action | Each record in the results has an ID. In a Loop, reference the current item's ID |
| Webhook received | You must include the Record ID in the webhook payload, or look it up with Get Records |
Need to update multiple records at once? You can pass comma-separated Record IDs, or use [Loop (Batch)](../logic/loop-run) with a Get Records result to update records in bulk.
## Partial updates
This action performs a partial update. This means:
* **Mapped fields** are overwritten with the new values you specify.
* **Unmapped fields** are left exactly as they are.
You do not need to re-send all field values — just the ones you want to change. This is safe and efficient.
## Warning: trigger loops
If your workflow uses a "When record updated" trigger and a subsequent step updates the same watched fields in the same table, the workflow will fire again, creating an infinite loop.
If your automation is triggered by **When record updated** and your Update Record action writes back to the **same table**, you can create an infinite loop:
1. Record changes → trigger fires → automation updates the record → trigger fires again → and so on.
**How to prevent loops:**
* **Watch specific fields** on the trigger that are *different* from the fields you update. For example, watch "Status" but update "Processed Date".
* **Add a filter** to the trigger. For example, trigger only when `Processed` is not `true`, and set `Processed` to `true` in your action.
* Consider using [When record matches conditions](/en/basic/automation/trigger/records/record-matches-conditions) instead, which only fires on state transitions.
## When to use
* **Mark a task as complete after approval.** When a button is clicked, set Status to "Approved" and fill in the approval date.
* **Update a status field based on external events.** When a webhook reports a payment, find the order record and update its status to "Paid".
* **Write a timestamp when something changes.** When a record is updated, set a "Last Modified By Automation" date field to the current time.
* **Sync data back from an external system.** After calling an external API, write the response data (e.g., a tracking number) back into the record.
* **Batch-update records.** Combine with Get Records and Loop to update multiple records at once — for example, marking all overdue tasks as "Escalated".
## Tips
* Updating a record may trigger other automations watching the same table. Be aware of cascading effects.
* When updating multiple records with comma-separated IDs, all records receive the same field values. For different values per record, use a [Loop](../logic/loop-run) step instead.
* If you need to clear a field, map it to an empty value. Simply leaving it unmapped will *not* clear it.
* Use [Cross-Project Access](/en/basic/automation/actions/records/cross-base) to update records in a table that lives in a different project.
## Related
* [Create record](/en/basic/automation/actions/records/create-record) — add new records instead of modifying existing ones
* [Get records](/en/basic/automation/actions/records/get-records) — retrieve records to find their IDs before updating
* [Cross-project access](/en/basic/automation/actions/records/cross-base) — update records in tables outside the current project
* [Loop (batch)](../logic/loop-run) — update multiple records with different values
# Run script
Source: https://help.teable.ai/en/basic/automation/ai/scripting/runscript
Run custom JavaScript in a secure sandbox for logic that goes beyond built-in actions
We strongly recommend using Run script to build automations, because it can cover all action behaviors, including actions that would otherwise need to be built manually. Just describe your requirements to AI in chat.
Please note: if you add actions manually, AI will not recognize or modify them later.
The Run script action lets you write custom JavaScript to handle logic that built-in actions cannot cover. You can transform data, call external APIs, perform calculations, implement conditional branching, and more — all within a secure sandbox environment.
Scripts receive data from previous steps via the `input` object and pass results to subsequent steps via the `output.set()` function.
## When to use Run script vs. built-in actions
| Scenario | Use built-in actions | Use Run script |
| - | - | - |
| Create, update, or get records | Yes | Only if you need complex logic around it |
| Send a simple email | Yes | No |
| Call a single API endpoint | Yes (HTTP Request) | Only if you need to process the response in complex ways |
| Transform data between steps | Sometimes | Yes — when you need conditional logic, loops, or string manipulation |
| Parse complex JSON structures | No | Yes |
| Calculate dates, format numbers | No | Yes |
| Chain multiple API calls with logic | Awkward with built-in | Yes |
| Implement business rules with many conditions | Not practical | Yes |
In general, use built-in actions when they fit your needs. Use Run script when you need custom logic, data transformation, or complex API interaction.
## Environment
| Property | Value |
| - | - |
| Language | JavaScript (ES6+), top-level `await` supported |
| Runtime | Secure sandbox with a 60-second timeout |
| Modules | CommonJS (`require()`), npm packages supported |
| Network | HTTP requests via `fetch()` |
## How to set it up
1. Add a **Run script** action to your workflow.
2. The script editor opens with a blank canvas. Write your JavaScript code here.
3. Your script can read data from previous steps using the `input` object (see below).
4. Use `output.set(key, value)` to pass results to subsequent steps.
5. (Optional) Add npm dependencies in the configuration panel if your script needs external libraries.
6. Click **Test** to run the script with real data from the most recent trigger execution.
7. Check the test output and console logs to verify your script works correctly.
8. Save the action.
## Reading input data
The `input` object contains data from all previous steps in the workflow. Each step is identified by its action ID.
### Input structure
```javascript theme={null}
// input is an object keyed by action IDs
// Each key contains the output of that step
const actionIds = Object.keys(input);
// actionIds might be: ["triggerStep1", "actionStep2", "actionStep3"]
```
### Getting trigger data (record fields)
```javascript theme={null}
const actionIds = Object.keys(input);
const triggerData = input[actionIds[0]]; // First entry is usually the trigger
// For record-based triggers (created, updated, button clicked, form submitted):
const recordId = triggerData.record.id;
const fields = triggerData.record.fields;
// Access specific fields by field ID
const customerName = fields.fldXXXXXXX; // Replace with actual field ID
const orderAmount = fields.fldYYYYYYY;
```
### Getting data from a Get Records step
```javascript theme={null}
const actionIds = Object.keys(input);
const getRecordsData = input[actionIds[1]]; // Second step, for example
const records = getRecordsData.records;
records.forEach(record => {
console.log(record.id, record.fields.fldName);
});
```
### Getting data from other action outputs
```javascript theme={null}
const actionIds = Object.keys(input);
const previousOutput = input[actionIds[2]]; // Third step output
// The structure depends on what that action outputs
```
Use `console.log(JSON.stringify(input, null, 2))` during testing to see the exact structure of your input data. This is the fastest way to understand what is available.
## Writing output
Use `output.set(key, value)` to make data available to subsequent steps. You can set multiple keys.
```javascript theme={null}
// Set simple values
output.set("status", "success");
output.set("count", 42);
// Set objects
output.set("result", {
name: "Alice",
score: 95,
passed: true
});
// Set arrays
output.set("items", [
{ id: 1, name: "Item A" },
{ id: 2, name: "Item B" }
]);
```
Each key you set becomes a separate variable that subsequent steps can reference via the **+** variable picker. For example, if you call `output.set("status", "success")`, the next step can reference `status` from this script's output.
## Debugging with console.log
During development, use `console.log()` to inspect data and track execution flow. Log output appears in the test panel when you click **Test**.
```javascript theme={null}
const actionIds = Object.keys(input);
console.log("Action IDs:", actionIds);
const data = input[actionIds[0]];
console.log("Trigger data:", JSON.stringify(data, null, 2));
// Log intermediate results
const processed = data.record.fields.fldName.toUpperCase();
console.log("Processed name:", processed);
output.set("name", processed);
```
Console logs are only visible during testing — they do not appear in production run history. Use them liberally while building your script.
## npm package management
You can use npm packages in your scripts. Declare dependencies in the configuration panel:
```json theme={null}
[
{ "name": "lodash", "version": "4.17.21" },
{ "name": "dayjs", "version": "1.11.10" }
]
```
Then use them in your script with `require()`:
```javascript theme={null}
const _ = require("lodash");
const dayjs = require("dayjs");
const actionIds = Object.keys(input);
const records = input[actionIds[0]].records;
const grouped = _.groupBy(records, r => r.fields.fldCategory);
const today = dayjs().format("YYYY-MM-DD");
output.set("grouped", grouped);
output.set("date", today);
```
Prefer built-in JavaScript features over npm packages when possible. Modern JavaScript has many utilities built in — `Array.map()`, `Array.filter()`, `Object.entries()`, template literals, destructuring, etc. Only add npm packages when they provide significant value.
## Built-in variables
| Variable | Description |
| - | - |
| `process.env.AUTOMATION_TOKEN` | A Bearer token for calling the Teable API. Scoped to the current automation's permissions |
| `process.env.PUBLIC_ORIGIN` | The base URL of your Teable instance (e.g., `https://app.teable.io`) |
### Security: AUTOMATION\_TOKEN scope
The `AUTOMATION_TOKEN` is automatically generated for each automation run. It has the same permissions as the automation creator and is scoped to the current execution. Key points:
* It can access any table the automation creator has access to.
* It is valid only for the duration of the script execution (60-second timeout).
* Do not expose this token to external systems — it is meant for calling the Teable API from within your script.
### Calling the Teable API
```javascript theme={null}
const base = process.env.PUBLIC_ORIGIN + "/api";
const token = process.env.AUTOMATION_TOKEN;
// Example: get records from a table
const res = await fetch(`${base}/table/tblXXXXXXX/record?take=10`, {
headers: {
Authorization: `Bearer ${token}`,
"Content-Type": "application/json"
}
});
const data = await res.json();
console.log("Fetched records:", data);
output.set("records", data);
```
### Calling AI from a script
`POST /api/automation/runtime/ai` sends a prompt to your project's AI model. The project comes from the automation's context, so no project ID is needed. The body takes `prompt`, plus optional `attachments`, `modelKey`, `temperature`, and `outputType`; the response is `{ "message": ... }`.
Attachments are `{ url, mimetype, name }` items, up to 10 per call, each under 20MB and 30 seconds to download, covering images, PDFs, and Office documents. The default chat model may not read images and similar attachments, so pass `modelKey` when you send files. Each call consumes credits.
## Error handling
Always wrap risky operations in try/catch blocks so your workflow can handle failures gracefully:
```javascript theme={null}
try {
const res = await fetch("https://api.example.com/data");
if (!res.ok) {
throw new Error(`API returned ${res.status}: ${res.statusText}`);
}
const data = await res.json();
output.set("success", true);
output.set("data", data);
} catch (error) {
console.log("Error:", error.message);
output.set("success", false);
output.set("error", error.message);
}
```
Without error handling, a failed fetch or unexpected data format will crash the script, and subsequent steps will not receive any output.
## Complete example: process and route support tickets
```javascript theme={null}
const actionIds = Object.keys(input);
const record = input[actionIds[0]].record;
const subject = record.fields.fldSubject || "";
const body = record.fields.fldBody || "";
const email = record.fields.fldEmail || "";
// Simple keyword-based routing
const text = (subject + " " + body).toLowerCase();
let category = "General";
let priority = "Normal";
if (text.includes("billing") || text.includes("invoice") || text.includes("payment")) {
category = "Billing";
} else if (text.includes("bug") || text.includes("error") || text.includes("crash")) {
category = "Technical";
priority = "High";
} else if (text.includes("cancel") || text.includes("refund")) {
category = "Account";
priority = "High";
}
// Check for VIP customers
const vipDomains = ["bigcorp.com", "enterprise.io"];
const domain = email.split("@")[1] || "";
if (vipDomains.includes(domain)) {
priority = "Urgent";
}
output.set("category", category);
output.set("priority", priority);
output.set("isVIP", vipDomains.includes(domain));
```
## Tips
* **Start with console.log.** When building a new script, log the entire `input` object first to understand its structure.
* **Keep scripts focused.** Do one thing well rather than cramming multiple tasks into one script. Chain multiple Run script actions if needed.
* **Mind the 60-second timeout.** Long-running operations (large data processing, many sequential API calls) can hit the timeout. Break large tasks into smaller chunks.
* **Test with real data.** The test panel uses actual data from the most recent trigger execution, giving you realistic results.
* **Handle missing data.** Use default values (`||` operator) for fields that might be empty or undefined.
## Related
* [AI generate](/en/basic/automation/actions/ai/ai-generate) — for prompt-based AI tasks that do not need custom code
* [HTTP request](/en/basic/automation/actions/logic/http-request) — for simple API calls that do not need scripting
# Auto-classify new form entries with AI
Source: https://help.teable.ai/en/basic/automation/examples/ai-classify-forms
Use AI Generate to automatically categorize form submissions
We recommend building automation examples directly in AI chat. Just describe the workflow you want, and AI will handle the full setup for you, including the trigger, actions, script, and configuration.
## Build with AI
Open the AI Chat in your table's right sidebar and tell AI what you want. For example, you can say:
*"When someone submits the feedback form, classify the feedback as Bug Report, Feature Request, or General Feedback, and write the category back to the record"*
AI will create the complete workflow automatically. You can review the generated script, test it with real data, and enable the workflow when ready.
## Manual setup
1. **Create a workflow** with trigger **When Form Submitted**.
2. Select your **Feedback** table and form.
3. Click **Test**.
4. **Add an action** → **AI Generate**.
* Prompt:
```
Classify this feedback into exactly one category:
Bug Report, Feature Request, or General Feedback.
Reply with only the category name.
Feedback:
```
* Output Type: **Text**
5. **Add an action** → **Update Record**.
* Record ID: the trigger record's ID (via **+**)
* Category field → the AI Generate output (via **+**)
6. Test each step, then **enable**.
## Tips
* For more nuanced classification, increase the number of categories in the prompt.
* Use **JSON** output type if you want the AI to return multiple fields (e.g. category + sentiment + summary) in one call.
# Generate and send a daily email digest with AI
Source: https://help.teable.ai/en/basic/automation/examples/ai-email-digest
Use a scheduled trigger + AI Generate to summarize the day's activity and email it to your team
We recommend building automation examples directly in AI chat. Just describe the workflow you want, and AI will handle the full setup for you, including the trigger, actions, script, and configuration.
## Build with AI
Open the AI Chat in your table's right sidebar and tell AI what you want. For example, you can say:
*"Every day at 6pm, find all tasks completed today, summarize them into a brief report, and email it to [team@yourcompany.com](mailto:team@yourcompany.com)"*
AI will create the complete workflow automatically. You can review the generated script, test it with real data, and enable the workflow when ready.
## Manual setup
1. **Create a workflow** with trigger **At Scheduled Time** — daily at 18:00.
2. **Add an action** → **Get Records**.
* Table: **Tasks**
* Filter: `Status` **is** `Completed` AND `Completed At` **is** `today`
3. **Add an action** → **AI Generate**.
* Prompt:
```
Summarize these completed tasks into a brief daily report.
Group by category if applicable. Keep it under 200 words.
Tasks:
```
* Output Type: **Text**
4. **Add an action** → **Send Email**.
* To: `team@yourcompany.com`
* Subject: `Daily Task Report`
* Body: insert the AI Generate output (via **+**)
5. Test each step, then **enable**.
## Variations
* **Weekly digest:** change the schedule to Fridays and the filter to "past 7 days".
* **Customer activity digest:** query a CRM table for new interactions and summarize.
# Build automations programmatically with the API
Source: https://help.teable.ai/en/basic/automation/examples/api-automation
Create and configure workflows using the Teable API and JavaScript
We recommend building automation examples directly in AI chat. Just describe the workflow you want, and AI will handle the full setup for you, including the trigger, actions, script, and configuration.
## Build with AI
Open the AI Chat in your table's right sidebar and tell AI what you want. For example, you can say:
*"Create an automation that watches for order status changes and sends a webhook notification when an order ships"*
AI will create the complete workflow automatically. You can review the generated script, test it with real data, and enable the workflow when ready.
## Prerequisites
* A Personal Access Token (PAT). See [Access Token](/en/api-doc/token).
* Your project ID, table ID, and field IDs. See [Get IDs](/en/api-doc/get-id).
## Helper Functions
```javascript theme={null}
const baseUrl = "https://app.teable.ai/api";
const token = process.env.TEABLE_TOKEN;
const baseId = "bserxxxxxx";
const headers = {
Authorization: `Bearer ${token}`,
"Content-Type": "application/json",
};
async function api(method, path, body) {
const res = await fetch(`${baseUrl}${path}`, {
method,
headers,
body: body ? JSON.stringify(body) : undefined,
});
if (!res.ok) throw new Error(`${method} ${path} → ${res.status}`);
return res.json();
}
```
## Create the Workflow
```javascript theme={null}
// 1. Create a workflow
const wf = await api("POST", `/base/${baseId}/workflow`, {
name: "Notify on shipment",
description: "Send webhook when order status becomes Shipped",
});
// 2. Add a trigger
const trigger = await api("POST", `/base/${baseId}/workflow/${wf.id}/trigger`, {
type: "recordUpdated",
config: { tableId: "tblOrders", watchFieldIds: ["fldStatus"] },
});
// 3. Test the trigger
await api("POST", `/base/${baseId}/workflow/${wf.id}/test/${trigger.id}`);
// 4. Add an HTTP Request action
const action = await api("POST", `/base/${baseId}/workflow/${wf.id}/action`, {
type: "httpRequest",
parentNodeId: trigger.id,
});
// 5. Enable
await api("PUT", `/base/${baseId}/workflow/${wf.id}/active`, {
method: "activate",
});
```
## Best Practices
* Use the least-privileged PAT — restrict it to the spaces/projects it needs.
* Store tokens in environment variables, never hardcode them.
* Use **Test Node** to verify before enabling.
* See the full [Automation API Reference](/en/api-reference/automation/put-base-workflow-action).
# Batch-process records with loop
Source: https://help.teable.ai/en/basic/automation/examples/batch-loop
Use Get Records + Loop to process multiple records in a single workflow run
We recommend building automation examples directly in AI chat. Just describe the workflow you want, and AI will handle the full setup for you, including the trigger, actions, script, and configuration.
## Build with AI
Open the AI Chat in your table's right sidebar and tell AI what you want. For example, you can say:
*"Every day at 8am, find all tasks where the due date has passed and status is not Overdue, then update their status to Overdue"*
AI will create the complete workflow automatically. You can review the generated script, test it with real data, and enable the workflow when ready.
## Manual setup
1. **Create a workflow** with trigger **At Scheduled Time** — daily at 08:00.
2. **Add an action** → **Get Records**.
* Table: **Tasks**
* Filter: `Due Date` **is before** `today` AND `Status` **is not** `Overdue`
3. Click **Test** to see matching records.
4. **Add an action** → **Update Record**.
5. Click **Loop Run** below the table selector.
6. Select the array output from the Get Records step.
7. Map:
* Record ID → the current item's record ID (via **+**)
* Status → `Overdue`
8. Click **Test**, then **enable**.
## How It Works
The Get Records step returns an array. The Update Record step with Loop enabled iterates through each item and updates it individually, in order.
# Run different actions based on record values
Source: https://help.teable.ai/en/basic/automation/examples/conditional-actions
Use conditional logic to branch your workflow and perform different actions depending on field values
We recommend building automation examples directly in AI chat. Just describe the workflow you want, and AI will handle the full setup for you, including the trigger, actions, script, and configuration.
## Build with AI
Open the AI Chat in your table's right sidebar and tell AI what you want. For example, you can say:
*"When a new ticket is created, check the priority field. If it's Urgent, email the on-call team. Otherwise, email the general support queue"*
AI will create the complete workflow automatically. You can review the generated script, test it with real data, and enable the workflow when ready.
## Manual setup
1. **Create a workflow** with trigger **When Record Created**.
2. Select your **Tickets** table.
3. Click **Test** to get a sample record.
4. **Add a Condition** node.
5. Set the rule: **Priority** `is` **Urgent**.
6. Click **Test**.
7. **On the true path** → add a **Send Email** action:
* To: `oncall@yourcompany.com`
* Subject: `Urgent ticket: ` + ticket title (via **+**)
* Body: ticket description (via **+**)
8. **On the false path** → add a **Send Email** action:
* To: `support@yourcompany.com`
* Subject: `New ticket: ` + ticket title
* Body: ticket description
9. Test both paths, then **enable**.
## Tips
* You can nest conditions: add another condition inside the false path to separate "High" from "Low" priority.
* Combine rules with AND/OR — e.g. `Priority is Urgent AND Assignee is empty`.
# Keep records in sync across multiple projects
Source: https://help.teable.ai/en/basic/automation/examples/cross-base-sync
Automatically replicate new or updated records to another project using Cross-Project Access
We recommend building automation examples directly in AI chat. Just describe the workflow you want, and AI will handle the full setup for you, including the trigger, actions, script, and configuration.
## Build with AI
Open the AI Chat in your table's right sidebar and tell AI what you want. For example, you can say:
*"When a new order is created in the Sales project, create a matching record in the Fulfillment project with the order ID, customer name, amount, and status set to Pending"*
AI will create the complete workflow automatically. You can review the generated script, test it with real data, and enable the workflow when ready.
## Manual setup
1. **Create a workflow** in the **Sales** project with trigger **When Record Created**.
2. Select your **Orders** table.
3. Click **Test**.
4. **Add an action** → **Create Record**.
5. Click **Cross-Project Access** next to the table selector.
6. Navigate to the **Fulfillment** project and select the **Orders** table.
7. Map fields:
* Order ID → trigger's Order ID (via **+**)
* Customer → trigger's Customer
* Amount → trigger's Amount
* Status → `Pending Fulfillment`
8. Click **Test**, then **enable**.
## Two-Way Sync
To sync updates in both directions:
1. Create a second workflow in the **Fulfillment** project.
2. Use **When Record Updated** → **Update Record** with Cross-Project Access pointing back to the Sales project.
3. Use a filter to avoid infinite loops — e.g. only trigger when specific fields change, and check that the value actually differs before updating.
# Send deadline reminders before tasks are due
Source: https://help.teable.ai/en/basic/automation/examples/deadline-reminders
Automatically email assignees about tasks that are due soon
We recommend building automation examples directly in AI chat. Just describe the workflow you want, and AI will handle the full setup for you, including the trigger, actions, script, and configuration.
## Build with AI
Open the AI Chat in your table's right sidebar and tell AI what you want. For example, you can say:
*"Every morning at 8am, find tasks due within the next 2 days that aren't completed, and email each assignee a reminder"*
AI will create the complete workflow automatically. You can review the generated script, test it with real data, and enable the workflow when ready.
## Manual setup
1. **Create a workflow** with trigger **At Scheduled Time** — daily at 08:00.
2. **Add an action** → **Get Records**.
* Table: **Tasks**
* Filter: `Due Date` **is within** `next 2 days` AND `Status` **is not** `Completed`
3. Click **Test** to see matching records.
4. **Add an action** → **Send Email** with **Loop** enabled.
5. Select the array from the Get Records step as the loop source.
6. Map:
* To → Assignee's email (via **+**, referencing the current loop item)
* Subject: `Reminder: "" is due soon`
* Body: `Your task "" is due on . Please update the status when done.`
7. Click **Test**, then **enable**.
## Tips
* Adjust the filter window ("next 2 days", "next 7 days") based on how urgent tasks typically are.
* Add a condition to only email tasks where the Assignee is not empty.
# Avoid unwanted triggers with filters and watch fields
Source: https://help.teable.ai/en/basic/automation/examples/prevent-unwanted-triggers
Prevent your automations from running when they shouldn't
We recommend building automation examples directly in AI chat. Just describe the workflow you want, and AI will handle the full setup for you, including the trigger, actions, script, and configuration.
## Build with AI
Open the AI Chat in your table's right sidebar and tell AI what you want. For example, you can say:
*"When the Status field changes to Approved, send a notification email to the assignee. Only trigger on Status changes, ignore other field edits"*
AI will create the complete workflow automatically. You can review the generated script, test it with real data, and enable the workflow when ready.
A workflow that triggers too often wastes runs, sends unwanted emails, and creates noise. Here's how to keep triggers precise.
## Use Watch Fields
When using **When Record Updated**, always select specific fields instead of "All Fields".
**Problem:** A workflow sends a notification when the Status field changes. With "All Fields" selected, it also triggers when someone edits the Description or adds a comment.
**Fix:** Set Watch Fields to **Status** only. Now the workflow ignores all other changes.
## Use Filters
Add a filter to any record trigger to narrow which records activate the workflow.
**Problem:** A workflow processes all new records, but some are test entries.
**Fix:** Add a filter: `Type` **is not** `Test`. Only real records trigger the workflow.
## Combine Both
For maximum control, use watch fields **and** a filter together:
* Watch Fields: `Status`
* Filter: `Status` **is** `Approved`
This means: only trigger when the Status field changes **and** the new value is "Approved".
## Use "When Record Matches Conditions" for State Changes
If you want to trigger **only on the transition** (e.g. from "Pending" to "Approved"), use the **When Record Matches Conditions** trigger instead. It fires once at the moment the record begins to match — not on every subsequent edit.
# Push notifications to Slack, Discord, or Teams
Source: https://help.teable.ai/en/basic/automation/examples/push-notifications
Send a message to a chat channel when something happens in your table
We recommend building automation examples directly in AI chat. Just describe the workflow you want, and AI will handle the full setup for you, including the trigger, actions, script, and configuration.
## Build with AI
Open the AI Chat in your table's right sidebar and tell AI what you want. For example, you can say:
*"When a new high-priority ticket is created, send a Slack message to the #support channel with the ticket title and description"*
AI will create the complete workflow automatically. You can review the generated script, test it with real data, and enable the workflow when ready.
## Prerequisites
You need a webhook URL from your chat platform:
* **Slack:** Create an [Incoming Webhook](https://api.slack.com/messaging/webhooks)
* **Discord:** Server Settings → Integrations → Webhooks → New Webhook
* **Teams:** Channel → Connectors → Incoming Webhook
## Manual setup
1. **Create a workflow** with trigger **When Record Created**.
2. Select your **Tickets** table.
3. Add a filter: `Priority` **is** `High`.
4. Click **Test**.
5. **Add an action** → **HTTP Request**.
6. Configure:
* Method: **POST**
* URL: your webhook URL
* Content-Type: `application/json`
* Body (for Slack):
```json theme={null}
{
"text": "New high-priority ticket: "
}
```
* Use the **+** button to insert the ticket title dynamically.
7. Click **Test**, then **enable**.
## Adapting for Discord
Discord uses `"content"` instead of `"text"`:
```json theme={null}
{
"content": "New high-priority ticket: "
}
```
## Adapting for Teams
Teams uses an Adaptive Card format:
```json theme={null}
{
"type": "message",
"attachments": [{
"contentType": "application/vnd.microsoft.card.adaptive",
"content": {
"type": "AdaptiveCard",
"body": [{ "type": "TextBlock", "text": "New high-priority ticket: " }],
"$schema": "http://adaptivecards.io/schemas/adaptive-card.json",
"version": "1.2"
}
}]
}
```
# Auto-create records on a recurring schedule
Source: https://help.teable.ai/en/basic/automation/examples/recurring-records
Use a scheduled trigger to create records automatically at regular intervals
We recommend building automation examples directly in AI chat. Just describe the workflow you want, and AI will handle the full setup for you, including the trigger, actions, script, and configuration.
## Build with AI
Open the AI Chat in your table's right sidebar and tell AI what you want. For example, you can say:
*"Every Monday at 9am, create a new Weekly Review task in my Tasks table with status set to To Do"*
AI will create the complete workflow automatically. You can review the generated script, test it with real data, and enable the workflow when ready.
## Manual setup
1. **Create a workflow** and choose the trigger **At Scheduled Time**.
2. Configure the schedule:
* Frequency: **Weeks**, every **1** week
* Weekdays: **Monday**
* Trigger time: **09:00**
* Time zone: your local time zone
3. Click **Test** to verify the next trigger time.
4. **Add an action** → **Create Record**.
5. Select your **Tasks** table.
6. Map the fields:
* Title → `Weekly Review`
* Due Date → use the **+** button to insert the trigger's timestamp
* Status → `To Do`
7. Click **Run as Configured** to test.
8. **Enable** the workflow.
## Variations
* **Daily standup reminder:** set frequency to Days, every 1 day, at 09:00.
* **Monthly invoice:** set frequency to Months, day 1, to create a billing record at the start of each month.
* **One-time event:** set frequency to One-time for a single future date.
# Auto-record the time when a status changes
Source: https://help.teable.ai/en/basic/automation/examples/timestamp-status
Automatically write a timestamp when a record's status changes to a specific value
We recommend building automation examples directly in AI chat. Just describe the workflow you want, and AI will handle the full setup for you, including the trigger, actions, script, and configuration.
## Build with AI
Open the AI Chat in your table's right sidebar and tell AI what you want. For example, you can say:
*"When a task's status changes to Completed, write the current date and time into the Completed At field"*
AI will create the complete workflow automatically. You can review the generated script, test it with real data, and enable the workflow when ready.
## Manual setup
1. **Create a workflow** with trigger **When Record Matches Conditions**.
2. Select your **Tasks** table.
3. Set the filter: `Status` **is** `Completed`.
4. Click **Test**.
5. **Add an action** → **Update Record**.
6. Map:
* Record ID → the trigger record's ID (via **+**)
* Completed At → use an expression or set to the trigger's timestamp
7. Click **Test**, then **enable**.
## Why "When Record Matches Conditions"?
This trigger fires **once** — at the moment the record transitions to matching. If someone later edits the Description (while Status is still "Completed"), the workflow does **not** fire again. This prevents the timestamp from being overwritten.
## Variations
* **"Started At"** — trigger when Status becomes "In Progress".
* **"Escalated At"** — trigger when Priority becomes "Urgent".
* **"Approved At"** — trigger when Approval becomes "Yes".
# When email received overview
Source: https://help.teable.ai/en/basic/automation/trigger/email/email-received-overview
Trigger a workflow when a new email arrives in a monitored mailbox
Please note: all trigger setup can be done in AI chat. Tell AI what you want the workflow to do, and it will handle the rest.
This trigger runs when a new, unread email arrives in a monitored mailbox.
## Build with AI
Open the AI Chat in your table's right sidebar and describe what you want.
AI handles everything: it chooses the right trigger, maps the relevant fields, and sets up all actions automatically.
Describe the goal once, and the workflow is ready — no manual setup needed.
**Example:** *"When I receive a support email, create a ticket and classify it."*
## Configuration
| Setting | Required | Description |
| - | - | - |
| Connection Type | Yes | IMAP only |
| Poll Interval | Yes | How often to check for new emails: 10 to 60 minutes (default 10) |
## Connect the mailbox
The trigger connects over IMAP, which works with any provider that supports the protocol, Gmail and Outlook included once IMAP is enabled on the account.
| Setting | Required | Description |
| - | - | - |
| Host | Yes | Your IMAP server address (e.g., `imap.gmail.com`, `imap.mail.yahoo.com`) |
| Port | Yes | Usually 993 (SSL/TLS) or 143 (unencrypted, not recommended) |
| Username | Yes | Your email address or account username |
| Password | Yes | A secret granted to this automation, not a value typed into the trigger |
| Mailbox | No | The folder to monitor (defaults to `INBOX`) |
For the password, click **Select a secret** to pick one of the secrets granted to this automation, or **Add secret** to create one (default variable name `IMAP_PASSWORD`). Store the app password or authorization code there, not your mailbox login password; the trigger keeps a reference to the secret rather than the value.
## What email data is available to next steps
When the trigger fires, the following data from the email is available as variables in your action steps:
| Data | Description |
| - | - |
| **From** | The sender's email address |
| **Subject** | The email subject line |
| **Body (text)** | The plain-text version of the email body |
| **Body (HTML)** | The HTML version of the email body (if available) |
| **Date** | When the email was sent |
| **Attachments** | File attachments included in the email |
You can reference any of these by clicking **+** in your action fields.
## How to set it up (IMAP example)
1. Open your automation and add a new trigger.
2. Select **When email received**.
3. Choose **IMAP** as the connection type.
4. Enter your IMAP server details: host, port, and username, then select or add the secret that holds the password.
5. (Optional) Change the **Mailbox** if you want to monitor a folder other than INBOX.
6. Set the **Poll Interval** — how often to check for new emails. A shorter interval means faster responses but more frequent server checks.
7. Click **Test** to verify the connection. Teable will attempt to connect to your mailbox and report success or failure.
8. Save and activate the automation.
9. Add your action steps, using the email data (From, Subject, Body, etc.) as variables.
## When to use
* **Create a record for each incoming support email.** Parse the subject and body to populate fields in a support tickets table automatically.
* **Extract invoice data from emails with AI.** Use the AI Generate action to read the email body or attachment and pull out amounts, dates, and vendor names.
* **Route customer inquiries to the right team.** Based on keywords in the subject or body, update a "Team" field or send notifications to specific people.
* **Archive important emails as records.** Automatically log emails from specific senders or with specific subjects into a Teable table for easy searching and tracking.
* **Process order confirmations.** When an order confirmation email arrives, extract the order number and details to update your orders table.
## Troubleshooting
* **Connection failed (IMAP):** Double-check your host, port, username, and password. Make sure your email provider allows IMAP access — some providers disable it by default.
* **Gmail: "Less secure app" error:** Gmail does not allow plain password login. Store an **App Password** as the secret instead. See [Set up Gmail IMAP](/en/basic/automation/trigger/email/gmail-imap) for instructions.
* **Emails not being picked up:** Check the poll interval. Also confirm that the emails are arriving in the monitored folder. Emails in subfolders may be missed if the wrong mailbox is selected.
* **Duplicate processing:** The trigger tracks which emails it has already processed. However, if you deactivate and reactivate the automation, it may reprocess recent emails. Mark emails as read in your inbox if needed.
## Tips
* A shorter poll interval means faster response to emails but does not guarantee real-time delivery. For true real-time processing, consider using a webhook-based approach if your email provider supports it.
* Use filters in your email client to route relevant emails to a specific label or folder, then have Teable monitor only that label. This reduces noise.
* For high-volume mailboxes, consider increasing the poll interval and processing in batches to avoid overwhelming your workflow.
* A trigger that still holds a typed password keeps running, and the password field reads **Password set. Select a secret to replace it.** The next change to that password has to be a secret.
## Related
* [Set up Gmail IMAP](/en/basic/automation/trigger/email/gmail-imap) — detailed instructions for connecting Gmail
* [AI generate action](/en/basic/automation/actions/ai/ai-generate) — useful for extracting structured data from email content
* [Create record action](/en/basic/automation/actions/records/create-record) — commonly paired with email triggers to log emails as records
* [Send email](/en/basic/automation/actions/communication/send-email-overview)
* [Credentials and integrations](/en/basic/credential) — manage secrets and grant them to an automation
# Set up Gmail IMAP
Source: https://help.teable.ai/en/basic/automation/trigger/email/gmail-imap
How to enable Gmail IMAP and create an App Password for Teable
# How to Enable Gmail IMAP and Create App Password
This guide shows how to prepare your Gmail account so Teable can automatically capture incoming emails.
## Enable IMAP in Gmail
1. Open Gmail in a web browser.
2. Click the **Settings → See all settings**.
3. Go to **Forwarding and POP/IMAP** tab.
4. Scroll to **IMAP Access**.
5. Select **Enable IMAP**.
6. Optional: Leave **Auto-Expunge on** and **Do not limit folder size** as default.
7. Click **Save Changes**.
**Screenshot example:**
## Enable 2-Step Verification
1. Go to **[https://myaccount.google.com/](https://myaccount.google.com/)** and log in.
2. Select **Security → 2-Step Verification**.
3. Follow steps to enable 2FA (SMS, authenticator, or security key).
**Screenshot example:**
## Create App Password
1. After enabling 2-Step Verification, go to **App Passwords**:
* Direct link: [https://myaccount.google.com/apppasswords](https://myaccount.google.com/apppasswords)
2. In **Select App**, choose `Mail`.
3. In **Select Device**, choose `Other` and name it `Teable IMAP`.
4. Click **Generate**.
5. Copy the **16-character password** (you will need this in Teable).
**Screenshot example:**
## Notes
* Use the generated **App Password**, not your Gmail main password, in Teable.
* Only new, unread emails trigger the automation.
* Keep the App Password safe — you will only see it once.
# When Connector Event Received
Source: https://help.teable.ai/en/basic/automation/trigger/external/connector-event
Run a workflow when a connected third-party app reports an event
Available on all Cloud plans; Self-Hosted requires Business or higher, with connector events turned on by whoever runs the deployment.
Start a workflow from something that happens inside a connected app such as GitHub, Gmail, or Slack: a new email arrives, an issue is opened, a message is posted. The app delivers the event to Teable directly, so you do not have to host a webhook URL or poll for changes.
## Build with AI
Open AI chat in the right sidebar of any table and describe what you need.
AI handles everything: it picks the right trigger, maps the relevant fields, and sets up the actions.
Describe the goal once and the workflow is ready, with no manual configuration.
**Example:** *"When a new issue is opened in my GitHub repo, create a record in the Tasks table"*
## How to Set It Up
Create a workflow and choose **When connector event received** as the trigger.
Pick the app under **App**, then the specific event under **Event**. Every event in the list carries a one-line summary and a badge; the badges are explained below.
Under **Account**, pick which connected account receives the event. If you have never connected this app, connect it from the same dropdown: the new connection is granted to this workflow automatically.
Fill in the **Parameters** the event needs, such as a repository, a channel, or a label. Fields marked \* are required. Click **Save** when you are done.
Add the actions that follow, then turn the workflow on. The subscription is created when the workflow is activated, so a draft receives nothing.
Changing the app or the event clears the steps after the trigger, and variables that referenced the previous event stop resolving, so those steps have to be configured again.
## Event Badges
| Badge | What it means |
| - | - |
| **Instant** | The app pushes the event, which arrives shortly after it happens |
| **Polling · may take a few minutes** | Teable asks the app periodically, so do not rely on these events where timing matters |
| **High volume** | This event fires often in practice, and every firing counts as an automation run |
| **Deprecated** | The app has deprecated this event and may stop sending it, so choose another one |
## Data Available After the Trigger
The event itself lands in the **event** variable, which later steps insert through **+**. The variable is empty right after you configure the trigger: an actual event has to arrive first. Click **Test trigger**, and once the panel shows **Waiting for an event**, go into the app and do something that fires it. A polling event may take a few minutes.
The event that arrives stays on the trigger as sample data, so later steps can reference its fields. Click **Stop waiting** to end the wait early; after about 30 minutes without an event the panel reports **Stopped waiting. No event arrived.**
## When the Connection Drops
The trigger stops receiving events when the account grant is revoked, the connected account is removed, the app stops the subscription (expired credentials or an unhealthy subscription), or the subscription could not be created. The workflow itself is not switched off, but nothing new runs until it is restored.
Teable notifies the member who last edited the workflow, and the trigger panel shows **Disconnected — reconnect the account or pick another one**. Restore it according to the cause:
* Click **Reconnect** on the same account under **Settings** → **Integrations**, and the subscription is rebuilt on its own.
* To use a different account, go back to the trigger, pick another **Account**, and save.
* When the subscription failed to be created, check the parameters and save again to retry.
## After a Copy or an Import
Credentials do not travel with a workflow. After you copy a workflow, or import or copy a project, the trigger reads **Account not authorized**: pick one of your own accounts and save before the workflow can subscribe again.
## Related Docs
* [Credentials and Integrations](/en/basic/credential)
* [Routine](/en/basic/ai/routine)
# At scheduled time
Source: https://help.teable.ai/en/basic/automation/trigger/external/scheduled-time
Run a workflow on a recurring or one-time schedule
Please note: all trigger setup can be done in AI chat. Tell AI what you want the workflow to do, and it will handle the rest.
This trigger runs on a schedule you define — from every few minutes to once a month, or a single one-time run.
## Build with AI
Open the AI Chat in your table's right sidebar and describe what you want.
AI handles everything: it chooses the right trigger, maps the relevant fields, and sets up all actions automatically.
Describe the goal once, and the workflow is ready — no manual setup needed.
**Example:** *"Every Monday at 9am, email me a list of overdue tasks."*
## Configuration
| Setting | Required | Description |
| - | - | - |
| Start Time | Yes | When the schedule begins |
| End Time | No | When the schedule stops (leave blank to run indefinitely) |
| Time Zone | Yes | Defaults to your current time zone. All times are interpreted in this zone |
| Frequency | Yes | How often the trigger fires — see options below |
## Frequency options
| Frequency | Interval | Extra Settings |
| - | - | - |
| Minutes | Every 10–60 min | — |
| Hours | Every 1–24 h | — |
| Days | Every 1–31 days | Trigger time (hour + minute) |
| Weeks | Every 1–52 weeks | Weekdays (Mon–Sun) + trigger time |
| Months | Every 1–12 months | Days of month + trigger time |
| One-time | — | Fires once at the specified time, then auto-deactivates |
Use **-1** as the day of month to target the last day of the month, regardless of whether it has 28, 30, or 31 days.
## How to set it up
1. Open your automation and add a new trigger.
2. Select **At scheduled time**.
3. Set the **Time Zone**. This is especially important if your team spans multiple time zones — the schedule runs in whichever zone you select here.
4. Choose a **Frequency**. For example, to run every Monday at 9:00 AM:
* Set Frequency to **Weeks**.
* Set interval to **1** (every 1 week).
* Check **Monday** in the weekday selector.
* Set the trigger time to **09:00**.
5. Set a **Start Time** (when the schedule becomes active).
6. (Optional) Set an **End Time** if you want the schedule to expire.
7. Save and activate the automation.
8. Since there is no record data, your first action will typically be a **Get Records** step to load the data you need.
## Concrete example: weekly Monday morning report
Goal: Every Monday at 9:00 AM, get all tasks due this week and send a summary email.
1. **Trigger:** At scheduled time — Weeks, every 1 week, Monday, 09:00, your time zone.
2. **Action 1:** Get Records — from the Tasks table, filter: Due Date is within this week.
3. **Action 2:** Send Email — to your team, with the retrieved tasks listed in the body.
## One-time schedules
When you select **One-time** frequency, the automation fires once at the specified date and time and then automatically deactivates itself. This is useful for:
* A reminder to follow up on a specific date.
* A delayed action that needs to happen once (e.g., send a launch announcement at a future date).
* A time-limited campaign that triggers only once.
After a one-time trigger fires, you will see the automation marked as inactive. You can reactivate it with a new time if needed.
## When to use
* **Generate a daily summary report.** Run every day at 8:00 AM, get all records updated yesterday, and email a digest.
* **Create recurring tasks every Monday.** Run weekly and create records in your task table for the new week.
* **Send monthly invoice reminders.** Run on the 1st of each month, find unpaid invoices, and send reminder emails.
* **Clean up stale records.** Run daily, find records older than 90 days with a "Draft" status, and archive or delete them.
* **Sync data on a schedule.** Run every hour to push updated records to an external API.
Schedule triggers are not linked to any record, so there is no record data available to subsequent steps. If you need to process records, add a Get Records action as your first step and use filters to select the records you need.
## Tips
* Since schedule triggers have no "current record," you cannot reference trigger data in actions the way you would with record-based triggers. Always start with a **Get Records** action if you need data.
* Be mindful of time zones, especially for teams that work across regions. The time zone setting on the trigger determines when it fires — not the viewer's local time.
* For high-frequency schedules (every few minutes), keep your workflow lightweight to avoid overlapping runs.
* If your automation is time-sensitive (e.g., must run before a daily meeting), set it a few minutes early to allow for processing time.
* The **-1** day-of-month trick is useful for month-end reports or processes. Using -1 means "last day of the month", so it correctly fires on January 31, February 28 (or 29), March 31, etc.
## Related
* [Get records action](/en/basic/automation/actions/records/get-records) — typically the first step after a schedule trigger
* [Send email action](/en/basic/automation/actions/communication/send-email-overview) — commonly paired with schedules for periodic notifications
* [Loop (batch) action](/en/basic/automation/actions/logic/loop-run) — useful for processing the array of records returned by Get Records
# When webhook received
Source: https://help.teable.ai/en/basic/automation/trigger/external/webhook-received
Trigger a workflow by receiving an HTTP request from any external system
Please note: all trigger setup can be done in AI chat. Tell AI what you want the workflow to do, and it will handle the rest.
This trigger generates a unique URL. When an external system sends an HTTP POST to it, the workflow runs.
## Build with AI
Open the AI Chat in your table's right sidebar and describe what you want.
AI handles everything: it chooses the right trigger, maps the relevant fields, and sets up all actions automatically.
Describe the goal once, and the workflow is ready — no manual setup needed.
**Example:** *"When I receive a Stripe payment webhook, create an order record."*
## Configuration
| Setting | Required | Description |
| - | - | - |
| Authorization | No | **None** (public — anyone with the URL can trigger it) or **Bearer Token** (auto-generated token required in the request header) |
| Response | No | **Default** (Teable returns its own acknowledgement) or **Custom** (you decide the status code, content type, and body) |
## How to set it up
1. Open your automation and add a new trigger.
2. Select **When webhook received**.
3. The trigger immediately generates a unique **webhook URL**. Copy this URL — you will need it for the external system.
4. (Optional but recommended) Click **Generate Token** to enable Bearer Token authorization. This produces a token that must be included in the `Authorization` header of incoming requests.
5. Save and activate the automation.
6. Configure your external system to send a POST request to the webhook URL. Include the token in the header if you enabled authorization.
7. Send a test request (see examples below). Check the automation's run history to verify it received the data correctly.
8. Add your action steps. Click **+** in any action field to reference values from the webhook's JSON body.
## What data is available to next steps
The entire JSON body of the incoming POST request is available as variables. For example, if you send:
```json theme={null}
{
"order_id": "12345",
"customer": "Alice",
"amount": 99.95
}
```
Then in your actions, you can reference `order_id`, `customer`, and `amount` individually by clicking **+** and navigating to the trigger's output fields.
Teable automatically parses the JSON and creates named variables for each top-level key. Nested objects are also accessible.
## Customize the response
By default, Teable replies to every incoming request with its own acknowledgement. Some platforms will not accept that: they verify a subscription URL by sending a probe and requiring your endpoint to echo one field of it back. Slack works this way, so its events can only reach an automation once the webhook answers the handshake.
In the trigger panel, switch **Response** from **Default** to **Custom**:
| Field | Description |
| - | - |
| **Status code** | Any code from 200 to 299. Defaults to 200. |
| **Content type** | **JSON** or **raw text**. Defaults to JSON. |
| **Response body** | The text to return. Use `{{body.}}` to insert values from the incoming request. |
Switching to **Custom** pre-fills the body with the handshake reply most callers need:
```json theme={null}
{"challenge":"{{body.challenge}}"}
```
The paths inside `{{ }}` are the same ones the trigger exposes as output variables, so you can copy a path straight from a payload you have already seen in a test run. Nested values work too, for example `{{body.event.type}}`. In a JSON body, a path the request does not contain is rendered as `null`, so the response stays valid JSON.
Slack cannot send an `Authorization` header, so keep **Authorization** set to **None** when you connect it. The trigger panel shows a warning if both are on at once.
Switch **Response** back to **Default** at any time to return to Teable's own acknowledgement. Automations that never touch this setting are unaffected.
## Testing your webhook
The easiest way to test is with `curl` from the command line. Copy the real URL from the trigger panel rather than typing it out; it carries the project and workflow ids.
**Without authorization:**
```bash theme={null}
curl -X POST https://your-teable-instance.com/api/webhook/base/bseXXXXXXXXXXXX/workflow/wflXXXXXXXXXXXX \
-H "Content-Type: application/json" \
-d '{"test": true, "message": "Hello from curl"}'
```
**With Bearer Token authorization:**
```bash theme={null}
curl -X POST https://your-teable-instance.com/api/webhook/base/bseXXXXXXXXXXXX/workflow/wflXXXXXXXXXXXX \
-H "Content-Type: application/json" \
-H "Authorization: Bearer your-generated-token" \
-d '{"order_id": "12345", "status": "paid"}'
```
**Sending more complex data:**
```bash theme={null}
curl -X POST https://your-teable-instance.com/api/webhook/base/bseXXXXXXXXXXXX/workflow/wflXXXXXXXXXXXX \
-H "Content-Type: application/json" \
-H "Authorization: Bearer your-generated-token" \
-d '{
"event": "invoice.paid",
"data": {
"invoice_id": "INV-001",
"amount": 250.00,
"currency": "USD",
"customer_email": "alice@example.com"
}
}'
```
After sending a test request, check the automation's run history to confirm the data was received and parsed correctly.
## Rate limits
| Scope | Limit |
| - | - |
| Per project | 50 requests / second |
| Per workflow | 2 requests / second |
Requests exceeding the rate limit will receive an HTTP 429 response. If your external system sends bursts of requests, consider implementing retry logic with exponential backoff.
## Security best practices
* **Always use Bearer Token authorization** for production webhooks. A public webhook URL can be triggered by anyone who discovers the URL.
* **Keep your webhook URL private.** Treat it like a password. Do not commit it to public repositories or share it in open channels.
* **Regenerate the token** if you suspect it has been compromised. You can generate a new token from the trigger panel at any time.
* **Validate data in your workflow.** Do not assume the incoming data is well-formed. Use filters or script steps to verify required fields are present before processing.
* **Monitor run history.** Regularly check your automation's run logs to spot unexpected or unauthorized requests.
## When to use
* **Receive payment events from Stripe or PayPal.** Configure a Stripe webhook to send `invoice.paid` events to your Teable automation, creating or updating order records automatically.
* **Accept form submissions from your website.** Point your website's contact or signup form to the webhook URL to create records directly in Teable.
* **Ingest data from IoT devices.** Sensors or devices that can send HTTP requests can push data into Teable for monitoring and alerting.
* **Connect CI/CD pipelines.** Trigger workflows when a build succeeds or fails — create records, send notifications, or update project status.
* **Receive events from any SaaS tool.** Many tools (GitHub, Jira, Shopify, Twilio, etc.) support webhook notifications. Point them at your Teable webhook to automate cross-tool workflows.
## Tips
* The webhook only accepts **POST** requests. GET, PUT, and other methods will not trigger the automation.
* Always send a `Content-Type: application/json` header. If the body is not valid JSON, the trigger may not parse the data correctly.
* If you need to send data from a system that does not support custom headers (for Bearer auth), consider using the public mode but adding a secret key in the JSON body that your workflow validates with a filter or script.
* For debugging, you can use services like [webhook.site](https://webhook.site) to inspect what your external system is actually sending before pointing it at Teable.
## Related
* [HTTP request action](/en/basic/automation/actions/logic/http-request) — the outbound counterpart: call external APIs from your workflow
* [Run script](/en/basic/automation/ai/scripting/runscript) — for advanced webhook payload processing
* [Loop (batch) action](/en/basic/automation/actions/logic/loop-run) — process arrays in webhook payloads
# When button clicked
Source: https://help.teable.ai/en/basic/automation/trigger/forms/button-click
Trigger a workflow when a button field is clicked
Please note: all trigger setup can be done in AI chat. Tell AI what you want the workflow to do, and it will handle the rest.
This trigger runs when a user clicks a Button field in a table row. The workflow receives that row's data.
## Build with AI
Open the AI Chat in your table's right sidebar and describe what you want.
AI handles everything: it chooses the right trigger, maps the relevant fields, and sets up all actions automatically.
Describe the goal once, and the workflow is ready — no manual setup needed.
**Example:** *"When I click the Approve button, update the status and notify the team."*
## Configuration
| Setting | Required | Description |
| - | - | - |
| Table | Yes | The table that contains the button field |
| Watch Fields | Yes | The button field(s) to monitor for clicks |
| Filter | No | Only trigger if the record matches these conditions when the button is clicked |
## How to create a Button field
Before you can use this trigger, you need a Button field in your table:
1. Open the table where you want the button.
2. Click **+** to add a new field.
3. In the field type menu, go to **Advanced** and select **Button**.
4. Give the field a name (e.g., "Approve", "Send Invoice", "Export").
5. Save the field. A clickable button will now appear in every row of that column.
## How to set it up
1. Open your automation and add a new trigger.
2. Select **When button clicked**.
3. Choose the **Table** that has the button field.
4. In **Watch Fields**, select the button field you want to monitor. You can select multiple button fields if needed.
5. (Optional) Add a **Filter** to restrict which rows can trigger the automation. For example, `Status` not equal to `Completed` will prevent the button from firing on already-completed records.
6. Save and activate the automation.
7. Add your action steps. Click **+** in any action field to insert data from the clicked row.
## What data is available to next steps
When a button is clicked, the trigger provides:
* **Record ID** — the unique identifier of the row where the button was clicked.
* **All field values** — every field in the clicked row is available as a variable. This includes text, numbers, dates, linked records, attachments, and more.
This means you can use the row's data to populate emails, update other records, or send data to external APIs — all based on the specific row the user clicked.
## When to use
* **One-click approval workflows.** Add an "Approve" button to each row. When clicked, update the status to "Approved" and send a notification to the requestor.
* **Generate a report or document on demand.** A "Generate Report" button triggers an AI action or HTTP request to create a PDF or summary for that specific record.
* **Push a record to an external system.** A "Sync to CRM" button sends the row's data to Salesforce, HubSpot, or another platform via an HTTP request.
* **Send a personalized email.** A "Send Reminder" button composes and sends an email using the row's contact information and relevant details.
* **Trigger a manual review step.** A "Flag for Review" button marks the record and notifies a manager, giving humans explicit control over which items get escalated.
## Tips
* The button field itself does not store data — it is purely a trigger mechanism. You will not see a value in the cell; just a clickable button.
* If you have multiple button fields in a table, you can create separate automations for each one, or use a single automation that watches multiple buttons and uses conditional logic.
* The filter is evaluated at the moment the button is clicked. If the record does not match the filter, the automation simply does not run — the user will not see an error.
* Button triggers are great for workflows where you want human judgment before an action is taken, rather than fully automatic processing.
## Related
* [When form submitted](/en/basic/automation/trigger/forms/form-submitted) — fires on form submissions rather than button clicks
* [When record updated](/en/basic/automation/trigger/records/record-updated) — fires automatically on field changes, no user action required
* [Update record action](/en/basic/automation/actions/records/update-record) — commonly paired with button clicks to change the row's status
* [Send email](/en/basic/automation/actions/communication/send-email-overview)
# When form submitted
Source: https://help.teable.ai/en/basic/automation/trigger/forms/form-submitted
Trigger a workflow when a form view is submitted
Please note: all trigger setup can be done in AI chat. Tell AI what you want the workflow to do, and it will handle the rest.
This trigger runs when someone submits a specific form view. All submitted fields are available to the next steps.
## Build with AI
Open the AI Chat in your table's right sidebar and describe what you want.
AI handles everything: it chooses the right trigger, maps the relevant fields, and sets up all actions automatically.
Describe the goal once, and the workflow is ready — no manual setup needed.
**Example:** *"When someone submits the contact form, send a confirmation email."*
## Configuration
| Setting | Required | Description |
| - | - | - |
| Table | Yes | The table the form belongs to |
| Form | Yes | The specific form view to watch for submissions |
## How to set it up
1. Make sure you already have a form view on your table. If not, create one by clicking **+** in the view bar and selecting **Form**.
2. Open your automation and add a new trigger.
3. Select **When form submitted**.
4. Choose the **Table** that contains the form.
5. Choose the **Form** view you want to monitor.
6. Save and activate the automation.
7. Add your action steps. Click **+** in any action field to reference the submitted data — all form fields are available.
## What data is available to next steps
When a form is submitted, the following data is passed to your workflow:
* **Record ID** — the unique identifier of the newly created record.
* **All submitted field values** — every field that was included in the form (text, email, numbers, dates, selections, attachments, etc.) can be referenced by clicking **+** in subsequent actions.
Fields that the form does not include (hidden fields) will not have values from the submission, but they may have default values set on the table.
## Form submission also creates a record
It is important to understand that a form submission and a record creation are the same event at the data level. When someone submits a form, a new record is added to the table. This means:
* If you also have a **When record created** automation on the same table, *both* automations will fire on a form submission.
* To avoid duplicate processing, either use the Form Submitted trigger exclusively or add a filter to the Record Created trigger that excludes form-originated records.
A form submission is essentially a record creation. If the same table also has a "When record created" trigger configured, both workflows will run.
## When to use
* **Send a confirmation email after submission.** When a customer fills out a contact form, automatically send them a "thank you" email with details of their submission.
* **Auto-classify new support tickets with AI.** Use the AI Generate action to categorize the ticket based on the description the user submitted.
* **Notify your team about incoming applications.** When someone submits a job application form, post a notification to Slack or email the hiring team.
* **Create linked records in other tables.** When an order form is submitted, automatically create records in an "Order Items" table or a "Shipments" table.
* **Validate and flag submissions.** Check if required information is complete or if a value is out of range, and update a status field to "Needs Review" if something looks off.
## Tips
* This trigger fires once per submission. If the same person submits the form twice, it fires twice.
* If you need to trigger on all new records regardless of source (manual entry, API, form), use [When record created](/en/basic/automation/trigger/records/record-created) instead.
* You can have multiple automations watching the same form. For example, one automation sends a confirmation email while another creates a linked task.
* Form views respect field visibility settings. Only fields visible in the form are filled by the submission — hidden fields keep their defaults or remain empty.
## Related
* [When record created](/en/basic/automation/trigger/records/record-created) — fires on any new record, not just form submissions
* [When button clicked](/en/basic/automation/trigger/forms/button-click) — fires when a user clicks a button field in an existing row
* [Send email action](/en/basic/automation/actions/communication/send-email-overview) — commonly paired with form submissions for confirmations
# When record created
Source: https://help.teable.ai/en/basic/automation/trigger/records/record-created
Trigger a workflow when a new record is added to a table
Please note: all trigger setup can be done in AI chat. Tell AI what you want the workflow to do, and it will handle the rest.
This trigger runs when a new record is added to the table, regardless of how it was created.
## Build with AI
Open the AI Chat in your table's right sidebar and describe what you want.
AI handles everything: it chooses the right trigger, maps the relevant fields, and sets up all actions automatically.
Describe the goal once, and the workflow is ready — no manual setup needed.
**Example:** *"When a new order is created, notify the team on Slack."*
## Configuration
| Setting | Required | Description |
| - | - | - |
| Table | Yes | The table to watch for new records |
| Filter | No | Only trigger if the new record matches these conditions. Uses the same filter builder as views |
## How to set it up
1. Open your automation and add a new trigger.
2. Select **When record created**.
3. Choose the **Table** you want to monitor.
4. (Optional) Add a **Filter** if you only want to react to certain new records. For example, `Priority` equals `High` will ignore new records with other priority values.
5. Save and activate the automation.
6. Add your action steps. In each action, click the **+** button in any field to insert values from the trigger — you will see every field of the new record listed.
## What data is available to next steps
When this trigger fires, all fields of the newly created record are available as variables in subsequent steps:
* **Record ID** — the unique identifier of the new record
* **All field values** — every field in the table (text, number, date, attachments, linked records, etc.) can be referenced by clicking **+** in any action's field mapping
This means if your table has fields like Name, Email, Status, and Created Date, all four values are ready to use in your actions without any extra configuration.
## How the filter works
The optional filter lets you narrow which new records actually trigger the automation:
* If **no filter** is set, every new record fires the trigger.
* If a **filter** is set, the trigger only fires when the new record matches all conditions. Records that do not match are silently ignored.
This is useful when you only want to act on a subset of new records — for example, only high-priority tasks, only records assigned to a specific team, or only orders above a certain amount.
The filter is evaluated based on the field values at the time the record is created. If a field is empty at creation and filled in later, the automation will not retroactively fire.
## When to use
* **Send a welcome email to a new contact.** When a contact is added to your CRM table, automatically send a personalized welcome email using the contact's name and email address.
* **Create a linked task when a new project is added.** When a project record is created, automatically create a default set of tasks in a Tasks table linked to the new project.
* **Notify your team about new orders.** Post a message to Slack or send an email to the sales team whenever a new order comes in.
* **Auto-classify incoming records with AI.** When a support ticket is created, use the AI Generate action to categorize it based on the description field.
* **Log new records to an external system.** Use an HTTP Request action to push new record data to a CRM, ERP, or data warehouse.
## Tips
* This trigger fires for records created by *any* method, including other automations. If you have an automation that creates records in the same table, be careful to avoid infinite loops. Use a filter to exclude records that were created by automation (for example, by checking a flag field).
* The trigger fires once per record. If 10 records are bulk-imported, it fires 10 separate times.
* If you need to react only to records created through a specific form, use the [When form submitted](/en/basic/automation/trigger/forms/form-submitted) trigger instead — it gives you tighter control.
* Fields that are empty when the record is created will still be available as variables, but their values will be blank. Make sure your actions handle empty values gracefully.
## Related
* [When form submitted](/en/basic/automation/trigger/forms/form-submitted) — fires only for form submissions, not all record creation methods
* [When record updated](/en/basic/automation/trigger/records/record-updated) — fires when existing records change
* [Create record action](/en/basic/automation/actions/records/create-record) — the action counterpart for creating records in workflows
* [Send email](/en/basic/automation/actions/communication/send-email-overview)
# When record matches conditions
Source: https://help.teable.ai/en/basic/automation/trigger/records/record-matches-conditions
Trigger a workflow when a record starts matching specific conditions
Please note: all trigger setup can be done in AI chat. Tell AI what you want the workflow to do, and it will handle the rest.
This trigger is used when a workflow should run after a record begins to match certain conditions.
It can fire in two common cases:
* A new record is created and already matches the filter.
* An existing record is edited and changes from not matching to matching the filter.
## Build with AI
Open the AI Chat in your table's right sidebar and describe what you want.
AI handles everything: it chooses the right trigger, maps the relevant fields, and sets up all actions automatically.
Describe the goal once, and the workflow is ready — no manual setup needed.
**Example:** *"When a task becomes overdue, send me an email."*
## Configuration
| Setting | Required | Description |
| - | - | - |
| Table | Yes | The table to watch for changes |
| Filter | **Yes** | The conditions the record must match. Uses the same filter builder as views — supports field comparisons, AND/OR groups, and dynamic values |
## How to set it up
1. Open your automation and add a new trigger.
2. Select **When record matches conditions**.
3. Choose the **Table** you want to monitor.
4. Click **Add Filter** to define the conditions. For example: `Status` equals `Overdue`, or `Amount` is greater than `10000`.
5. You can combine multiple conditions with AND/OR logic, just like view filters.
6. Save and activate the automation.
7. Test it by creating a matching record, or by editing an existing record so that it goes from *not matching* to *matching* your filter. The automation should fire once.
After the trigger fires, subsequent steps can use all field data from the matched record, including the latest values at the time of the transition.
## How is this different from "When Record Updated"?
These two triggers are easy to confuse. Here is the key difference:
* **When Record Updated** fires every time a watched field changes, regardless of what the new value is. If you watch the "Status" field, it fires whether Status changes to "In Progress", "Done", or anything else.
* **When Record Matches Conditions** fires only when a record crosses the boundary from "not matching" to "matching" your filter. It does not fire on every edit — only on the transition.
Use **When Record Updated** when you need to react to any change. Use **When Record Matches Conditions** when you only care about a specific state being reached.
If you want to run an action every time a record is edited, use the [When record updated](/en/basic/automation/trigger/records/record-updated) trigger. If you only want to run an action once when a record first reaches a specific condition, use this trigger.
## When to use
* **Alert when an order becomes overdue.** Set the filter to `Due Date` is before today and `Status` is not `Shipped`. The automation fires once when the order first matches.
* **Escalate a support ticket when priority changes to urgent.** Filter: `Priority` equals `Urgent`. Only fires when a ticket first becomes urgent, not on subsequent edits.
* **Notify a manager when a deal exceeds a revenue threshold.** Filter: `Deal Value` is greater than `50000`. Fires once when the deal crosses that line.
* **Flag records that become incomplete.** Filter: `Required Field` is empty. Fires when a previously complete record loses its value.
* **Trigger onboarding steps when a contact's status changes to "Active".** Filter: `Status` equals `Active`. Only runs once per activation.
## Tips
* You **must** define at least one filter condition. Without it, the trigger has nothing to evaluate.
* The trigger checks the transition at the moment a record is saved. It does not retroactively fire for records that already matched before the automation was created.
* Records created after activation are also checked against the filter. If the initial values match, the workflow can trigger immediately.
* Combine this trigger with a **Send Email** or **Update Record** action to build powerful state-change workflows without writing any code.
## Related
* [When record updated](/en/basic/automation/trigger/records/record-updated) — fires on any field change, not just transitions
* [When record created](/en/basic/automation/trigger/records/record-created) — fires when new records are added
* [Send email](/en/basic/automation/actions/communication/send-email-overview)
# When record updated
Source: https://help.teable.ai/en/basic/automation/trigger/records/record-updated
Trigger a workflow when an existing record is modified
Please note: all trigger setup can be done in AI chat. Tell AI what you want the workflow to do, and it will handle the rest.
This trigger runs when an existing record is modified. It does not fire on creation.
## Build with AI
Open the AI Chat in your table's right sidebar and describe what you want.
AI handles everything: it chooses the right trigger, maps the relevant fields, and sets up all actions automatically.
Describe the goal once, and the workflow is ready — no manual setup needed.
**Example:** *"When the status field changes, send an email to the assignee."*
## Configuration
| Setting | Required | Description |
| - | - | - |
| Table | Yes | The table to watch for changes |
| Watch Fields | Yes | Choose specific fields to monitor, or select "All Fields" to trigger on any change |
| Filter | No | Only trigger if the updated record matches these conditions after the change |
## How to set it up
1. Open your automation and add a new trigger.
2. Select **When record updated**.
3. Choose the **Table** you want to monitor.
4. In **Watch Fields**, select one or more specific fields. For example, choose only "Status" if you want to react to status changes.
5. (Optional) Add a **Filter** to further narrow which updates fire the trigger. For example, `Status` equals `Done` will only fire when a record's status is changed to "Done".
6. Save and activate the automation.
7. Add your action steps. Click **+** in any action field to insert values from the updated record.
## Understanding Watch Fields
The Watch Fields setting is the most important part of this trigger:
* **Specific fields (recommended):** Select only the fields you care about. The trigger only fires when one of these fields changes. All other edits to the record are ignored.
* **All Fields:** The trigger fires whenever *any* field in the record changes. This includes computed fields, last-modified timestamps, and minor edits you might not care about.
**Why specific fields are better in most cases:**
* Fewer unnecessary trigger executions, which means fewer wasted automation runs.
* Prevents accidental loops (see below).
* Makes your automation's purpose clearer to anyone reading it.
Choose "All Fields" only when you genuinely need to react to every possible change — for example, a full audit log.
It is strongly recommended to select specific watch fields. Selecting "All Fields" can cause the workflow to fire on unrelated edits, waste automation runs, and lead to unexpected behavior.
### Computed fields
[Formula](/en/basic/field/formula), [Lookup](/en/basic/field/lookup), [Rollup](/en/basic/field/rollup), [Conditional Lookup](/en/basic/field/conditional-lookup), and [Conditional Rollup](/en/basic/field/conditional-rollup) values come from Teable's own calculation rather than from typing, and a recalculation only fires this trigger when you name the computed field in **Watch Fields**. All five behave the same way.
This lets you react to a derived result instead of to the raw inputs behind it. Watch a `Total amount` Formula field and the workflow runs whenever the total actually changes, no matter which of the underlying fields moved. Watch a Rollup of linked tasks and the workflow runs when the rolled-up value changes, including when the change came from an edit in the linked table.
## Common pitfall: update loops
If your workflow includes an Update Record action that writes to the same table and updates a watched field, the trigger will fire again, creating an infinite loop.
If your automation is triggered by updates to a table and also has an **Update Record** action that writes back to the *same table*, you can create an infinite loop:
1. A field changes → trigger fires.
2. The automation updates another field in the same record → trigger fires again.
3. Repeat endlessly.
**How to avoid this:**
* Watch only specific fields, and make sure your Update Record action writes to *different* fields than the ones being watched.
* Use a filter condition to stop the loop. For example, only trigger when `Status` does not equal `Processed`, and have your action set `Status` to `Processed`.
* If your action must update the same field, consider using the [When record matches conditions](/en/basic/automation/trigger/records/record-matches-conditions) trigger instead, which fires only on transitions.
## When to use
* **Sync price changes to an external system.** Watch the "Price" field. When it changes, send an HTTP request to update the price in your e-commerce platform.
* **Send a notification when a task's status changes.** Watch the "Status" field. When a task moves to "Blocked" or "Done", notify the assignee or manager.
* **Log field changes for auditing.** Watch "All Fields" and create a record in an audit log table with the old and new values.
* **Update a linked record when a parent changes.** Watch key fields on a project record. When the project deadline changes, update all linked tasks.
* **Trigger a recalculation in another system.** Watch numeric fields like "Quantity" or "Unit Price". When they change, call an API to recalculate totals.
## Tips
* Start with specific watch fields. You can always add more later if you find you are missing events.
* The filter is evaluated *after* the update. This means the filter checks the record's new values, not the old ones.
* This trigger does not tell you what the previous value was — only what the record looks like now. If you need before-and-after comparison, consider maintaining a "Previous Value" field that your automation updates.
* The trigger fires once per save, even if multiple watched fields change in the same edit.
## Related
* [When record matches conditions](/en/basic/automation/trigger/records/record-matches-conditions) — fires only on state transitions, not every edit
* [When record created](/en/basic/automation/trigger/records/record-created) — fires on new records, not updates
* [Update record action](/en/basic/automation/actions/records/update-record) — the action counterpart for modifying records in workflows
# Overview
Source: https://help.teable.ai/en/basic/base
Create, manage, import and export projects. Move data between Teable Cloud spaces or migrate between Cloud and Self-Hosted instances using .tea files.
A project groups related tables, apps, and automations in one place. Each space can contain multiple projects, and each project has its own resources and collaboration permissions.
Project is the product name for the resource called `base` in the API and CLI. API fields such as `baseId`, the `bse` ID prefix, and `/base/...` URLs stay the same.
For users unfamiliar with projects, you can think of them as workbooks in Excel, where each workbook can contain multiple sheets.
## Create and Manage Projects
### Adding a Project
1. Enter a space
2. Click "Create Project" in the upper right corner
### Creating a Project from a Template
The template center holds projects you can use as they are. Open it from **Template** in the space sidebar, or choose **From template** when you create a project. In the template detail, click **Use this template** and pick the space to put it in; Teable creates a new project from the template.
Some templates are solutions: their automations need external platforms connected before they can keep pulling data, and the template detail lists the platforms involved. For these, Teable creates the project without sample rows and opens a setup screen first:
1. Each platform is one row. Accounts you already authorized under **Settings** → **Integrations** are bound when the screen opens; for the rest, click **Connect account** to run an OAuth flow, or **Authorize mine** to use an existing connection.
2. Entries that need an API key are listed under **Keys to enter**. Click **Enter** to create one, or pick a secret you already saved.
3. Click **Start**. Every workflow whose credentials are complete is switched on, and those that run on a schedule take their first run right away, which you can follow in the automation's run history. You then land in the project.
Integrations you skip here are not lost. As long as the project still has one that is not connected, the page shows **N integrations are not connected**; click **Connect** to fill it in at any time. See [Credentials and Integrations](/en/basic/credential).
### Renaming/Deleting a Project
1. Enter a space
2. Hover over a project
3. Click the "···" button to open the menu
4. Click "Rename" or "Delete"
### Organize Resources in a Project
After entering a project, the left sidebar shows the resources in the current project, such as tables, apps, and automations. You can use folders to organize these resources and make large projects easier to browse.
Common operations include:
* **Create folders**: Create folders in the left sidebar to group related resources.
* **Move resources**: Drag tables, apps, or automations into folders, or drag them to reorder.
* **Organize hierarchy**: Folders can contain child nodes. Keep the hierarchy shallow enough for easy navigation.
* **Add descriptions**: For tables, apps, and automations, click **Add description** under the resource name in the header. Use descriptions to record purpose, owner, handoff notes, or usage rules. Teable opens a description the first time you open its resource, and once more after it changes.
* **Check node info**: Open a resource's `...` menu and choose **Node info** to view the folder, table, automation, or app ID, plus created and modified information.
### Duplicate a Project to Another Space
Step 1: In the space, select the project you want to duplicate;
Step 2: Click the menu icon and select the Copy Project option;
Step 3: In the popup, choose the target space. You need Creator permissions in that space.
For larger projects, Teable shows progress in the duplicate dialog while it copies the project structure, records, and attachments. Keep the dialog open until the copy finishes. Revision history and collaborators are not copied.
If the project contains Link, Lookup, Rollup, Conditional Lookup, or Conditional Rollup fields that point to another Space, Teable shows the affected fields before duplication. If you continue, Teable converts those fields to **Single line text** in the duplicated project.
### Move a Project Between Spaces
If you have the required Space permissions, you can move a project to another Space. If the move would leave relationship-based fields pointing across Spaces, Teable warns you and lists the affected fields. When you confirm, Teable converts those fields to **Single line text** as part of the move.
## Import and Export Projects
Use AI Chat to migrate Airtable, Baserow, NocoDB, SmartSuite, and other systems into Teable.
### Import Project (Data Migration)
The `.tea` file format imports a complete project with all its tables, fields, data, and configurations. This is useful for:
* **Data Migration**: Move projects between different Teable instances (e.g., from Cloud to Self-Hosted)
* **Backup Restoration**: Restore a previously exported project
* **Template Sharing**: Share complete project structures with other teams
**Steps:**
1. Enter the space
2. Click the 「···」 button at the top right corner of the space to open the menu
3. Click 「Import」
4. Choose **Import from file** and upload the `.tea` file.
If you want to create a project from Airtable, choose **Import from Airtable** in the same import dialog.
### Export Project (Backup & Migration)
Export your project to a `.tea` file for backup or migration purposes. The exported file contains all tables, fields, data, views, and configurations.
**Steps:**
1. Enter the space
2. Hover your mouse over the project you want to export
3. Click the 「···」 button to open the menu
4. Click 「Export」
5. Keep **Include records** turned on to export record data. Turn it off to export only the structure and configuration.
6. Click **Start exporting** and wait for the export to finish.
7. Click **Download** in the export dialog to save the `.tea` file.
* To migrate data between Teable instances, export your project from the source instance, then import the `.tea` file to the target instance. All data and configurations will be preserved.
* Teable converts cross-project relation fields to **Single line text** fields in the exported file.
* When you duplicate or move a project across Spaces, cross-Space relationship fields are converted to **Single line text**.
## Share a Project
Projects can be shared through public links. The sharing scope can be the entire project or the currently selected item.
1. Enter the target project
2. Open the share menu for the project or selected item
3. Turn on **Share to web**
4. Copy the share link or QR code
Sharing scopes include:
| Scope | Description |
| - | - |
| **Share entire project** | Shares all items in the current project. New tables and folders added later are automatically included. |
| **Share selected item** | Shares the currently selected item. When a folder is shared, its child items are included. |
In the share settings, you can configure link permissions, **Allow viewers to copy data**, password access, regenerate the link, delete the share link, or copy the embed config. When you turn on password access, Teable generates a random password; click **Copy link and password** to send both to visitors at once. See [Share Link Protection](/en/basic/security#share-link-protection).
If the sharing scope includes an app, the app must be published before it can be accessed through the public link.
## Features Within a Project
A project can contain multiple tables for recording and organizing work or business-related information.
For example: A customer management project might have separate tables for "Customer Companies," "Customer Contacts," and "Customer Follow-up Records," while a meeting room management project might have separate tables for recording "Meeting Room Management," "Meeting Room Equipment," and "Meeting Room Reservations."
Therefore, most features within a project are related to tables:
* **Creating Tables**: Projects allow users to create new tables based on project-specific needs, where users can define table structure, fields, and data types.
* **Editing Tables**: Users can edit existing tables within the project, including adding, deleting, and modifying records.
* **Exporting and Importing Data**: Projects support exporting data to CSV, and importing data in both CSV and XLSX formats.
Refer to the [Tables section](/en/basic/table) for more information about tables.
# Credentials and Integrations
Source: https://help.teable.ai/en/basic/credential
Manage your connections and secrets, and grant them to the apps and automations that need them.
Available on all Cloud plans; Self-Hosted requires Business or higher.
When an app or an automation calls an external service, it uses **your credential**. Credentials belong to you, not to the app or automation, and come in two kinds:
* **Connections**: third-party accounts you authorize to Teable, such as Slack, Airtable, or Google Sheets.
* **Secrets**: strings you store yourself, such as an API key or an access token.
You manage credentials in **Settings** → **Integrations** and grant them to individual apps and automations. Once granted, everyone who runs that app or automation uses the granting person's credential. The value is never shown to anyone, and automation test results mask it.
## Manage Your Connections and Secrets
Click your avatar in the lower left, then open **Settings** → **Integrations**. The page has three sections: **My connections**, **My secrets**, and **Third-party apps you authorized**.
**Add secret** asks for:
| Field | Description |
| - | - |
| **Key** | Starts with an uppercase letter; uppercase letters, digits, and underscores only |
| **Value** | Write-only after saving; enter a new value to replace it |
| **Description** | Optional, to record what the secret is for |
Add a connection with **Connect new account**. Type a service name in the search box: the services Teable integrates itself are pinned at the top, and the **Managed by Composio** group below holds several hundred more that Composio authorizes. Both kinds are granted to apps and automations the same way, and neither exposes its value; they differ only in how app code reads them, covered under "Read a Credential in Code" below.
Most services take a single OAuth round trip. A service marked **Connects with an API key** opens a connect dialog instead and asks for the key that service issued you; Composio keeps that value and signs each request with it, and Teable never stores it.
When an authorization expires, the connection offers **Reconnect**.
Each credential shows how many resources currently use it. Click **View** for the list of apps and automations, each marked with when the grant was made, where you can **Remove grant** for any single one.
## Grant a Credential to an App or Automation
Open the resource's credential panel:
* **Apps**: in the App Builder chat panel, open **+** → **More** → **Credentials & config**.
* **Automations**: open the workflow and click **Credentials & config** on the **Edit** tab.
**Grant** offers three routes: **Grant existing credential** picks one of your secrets or connections; **Add secret** creates one and grants it right away; or pick a third-party service from the **Services** list, which runs an OAuth flow for a service you have not connected and grants directly for one marked **Connected**.
Every grant needs a **Variable name**, the alias this credential has inside that app or automation. It follows the same naming rules as a secret key, and it is the name the code reads.
The panel can also list **Not bound yet** placeholders. Copying an app, duplicating a workflow, and importing or duplicating a project carry over the aliases the code expects but none of the credentials. Click **Bind mine** to supply your own credential so the app or automation can run.
When an alias currently holds someone else's credential, **Replace with mine** takes it over. **Only remove the grant (keep placeholder)** unbinds it and leaves the placeholder, so the code needs no change.
When a project still has integrations that are not connected, a strip at the top of the page reads **N integrations are not connected.** Click **Connect** to open the integrations panel and connect an account or enter a key row by row. Closing the strip only silences the integrations that are empty right now; it comes back when a new one is left open. The panel only connects and authorizes — whether an automation runs is still decided by its own switch.
Editing a resource's credential grants requires edit permission on that app or automation. You can only grant credentials you own.
## Read a Credential in Code
| Where | How to read it |
| - | - |
| Automation scripts | An environment variable, such as `process.env.EXTERNAL_API_KEY` |
| Automation input fields | Click **Insert secret** beside the field and pick a granted secret |
| Secrets in an app | Server-side code reads `process.env.MY_API_KEY` |
| Connections in an app | Server-side code calls `getConnectionToken('ALIAS')` for an access token |
| Composio-managed connections in an app | These have no access token to exchange; server-side code calls `callConnection('ALIAS', { ... })` instead, and Composio signs the request server-side |
Paste something that looks like a key into an automation input field and Teable stores it as your secret, leaving a reference in place, so the plaintext never lands in the workflow configuration. Click **Undo** in the notice if you would rather keep the text as typed.
## Credits for Third-Party App Calls
Calling a third-party app through a connection consumes the space's credits, whether the call comes from AI chat, an app, or an automation. These charges are listed under type **Third-party apps** in **Credit usage summary** on the billing page.
Most apps cost very little per call. Apps that bill Teable per returned resource or per request, such as X, cost noticeably more for a single call. Failed calls are not charged, and neither is looking up available tools. Once the space runs out of credits, these calls are refused.
## Authorization Cards in AI Chat
When AI needs an external account, it pins a card headed **Authorization required for this task** to the conversation and waits for you before the turn goes on. Which card you get depends on who needs the credential.
**Connect card**: appears when Cuppy itself has to read or write a service to finish the task, such as fetching mail from Gmail or writing to Notion. The card names the service; click **Connect** to run an OAuth flow or enter that service's key. The turn resumes once the connection is made, and the connection is saved under **My connections** in **Settings** → **Integrations**. Services Teable integrates itself and services managed by Composio are both connected from this card, so there is no need to visit the settings page first. **Skip** withholds the connection, and Cuppy continues with the parts that do not depend on it. If connecting fails, the card shows the error: click **Retry** to try again, or **Give up** to end the request.
**Credential request card**: appears when an app or automation you are building needs the credential at run time, naming the service it wants a connection for, or the alias it wants a secret for. You can:
* **Connect my account**: run an OAuth flow; the new connection is granted to the resource automatically.
* **Grant my …**: use a connection or secret you already have.
* **Skip**: withhold the credential. AI continues with the parts that do not depend on it.
Sending a message in the composer while a card waits also closes the card and records it as **Skipped**; your message becomes the next instruction for that turn. If the credential is still needed later, ask Cuppy to request it again.
## Replace, Delete, and Leaving a Space
Before you replace a secret value, delete a secret, or disconnect a connection, Teable lists the apps and automations still using it. Deleting and disconnecting break those resources immediately, so grant them a different credential first if they need to keep running. The old secret value cannot be recovered.
After a new value is saved, an automation picks it up on its next run; an app picks it up when its preview environment restarts, and a published app when you republish it.
When you leave a space where an app or automation still uses your credential, the **Integrations** page flags it with **You left this space**. Click **Remove grant** to stop providing it.
# Overview
Source: https://help.teable.ai/en/basic/field
Fields are the columns in a table. By combining different field types, you can build a structure that fits your workflow.
## Field Types
Teable currently provides these field types:
| Category | Field types |
| - | - |
| Basic fields | [Single line text](/en/basic/field/single-line-text), [Long text](/en/basic/field/long-text), [Number](/en/basic/field/number), [Single select](/en/basic/field/single-select), [Multiple select](/en/basic/field/multiple-select), [User](/en/basic/field/user), [Date](/en/basic/field/date), [Rating](/en/basic/field/rating), [Checkbox](/en/basic/field/checkbox), [Attachment](/en/basic/field/attachment) |
| Advanced fields | [Formula](/en/basic/field/formula), [Link to record](/en/basic/field/link), [Lookup](/en/basic/field/lookup), [Rollup](/en/basic/field/rollup), [Conditional lookup](/en/basic/field/conditional-lookup), [Conditional rollup](/en/basic/field/conditional-rollup), [Button](/en/basic/field/button), [Auto number](/en/basic/field/auto-number) |
| System fields | [Created time](/en/basic/field/created-time), [Last modified time](/en/basic/field/last-modified-time), [Created by](/en/basic/field/created-by), [Last modified by](/en/basic/field/last-modified-by) |
## Adding Fields
In the table view, follow these steps to add a new field:
1. Enter the table view
2. Scroll the table to the rightmost side
3. Click the + icon on the far right of the field bar
4. Edit the field in the popup dialog
5. Click Save
## Editing Fields
Users can edit fields when adding them or edit existing fields when needed. To edit an existing field, follow these steps:
1. Right-click the field you want to edit
2. Click the Edit Field option in the expanded menu
3. Edit the field in the Edit Field dialog
4. Click Save
Editing fields may trigger field conversion. Users can change the current field to a new field type, for example, converting a single-line text field to a single select field. However, in some cases, certain conversions may result in data loss. For example, converting a text field to an attachment field will lose all text information because plain text values cannot be converted to attachments.
If you find that some cell values were lost during conversion, you can use the keyboard shortcut `Ctrl+Z`, or `⌘ + Z` on Mac, to undo the conversion, restoring the field to its previous state and recovering any data lost due to the conversion.
For detailed information about each field type and its specific customization options, please refer to the documentation for each field type.
## Deleting Fields
1. Right-click the field you want to edit
2. Click the Delete Field option in the expanded menu
3. Click Confirm in the confirmation dialog
## Hiding Fields
Users can hide fields through the field right-click menu or the hide tool. Hidden fields will not be displayed in the table view. Users can control field visibility at any time using the hide tool. For filtering, sorting, grouping, and other toolbar capabilities, see [View toolbar](/en/basic/view/toolbar).
In the hide tool, click a visible field name to scroll the grid to that column and briefly highlight it. Use the switch next to each field when you want to show or hide the field.
# AI Fields
Source: https://help.teable.ai/en/basic/field/ai/ai-field
AI fields can summarize text, classify tags, generate scores, or turn content into images.
Available on all Cloud plans. Self-hosted deployments require the Business plan or higher.
## Main Use Cases
AI fields generate the current field value from other fields in the same row. Use them to turn raw content into summaries, translations, extracted details, categories, scores, dates, or images.
Summarize, translate, extract information, improve writing, or customize the output. Best for turning longer text into usable copy.
Smart classify or customize the output. Best for matching content to one existing category.
Smart tag or customize the output. Best for matching content to one or more existing tags.
Rate or customize the output. Best for generating scores or numeric results from source content.
Extract information or customize the output. Best for extracting dates or times from content.
Generate images or customize the output. Best for creating images from text or attachments.
If you are not sure which action to use, start here:
* **Summarize**: Creates a summary from the source field.
* **Translate**: Translates the source field into the target language.
* **Extract Information**: Extracts specific information from text. Date fields can also use it to extract dates or times.
* **Improve Writing**: Rewrites content based on your additional requirements.
* **Smart Classify**: Matches a single select field to an existing option.
* **Smart Tag**: Matches a multiple select field to existing options.
* **Rate**: Generates a score or numeric value from the source content.
* **Generate Image**: Creates images in an attachment field. Some models support using an attachment field as a reference image.
Use a custom prompt when the default actions do not cover your case. Custom prompts can reference fields from the same row.
## Workflow
Create a field, choose the field type, then expand **AI Configuration**. Each field type shows the AI actions it supports.
Choose the **AI Action Type** and **AI Model**. The action controls the task. The model controls which AI model generates the result.
Choose the field AI should read as input. The AI field generates its value from source fields in the same row.
Depending on the action, fill in **Additional Requirements**, **Target Language**, or a **Custom Prompt**. For image generation in attachment fields, use **Advanced Settings** to adjust image size, quality, count, aspect ratio, resolution, or reference images. Available settings depend on the selected model.
When you edit an AI field, you can change the action type, model, source fields, additional requirements, custom prompt, and auto-update setting. After you save, the new configuration applies to future generations. If an existing result is not what you want, regenerate it.
## Auto-update and Batch Generation
When **Auto-update** is enabled, the AI field updates with the current configuration when source field content or the AI configuration changes. Use it when the result should stay in sync with source content, such as categories, summaries, scores, or tags generated from feedback.
After you create a field or change its AI configuration, you can choose whether to process records in the current view right away:
Generate content only for empty cells. Existing values are not overwritten.
Regenerate results for records in the current view. Existing values are overwritten.
Save the field configuration without writing values to cells.
After you choose a generation option, Teable shows the task status while it processes records.
To run generation later, use the field menu instead of saving the configuration again.
You can also right-click the field and choose **Generate** to run batch generation for the current view. Availability depends on the current view and your permissions.
## FAQ
After you create a field or change its AI configuration, you can choose **Fill empty cells only**, **Generate entire column**, or **Save configuration only**. You can also batch generate later from the field right-click menu by choosing **Generate**.
Enable **Auto-update** if you want the AI field to update when source field content changes. If you want to control when generation runs, leave it off and use **Generate** when needed.
AI actions depend on the field type. Text fields are suited for summarizing, translating, and extracting information. Single select fields are suited for Smart Classify. Multiple select fields are suited for Smart Tag. Attachment fields are suited for image generation.
The model list comes from models provided by Teable and AI models configured in the current space. To use a third-party model, add a custom AI model in space settings first.
Image size, quality, count, aspect ratio, resolution, and reference image options depend on the selected model.
Some image models apply a total pixel limit. When you choose a high resolution such as **4K**, Teable uses the largest compliant size for the selected aspect ratio, so the exact width and height can vary.
# Attachment
Source: https://help.teable.ai/en/basic/field/attachment
Store images, PDFs, documents, and other files in records, with support for preview, download, and batch download.
The **Attachment** field stores one or more files in a record. Common use cases include contracts, images, invoices, design files, resumes, reports, and images generated by AI fields.
## Use Cases
| Scenario | Good for |
| - | - |
| File archive | Contracts, invoices, reports, resumes, and other business files |
| Image and asset management | Product images, campaign assets, design files, screenshots |
| Form file collection | Resumes, reimbursement receipts, and files submitted by customers |
| AI image output | Image results generated by AI fields |
## Create and Configure
In a table, click `+` to add a field, then choose **Attachment**.
Enter a field name, such as "Files", "Images", or "Contract attachments".
After saving, each record can upload one or more files in this field.
## Upload and View
Attachment fields can store images, PDFs, documents, archives, and other file types.
* **Upload files**: Click the attachment area in a cell or record detail, then choose local files to upload.
* **Store multiple attachments**: One attachment cell can contain multiple files.
* **Preview files**: Images and some file types can be previewed in the cell or record detail.
* **Download or delete one attachment**: Open an attachment to download the file. If you can edit the field, the preview also offers **Delete**, and it moves on to the next file in the record.
Attachment fields store files, not plain text. When converting a text field to an attachment field, Teable cannot convert the original text into files. Check whether the data needs a backup before converting the field.
## Batch Download Attachments
From the attachment field menu, you can download attachments from the current field as a ZIP file. The download scope follows the current table search results:
* If no search is active, Teable downloads downloadable attachments in this attachment field.
* If the table is searching and hiding unmatched rows, Teable only downloads attachments from matching records.
When downloading the ZIP, you can choose an attachment filename prefix:
| Prefix option | Description |
| - | - |
| **Default index** | Uses a system-generated index as the prefix, which helps keep file order clear |
| **Select a field as prefix** | Uses another field value as the filename prefix, useful for organizing files by ID, customer name, or project name |
| **No prefix** | Keeps the original filename where possible |
If duplicate filenames appear in the ZIP file, Teable adds suffixes so each filename stays unique.
## Use with AI Fields
AI fields can read attachments and write generated images to attachment fields.
* **Read attachments**: In AI field settings, add the attachment field as an input field. Whether the AI field can recognize image or file content depends on the selected model.
* **Save images**: Set the AI field output to an attachment field. Generated images are saved to that field.
For more information, see [AI Field](/en/basic/field/ai/ai-field).
## Upload Attachments Through API
The attachment upload API supports local file upload and URL-based upload. New attachments are appended to the end of the target attachment field in the specified record.
See [Upload Attachment API](/en/api-doc/record/upload-attachment).
# Auto Number
Source: https://help.teable.ai/en/basic/field/auto-number
Generate increasing numbers when records are created. Useful for ticket numbers, order sequences, and internal IDs.
An **Auto Number** field automatically generates an increasing number for each record. After the field is created, Teable fills existing records and future records with numbers, so users do not need to maintain them by hand.
## Use Cases
| Scenario | Good for |
| - | - |
| Ticket numbers | Generate short IDs for issues, feedback, or support requests |
| Order and contract sequences | Create internal sequence numbers for orders, contracts, or applications |
| Member or candidate IDs | Assign base IDs to members, candidates, or employees |
| Conversation references | Refer to records with numbers such as `#45` in messages or comments |
## Create and Configure
Click the `+` icon on the right side of the table header, then choose **Auto Number** from the field type list.
Enter a field name, such as "Order ID", "Member ID", or "Ticket Number".
After the field is created, Teable fills sequence numbers for existing records and future records.
## Field Behavior
* **Auto-incrementing**: Each new record receives the next number in the sequence.
* **Read-only**: Auto numbers are record metadata. Users cannot edit specific values by hand.
* **Stable across views**: After a number is generated, it stays with the record. Sorting, filtering, and switching views do not change it.
## Notes
* Auto numbers only move forward. If record `3` is deleted, Teable does not reuse that number. The next new record continues with a later number. Gaps can appear in the sequence so references to historical records stay stable.
# Button
Source: https://help.teable.ai/en/basic/field/button
Add a clickable button to each record and use it to trigger an automation.
The Button field adds a clickable button to each record. When someone clicks the button, Teable can trigger a configured automation, such as updating a record, creating a record, sending a message, or calling an external system.
## Use Cases
| Scenario | Suitable actions |
| - | - |
| Status workflow | Start work, complete a task, submit for approval, archive a record |
| Data workflow | Convert a lead to an opportunity, create a task from a request, write the current record to another table |
| Notifications | Send email, team messages, or reminder notifications |
| External integrations | Connect to external systems through an HTTP action in an automation |
## Create and Configure
Create a field in the table and choose the **Button** type.
Customize the button text and color, such as "Send email", "Submit for approval", or "Generate report".
Enable **Limit number of clicks** or **Confirm before click** when needed.
Click **Custom automation** and set the actions that should run after the button is clicked.
## Settings
| Setting | Description |
| - | - |
| Button text and color | Controls how the button appears in the cell |
| Limit number of clicks | Sets the maximum click count for each record, with an optional reset setting |
| Confirm before click | Shows a confirmation dialog before running the button action |
| Custom automation | Configures the automation triggered by the button |
## Common Uses
* **Status workflow**: Click "Complete task" to update the current record status to "Completed".
* **Lead conversion**: Click "Convert to opportunity" to create a record in the opportunities table and update the lead status.
* **Send reminders**: Click "Send reminder" to send an email or team message.
* **External system integration**: Use an HTTP action in the automation to sync the current record to another system.
## Notes
* Each successful button click that triggers an automation counts toward the workspace automation run quota.
* Permission to click a button is separate from permission to edit a record. If users can see the button, they may be able to click it and trigger the workflow, including read-only users or visitors with a shared link.
* A button does not perform actions by itself. It depends on the linked automation. If the automation is disabled or deleted, clicking the button has no effect.
# Button Practical Guide
Source: https://help.teable.ai/en/basic/field/button-practical-guide
Use a Button field to trigger automations and turn fixed workflows, such as lead conversion or task reminders, into one click.
Button fields are useful for fixed, repeated workflows that should run after a person confirms the action. Common examples include converting a lead to an opportunity, scheduling approved content, sending task reminders, or syncing the current record to an external system.
This guide uses lead conversion as the main example and shows how to connect a button to an automation.
## Use Cases
| Scenario | What the button can do |
| - | - |
| Lead conversion | Create a record in the opportunities table and mark the original lead as converted |
| Content scheduling | Create a publishing schedule and notify the teammate responsible for publishing |
| Task reminders | Send an email or team message to the assignee |
| External system sync | Send the current record to another system through an HTTP request |
## Example: Convert a Lead to an Opportunity
In a CRM table, a sales rep clicks the "Convert to opportunity" button after deciding that a lead is ready. The automation completes two actions:
* Create a new record in the opportunities table with key information such as company and contact.
* Update the original lead status in the leads table to "Converted".
### Prepare the Tables
This example uses two tables:
| Table | Purpose | Example fields |
| - | - | - |
| Leads table | Stores leads to follow up. This is where the button field is created | Company name, contact, owner, status |
| Opportunities table | Stores converted opportunities | Opportunity name, related customer, owner, source lead |
### Create the Button Field
Add a button field in the leads table:
Create a field and choose **Button** as the field type.
Set the button text to "Convert to opportunity" and choose a color that is easy to recognize.
To avoid accidental clicks, enable **Confirm before click** and fill in the dialog title, message, and confirm-button text.
### Configure Automation Actions
After creating the button field, configure the automation that runs when the button is clicked.
In the button field settings, click **Custom automation** and create a workflow.
Add a **Create record** action and choose the opportunities table as the target table.
Write key lead fields into the new opportunity. For example:
* `Opportunity name` = `Company name` from the triggering record
* `Related customer` = `Contact` from the triggering record
* `Owner` = `Owner` from the triggering record
Add an **Update record** action. Choose the leads table as the target table, use the triggering record ID as the record ID, and update `Status` to "Converted".
After saving the automation, the sales rep can click "Convert to opportunity" to create the opportunity and update the original lead status.
### Add Notifications
If a sales manager or opportunity owner needs to be notified after conversion, add a **Send email** action or a team message action to the automation.
Common settings:
* **Recipient**: A fixed email address, or a user field from the current record.
* **Subject and body**: Insert field values from the triggering record, such as company name, owner, or lead source.
Example email body:
> New opportunity converted: \[Company name] was converted by \[Owner]. Please follow up.
### Connect External Systems
If converted opportunities also need to be synced to a CRM, finance system, or internal tool, add an HTTP request action to the automation.
HTTP requests work best when the target system has a stable API. Before configuring the action, confirm the endpoint, request method, authentication method, and field format.
### Limit Duplicate Clicks
Lead conversion usually should not happen more than once for the same lead. Enable **Limit number of clicks** in the button field:
| Setting | Recommendation |
| - | - |
| Max clicks | Set to `1` |
| Allow reset | Usually keep this off to avoid duplicate opportunities |
After the click limit is reached, the button on that record becomes disabled.
## Notes
* Whether a button click runs successfully depends on whether the linked automation is enabled and working.
* Each successful automation trigger counts toward the workspace automation run quota.
* If the button changes important data, enable click confirmation and limit the number of clicks.
# Checkbox
Source: https://help.teable.ai/en/basic/field/checkbox
Store binary states such as yes/no or done/not done.
A **Checkbox** field records a binary state, such as yes/no, on/off, or done/not done. Users can click a cell to switch between checked and unchecked.
## Use Cases
| Scenario | Good for |
| - | - |
| Task completion | Done, processed, archived |
| Quick flags | VIP, blocked, needs restock |
| Process checkpoints | Image uploaded, copy reviewed, approval passed |
| Automation triggers | Send a notification, update a status, or start the next step after a box is checked |
## Create and Configure
Click the `+` on the right side of the table header, then choose **Checkbox** from the field type list.
Enter a field name, such as "Done", "VIP", or "Approved".
Choose whether new records should be checked or unchecked by default.
After saving, users can click cells to switch the state.
## Common Uses
* **Task status**: Use a "Done" field in a task table, then create an "Incomplete tasks" view that only shows unchecked records.
* **Quick flags**: Mark "VIP" in a customer table or "Needs restock" in an inventory table.
* **Process checkpoints**: Add fields such as "Image uploaded" or "Copy reviewed" in a content calendar so collaborators can see which steps are complete.
## Use Checkbox Values in Formulas
Checkbox fields can be used as boolean values in formulas. For example, return different text based on completion status:
```js theme={null}
IF({Done}, "Done", "In progress")
```
## Statistics and Automation
* **Track completion**: Use the summary bar to count checked values. With counts, you can calculate completion rates.
* **Trigger automation**: When "Approved" is checked, automation can send an email or update other fields.
## Notes
* A Checkbox field only represents two states. If you need several states, such as "Not started", "In progress", and "Done", use a **Single Select** field.
* Use Checkbox fields for clear switches. Do not use them for notes, reasons, or explanations.
# Formatting
Source: https://help.teable.ai/en/basic/field/common/formatter
Control how field values appear, such as decimal places, percentages, currency symbols, date formats, and time formats.
Formatting controls how field values appear. It does not change the field's raw data. It only changes what users see in the table, such as decimal places, percentages, currency symbols, date formats, and time formats.
## Number Formatting
Number fields can use display formats that match your work:
| Format | Description |
| - | - |
| Decimal | Set how many decimal places to show |
| Percentage | Show a number as a percentage, such as `0.25` as `25%` |
| Currency | Add a currency symbol and set decimal places |
## Date and Time Formatting
Date and time fields can set the date format, time format, and timezone.
| Setting | Example |
| - | - |
| US style | `12/31/2023` |
| European style | `31/12/2023` |
| Asian style | `2023/12/31` |
| ISO standard | `2023-12-31` |
| Year and month only | `2023-12` |
| Month and day only | `12-31` |
| Year only | `2023` |
| Month only | `12` |
| Day only | `31` |
Time formats support 24-hour time, 12-hour time, or no time display. Timezones can use a fixed timezone or follow the viewer's location.
## Field Basic Data Types
| Teable field type | Basic data type | Supports formatting | Dynamic type flag |
| - | - | - | - |
| Single line text | Text | No | No |
| Long text | Text | No | No |
| User | Text | No | No |
| Attachment | Text | No | No |
| Checkbox | Boolean | No | No |
| Multiple select | Text | No | No |
| Single select | Text | No | No |
| Date | Date | Yes | No |
| Number | Number | Yes | No |
| Duration | Number | Yes | No |
| Rating | Number | No\* | No |
| Formula\* | Dynamic | Yes\* | Yes |
| Rollup\* | Dynamic | Yes\* | Yes |
| Count | Number | Yes | No |
| Link | Text | No | No |
| Created time | Date | Yes | No |
| Last modified time | Date | Yes | No |
| Created by | Text | No | No |
| Last modified by | Text | No | No |
| Auto number | Number | Yes | No |
| Button | Text | No | No |
## Notes
* Rating fields show an interactive rating bar. They do not use number formatting, but they are still number fields and can be used in numeric calculations.
* Formula and rollup formatting depends on the output type. If the result is a date or number, it can be formatted. If the result is text or boolean, formatting does not apply.
* Referenced fields still follow the basic value type of the original field.
# Single Value and Multiple Values
Source: https://help.teable.ai/en/basic/field/common/is-multiple-value
Explains whether a field cell stores one value or a group of values.
Single value and multiple values describe whether a cell stores one value or a group of values. After you understand this concept, it is easier to see why links, lookups, rollups, and formulas may return multiple results.
## Basic Concepts
| Type | Description | Example |
| - | - | - |
| Single value | One definite piece of information | "today's date", "John's phone number" |
| Multiple values | A group of values, also understood as an array | "all dates this month", "all of John's phone numbers" |
## Default Single and Multiple Value States
| Field type | Default state |
| - | - |
| Single line text, long text | Single |
| Single select, checkbox, date, number, rating | Single |
| Created time, last modified time, created by, last modified by, auto number, button | Single |
| Multiple select, attachment | Multiple |
| User | Optional |
| Link | Optional |
| Formula, rollup | Dynamic |
Here, "default state" means the field's common state on its own. **Optional** means you can decide whether the field is single-value or multiple-value through field settings. **Dynamic** means the result depends on formula logic, rollup functions, and whether referenced fields are multiple-value fields. After a value passes through a link, lookup, rollup, or formula reference, its state may change.
## State Changes from Links and References
* **Link fields**: If a link field is multiple-value, fields referenced through that link may also become multiple-value. For example, if one task can be assigned to several employees, looking up employee phone numbers through that link may return several phone numbers.
* **Formulas and rollups**: Formulas and rollups are often single-value, but they may become multiple-value when they reference multiple-value fields.
### Example
Suppose you manage a company in Teable with two tables: `Employee Information` and `Project Tasks`.
**Employee Information table**
| Name | Phone | Email | Tasks |
| - | - | - | - |
| John | 123456 | [john@company.com](mailto:john@company.com) | Task 1, Task 2 |
| Mary | 789012 | [mary@company.com](mailto:mary@company.com) | Task 3 |
**Project Tasks table**
| Task name | Assignee | Due date | Progress |
| - | - | - | - |
| Task 1 | John | 2023-11-20 | 50% |
| Task 2 | John | 2023-12-01 | 30% |
| Task 3 | Mary | 2023-11-15 | 80% |
In this example:
* The "Tasks" field in the **Employee Information** table is multiple-value because one employee can be responsible for several tasks.
* The "Assignee" field in the **Project Tasks** table is single-value because each task has one assignee.
When you create a new task in the "Project Tasks" table and assign it to an employee, that employee's "Tasks" field in the "Employee Information" table updates to include all assigned tasks.
### Number Mini Charts
Number fields sometimes display multiple lines or bars instead of one number. This usually means the field has become multiple-value, often through a link, lookup, rollup, or formula reference.
# Interactive Display
Source: https://help.teable.ai/en/basic/field/common/show-as
Change field value display and click behavior, such as emails, phone numbers, and number charts.
Interactive display changes how field values appear and behave when clicked. It does not change the field type. It only changes how users view and interact with the field content.
## Interactive Display for Text Fields
| Display | Description |
| - | - |
| Email | Show text as an email address. Clicking it opens the default mail app |
| Phone | Show text as a phone number. Clicking it starts a call action, depending on device support |
## Interactive Display for Number Fields
Number fields can show numeric status as charts.
### Single-Value Number Fields
| Display | Description |
| - | - |
| Bar | Show the value with bar length. You can set the color, whether to show the value, and the target value that represents 100% |
| Ring | Show the value as ring progress. You can set the color, whether to show the value, and the target value that represents 100% |
### Multiple-Value Number Fields
| Display | Description |
| - | - |
| Bar | Show multiple number values as side-by-side bars |
| Line | Show multiple number values as a line chart |
## Notes
* The target value is a display reference. It does not set a hard upper limit.
* Interactive display can also apply to some formula, rollup, and lookup results. Available options depend on the result type.
# Conditional Lookup
Source: https://help.teable.ai/en/basic/field/conditional-lookup
Look up data across tables with filter conditions and return matching record values.
Conditional Lookup can fetch matching data from a target table without creating a link relationship first. It is useful when the lookup needs to change based on field values in the current record, such as finding the top-selling product in the same category or looking up data for a matching period.
## Use Cases
| Scenario | Good for |
| - | - |
| Category analysis | Find the top-selling product in the same category |
| Period comparison | Look up the previous period's sales amount for period-over-period calculations |
| Customer matching | Find customer details by phone number, email, or customer ID |
| Detail lookup | Return matching detail records based on conditions from the current record |
## Procedure
Click the `+` icon on the right side of a field name, choose **Conditional Lookup**, and enter a field title, such as "Related orders".
In the target table dropdown, choose the table to query.
Choose the field to extract and confirm the returned data type.
Add filter conditions, choose the field, condition type, and comparison value. The comparison value can be a static value or a field from the current table.
Set the sort field, sort direction, and number of records to show when needed.
Turn on **Remove duplicate values** and each value is shown once.
At least one filter condition is required. For multiple conditions, choose "All conditions are met (AND)" or "Any condition is met (OR)".
## Scenario Practice
### Sales Data Period-over-Period Analysis
**Tables**
* Period sales summary table, with fields such as period, start date, end date, and sales amount
* Sales detail table, with fields such as sales amount and sales date
In the period sales summary table, calculate period-over-period growth for each period. First use Conditional Rollup to calculate current period sales, then use Conditional Lookup to fetch previous period sales, and finally use a Formula field to calculate the growth rate.
**Steps**
**Create a conditional rollup field for current period sales**
1. In the period sales summary table, create a Conditional Rollup field named "Current period sales"
2. Target table: Sales detail table
3. Rollup field: Sales amount
4. Filter conditions:
* Field: Sales date -> Condition: Earlier than or equal to -> Value: End date field from the current table
* Field: Sales date -> Condition: Later than or equal to -> Value: Start date field from the current table
5. Aggregate function: Sum
**Create a conditional lookup field for previous period sales**
1. Create a Conditional Lookup field named "Previous period sales"
2. Target table: Period sales summary table (this table)
3. Field: Current period sales
4. Filter condition:
* Field: End date -> Condition: Equals -> Value: Previous period end date field from the current table
5. Aggregate function: Sum
**Create a formula field for period-over-period growth**
1. Create a Formula field named "Period-over-period growth rate"
2. Set the formula to `(Current period sales - Previous period sales) / Previous period sales * 100`
3. Format it as a percentage with 2 decimal places
### Sales Data Product Analysis
**Tables**
* Products table, with fields such as category ID, product name, and sales volume
* Categories table, with fields such as category ID and category name
In the categories table, find the top-selling product for each category to identify the main product in each category.
**Steps**
**Top-selling product**
1. In the categories table, create a Conditional Lookup field named "Top-selling product"
2. Target table: Products table
3. Lookup field: Product name
4. Filter condition:
* Field: Category ID -> Condition: Equals -> Value: Category ID field from the current table
5. Sorting: Sales volume field -> Descending
6. Limit display: 1 record
**Sales volume**
1. Create another Conditional Lookup field named "Sales volume"
2. Target table: Products table
3. Lookup field: Sales volume
4. Filter condition:
* Field: Category ID -> Condition: Equals -> Value: Category ID field from the current table
5. Sorting: Sales volume field -> Descending
6. Limit display: 1 record
## FAQ
Some complex field types, such as images and attachments, may not support filter conditions.
A regular Lookup field requires a Link field first. Conditional Lookup can match data in the target table directly with filter conditions.
# Conditional Rollup
Source: https://help.teable.ai/en/basic/field/conditional-rollup
Calculate cross-table statistics with filter conditions and return one aggregated value.
Conditional Rollup filters matching records from a target table without creating a link relationship first, then calculates statistics on a selected field. It is useful for calculating counts, sums, averages, and other results based on field values in the current record.
## Use Cases
| Scenario | Good for |
| - | - |
| Employee task statistics | Count in-progress tasks and completed tasks for an assignee |
| Period sales statistics | Calculate sales amount, order count, or average order value by date range |
| Duplicate data checks | Count duplicate names, phone numbers, or IDs |
| Regional reports | Aggregate business data by region, store, or channel |
## Procedure
Click the `+` icon on the right side of a field name, choose **Conditional Rollup**, and enter a field title, such as "Total sales amount".
In the target table dropdown, choose the table to query.
Choose the field to calculate and confirm the field type.
Add filter conditions, choose the field, condition type, and comparison value. The comparison value can be a static value or a field from the current table.
Choose a calculation method based on the data type, such as original value, unique values, unique count, sum, count, average, maximum, or minimum.
## Scenario Practice
### Team Task Volume Statistics
**Tables**
* Tasks table
* Statistics table
A team admin needs to count tasks in different statuses for each employee, such as in-progress and completed tasks, to understand workload distribution and completion progress.
**In-progress tasks**
1. In the employee information table, create a Conditional Rollup field named "In-progress tasks"
2. Target table: Task assignments table
3. Rollup field: Task ID
4. Filter conditions:
* Field: Assignee -> Condition: Equals -> Value: Employee field from the current table
* Field: Task status -> Condition: Equals -> Value: "In progress"
5. Aggregate function: Count all
**Completed tasks**
1. Create another Conditional Rollup field named "Completed tasks"
2. Target table: Task assignments table
3. Rollup field: Task ID
4. Filter conditions:
* Field: Assignee -> Condition: Equals -> Value: Employee field from the current table
* Field: Task status -> Condition: Equals -> Value: "Completed"
5. Aggregate function: Count all
### Find Duplicate Values
**Tables**
* Customers table, with fields such as customer name and phone number
In the customers table, find duplicate customer names before merging customer profiles.
**Steps**
1. In the customers table, create a Conditional Rollup field named "Customer name duplicate count"
2. Target table: Customers table (this table)
3. Rollup field: Customer name
4. Filter condition:
* Field: Customer name -> Condition: Equals -> Value: Customer name field from the current table
5. Aggregate function: Count all
6. Create a Formula field named "Duplicate flag"
7. Set the formula to `IF(Customer name duplicate count > 1, "Duplicate", BLANK())`
The customers table shows how many times each customer name appears and marks duplicate records with "Duplicate", so you can filter and handle them later.
## FAQ
Conditional Rollup returns one calculated value, which works well for totals, counts, and averages. Conditional Lookup returns a list of matching raw values, which works well for viewing detail data.
# Created By
Source: https://help.teable.ai/en/basic/field/created-by
Automatically record who created each record.
The **Created By** field automatically records who first created each record. Teable generates the value, so it works well for source tracking, workload analysis, and personal views.
## Use Cases
| Scenario | Good for |
| - | - |
| Source tracking | See which member first created a record |
| Workload statistics | Group by creator and count how many records each member added |
| Personal views | Filter records created by the current user |
| Accountability | Find the original source when data looks wrong |
## Create and Configure
Click the `+` icon on the right side of the table header, then choose **Created By** from the field type list.
Enter a field name, such as "Submitted by" or "Registered by".
After the field is added, it automatically shows the avatar and name of the original creator.
## Common Uses
* **Workload statistics**: Group by the Created By field to see how many records each member created.
* **Issue tracing**: When data looks wrong, check the Created By field to find the original source.
* **Personal workspace**: Set a filter such as `Created By` `is` `current user`.
## Notes
* Created By records the person who created the record **first**. Later edits by other members do not change this field.
* To track who last edited a record, use **Last Modified By**.
* For records imported from Excel or CSV, Created By usually records the user who ran the import.
# Created Time
Source: https://help.teable.ai/en/basic/field/created-time
Automatically record when each record was first created.
The **Created Time** field automatically records when each record was first created. Teable writes the value, so it works well for sorting, filtering, and reporting by creation time.
## Use Cases
| Scenario | Good for |
| - | - |
| New record tracking | See when each record was created |
| Latest record sorting | Sort by Created Time descending to handle the newest data first |
| Period reporting | Filter data created this week, this month, or within a custom date range |
| Read-only timestamp | Store a creation time that users cannot edit by hand |
## Create and Configure
Click the `+` icon on the right side of the table header, then choose **Created Time** from the field type list.
Enter a field name, such as "Submitted at" or "Registered date".
After the field is added, Teable fills the creation time for existing records and future records.
## Display Format
| Setting | Description |
| - | - |
| Date format | Controls how dates are displayed for your business format |
| Time format | Shows or hides time, and supports 12-hour or 24-hour time |
| Time zone | Follows the viewer's system time zone or uses a fixed time zone |
## Common Uses
* **Show latest activity first**: Sort by Created Time descending so newly created records appear at the top.
* **Report by period**: Set a filter such as `Created Time` `is` `this month` to see new records for the month.
## Notes
* Created Time is read-only and cannot be edited by hand.
* When records are imported from Excel or CSV, the created time is usually the import time.
* If you need to record a business date manually, use a **Date** field.
# Date
Source: https://help.teable.ai/en/basic/field/date
Store dates and times, with support for date format, time format, time zone, and auto-fill current time.
A **Date** field stores a specific date or point in time, such as a project deadline, meeting time, or employee start date. It can show only the date, or include a time such as `2025-11-03 14:30`.
## Use Cases
| Scenario | Good for |
| - | - |
| Project scheduling | Task start dates, deadlines, milestone dates |
| Event planning | Meetings, events, appointments, release plans |
| People and contract records | Start dates, signing dates, expiration dates |
| Period reporting | Filter and report data by week, month, or quarter |
## Create and Configure
In table view, add a field and choose **Date**.
Enter a field name, such as "Due Date", "Meeting Time", or "Start Date".
Set the date format, whether to include time, the time format, and the time zone as needed.
If new records should use the current time automatically, enable auto-fill current time.
## Date Field Options
| Option | Description |
| - | - |
| Include time | Store a specific time in addition to the date |
| Date format | Controls date display, such as `YYYY-MM-DD`, `DD/MM/YYYY`, `MM/DD/YYYY`, or `D MMM YYYY` |
| Time format | Controls whether time is shown, and whether it uses 12-hour or 24-hour time |
| Time zone | Sets the time zone used for dates and times, useful for teams across regions |
| Auto-fill current time | Fills new records with the current time when they are created |
For more formats, see [Formatter](/en/basic/field/common/formatter).
## Common Uses
* **Task scheduling**: Record start dates and due dates, then sort or filter by due date.
* **Event planning**: Record meeting and event times so important dates are easy to track.
* **Period reporting**: Filter data for this week, this month, or a custom date range.
* **Date calculations**: Reference Date fields in Formula fields to calculate intervals between dates.
## Notes
If you need to record when a record was created and keep that value read-only, use **[Created Time](/en/basic/field/created-time)**.
# Formula
Source: https://help.teable.ai/en/basic/field/formula
Reference other fields and calculate text, numbers, dates, and logical conditions with formulas.
Formula fields calculate results from other fields in the same record. They can handle math operations, text joining, date calculations, and conditional logic. Use them to turn repeated calculation rules into fields.
## Use Cases
| Scenario | Good for |
| - | - |
| Automatic calculation | Calculate total price, profit, or score from quantity, unit price, discount, and other fields |
| Text processing | Join text, extract content, or parse information by delimiter |
| Date processing | Calculate date differences, check time ranges, or generate future dates |
| Conditional logic | Return different results based on conditions, such as status, hints, or categories |
## Formula Basics
### Data Types
Before writing a formula, confirm the types of the fields used in the calculation. Different types support different operations and functions.
| Type | Description | Common uses |
| - | - | - |
| Number | Integers or decimals | Arithmetic, rollups, comparisons |
| Text | String values | Joining, extracting, replacing, splitting |
| Date | Date or date-time values | Calculating intervals, comparing dates |
| Boolean | `TRUE` or `FALSE` | Conditions and logical operations |
### Reference Fields
In a formula, reference another field by its field name. Wrap the field name in `{}` and keep it consistent with the actual field name:
```js theme={null}
{Unit price} * {Quantity}
```
### Operators
| Operator | Use |
| - | - |
| `+` | Calculates the sum of numbers, or joins strings |
| `-` | Calculates the difference between numbers |
| `*` | Calculates the product of numbers |
| `/` | Calculates the quotient of numbers |
| `%` | Calculates the remainder |
## Functions and Expressions
### Common Functions
Functions perform specific operations. For example, `SUM` calculates a total, `LEFT` extracts characters from the start of text, `TEXTBEFORE` extracts text before a delimiter, and `TEXTSPLIT` splits text by a delimiter.
See the [formula cheat sheet](/en/basic/field/formula/cheat-sheet) for more functions.
### Text Processing
| Operation | Function examples | Description |
| - | - | - |
| Join text | `&`, `CONCATENATE` | Joins two or more text values |
| Extract text | `LEFT`, `RIGHT`, `MID`, `TEXTBEFORE` | Extracts part of a string |
| Split text | `TEXTSPLIT` | Splits text into multiple values by delimiter |
### Logical Conditions
Use the `IF` function to return different values based on a condition:
```js theme={null}
IF(condition, value_if_true, value_if_false)
```
When checking whether a field is empty, compare it with `BLANK()`. For example, `IF({Weight}=BLANK(), 1, 2)` returns `1` when a number field is empty, and `2` otherwise.
### Complex Expressions
A complex formula can include multiple functions, field references, and operators. Use parentheses to control calculation order:
```js theme={null}
({Unit price} * {Quantity}) * (1 - {Discount})
```
## Result Display and Maintenance
### Formatting and Interactive Display
Formula results can also use [formatting](/en/basic/field/common/formatter) and [interactive display](/en/basic/field/common/show-as) settings, such as percentage, progress bar, or icon styles. Available options depend on the formula result type.
### Debugging and Optimization
* **Check data types**: Confirm that operations and functions use the correct data types.
* **Verify field references**: Confirm that field names are written correctly.
* **Test step by step**: Break complex formulas into smaller parts and test them separately.
* **Avoid repeated calculations**: If the same calculation is used in several places, consider storing the result in a separate field.
### Complexity Limits
When you save a formula, Teable first expands it into the structure that actually takes part in the computation, then checks the size of that structure. If it exceeds a limit, the save is rejected and the message names what went over and the limit that applies — the number of expanded nodes, the nesting depth of the computation, the depth of references between formulas — and the change is not saved.
A short formula can still go over: when one formula references another, and that one references a third, the expanded structure grows quickly. Storing intermediate results in their own fields and cutting repeated references and complex branches usually brings it back under the limit.
If a saved formula hits a limit while computing, the field reports `Formula compilation exceeds the computation limit; results have not been updated` in [computed field activity](/en/basic/view/grid). Once the formula is simpler, the next write recomputes the field.
# Function Cheat Sheet
Source: https://help.teable.ai/en/basic/field/formula/cheat-sheet
Quickly find formula functions, parameters, output types, and basic examples.
The function cheat sheet helps you find available functions, parameters, output types, and examples. When writing a formula, use the function category to find the function you need.
## Numeric Functions
Numeric functions handle math operations, statistical calculations, and number formatting.
| Function Name | Description | Input | Output | Example |
| - | - | - | - | - |
| SUM | Adds numbers together. Equivalent to number1 + number2 + ... | `number1, [number2, ...]` | Number | `SUM(100, 200, 300) => 600` |
| AVERAGE | Returns the average of numbers. | `number1, [number2, ...]` | Number | `AVERAGE(100, 200, 300) => 200` |
| MAX | Returns the largest value among given numbers. | `number1, [number2, ...]` | Number | `MAX(100, 200, 300) => 300` |
| MIN | Returns the smallest value among given numbers. | `number1, [number2, ...]` | Number | `MIN(100, 200, 300) => 100` |
| ROUND | Rounds a value to the number of decimal places specified by "precision". | `value, [precision]` | Number | `ROUND(1.99, 0) => 2` `ROUND(16.8, -1) => 20` |
| ROUNDUP | Always rounds up, away from zero. | `value, [precision]` | Number | `ROUNDUP(1.1, 0) => 2` `ROUNDUP(-1.1, 0) => -2` |
| ROUNDDOWN | Always rounds down, toward zero. | `value, [precision]` | Number | `ROUNDDOWN(1.9, 0) => 1` `ROUNDDOWN(-1.9, 0) => -1` |
| CEILING | Returns the nearest integer multiple greater than or equal to the value. | `value, [significance]` | Number | `CEILING(2.49) => 3` `CEILING(2.49, 1) => 2.5` |
| FLOOR | Returns the nearest integer multiple less than or equal to the value. | `value, [significance]` | Number | `FLOOR(2.49) => 2` `FLOOR(2.49, 1) => 2.4` |
| EVEN | Returns the smallest even number greater than or equal to the specified value. | `value` | Number | `EVEN(0.1) => 2` `EVEN(-0.1) => -2` |
| ODD | Rounds positive values up to the nearest odd number and negative values down to the nearest odd number. | `value` | Number | `ODD(0.1) => 1` `ODD(-0.1) => -1` |
| INT | Returns the integer part of a number. | `value` | Number | `INT(1.9) => 1` `INT(-1.9) => -2` |
| ABS | Returns the absolute value. | `value` | Number | `ABS(-1) => 1` |
| SQRT | Returns the square root of a non-negative number. | `value` | Number | `SQRT(4) => 2` |
| POWER | Calculates the specified base to the specified power. | `base, exponent` | Number | `POWER(2, 2) => 4` |
| EXP | Calculates Euler's number (e) to the specified power. | `value` | Number | `EXP(0) => 1` `EXP(1) => 2.718` |
| LOG | Calculates the logarithm of a value in the provided base. If not specified, base defaults to 10. | `value, [base=10]` | Number | `LOG(100) => 2` `LOG(1024, 2) => 10` |
| MOD | Returns the remainder after dividing the first parameter by the second. | `value, divisor` | Number | `MOD(9, 2) => 1` `MOD(9, 3) => 0` |
| VALUE | Converts a text string to a number. | `text` | Number | `VALUE("$1,000,000") => 1000000` |
## Text Functions
Text functions handle joining, searching, replacing, extracting, and splitting strings.
| Function Name | Description | Input | Output | Example |
| - | - | - | - | - |
| CONCATENATE | Joins multiple value type parameters into a single text value. | `text1, [text2, ...]` | Text | `CONCATENATE("Hello ", "Teable") => Hello Teable` |
| FIND | Finds the position of a substring in specified text. Returns 0 if substring not found. | `stringToFind, whereToSearch, [startFromPosition]` | Number | `FIND("Teable", "Hello Teable") => 7` |
| SEARCH | Finds the position of a substring in specified text. Returns empty if substring not found. Similar to FIND but returns empty instead of 0. | `stringToFind, whereToSearch, [startFromPosition]` | Text or Empty | `SEARCH("Teable", "Hello Teable") => 7` |
| MID | Extracts a specified number of characters from a text string starting at a specified position. | `text, whereToStart, count` | Text | `MID("Hello Teable", 6, 6) => "Teable"` |
| LEFT | Extracts a specified number of characters from the start of a string. | `text, count` | Text | `LEFT("2023-09-06", 4) => "2023"` |
| RIGHT | Extracts a specified number of characters from the end of a string. | `text, count` | Text | `RIGHT("2023-09-06", 5) => "09-06"` |
| REPLACE | Replaces a specified number of characters starting at a specified position with replacement text. | `text, whereToStart, count, replacement` | Text | `REPLACE("Hello Table", 7, 5, "Teable") => "Hello Teable"` |
| REGEXP\_REPLACE | Replaces all substrings matching a regular expression with replacement text. | `text, regular_expression, replacement` | Text | `REGEXP_REPLACE("Hello Table", "H.* ", "") => "Teable"` |
| SUBSTITUTE | Replaces old text with new text. Can specify an index to replace a specific occurrence of old text. If no index specified, replaces all occurrences. | `text, oldText, newText, [index]` | Text | `SUBSTITUTE("Hello Table", "Table", "Teable") => "Hello Teable"` |
| TEXTBEFORE | Returns the text before the specified delimiter. | `text, delimiter` | Text | `TEXTBEFORE("20, 04, 79", ",") => "20"` |
| TEXTSPLIT | Splits text by the specified delimiter and returns multiple text values. | `text, delimiter` | Array | `TEXTSPLIT("20, 04, 79", ",") => ["20", " 04", " 79"]` |
| LOWER | Converts string to lowercase. | `text` | Text | `LOWER("Hello Teable") => "hello teable"` |
| UPPER | Converts string to uppercase. | `text` | Text | `UPPER("Hello Teable") => "HELLO TEABLE"` |
| REPT | Repeats text a specified number of times. | `text, number` | Text | `REPT("Hello!", 3) => "Hello!Hello!Hello!"` |
| TRIM | Removes whitespace characters from the beginning and end of a string. | `text` | Text | `TRIM(" Hello ") => "Hello"` |
| LEN | Counts the number of characters in a string. | `text` | Number | `LEN("Hello") => 5` |
| T | Returns the parameter if it's text, otherwise returns empty. | `value` | Text or Empty | `T("Hello") => "Hello"` `T(100) => null` |
| ENCODE\_URL\_COMPONENT | Replaces certain characters with encoded equivalents for constructing URLs or URIs. Does not encode: - \_ . \~ | `value` | Text | `ENCODE_URL_COMPONENT("Hello Teable") => "Hello%20Teable"` |
## Logical Functions
Logical functions handle conditions and logical operations, such as `IF`, `AND`, and `OR`.
| Function Name | Description | Input | Output | Example |
| - | - | - | - | - |
| IF | Returns value1 if the logical parameter is true, otherwise returns value2. Can be used for nested IF statements and checking if cells are empty. | `logical, value1, value2` | String \| Number \| Boolean \| Datetime | `IF(2 > 1, "A", "B") => "A"` `IF(2 > 1, TRUE, FALSE) => TRUE` |
| SWITCH | Matches an input expression against a series of values and returns the corresponding result. Can return a default value if no match is found. Can often replace nested IF() formulas. | `expression, [pattern, result]..., [default]` | String \| Number \| Boolean \| Datetime | `SWITCH("B", "A", "Value A", "B", "Value B", "Default Value") => "Value B"` |
| AND | Returns true if all parameters are true; otherwise returns false. | `logical1, [logical2, ...]` | Boolean | `AND(1 < 2, 5 > 3) => true` `AND(1 < 2, 5 < 3) => false` |
| OR | Returns true if any parameter is true. | `logical1, [logical2, ...]` | Boolean | `OR(1 < 2, 5 < 3) => true` `OR(1 > 2, 5 < 3) => false` |
| XOR | Returns true if an odd number of parameters are true. | `logical1, [logical2, ...]` | Boolean | `XOR(1 < 2, 5 < 3, 8 < 10) => false` `XOR(1 > 2, 5 < 3, 8 < 10) => true` |
| NOT | Inverts the logical value of its parameter. | `boolean` | Boolean | `NOT(1 < 2) => false` `NOT(1 > 2) => true` |
| BLANK | Returns a null value. Can also be used to test whether a field is empty. | `-` | null | `BLANK() => null` `IF({Weight}=BLANK(), 1, 2) => 1` |
| ERROR | Returns an error value. | `message` | Error | `IF(2 > 3, "Yes", ERROR("Calculation")) => "#ERROR: Calculation"` |
| IS\_ERROR | Returns true if the expression causes an error. | `expr` | Boolean | `IS_ERROR(ERROR()) => true` |
## Date Functions
Date functions handle and convert date and time values, such as getting the current date, calculating date differences, and comparing dates.
| Function Name | Description | Input | Output | Example |
| - | - | - | - | - |
| TODAY | Returns the current date. | `-` | Datetime | `TODAY() => "2023-09-08 00:00"` |
| NOW | Returns the current date and time. | `-` | Datetime | `NOW() => "2023-09-08 16:50"` |
| YEAR | Returns the four-digit year of a date. | `date` | Number | `YEAR("2023-09-08") => 2023` |
| MONTH | Returns the month of a date as a number between 1 (January) and 12 (December). | `date` | Number | `MONTH("2023-09-08") => 9` |
| WEEKNUM | Returns the week number of the year. | `date` | Number | `WEEKNUM("2023-09-08") => 36` |
| WEEKDAY | Returns the day of the week as an integer between 0 and 6. You can optionally provide a second parameter ("Sunday" or "Monday") to start the week on that day. | `date, [startDayOfWeek]` | Number | `WEEKDAY("2023-09-08", "Monday") => 5` |
| DAY | Returns the day of the month as a number between 1-31. | `date` | Number | `DAY("2023-09-08") => 8` |
| HOUR | Returns the hour of a date as a number between 0 (12:00am) and 23 (11:00pm). | `date` | Number | `HOUR("2023-09-08 16:50") => 16` |
| MINUTE | Returns the minute of a date as an integer between 0 and 59. | `date` | Number | `MINUTE("2023-09-08 16:50") => 50` |
| SECOND | Returns the seconds of a date as an integer between 0 and 59. | `date` | Number | `SECOND("2023-09-08 16:50:30") => 30` |
| FROMNOW | Calculates the number of days between the current date and another date. | `date, unit` | Number | `FROMNOW({Date}, "day") => 25` |
| TONOW | Calculates the number of days between the current date and another date. | `date, unit` | Number | `TONOW({Date}, "day") => 25` |
| DATETIME\_DIFF | Returns the datetime difference in specified units. Default unit is seconds. (See unit specifier list.) | `date1, date2, [unit]` | Number | `DATETIME_DIFF("2022-08-01", "2023-09-08", "day") => 403` |
| WORKDAY | Returns the workday date offset from the start date, excluding specified holidays | `date, count, [holidayStr]` | Datetime | `WORKDAY("2023-09-08", 200) => "2024-06-14 00:00:00"` |
| WORKDAY\_DIFF | Returns the number of workdays between date1 and date2. Workdays exclude weekends and an optional list of holidays formatted as a comma-separated string of ISO format dates. | `date1, date2, [holidayStr]` | Number | `WORKDAY_DIFF("2023-06-18", "2023-10-01") => 75` |
| IS\_SAME | Compares two dates to a unit and determines if they are the same. Returns true if they are, false otherwise. | `date1, date2, [unit]` | Boolean | `IS_SAME("2023-09-08", "2023-09-10") => false` |
| IS\_AFTER | Determines if date1 is later than date2. Returns true if it is, false otherwise. | `date1, date2, [unit]` | Boolean | `IS_AFTER("2023-09-10", "2023-09-08") => true` `IS_AFTER("2023-09-10", "2023-09-08", "month") => false` |
## Array and Other Functions
Array and other functions handle rollup arrays, deduplication, joining, cleaning empty values, and record IDs.
| Function Name | Description | Input | Output | Example |
| - | - | - | - | - |
| COUNTALL | Returns the count of all elements, including text and blanks. | `value1, [value2, ...]` | Number | `COUNTALL(100, 200, "", "Teable", TRUE()) => 5` |
| COUNTA | Returns the count of non-empty values. This function counts both numbers and text values. | `value1, [value2, ...]` | Number | `COUNTA(100, 200, 300, "", "Teable", TRUE) => 4` |
| COUNT | Returns the count of numeric items. | `value1, [value2, ...]` | Number | `COUNT(100, 200, 300, "", "Teable", TRUE) => 3` |
| ARRAY\_JOIN | Joins an array of rollup items into a string using a separator. | `array, [separator]` | String | `ARRAY_JOIN(["Tom", "Jerry", "Mike"], "; ") => "Tom; Jerry; Mike"` |
| ARRAY\_UNIQUE | Returns only the unique items in an array. | `array` | Array | `ARRAY_UNIQUE([1, 2, 3, 2, 1]) => [1, 2, 3]` |
| ARRAY\_FLATTEN | Flattens an array by removing any array nesting. All items become elements of a single array. | `array` | Array | `ARRAY_FLATTEN([1, 2, " ", 3, true], ["ABC"]) => [1, 2, 3, " ", true, "ABC"]` |
| ARRAY\_COMPACT | Removes empty strings and null values from an array. Preserves "false" and strings containing one or more whitespace characters. | `array` | Array | `ARRAY_COMPACT([1, 2, 3, "", null, "ABC"]) => [1, 2, 3, "ABC"]` |
| RECORD\_ID | Returns the ID of the current record. | `-` | String | `RECORD_ID() => "recxxxxxx"` |
# Formula Grammar
Source: https://help.teable.ai/en/basic/field/formula/grammar
Formula grammar consists of basic values, field references, operators, functions, and parentheses. After you understand these elements, you can write formulas for calculations, conditions, and text processing.
## Basic Elements
| Element | Syntax | Description |
| - | - | - |
| String | `'Hello'` or `"World"` | Text wrapped in single or double quotes |
| Integer | `123`, `-456` | A number without a decimal point |
| Decimal | `12.34`, `-45.67` | A number with a decimal point |
| Boolean | `TRUE`, `FALSE` | A true or false value |
| Field reference | `{age}` | A field name wrapped in `{}`. The name must match the actual field name |
## Operators
Operators in formulas are used to connect or compare values:
| Type | Operators | | |
| - | - | - | - |
| Math | `+`, `-`, `*`, `/`, `%` | | |
| Comparison | `>`, `<`, `>=`, `<=`, `=`, `!=` | | |
| Logic | `&&`, \` | | \` |
## Function Calls
You can call functions within formulas. A function call consists of a function name, a pair of parentheses, and parameters inside the parentheses. Parameters are separated by commas.
For example, `sum(1, 2, 3)` calls the `sum` function with three parameters: 1, 2, and 3.
## Other Structures
| Structure | Description |
| - | - |
| Parentheses | Change operation precedence, such as `(1 + 2) * 3` |
| Comments | Add context. Block comments use `/* */`, and line comments use `//` |
| Whitespace and line breaks | Usually ignored, but they can make formulas easier to read |
# Last Modified By
Source: https://help.teable.ai/en/basic/field/last-modified-by
Automatically record the user who last edited a record.
The **Last Modified By** field automatically records the user who last edited a record. It helps track collaboration changes. Used with Last Modified Time, it shows who made the latest update and when.
## Use Cases
| Scenario | Good for |
| - | - |
| Collaboration tracking | See which member last updated a record |
| Accountability | Find the most recent editor when a record looks wrong |
| Personal review | Filter records you recently updated |
| Use with Last Modified Time | See both the last editor and last edit time |
## Create and Configure
Click the `+` icon on the right side of the table header, then choose **Last Modified By** from the field type list.
Enter a field name, such as "Last editor" or "Updated by".
After the field is created, it updates to the current user when the record is edited.
## Common Uses
* **Track collaboration responsibility**: If a task status changes to "Canceled", check Last Modified By to see who made the last change.
* **Review recent work**: Set a filter such as `Last Modified By` `is` `current user` to see records you recently handled.
* **Use with Last Modified Time**: View **Last Modified By** and **Last Modified Time** together to confirm when the latest update happened and who made it.
## Notes
* Last Modified By updates automatically when record content changes.
* This field is read-only. Users cannot choose or edit the value by hand.
* If you only need to record the original creator, use **Created By**.
# Last Modified Time
Source: https://help.teable.ai/en/basic/field/last-modified-time
Automatically record when a record was last edited.
The **Last Modified Time** field automatically records when a record was last edited. It can track all fields or only selected fields, which makes it useful for recent updates, inactive data cleanup, and collaboration review.
## Use Cases
| Scenario | Good for |
| - | - |
| Recent updates | Sort by Last Modified Time to see records that changed recently |
| Selected field tracking | Update the time only when key fields change, reducing noise from unrelated edits |
| Inactive data cleanup | Filter records that have not been updated for a long time |
| Collaboration review | Use with Last Modified By to see the latest edit time and editor |
## Create and Configure
Click the `+` icon on the right side of the table header, then choose **Last Modified Time** from the field type list.
Enter a field name, such as "Last updated at" or "Recently maintained".
Choose whether to track all fields or only selected fields.
Set the date format, time format, and time zone as needed.
## Tracking Options
| Option | Description |
| - | - |
| Track all fields | Updates Last Modified Time when any field in the record changes |
| Track selected fields | Updates Last Modified Time only when selected fields change |
## Display Format
| Setting | Description |
| - | - |
| Date format | Choose how dates are displayed, such as `2024-01-30` or `Jan 30, 2024` |
| Time format | Controls whether a specific time is shown, and whether it uses 12-hour or 24-hour time |
| Time zone | Uses a fixed time zone or follows the viewer's system time zone |
## Common Uses
* **Find recently updated tasks**: Sort by Last Modified Time descending so changed records appear at the top.
* **Track key content changes**: Choose **Track selected fields**, then select key fields such as "Title" and "Status".
* **Clean up inactive data**: Set a filter such as `Last Modified Time` `is before` `90 days ago` to find records that have not been maintained.
## Notes
* Last Modified Time is read-only and cannot be edited by hand.
* If selected field tracking is enabled, changes to fields that are not selected do not update the time.
* If you need to record when a record was first created, use **Created Time**.
# Link
Source: https://help.teable.ai/en/basic/field/link
Create relationships between tables and select records from another table in the current record.
The Link field connects two tables. With a Link field, you can select records from another table in the current table and open the linked records when needed. Link fields are also required before you can use **Lookup** and **Rollup** fields.
## Use Cases
| Scenario | Good for |
| - | - |
| Customers and orders | Link customers in the orders table, and view related orders from the customer table |
| Projects and tasks | Link a task to its project, and view all tasks under a project |
| Students and courses | Track course enrollment, project members, or other many-to-many relationships |
| Line items and parent records | Link order line items to an order, then look up prices or roll up totals |
## Create and Configure
In the current table, click add field and choose **Link**.
In the configuration dialog, choose the table to link to, such as linking the orders table to the customers table.
Choose a one-way or two-way link as needed.
Use **Allow multiple selection** and **Allow duplicate values** to configure one-to-one, one-to-many, many-to-one, or many-to-many relationships.
## One-Way and Two-Way Links
| Mode | Description | Best for |
| - | - | - |
| Two-way link | Enabled by default. When you create a link field, Teable creates a corresponding link field in the target table, and both sides stay in sync | Relationships that need to be viewed from both tables, such as orders and customers or projects and tasks |
| One-way link | When the two-way option is off, only the current table shows the linked records. The target table does not get a reverse field | Cases where you only need to reference another table and do not want to change the target table structure |
## Relationship Types
Use **Allow multiple selection** and **Allow duplicate values** together to define four common relationship types:
| Relationship | Business example | Configuration |
| :- | :- | :- |
| **One-to-one (1:1)** | **Employee - Profile** One employee has one profile, and one profile belongs to one employee | ☐ Allow multiple selection ☐ Allow duplicate values *(both options off)* |
| **One-to-many (1:N)** | **Department - Employee** One department has multiple employees, but each employee belongs to one department | ☑ Allow multiple selection ☐ Allow duplicate values *(only allow multiple selection)* |
| **Many-to-one (N:1)** | **Task - Project** Multiple tasks belong to one project, but each task belongs to only one project | ☐ Allow multiple selection ☑ Allow duplicate values *(only allow duplicate values)* |
| **Many-to-many (N:N)** | **Student - Course** One student can take multiple courses, and one course can have multiple students | ☑ Allow multiple selection ☑ Allow duplicate values *(both options on)* |
## Common Uses
* **CRM customer management**: In a `Companies` table, create a link field to a `Contacts` table so one company can link to multiple contacts.
* **Project task assignment**: In a `Tasks` table, create a link field to a `Projects` table so each task belongs to one project, while the project table can show related tasks.
* **Order line items**: In an `Orders` table, link to a `Products` table, then use lookup fields to show prices and rollup fields to calculate order totals.
## Notes
* **One-to-many limits**: In a strict one-to-many relationship, when multiple selection is off on the Table B side, a Table B record linked by one Table A record cannot be selected by other Table A records. This works for data that should not be reused, such as ID numbers or employee profiles.
Link fields can only connect tables in the same Space. Lookup, Rollup, Conditional Lookup, and Conditional Rollup fields also need same-Space source data.
# Long Text
Source: https://help.teable.ai/en/basic/field/long-text
Store long text with line breaks, with support for plain text and Markdown display.
**Long Text** is for longer content that needs line breaks, such as notes, instructions, logs, meeting notes, or detailed descriptions. Unlike Single Line Text, Long Text keeps paragraph structure and can be displayed as Markdown.
## Use Cases
| Scenario | Good for |
| - | - |
| Detailed descriptions | Task details, product descriptions, bug reproduction steps |
| Process notes | Customer follow-ups, daily summaries, meeting notes |
| Supporting context | Notes or explanations that should not be split into separate fields |
| Content drafts | Copy, announcements, and knowledge base snippets |
## Create and Configure
In a table, click `+`, then choose **Long Text**.
Enter a field name, such as "Description", "Notes", or "Details".
Set **Default value**, **Display mode**, and **Field description** as needed.
After saving, users can enter multi-line content in cells.
## Display Mode
| Display mode | Good for | Description |
| - | - | - |
| Plain text | Notes, logs, instructions | Keeps line breaks and is suitable for direct editing and reading |
| Markdown | Document snippets, checklists, links | Displays content with Markdown formatting |
## Common Uses
* **Manual line breaks**: Press `Shift + Enter` while editing to insert a line break.
* **Automatic wrapping**: Cells wrap content based on column width, which makes long text easier to read.
* **Default text**: If every new record needs the same note, set a default value.
## Notes
* Web addresses in the text become clickable links automatically, with nothing to configure. In an expanded record, a link button next to the input lists every address found in the cell.
* Long Text does not support Email or Phone interactive display. Use a **Single Line Text** field when you need to click an address or number to write or call.
# Lookup
Source: https://help.teable.ai/en/basic/field/lookup
Reference field values from a linked table through an existing link relationship and keep the data in sync.
Lookup fields are built on **Link** fields. A Lookup field references a selected field from a linked table, so the current table can display data from another table without entering it again.
## Use Cases
| Scenario | Good for |
| - | - |
| Order line items | After linking a product, show its price, SKU, or category |
| Ticket handling | After linking a customer, show phone number, customer tier, or owner |
| Book management | In a books table, show the author's birthday, nationality, or bio |
| Project management | From linked tasks, show assignee, due date, or status |
## Create and Configure
Before using a Lookup field, create a **Link** field between the two tables.
In the table view, click `+` to add a field and choose **Lookup**.
Choose an existing link field in the current table as the lookup path.
Choose the field to read from the source table, such as an author's birth date, a customer's phone number, or a product price.
When the link points to several records, turn on **Remove duplicate values** and each value is shown once.
## Automatic Sync
After setup, Teable fills the lookup result based on the existing link relationship:
* If the linked record changes, such as choosing a different author, the lookup value updates.
* If source data changes, such as editing an author's birthday, the lookup value refreshes.
## Common Uses
* **Book management**: In a `Books` table, use an `Author` link field to look up `Birth date` from an author details table.
* **Order calculation**: In an `Order line items` table, look up the product price and then use a formula to calculate the total.
* **Customer information sync**: In a tickets table, link a customer and look up the customer's phone number, email, or tier.
## Notes
* **Read-only field**: Lookup fields are **read-only**. You cannot edit the looked-up value from the current table. To change the value, edit the original field in the source table.
* **Single value and multiple values**: If the link relationship is one-to-one, the lookup result is a single value. If the relationship is one-to-many, the lookup result becomes a multi-value array and displays values separated by commas.
* **Data dependencies**: Lookup fields depend on the link field and the source field. If the link field or target field in the source table is deleted, the lookup field stops working.
# Multiple Select
Source: https://help.teable.ai/en/basic/field/multiple-select
Choose one or more values from a predefined list. Useful for tags, categories, and multi-dimensional filtering.
A **Multiple Select** field lets users choose one or more values from predefined options. It works well for tags, topics, skills, departments, and other categories that can apply at the same time.
## Use Cases
| Scenario | Good for |
| - | - |
| Tags and topics | Multiple tags for articles, videos, customers, or tasks |
| Skills and capabilities | Several skills or areas of experience for a member |
| Cross-team work | Departments involved in a project, such as Sales, Engineering, and Finance |
| Multi-dimensional categories | Records that belong to several topics, channels, or business lines |
## Create and Configure
Click the `+` icon on the right side of the table header, then choose **Multiple Select** from the field type list.
Enter a field name, such as "Topics", "Skills", or "Departments".
Enter an option name in the setup panel and press **Enter** to add it quickly.
Set default values as needed, and choose whether users can create new options while editing.
## Option Management
| Setting | Description |
| - | - |
| Color | Teable assigns colors automatically. You can also click the dot on the left side of an option to change it |
| Order | Drag the icon on the left side of an option to reorder the list |
| Default value | New records can start with a common set of tags |
| Allow creating new options | When turned off, users can only choose existing options while editing cells |
## Filter by Multiple Select Values
| Filter type | Description |
| - | - |
| Contains any of | Shows records that include at least one selected option |
| Contains all of | Shows records that include every selected option |
| Exactly equals | The selected options must match exactly, with no extra or missing options |
## Common Uses
* **Content tags**: Add topics such as "Technology", "Design", and "Marketing" to content records.
* **People skills**: Record several skills for each member, then filter by skill combinations.
* **Project departments**: Record which departments are involved in cross-team projects for grouping and reporting.
## Notes
* Multiple Select allows **1 to N** values. Single Select allows **1** value per record.
* Colors help identify categories, but do not rely on color alone for key meaning.
* If the value must be mutually exclusive, use a **Single Select** field.
# Number
Source: https://help.teable.ai/en/basic/field/number
Store numeric data such as prices, inventory, quantities, and ratios. Supports decimals, currency, percentage, and visual displays.
A **Number** field stores values that can be calculated, such as prices, inventory, quantities, scores, and ratios. It supports number, currency, and percentage formats, and can show values as bars, rings, or lines.
## Use Cases
| Scenario | Good for |
| - | - |
| Amounts and costs | Contract amounts, product prices, budgets, costs |
| Quantities and inventory | Stock counts, order quantities, work hours, counts |
| Ratios and progress | Achievement rate, conversion rate, completion rate |
| Scores and metrics | Scores, weights, health scores, risk scores |
## Create and Configure
Click the `+` on the right side of the table header, then choose **Number** from the field type list.
Enter a field name, such as "Product Price", "Inventory", or "Achievement Rate".
Choose **Number**, **Currency**, or **Percentage** based on the data.
Set decimal places, and add a default value for new records if needed.
## Number Formats
| Format | Good for | Example |
| - | - | - |
| Number | Counts, quantities, scores | `100`, `2.5` |
| Currency | Amounts, costs, budgets | `$100.00` |
| Percentage | Ratios, progress, conversion rates | `50%` |
Precision controls how many decimal places are shown. After precision is set, Teable rounds displayed values to that precision.
## Display Settings
Number fields can show values visually in addition to plain text.
| Display mode | Good for | Description |
| - | - | - |
| Default | Single-value and multi-value numbers | Shows the number directly |
| Bar | Single-value and multi-value numbers | Uses bar length to show value size |
| Ring | Single-value numbers | Uses a ring progress display to show proportion |
| Line | Multi-value numbers | Uses a line to show changes across values |
For Bar and Ring display, you can set a target value, color, and whether to show the number. The target value is the value that fills the visual display. For example, if the full score is `100`, set the target value to `100`.
## Common Uses
* **Contract amounts**: Create a "Contract Amount" field, choose **Currency**, select `$`, and set precision to 2 decimal places.
* **Sales achievement rate**: Create an "Achievement Rate" field, choose **Percentage**, set display mode to **Bar**, and set the target value to `1`.
* **Inventory management**: Create an "Inventory" field, choose **Number**, then use it for sorting, filtering, and summaries.
## Notes
* Number fields only accept integers and decimals, such as `12` and `3.14`.
* Percentages are stored as decimals. Entering `100%` stores `1`; entering `50%` stores `0.5`.
* If Formula, Rollup, or Lookup results are numeric, they can use Number field formatting and display modes.
# Rating
Source: https://help.teable.ai/en/basic/field/rating
Add visual numeric ratings to records. Useful for quality, priority, satisfaction, and evaluation results.
A **Rating** field uses icons to show a score. It works well for customer satisfaction, product ratings, priority, idea scores, and performance reviews.
## Use Cases
| Scenario | Good for |
| - | - |
| Product evaluation | Product, feature, or content ratings |
| Service feedback | Customer satisfaction and service quality ratings |
| Performance review | Employee, project, or vendor scores |
| Priority judgment | Urgency, value, or risk |
## Create and Configure
Click the `+` icon on the right side of the table header, then choose **Rating** from the field type list.
Enter a field name, such as "Customer Satisfaction", "Recommendation Score", or "Priority".
The default maximum is **5**. You can change it to **10** or another limit to set the available rating range.
Ratings use stars by default. You can choose another icon to match the meaning of the field.
## Settings
| Setting | Description |
| - | - |
| Maximum value | Controls the rating limit, such as a 5-point or 10-point scale |
| Icon style | Controls the rating symbol, such as star, heart, thumbs-up, or lightbulb |
## Common Uses
* **Product review management**: Record product ratings, then filter for high-rated products.
* **Service feedback**: Collect customer satisfaction in support records and review service quality.
* **Employee performance review**: Score several capability areas in an HR review table.
* **Rating plus comment**: Use with a **Long Text** field to capture both a score and written feedback.
## Notes
* Rating values can be referenced by **Formula** fields to calculate averages or totals.
* Before setting the maximum value, align the team on what each score means.
* If you lower the maximum value later, such as changing 10 to 5, existing scores above the new limit may not display correctly. Check historical data before changing it.
# Rollup
Source: https://help.teable.ai/en/basic/field/rollup
Aggregate values from linked records, such as sum, count, average, maximum, and minimum.
Rollup fields calculate statistics from multiple linked records. A Rollup field usually starts from an existing **Link** field, selects a target field from linked records, and calculates the result with a chosen function.
## Use Cases
| Scenario | Good for |
| - | - |
| Order amount | Roll up prices from order line items to calculate the order total |
| Task progress | Count linked tasks, completed tasks, or average ratings |
| Customer value | Roll up total spend or order count from customer orders |
| Tag cleanup | Combine tags, participants, or source channels from linked records |
## Create and Configure
Before creating a Rollup field, create a **Link** field.
Click `+` in the table header to add a field and choose **Rollup**.
Choose the link field that provides the data source, then choose the target field to calculate.
Choose a function based on the target field type, such as sum, count, average, maximum, or minimum.
## Formatting and Display
Rollup results can usually use formatting and interactive display settings:
* **Formatting**: Set decimal precision, currency symbols, or percentages.
* **Interactive display**: Show number results as bars, rings, or other display styles.
See [formatting](/en/basic/field/common/formatter) and [interactive display](/en/basic/field/common/show-as) for details.
## Common Uses
* **Bookstore order totals**: In an `Orders` table, use the `Selected books` link field to roll up the `Price` field from the `Books` table. Choose **SUM** to calculate the order total.
* **Project task statistics**: In a `Projects` table, count linked tasks or calculate task completion rate.
* **Customer spending totals**: In a `Customers` table, roll up related order amounts to see each customer's total spend.
## Supported Rollup Formulas
| Formula name | Explanation |
| - | - |
| COUNTALL | Counts all values, including text values and blanks |
| COUNTA | Counts non-empty values |
| COUNT | Counts numeric items |
| SUM | Calculates the sum of all numeric values |
| MAX | Returns the largest numeric value |
| MIN | Returns the smallest numeric value |
| AND | Returns true if all values are true |
| OR | Returns true if any value is true |
| XOR | Returns true if an odd number of values are true |
| ARRAY\_JOIN | Joins all values in an array into a string |
| ARRAY\_UNIQUE | Removes duplicate values and returns an array with unique values |
| ARRAY\_COMPACT | Removes empty values and returns a new array |
| CONCATENATE | Joins multiple values into a string |
## Notes
* **Dynamic updates**: Rollup fields calculate in real time. If source data or link relationships change, the rollup result refreshes.
* **Data type limits**: Some functions only work with specific field types. For example, **SUM** only works with number fields. If you choose a text field, Teable does not offer sum as an option.
* **Performance**: Many rollup fields can affect performance, especially when they involve many records. Plan link relationships carefully and review rollup settings from time to time.
# Single Line Text
Source: https://help.teable.ai/en/basic/field/single-line-text
Store short text such as names, titles, IDs, URLs, email addresses, and phone numbers.
**Single Line Text** stores short content that does not need line breaks, such as customer names, task titles, order IDs, SKUs, URLs, email addresses, or phone numbers. Values can be sorted and filtered, and formula functions can reference them for extraction, concatenation, and text formatting.
For notes, summaries, or descriptions that need line breaks, use **[Long Text](/en/basic/field/long-text)**. For fixed values such as status, category, or priority, **[Single Select](/en/basic/field/single-select)** or **[Multiple Select](/en/basic/field/multiple-select)** is usually a better fit.
## Use Cases
| Scenario | Good for |
| - | - |
| Record names or titles | Customer names, task titles, product names, project names |
| IDs or codes | Order IDs, contract IDs, SKUs, external system IDs |
| Contact or access details | Company websites, email addresses, phone numbers |
| Short free text | Short notes, labels, or identifiers that cannot be listed as fixed options |
## Create and Configure
Click the **+** icon on the right side of the table header, then choose **Single Line Text** from the field type list.
Enter a field name, such as "Customer Name", "Order ID", or "Company Website".
If new records usually start with the same text, enter a **Default value**, such as "Pending review" or "New". The default value is filled only when a new record is created and can still be edited later.
## Automatic Link Detection
Web addresses in a cell become clickable links automatically, with nothing to configure. Teable recognizes addresses that start with `https://` or `www.`, as well as common domains such as `teable.ai`. When one value holds several addresses, each becomes its own link. In an expanded record, a link button next to the input lists every address found in the cell.
File names and version numbers such as `readme.md` or `v1.2.3` are not mistaken for addresses.
## Display Mode
Single Line Text supports three display modes:
| Display mode | Good for | Click behavior |
| - | - | - |
| Default | Names, titles, IDs, and other plain text | Addresses become links and open when clicked |
| Email | Email addresses | Opens the default email app |
| Phone | Phone numbers | Opens the communication app on the device. On mobile, users can call the number directly |
Display mode changes how the value appears and behaves when clicked. It does not change the field type. Interactive display can also be used for Formula, Rollup, and Lookup fields. For details, see [Interactive Display](/en/basic/field/common/show-as).
## Common Uses
* **Customer contact management**: Create a "Company Website" field and type the address in it so the website opens when clicked. Create a "Phone" field and set it to **Phone** so mobile users can call in one tap.
* **Order or contract management**: Create an "Order ID" or "Contract ID" field for search, filtering, and matching with external systems.
* **Initial ticket status**: Create a "Current Stage" field and set the default value to "New". If the stage comes from a fixed workflow, use a **Single Select** field instead.
* **Text extraction and concatenation**: Reference Single Line Text in formulas to extract ID segments, concatenate display names, or normalize text format.
## Notes
* Single Line Text is for short content. The Enter key usually confirms input. Use **Long Text** for notes, article summaries, and other long content.
* Email and Phone are display modes. The field remains Single Line Text and can still be sorted, filtered, and processed with text functions.
* Single Line Text does not limit values to predefined options. Use **Single Select** or **Multiple Select** for statuses, categories, and priorities that need consistent values.
# Single Select
Source: https://help.teable.ai/en/basic/field/single-select
Choose one option from a predefined list. Useful for statuses, categories, and priorities.
A **Single Select** field lets users choose one value from predefined options. It works well for mutually exclusive states, such as task stage, customer tier, priority, or approval result.
## Use Cases
| Scenario | Good for |
| - | - |
| Status flow | Not started, in progress, done, and other mutually exclusive stages |
| Category management | Customer tier, lead source, content type |
| Priority management | High, medium, low, and other fixed priorities |
| Approval result | Approved, rejected, needs more information |
## Create and Configure
Click the `+` icon on the right side of the table header, then choose **Single Select** from the field type list.
Enter a field name, such as "Task Status", "Priority", or "Customer Tier".
Enter an option name in the input box and press **Enter** to create it quickly.
If new records usually use the same option, set it as the default value.
## Option Management
| Setting | Description |
| - | - |
| Color | Click the dot on the left side of an option name to choose a color from the palette |
| Order | Drag the icon on the left side of an option to change its order in the dropdown |
| Edit | Edit an option name directly. Existing records are updated with the new name |
| Delete | Click the trash icon on the right side of an option to delete it |
| Allow creating new options | When turned off, users can only choose existing options while editing cells |
## Common Uses
* **Project progress management**: Create a "Task Status" field with options such as "Not started", "In progress", and "Done", then create a **Kanban View** based on that field.
* **Customer tier management**: Create a "Customer Tier" field with options such as "High", "Medium", and "Low", then group customers by tier.
## Single Select vs. Multiple Select
| Field type | Number of values | Good for |
| - | - | - |
| Single Select | Each record can choose only 1 value | Status, stage, tier, priority |
| Multiple Select | Each record can choose multiple values | Tags, skills, topics, departments |
## Notes
* Single Select allows only **1** value per record, so it is suitable for mutually exclusive states.
* If a record needs multiple tags, use a **Multiple Select** field.
* Before converting a Multiple Select field to Single Select, check the data. If a record has multiple options, Teable usually keeps only the first option, which may cause data loss.
# User
Source: https://help.teable.ai/en/basic/field/user
Select space members in records. Useful for assignees, participants, approvers, and collaborators.
A **User** field selects space members in a record. It works well for task assignees, project participants, approvers, and collaborators. It can also be used with filters, grouping, and Kanban views to build personal workspaces.
## Use Cases
| Scenario | Good for |
| - | - |
| Task owner | Assign one owner to each task |
| Multi-person collaboration | Select multiple members on one record to show shared participation |
| Approval and handoff | Record approvers, reviewers, or delivery owners |
| Personal workspace | Filter records assigned to the current user |
## Create and Configure
Click `+` in the table header to add a field, then choose **User**.
Enter a field name, such as "Owner", "Assignee", or "Approver".
When enabled, one record can select multiple members. When disabled, one record can select only one member.
Enable **Notify users when selected** if needed. Selected members receive a notification.
## Settings
| Setting | Description | Good for |
| - | - | - |
| Allow multiple users | One record can select several members | Collaborative tasks, multi-person participation |
| Do not allow multiple users | One record can select only one member | Clear ownership, single approver |
| Notify users when selected | Selected members receive a notification | Task assignment, approval reminders |
## Common Uses
* **Task assignment and Kanban management**: Create an "Owner" field, usually with multiple users turned off, then create a Kanban view grouped by owner.
* **My workspace**: In a table or Kanban view, set a filter such as `Owner` `is` `current user` so each member sees their own tasks.
## Notes
* If **Allow multiple users** is enabled, one record may appear under multiple member groups in grouped or Kanban views. For example, if a task is assigned to A and B, it appears in both A's column and B's column.
* **Notify users when selected** covers new assignments only: someone selecting a member while editing records, or a form submission that fills the field. Operations that carry existing assignments along, such as importing data, duplicating a table or record, restoring records from the trash, and undo or redo, send no notifications.
* When one person assigns members across several records in the same table within a few seconds, each member receives one combined notification instead of one per record.
# Overview
Source: https://help.teable.ai/en/basic/record
Records are the basic data units stored in a table. In a table view, each row usually represents one record.
Records store complete data entries. Each record is made up of multiple fields. For example, a customer record can include name, phone number, owner, and follow-up status. An order record can include order number, customer, amount, and delivery date.
## Basic Concepts
| Concept | Description |
| - | - |
| Record | A row of data in a table |
| Field | An attribute in a record, corresponding to a table column |
| Cell | The value of one record under one field |
| Primary field | The main display name of a record, often used in mobile lists and linked record selectors |
## Create Records
You can create records in the following ways:
| Entry | Action |
| - | - |
| Bottom of the table | Click the `+` button at the bottom of the table view to add a record at the end |
| Top toolbar | Click `+ Add record` on the left side of the toolbar |
| Context menu | Right-click an existing record and insert a record above or below it |
## Edit Records
* **Edit a cell**: Click any cell and enter or change its content.
* **Clear content**: Select one or more cells, then press `Delete` or `Backspace`.
* **Bulk select**: Drag with the mouse to select multiple cells or records, then edit, delete, or copy them.
* **Copy and paste**: Copy and paste one or more cells. If the pasted data has more rows than the current table, Teable automatically adds new rows.
## Delete Records
Select one or more records, then right-click and choose **Delete record**. For bulk deletion, you can select the checkboxes at the beginning of rows before deleting them.
Deleted records go to the table trash, where you can review and restore them. If you want records out of the table but still available, archive them instead of deleting. See [Archive and Trash](/en/basic/record/archive-trash).
If another table links to the record through a **Required** [Link](/en/basic/field/link) field, Teable refuses the deletion and names the table and field that would be left empty. Point that link at another record, clear the **Required** setting on the field, or delete the linking records together with this one.
## Record Details
Click the expand icon at the beginning of a record row, or select a record and press Space, to open the record detail card.
The detail card is useful for records with many fields. You can browse fields vertically on one page, reduce horizontal scrolling, edit fields, view comments, and check record history.
## Collaboration and Tracking
| Feature | Description |
| - | - |
| Comments | Each record has its own comment area for discussing specific data, @mentioning teammates, or adding context. See [Comments](/en/basic/record/comment). |
| Record history | Teable records record changes so you can trace updates. See [Record History](/en/basic/record/record-history). |
| Archive and trash | Move finished records out of the table, or restore ones that were deleted. See [Archive and Trash](/en/basic/record/archive-trash). |
| Linked records | Use a **Link** field to connect records across tables. See [Link Field](/en/basic/field/link). |
## Notes
* The primary field is used as the main display name of a record. Put recognizable information such as a name, task title, or order number in the primary field, instead of note-style content.
* Each record has a unique record ID. After opening the record detail card, the string in the browser URL that starts with `rec` is the record ID.
* If you cannot edit some records, an administrator may have limited the editable scope through the **Authority Matrix**. See [Authority Matrix](/en/basic/authority-matrix).
# Archive and Trash
Source: https://help.teable.ai/en/basic/record/archive-trash
Archive records to move them out of a table without losing them, and restore deleted records from the table trash.
Records that leave the grid end up in one of two places. The **Archive** holds records you moved out of daily work but still need. The **Trash** holds records you deleted, so you can put them back.
Both open from the same place: click the **...** button next to the table, then choose **History** > **Archive** or **History** > **Trash**.
## Archive Records
Available for Business plan and above
Archiving takes records out of the table view and out of your space's record count, while keeping their field values, attachments, and creator information. Use it for finished projects, closed deals, or past seasons that you want out of the way but not deleted.
To archive records, select one or more rows in the grid, right-click, and choose **Archive record** or **Archive all selected records**. The confirmation dialog shows how many records will be archived. If you archive the wrong rows, `Ctrl/Cmd + Z` undoes the action and puts them back.
### Review the Archive
The archive opens as a read-only grid with two extra columns, **Archived time** and **Archived by**, in front of the table's own fields. Click the expand icon on a row to open **Record detail** and read the full record.
Use the toolbar to find the records you need:
| Control | What it does |
| - | - |
| Sort selector | Order by **Sort by archived time**, **Sort by created time**, or **Sort by last modified time** |
| **All creators** | Show only records created by selected collaborators |
| **Archived time** | Limit the list to a date range |
| **Clear filter** | Return to the full archive |
| **Export CSV** | Download the archived records currently listed |
### Restore or Permanently Delete
Select rows in the archive, then use **Restore** or **Permanently delete** in the toolbar. Both buttons show the number of selected records.
Restoring puts the records back into the table with their original values, and they count toward your space record limit again. If the space is already at its record limit, restore fails until you free up rows or raise the limit.
**Permanently delete** removes the archived records for good. This cannot be undone.
Owners and creators can archive, restore, and permanently delete. Editors can archive records and open the archive, but cannot restore or delete from it. Commenters and viewers have no access.
## Table Trash
The trash lists records, fields, and views that were deleted from the table, along with who deleted them and when. Filter the list by type, by the user who deleted the item, or by deletion time, and use **Clear filter** to go back to the full list.
To see what a deletion actually contained, click the entry in the **Deleted resource** column of a record row. **Deleted records** lists those rows in a grid, where you can filter by creator or created time and expand a row for its **Record detail**. Check the batch here before you restore it.
Click **Restore** on a trash entry to put the deleted resource back. As with the archive, restoring records re-occupies row quota, so a space that is already at its record limit must free up rows first.
### How Long Deleted Records Stay Visible
How far back the trash lists deletions depends on your plan:
| Plan | Trash history visible |
| - | - |
| Free | 14 days |
| Pro | 1 year |
| Business | 3 years |
## Related
* [Record History](/en/basic/record/record-history): trace who changed a value and when
* [Records Overview](/en/basic/record): create, edit, and delete records
* [Billing and Plans](/en/basic/space/billing): compare plan limits and change your subscription
# Comments
Source: https://help.teable.ai/en/basic/record/comment
Start discussions in records, @mention teammates, and add context to specific data.
Comments belong to specific records. Team members can discuss issues, add materials, explain why a change was made, and keep context with the data instead of spreading it across chat tools.
## Use Comments
### Open Comments
Open any record detail card, then click the **Comments** icon in the top-right corner to open the side comment panel.
You can also right-click a record in the table view and select **Add comment**.
### Send Comments
Enter content in the comment box and send it. Comments support images and pasted links, which are useful for adding screenshots, references, or external context.
### Mention Teammates
Type `@`, then choose a teammate from the dropdown. The mentioned member receives a notification and can jump directly to the related record.
### Reply and React
| Action | Description |
| - | - |
| Reply | Click **Reply** below a comment to continue the discussion under that comment |
| React | Click the emoji icon next to a comment to respond quickly |
| Edit | Hover over a comment you sent, then click the action button to edit it |
| Delete | Hover over a comment you sent, then click the action button to delete it |
Edited comments display an "edited" label.
## Notifications and Subscriptions
By default, notifications are sent only when:
* Someone `@` mentions you.
* Someone replies to your comment.
If you want to follow a record closely, click the bell icon in the top-right corner of the comment panel and switch to notifications for all comments.
New comment notifications usually appear in the notification center at the bottom-left corner of the interface. Clicking a notification opens the related record and locates the relevant comment.
## Common Scenarios
* **Task clarification**: @mention a teammate under a requirement or task record to confirm details, with the discussion preserved in the record.
* **Approval feedback**: Leave revision feedback under reimbursement, contract, or content review records so the requester can act on it directly.
* **Change notes**: Add a reason after changing important fields so the context is available later.
# Record History
Source: https://help.teable.ai/en/basic/record/record-history
View table-level or single-record change history and track who changed data and when.
Record history is used to view data changes. You can view changes across multiple records from the table level, or open one record to view its complete change history.
## Table Record History
Table record history shows changes across records in the current table. It is useful for checking which records were modified from a global table perspective, and it can also help find accidentally deleted records.
Click the **...** button in the top-right corner of the table, then choose **History** > **Table record history**.
In the table history dialog, click **View Record** next to a history entry to jump to the corresponding record.
Use the filters at the top of the dialog to narrow history by field, user, and time range. After filtering, use **Clear filters** to return to the full list.
When the **Authority Matrix** is not enabled, users with table editing permission can view table record history. When it is enabled, only administrators can view it.
## Individual Record History
Individual record history only shows changes for the current record. It is useful for checking when a field in one record was changed and what changed before and after the update.
Open the record detail card, then click the record history icon in the top-right corner.
You can also right-click a record in the table view and select **Show record history**.
In individual record history, you can use the same filters to focus on a field, modifier, or time range for that record.
Users only need editing permission for a specific record to view that record's history.
## Notes
* Record history stores changes at the cell level.
* Bulk paste and bulk update operations can generate many history entries.
* Records added by an import or by duplicating a table do not create history entries. Later changes to those records are recorded as usual.
* Button field actions appear as **Clicked button** entries.
* If you cannot see the history entry point, first confirm whether you have editing permission for the corresponding record or table.
# Overview
Source: https://help.teable.ai/en/basic/space
Create, rename, delete, and manage spaces in Teable.
## Creating a New Space
After logging into Teable, create a space from the space switcher:
Each user can own up to two free spaces. If you already own two free spaces, you cannot create another free space.
1. Click the current space name in the upper-left corner
2. Click **Create a space**
3. Enter the space name and confirm
## Renaming a Space
Users can change the space name from Space settings:
1. Click **Settings** in the space sidebar
2. Open **General** under **Space**
3. Edit **Space name**
## Adding a Space Avatar
1. Click **Settings** in the space sidebar
2. Open **General** under **Space**
3. Hover over the avatar and select an image
The image must be a JPEG, PNG, or WebP file no larger than 3 MB.
## Deleting a Space
When necessary, you can also delete a space:
1. Click **Settings** in the space sidebar
2. Open **General** under **Space**
3. Click **Delete space**
## Space Trash
Deleted spaces will go to the trash, where you can choose to empty the trash to permanently delete data or restore spaces
## Your Spaces When You Delete Your Account
Open your avatar at the bottom left → **Settings** → **Profile**, then click **Delete account**. The dialog first lists the spaces where you are the only owner; each one needs a decision. Every other space simply loses you as a collaborator and is otherwise untouched.
* By default a space goes to trash together with the account, exactly as if you had deleted it yourself.
* When the space has other members, you can hand it to one of them; the handover runs before the account is deleted.
* A space with an active subscription cannot go to trash with the account. Cancel the subscription first, or hand the space to another member.
Once those spaces are settled, type `DELETE` as prompted to confirm. A deleted account cannot be restored.
## Shared with Me
When someone shares a project with you as a collaborator, the project appears under **Shared with me** in the space sidebar.
Projects shared with you are different from projects in your own spaces:
* Access is controlled by the sharer.
* Available actions depend on the project permission you were granted.
* If the sharer removes your access, the project no longer appears.
For public project sharing, see [Project](/en/basic/base).
## Space Settings
* Click the "···" button in the upper right corner of the space to open the space menu
* Click Space Settings
Space settings now open in the same settings dialog as personal settings. Use the **Space** section in the sidebar for space-level configuration.
**General**
In the General page, you can change the space avatar, edit **Space name**, and view the Space ID.
**Collaborators**
In the Collaborators page, you can manage collaborators, send invitations, remove members, and configure permissions.
**AI settings**
In the AI settings page, space owners can configure custom model providers for AI features in the current space. For configuration details, see [Custom AI models](/en/basic/ai/custom-model).
**Chat in IM**
On the **Chat in IM** page, space administrators can create bots and configure their model, accessible Projects, Skills, files, and IM integration.
**Plan**
In the Plan page, you can view the plan capabilities available to the current space.
**Billing (Cloud Version Only)**
In the Billing page, you can view your current subscription plan and usage statistics.
**Authentication**
In the Authentication page, you can configure SSO providers for the space and manage **Login by URL** and **Login by Button**. See [Single Sign-On (SSO)](/en/basic/sso/overview).
# Project Invitation
Source: https://help.teable.ai/en/basic/space/base-invite
Manage permissions at the project level. Invite members to a specific project without granting access to the entire space for more granular and secure data collaboration.
## What is a Project Collaborator?
A project collaborator is a member invited to a specific project only. Unlike space collaborators, they can only access the projects they've been invited to and cannot see other projects in the space.
## Adding Project Collaborators
Enter any project and click the `Invite` button in the top-right corner. Two methods are supported:
* **Invite by email**: Enter the recipient's email address, set the project permission level (e.g. "Creator"), and click **Send Invitation**.
* **Invite by link**: Switch to the "Invite via Link" tab to generate a dedicated invitation link. Copy and share the link. Recipients can join by clicking it.
After sending an email invitation, you can copy the direct Project link shown in the panel and send it separately. The invitee also receives an in-app notification that opens the Project.
In the invitation panel, you can view all users who currently have access to the project:
* **Project collaborators**: Members invited directly to this project only.
* **Space collaborators**: Shown with a "Space" badge next to their name, indicating they are space-level members who automatically inherit access to this project.
The project offers four permission roles to support different levels of collaboration. For a detailed permission comparison, see [Permission Details](/en/basic/space/space-permission).
For finer-grained control at the table, field, or record level, use the [Authority Matrix](/en/basic/authority-matrix) feature.
| Role | Description |
| - | - |
| Creator | Can perform creation actions, modify table structure, edit automations, and enable authority matrix. |
| Editor | Can modify data. |
| Commenter | Can comment on records but cannot modify data. |
| Viewer | Can view but cannot comment. |
## Use Cases
Project invitation is designed for external collaborators. For example, a freelance designer hired to organize an asset library can be invited to that project alone with **Editor** permission, without seeing any other projects in the space.
## Notes
* **Permission inheritance**: A space Manager automatically has full access to all projects in that space and cannot be downgraded at the project level.
* **Link security**: Anyone who obtains an invitation link can attempt to join the project. If a link is leaked, you can revoke it by clicking the X next to it in the invitation panel.
When the [Authority Matrix](/en/basic/authority-matrix) and [Permission Details](/en/basic/space/space-permission) coexist, only **Manager** users are exempt from Authority Matrix restrictions. All other users are subject to it.
# Billing & Subscription
Source: https://help.teable.ai/en/basic/space/billing
Learn how to manage your subscription, view billing details, monitor usage, and download invoices.
Billing is only available in the Cloud version of Teable. Self-hosted users should refer to the [License Activation](/en/deploy/activate) documentation.
## Accessing Billing Settings
Only **Space Owners** have access to billing settings. To access:
1. Click **Settings** in the space sidebar
2. Select **Billing** under **Space**
## Billing Page Overview
The Billing page displays the following information:
### Current Plan
Shows your current subscription status including:
* **Subscription level** (Free, Pro, or Business)
* **Price per seat** (monthly or yearly)
* **Number of seats** you have purchased
* **Renewal date**, or the cancellation date when the subscription is set to cancel
* A plan change already scheduled for the end of the current period
Click **Change plan** to open the Plan page, where you can change the plan level, the number of seats, and the credit tier.
### Usage Statistics
Monitor your space's resource consumption with these metrics:
| Metric | Description |
| - | - |
| **Total collaborators** | Number of billable collaborators in the current space and its projects |
| **Maximum monthly automation runs** | Monthly automation run quota. Each automation run consumes 1 run quota |
| **Total records** | Total row count across all tables in the space |
| **Attachments storage** | Total storage used by uploaded attachments |
| **Total emails** | Emails sent via automation using Teable Email Service |
Data in both space trash and project trash are counted in the total record statistics. To reduce the total record count, clean up data in "Space → Trash" or "Project → Trash".
Click **Details** on the **Total records** card to view record usage by Project. The dialog shows active records, trash records, and total records for each Project. You can open a Project trash page from the dialog, or permanently delete a Project that is already in trash.
### When a Limit Is Reached
When the space reaches a plan limit, Teable stops the action before it runs and opens the upgrade dialog, which names the limit you hit, shows how much of it you have used, and links to per-Project usage. This applies to pasting, filling, duplicating rows, creating records in bulk, importing, and uploading attachments.
To continue, upgrade the plan or free up room by deleting records or attachments.
### Credits
Credits are Teable's usage units for AI-powered features. Consumption is based on the AI tokens used by the underlying language models, and you can review the details on the Billing page.
On paid plans, credits are bought per seat. Each plan card carries a **credits/seat/month** tier, and the space's monthly credits are the purchased seats multiplied by that tier, shared by everyone in the space. Monthly credits reset every billing period and do not roll over.
| Plan | Credits |
| - | - |
| **Free** | 200 one-time bonus credits |
| **Pro** | 2,000 to 6,000 credits per seat per month |
| **Business** | 3,000 to 1,000,000 credits per seat per month |
The Free plan's 200 credits are a **Welcome bonus** granted at signup. They never expire and count toward the extra credits on the credits card.
To get more credits, buy more seats or choose a higher credit tier on the plan card. The bigger the tier, the less each credit costs.
**What happens when credits run out:** On paid plans, once your monthly credits are exhausted, AI features will be limited until the next billing cycle or until you raise the credit tier. On the Free plan, once the Welcome bonus is used up, you can upgrade to a paid plan to get more credits.
Credits only apply to Teable Cloud; self-hosted editions don't consume Teable Cloud credits and are instead limited by your own infrastructure and any external AI providers you use.
The credits card shows your total credits, included extra credits, reset date, and current usage. Click **Detail** to open **Credit usage summary**, where you can filter by date range and type, view usage charts, and check usage records by name, type, model, credits, member, and date.
### Billing Details
Displays your billing information:
* **Name**: The billing account name
* **Email**: The billing email address
Click **Manage info** to open the payment portal where you can:
* Update your payment method
* Change billing address
* View payment history
The "Manage info" button opens Stripe Customer Portal in a new tab.
### Invoices
View and download your billing invoices:
1. Scroll to the **Invoices** section at the bottom of the page
2. Find the invoice you need in the table
3. Click the download icon to get a PDF copy
The invoice table shows:
* **Reference**: Invoice number
* **Tax**: Total amount including tax
* **Status**: Payment status (e.g., paid)
* **Date**: Invoice date
* **Download**: PDF download button
## Changing Your Subscription Plan
To upgrade, downgrade, or modify your plan:
1. Go to **Settings** → **Plan**
2. Choose the billing period (Monthly or Yearly) at the top of the page
3. On the plan card you want, pick the **credits/seat/month** tier and set the number of seats. The card shows the resulting monthly credits and the total price
4. Click **Subscribe**, or **Modify subscription** on your current plan
5. Complete the checkout or confirmation
Yearly billing is cheaper than monthly. The Plan page shows the current saving on the Yearly tab.
Changing an existing subscription goes through a confirmation page in the billing portal and then returns you to the Billing page. An upgrade applies immediately and is prorated, while a downgrade is scheduled for the end of the current billing period. A scheduled change or a pending cancellation appears in a banner above the plan cards, with **Undo** to keep the subscription as it is.
### Available Plans
| Plan | Best For |
| - | - |
| **Free** | Individuals |
| **Pro** | Small teams & professionals |
| **Business** | Scaling businesses |
### Seats
Seats are purchased up front, and buying ahead of your team is fine. A seat is taken by collaborators with the **Owner**, **Creator**, or **Editor** role in the space and its projects. **Commenter** and **Viewer** are free.
On cloud plans the purchased seats are a hard limit. Teable blocks any action that would push the space past it and offers to add seats. This covers email invitations, creating an invite link with a billable role or switching a link to one, joining through such a link, adding collaborators directly, and promoting someone to a billable role. Someone who already holds a seat can join another project or change role without taking a new one.
To continue, add seats on the Plan page, or give the person the free Commenter or Viewer role. Only the space owner can buy seats.
### Add-on Usage Subscriptions
In the **Plan** tab, **Add-on usage subscriptions** lets you purchase extra usage without changing the main plan. Available add-ons include:
* **Automation**
* **Records**
* **Attachments storage**
## Canceling Your Subscription
Teable follows a "use what you paid for" cancellation policy. When you cancel a subscription, you're not requesting an immediate service termination or refund. Instead, you're choosing not to renew at the end of your current billing period.
To cancel your subscription:
1. Go to **Space Settings** → **Billing**
2. Click **Change plan** to go to the Plan page
3. Find your current plan and click the cancel option
4. Confirm the cancellation
After cancellation:
* Your subscription will remain active until the end of the current billing period
* You'll see a "Will cancel on \[date]" notice
* Your data will be preserved, but premium features will become unavailable after the period ends
* You can resubscribe at any time to restore access to premium features
* No refunds are provided for unused time
## FAQ
Only the Space Owner has access to billing settings. Other collaborators (Creators, Editors, Commenters, Viewers) cannot view or modify billing information.
Seats are counted based on collaborators with **Editor** role or higher (Owner, Creator, Editor). Collaborators with **Commenter** or **Viewer** (Read-only) roles are free of charge.
* **Cloud version**: Teable Cloud plans are billed per seat on a space basis, and seats are bought up front for the whole space. Charges are prorated: if you buy seats partway through a billing period, you only pay for the remaining time in that period. Collaborators cannot exceed the purchased seats.
* **Self-hosted version**: Pricing is based on a monthly or annual pre-paid seat license with no storage, row, or other usage limits. Seats are counted across the entire instance. If the number of users exceeds your license limit, you will need to upgrade your plan to add more seats. See [License Activation](/en/deploy/activate) for details.
For Business plans with Authority Matrix enabled, users assigned through Authority Matrix are counted as billable users.
Have more questions about products or pricing? [Contact sales](https://contact.teable.ai/).
On cloud plans, purchased seats are a hard limit. An invitation, invite link, or role change that would need a seat you have not bought is rejected, and Teable offers to add seats. Buy seats on the Plan page, or give the person the free Commenter or Viewer role. Within the seats you already own, inviting someone costs nothing extra and needs no confirmation. Adding a member through the authority matrix still asks for confirmation, because that path bills automatically.
Yes, until it takes effect. The banner above the plan cards names the pending change and the date it applies. Click **Undo**, and the subscription keeps renewing as it is.
Bulk actions are checked against the number of records they would add, rather than writing until the quota runs out. An operation that would cross the limit is rejected outright, so it never leaves half-written data in your table.
**Total records** and **Attachments storage** are floating usage metrics. Teable calculates them automatically, but after large imports, deletes, trash cleanup, attachment uploads, or attachment deletes, the page may take some time to update.
If **Total records** still seems behind, open **Details** on that card and use **Calibrate** to recount records across all tables in the space. If **Attachments storage** looks inaccurate, use **Calibrate** on that card to recount storage for the current space. After calibration, the page may take a little time to update.
You'll be charged immediately upon subscribing and then on the renewal date each billing cycle (monthly or annually).
Click the **Manage info** button in the Billing details section. This opens the Stripe Customer Portal where you can update your card or add alternative payment methods.
Teable follows a "use what you paid for" cancellation policy. When you cancel, you're choosing not to renew at the end of your current billing period, not requesting an immediate service termination.
Teable does not provide refunds for canceled subscriptions (both Cloud and Self-Hosted) because your service continues until the end of your prepaid period. You receive the full value of your payment by maintaining access to paid features until your subscription naturally expires.
For self-hosted licenses specifically, once a license key is issued, it cannot be modified, downgraded, or refunded. This is because self-hosted licenses are issued as pre-paid, fixed-term authorizations with encrypted validation that cannot be revoked after delivery. If you need a different seat count, you would need to purchase a new license when your current one expires.
For annual billing payments, the upfront annual payment, as well as each additional annual user payment and monthly/quarterly true-up payments, are non-refundable. We offer this discounted rate as a way to encourage long-term investment in Teable, which helps us hire more people, improve the product and customer experience, and support the open source project. If you're not ready to commit, no worries; stick with monthly billing.
If a payment fails, we'll notify you via email. You'll have a grace period to update your payment method before your subscription is suspended.
AI-powered features in Teable use credits. See the credit usage details on the Billing page for the specific usage. Free spaces get a one-time 200 credits at signup, which don't reset monthly. On Pro and Business, you choose a credits/seat/month tier when you subscribe, and the space's monthly credits are that tier multiplied by the purchased seats.
**Can I undo a prompt to get my credits back?**
Credits can't be returned once a prompt is processed. For App Builder, you can roll back your app to a previous version to undo unwanted changes, but the credits used for that prompt won't be restored.
**Credits were used on a failed action. Can I get them back?**
Credits are consumed once your prompt is processed, even if the result is not what you expected. If the AI Agent is unexpectedly interrupted, Teable restores the credits used by the final failed step. If you believe the failure was caused by a Teable-side issue, contact support and we can review it.
**I lost credits to repeated errors that didn't fix the problem.**
We understand the frustration. For App Builder, follow the [App Builder Practical Guide](/en/basic/ai/app-builder-practical-guide) before sending repeated fix prompts.
**The AI made changes I didn't ask for and used my credits.**
If the AI agent made unwanted changes in App Builder, you can roll back to a previous version. Credits for processed prompts are not automatically refunded unless the AI Agent was unexpectedly interrupted, but if the behavior seems like a product bug, we can review it.
If you believe credits were unfairly consumed because of a Teable-side issue, submit a [Credit Issue Report](https://app.teable.ai/share/shrmBIyArdkWm999klP/view) with the related usage details.
One AI Chat or App Builder run can include multiple processing steps. The conversation and billing page both show the total credits for that run. Work that Cuppy already completed and saved can still be used. If the final step is interrupted by an unexpected error, credits for that interrupted step are refunded automatically. You can continue working in the same conversation.
In Teable Cloud, Teable sends AI credit usage notifications to Space Owners when a space is close to or over its credit quota, or when credit usage increases sharply in a short time.
For quota reminders, Teable sends a notification when the current billing period reaches 80% or 90% of the available credits.
Teable Cloud may also send critical notifications for unusual usage, such as a large daily increase or a sudden burst in a short time. The system uses recent daily and hourly usage patterns, and the exact thresholds may change.
The notification opens **Space Settings** → **Billing**. When available, it shows the main sources of credit usage.
If the usage is expected, consider raising the credit tier or changing your plan. If it is unexpected, review the top contributor and adjust or pause the related workflow, app, or AI feature.
Credits follow the seats you have purchased, not the number of people using them. Filling a seat you already own changes nothing. To get more credits, buy seats or raise the credit tier on the Plan page.
## Need Help?
If you have billing questions or issues:
* Email us at **[support@teable.ai](mailto:support@teable.ai)**
* Include your space name and billing email for faster assistance
# Space Invitation
Source: https://help.teable.ai/en/basic/space/space-invite
Invite others to become space collaborators via email or link
## What is a Space Collaborator?
When you share a space with another user, they become a space collaborator with access to all projects within that space.
## Adding Space Collaborators
Creating an invitation link requires Manager or Creator space permissions.
1. Click the space where you want to add collaborators in the left sidebar.
2. Click the "Invite" button near the top of the space.
3. This opens the space invitation window, where you'll see options to invite via email or link. You'll also find previously configured "Invitation Links" and existing "Space Collaborators" in their respective sections.
4. **Email invitation**: Enter an email address or multiple addresses (separated by commas). Then, set the permission level you want users to have for all projects in the space. Finally, click send email to invite users to collaborate.
After sending an email invitation, you can copy the direct Space link shown in the panel and send it separately. The invitee also receives an in-app notification that opens the Space.
5. **Link invitation**: Click the "Invite via Link" option. Then, set the permission level that the invitation link will grant for all projects in the space. Finally, click create link. You can now click the clipboard icon next to the created link to share it however you see fit.
Space collaborators have access to all projects in the space. If someone only needs to work on specific projects, consider making them [Project Collaborators](/en/basic/space/base-invite).
## Deleting Invitation Links
To delete an invitation link, click the X on the right side of the link. This will invalidate the link, and anyone trying to use the old link will not be able to access the space.
## Removing Space Collaborators
You can remove space collaborators from the space sharing window. Click the X next to the user you want to remove. A few things to note:
* **Permission restriction**: Only users with Manager or Creator permissions can remove other collaborators.
* **Self-removal**: You can remove your own access if there is at least one other Manager in the space.
* **Scope**: Removing someone from the space does not remove the permissions they hold on individual projects.
When adding new users to a space, you can assign the following roles (see [Permission Details](/en/basic/space/space-permission)):
| Role | Description |
| - | - |
| Manager | Responsible for administration, has full permissions including user management, tables, automations, and enabling authority matrix. |
| Creator | Can perform creation actions, modify table structure, edit automations, and enable authority matrix. |
| Editor | Can modify data. |
| Commenter | Can comment on records but cannot modify data. |
| Viewer | Can view but cannot comment. |
## Reviewing Project Access
Each person or department appears once in the space collaborator list, even when they also hold permissions on individual projects. A **Project permissions** badge next to the role shows how many projects they were invited to. Someone who was never added to the space itself is listed as **Has access to selected projects only**.
Expand a row to see those projects and the role held on each. From there, **Remove project access** withdraws one project permission, and **Remove collaborator** on a project-only row withdraws every project permission that person holds in this space.
# Collaboration Permission Details
Source: https://help.teable.ai/en/basic/space/space-permission
This section outlines the operational scope for four different permission levels in spaces and projects.
Teable provides more granular permission control at table/field/record levels. Please refer to the [Authority Matrix](/en/basic/authority-matrix) section.
### Project Operations
| Description | Creator/Manager | Editor | Commenter | Viewer |
| - | :-: | :-: | :-: | :-: |
| View data within the project | ✅ | ✅ | ✅ | ✅ |
| Invite users with equal or lower permissions | ✅ | ✅ | ✅ | ✅ |
| Create or delete view share links | ✅ | ✅ | | |
| Create and edit automations | ✅ | | | |
| Enable authority matrix | ✅ | | | |
| Create or delete project collaboration invitation links | ✅ | | | |
| Rename project | ✅ | | | |
### Record Operations
| Description | Creator/Manager | Editor | Commenter | Viewer |
| - | :-: | :-: | :-: | :-: |
| Comment on records | ✅ | ✅ | ✅ | |
| Add, delete, or modify records | ✅ | ✅ | | |
### View Operations
| Description | Creator/Manager | Editor | Commenter | Viewer |
| - | :-: | :-: | :-: | :-: |
| Download view as CSV | ✅ | ✅ | ✅ | ✅ |
| Print view | ✅ | ✅ | ✅ | ✅ |
| Copy data from view | ✅ | ✅ | ✅ | ✅ |
| Add, delete, or modify views | ✅ | ✅ | ✅ \*Personal views only | |
| Lock and unlock views | ✅ | | | |
| Delete other collaborators' personal views | ✅ | | | |
### Field Operations
| Description | Creator/Manager | Editor | Commenter | Viewer |
| - | :-: | :-: | :-: | :-: |
| Add, delete, duplicate, rename, and edit fields | ✅ | | | |
### Table Operations
| Description | Creator/Manager | Editor | Commenter | Viewer |
| - | :-: | :-: | :-: | :-: |
| Add, delete, duplicate, and rename tables | ✅ | | | |
| Import CSV as new table | ✅ | | | |
### Space Operations
| Description | Manager | Creator | Editor | Commenter | Viewer |
| - | :-: | :-: | :-: | :-: | :-: |
| Access all projects in the space | ✅ | ✅ | ✅ | ✅ | ✅ |
| Invite users with equal or lower permissions | ✅ | ✅ | ✅ | ✅ | ✅ |
| Rename space | ✅ | ✅ | | | |
| Add and remove projects in space | ✅ | ✅ | | | |
| Rearrange projects within space | ✅ | ✅ | | | |
| Move projects between spaces | ✅ | ✅ | | | |
| Adjust billing settings, upgrade space | ✅ | | | | |
| Grant manager permissions | ✅ | | | | |
Once the Authority Matrix is enabled, only users with "Manager" permissions are exempt from its restrictions. For permission levels below "Manager" (such as "Creator" and below), all members except Authority Matrix administrators are subject to the Matrix's unified control.
# Overview
Source: https://help.teable.ai/en/basic/table
Create, import, share, and manage tables in a project.
Each project can contain multiple tables for storing and managing related data. Teable tables are equivalent to database tables — understanding [how they differ from spreadsheets](/en/compare/teable-vs-excel) will help you get the most out of Teable.
## Create and Manage Tables
### Adding Tables
In a project, click the `+` button in the directory and choose to:
1. Create a new blank table
2. Import from a CSV file
3. Import from an Excel file
4. Import from Airtable, if Airtable integration is configured
See the [Import section](/en/basic/table/import) for details.
### Renaming & Deleting
* **Rename**: Double-click the table name in the directory, edit it, then click anywhere outside to save.
* **Delete**: Hover over the table in the directory, click `...`, then select **Delete**.
When other tables link to the table you are deleting, the confirmation dialog lists the fields the delete affects, with the Project and table each one belongs to. Deleting the table converts those link fields into single line text fields that keep the linked record titles, and lookup or rollup fields built on them stop working.
### Trash
Click the trash icon in the upper left of the project to manage deleted tables.
* **Restore**: Bring the table back to the project with all data intact
* **Empty trash**: Permanently delete all trashed tables
Restoring a table does not undo the link conversion. Link fields in other tables stay text, so recreate them if you need the connection back.
## Design Tables
Click **Design** in the table menu to view the table's basic properties:
**Table Information**
Schema, physical table name, description, and last modified time
**Field Properties**
| Property | Description |
| :- | :- |
| **id** | Field ID |
| **name** | Field name |
| **dbFieldName** | Field name in the physical database |
| **type** | Field type |
| **description** | Field description |
| **graph** | View current field dependencies |
| **cellValueType** | Current field value type |
| **isLookup** | Whether it's a field looked up from a linked table |
| **isMultipleCellValue** | Whether it's an [array value field](/en/basic/field/common/is-multiple-value) |
| **isComputed** | Whether it's a computed field (record values of computed fields cannot be modified) |
| **isPending** | Whether it's in calculation |
| **hasError** | Whether there are calculation errors |
| **notNull** | Whether non-null validation is enabled |
| **unique** | Whether unique value validation is enabled |
## Share and Access Tables
### Share a Table
In a table, click **Share** in the upper-right corner, switch to **Share table**, and turn on **Share to web** to generate a share link.
After table sharing is enabled, the **Share** button appears in a gray shared state in every view in that table. This state comes from table sharing; it does not mean each view has been shared separately.
Link permissions:
* **Can view**: Anyone with the link can view table data
* **Can edit**: Logged-in users can edit records in the shared table
* **Can save as copy**: Anyone with the link can save a copy to their space
You can also configure **Allow viewers to copy data**, **Restrict by password**, regenerate or delete the link, and copy the embed config.
To share only the current view, switch to **Share view**. For details, see [View toolbar](/en/basic/view/toolbar).
### Ways to Access Tables
Tables default to a [Grid view](/en/basic/view/grid) and are also accessible via the [API](/en/api-doc/overview). You can create additional views — such as Kanban — to suit different workflow needs.
## Search and Downloads
### Global Search
* Turn on **Search field** to choose which fields to search. This mode supports date fields in addition to text fields.
* Turn off **Search field** to run a fuzzy search across the fields visible in the current view; fields hidden in that view are not matched. Global search does not include date, checkbox, or button fields. Your instance may also limit how many fields global search can cover.
* Turn on **Hide not match row** to show only matching records. Turn it off to keep all rows visible and highlight matches.
* For large tables, editors can turn on **Index** to improve search speed. Building or updating the index can temporarily affect read and write performance.
### Attachment Downloads
Bulk attachment downloads respect the current search results and include only attachments from matching records.
In the bulk download dialog, use **Attachment name prefix** to name ZIP files by default index, a chosen field, or **No prefix** to keep original filenames; duplicates get an auto-appended suffix.
## FAQ
Teable is stricter than Excel — each column has a fixed data type, and a Number column only stores numbers. This constraint ensures data integrity and is the foundation for advanced filtering and automation. See [Teable vs Excel](/en/compare/teable-vs-excel) for details.
Check whether the table is referenced by **linked fields** in other tables. Deleting the source table may cause data display issues in linked tables.
# Export
Source: https://help.teable.ai/en/basic/table/export
Export an entire table or the data currently shown in a view as a CSV file.
Teable supports exporting an entire table or only the data currently shown in a view. Exported files use CSV format.
Export the entire table when you need the full raw data. Export a specific view when you only need the data currently shown in that view.
To export an entire table, open the target table menu in the left directory. To export a view, switch to the target view and open the view menu.
Select **Download CSV**. Teable generates the file according to the selected export scope.
## Export Flow
To export an entire table, hover over the target table name in the left directory, click the `...` button on the right, then select **Download CSV**.
To export a specific view, switch to the target view, confirm the filters, sorting, and hidden-field settings, then click the `...` menu next to the view name and select **Download CSV**.
## Notes
* **Entire table export**: Includes the raw table data, including hidden fields and records.
* **View export**: Exports only the data currently shown in the view. Use it for filtered, sorted, or hidden-field results.
# Import
Source: https://help.teable.ai/en/basic/table/import
Import CSV, Excel, Airtable, or Google Sheets data into Teable.
Use import to initialize a new table, append new data to an existing table, or bring tables from Airtable or Google Sheets into a Teable project. Airtable and Google Sheets are also available when you import a whole project.
Use Connect Everything in AI Chat to migrate Airtable, Baserow, NocoDB, SmartSuite, and other systems into Teable.
Excel files are limited to **5MB**. If you need to import a larger dataset, save it as **CSV** first and then import it.
To create a new table, click `+` at the top of the left directory and choose **CSV file** or **Excel file** under **Add from other sources**. To append data to an existing table, choose **Import data** from the target table menu.
Select the CSV or Excel file you want to import. Excel files must be **5MB** or smaller.
When you create a new table, Teable offers **Import with AI** or **Import manually**.
Review the preview after upload. When creating a new table, you can adjust field types. When appending to an existing table, confirm how file columns map to target fields.
Click **Import** and keep the dialog open until the import finishes. It shows how many rows have been imported, and for a multi-sheet Excel file, which sheet is running.
Before the completion notification arrives, do not delete the table being generated, delete fields, or change field types. These changes may affect the import result.
## Import Flow
Click `+` at the top of the left directory, or `+` on the folder that should hold the new table, and select **CSV file** or **Excel file** according to your file type.
Once the file is uploaded, Teable offers **Optimize and import with AI**. **Import with AI** hands the file to AI Chat, which analyzes the data, adjusts the table structure, relationships, and field types, and runs the import. The import dialog closes and the chat panel opens, so you can watch the progress and reply to steer the result. An AI import uses AI credits, and it is offered when you create a new table, not when you import into an existing one.
**Import manually** goes to the field preview instead, and **Back** in the preview returns to the choice.
In that preview, Teable predicts field types from the first 5,000 rows of data. You can adjust them before importing.
To append data to an existing table, open the table menu, select **Import data**, and choose the file type.
After upload, map file columns to fields in the target table, then click **Import**. Teable processes the data in the background and notifies you when the import succeeds or fails.
## Import from Airtable
If Airtable integration is configured for your instance, you can use Airtable import in two ways:
* To create a new Teable project, open the target space menu, click **Import**, then choose **Import from Airtable**.
* To import tables into the Teable project you are viewing, use the project resource menu:
1. Open the target Teable project.
2. Click `+` at the top of the left directory.
3. Under **Add from other sources**, choose **Airtable**.
4. Connect your Airtable account if needed, then choose the Airtable base to import.
5. Choose whether to import records, download and import attachments, and import view filters, sorts, and grouping.
6. Click **Start import**.
When **Import view filters, sorts and grouping** is enabled, Teable asks for a read-only Airtable shared-base link because the Airtable API does not expose view settings. In Airtable, open the base's **Share** menu, use **Share to web** with full base access, paste that shared-base link into Teable, then turn the shared link off after the import completes.
During import, Teable shows progress by table. If some fields, views, or values need to be adjusted, the import log lists the changes before showing **Import completed**.
## Import from Google Sheets
Start from either entry point:
* To create a new Teable project, open the target space menu, click **Import**, then choose **Import from Google Sheets**.
* To add tables to the project you are viewing, click `+` at the top of the left directory and choose **Google Sheets** under **Add from other sources**.
The first time you import, click **Connect Google account** and finish authorizing in the popup. Teable remembers the connection for later imports.
Click **Select a spreadsheet from Google Drive** and choose one file in Google's file picker. Teable then reads its structure. Use **Change** to switch to a different spreadsheet.
Each tab is shown as a card with its row and column count. Select the tabs you want. Clear **Import records** if you only want the field structure without the data.
Click **Start import** and keep the dialog open. It reports progress table by table and, when it finishes, how many records each table received. After a new-project import, use **Open project** to go straight to the result.
Teable can only read the spreadsheets you select in Google's file picker, not your whole Drive. To import another file later, open the picker again and select it.
When values or columns need adjusting, the dialog lists each case: an empty tab is skipped, columns beyond the 300-column limit for one tab are not imported, and a value that does not fit the type Teable inferred for its column is dropped. If the import fails partway, the tables that already finished are kept, and the dialog says how many.
## FAQ
The table reached its row limit. That sheet keeps the rows that fit and skips the rest, and the other sheets in the file still import. The result list in the dialog marks which sheet was cut. Import the remaining rows into another table, or raise the row limit for your plan or instance.
A column in the header row is probably missing its name, so Teable used a record as the header instead. Name every column in the header row, remove stray notes from the cells beside the table, then import again.
When a sheet fails, the result list in the dialog shows the reason for that sheet. Before the import starts, Teable also blocks the file when the format does not match the option you chose, when an Excel file is larger than 5MB, or when a field name in the preview is empty or duplicated. Fix the file or the field names, then import again.
## Notes
* **Header row detection**: A CSV file uses the first row as the header. In an Excel file, Teable skips titles and blank rows above the table to find the header row, as long as the header sits on its own row and every column has a name. Check the column names in the preview before importing.
* **Date format**: Teable can recognize common date formats such as `YYYY-MM-DD`. For unusual formats, standardize them before import, or import them as text and convert the field type later.
* **Google Sheets field types**: Teable reads each column's cell formats to choose a field type, so values formatted as dates or numbers in Google Sheets arrive as Date and Number fields. Leading blank rows and banners above the table are skipped when Teable looks for the header row. Check the field types after importing.
* **Airtable select options**: If Airtable select options have names that become identical after trimming spaces, Teable keeps the first option and maps matching record values to it. This prevents duplicate option names during import.
# Form
Source: https://help.teable.ai/en/basic/view/form
Use a Form view to collect submissions and save each response as a new record in the current table.
Form views are generated from the current table. Each submission creates a new record in the table where the form view was created. Use forms to collect feedback, registrations, reimbursement requests, customer details, and other structured data.
Use App Builder for conditional logic, multi-step flows, branded pages, or more complex interactions.
Use a Form view when you only need field names, subtitles, required fields, and basic sharing.
You can also describe your collection needs in [AI Chat](/en/basic/ai/ai-chat) and let AI generate a form view from the current table.
## Use Cases
| Scenario | Good for |
| - | - |
| Information collection | Customer details, registration forms, surveys, feedback |
| Internal requests | Reimbursements, purchasing, leave requests, access requests |
| File submission | Resumes, receipts, contracts, screenshots |
| Lightweight workflow entry | Save external submissions directly as table records |
## Create a Form View
Go to the table that should store form submissions.
Open the view sidebar, click `+`, and choose **Form view**.
Enter a form view name.
After creating the view, Teable opens the form builder for field setup.
## Configure Form Fields
Form fields are generated from the table fields. In the form builder, you can adjust what submitters see.
| Action | Description |
| - | - |
| Reorder fields | Drag fields to change their order on the form |
| Hide fields | Click the hide button on a field, or drag the field to the hidden area on the left |
| Add fields | Drag a field from the left sidebar, or click `+ Add field to this table` |
| Rename field | Click a field and rename it. The name shown on the form updates with the field name |
| Field description | Add a field description to explain what the submitter should enter |
| Require a field | Turn on required so the form cannot be submitted without that field |
## Form Appearance
Form appearance supports a cover image, logo, and submit button text. The cover area uses a fixed height, so avoid placing important text or key information in an image that may be cropped.
## Share the Form
After configuring the form, click **Share form** in the top-right corner of the table, copy the form link, and send it to submitters. You can also click preview to open the public form page in your browser.
## Submission Settings
| Setting | Description |
| - | - |
| Password protection | Submitters must enter the correct password before submitting |
| Track form submitters | Requires submitters to log in to Teable and records submitter information in the Created By field |
When submitter tracking is enabled, visitors who are not logged in must log in or create a Teable account before submitting.
# Gallery
Source: https://help.teable.ai/en/basic/view/gallery
Display records as image cards for product catalogs, asset libraries, and portfolios.
Gallery view displays records as image cards. Use it when images are the main content of the table, such as product photos, design drafts, campaign assets, photo libraries, or portfolios.
## Use Cases
| Scenario | Good for |
| - | - |
| Product catalogs | Product images, models, prices, status |
| Asset management | Design drafts, campaign assets, ads, screenshots |
| Portfolios | Project covers, case images, design work |
| Image review | Filter image records by status, owner, or tags |
## Create a Gallery View
Click `+` next to the view tabs.
Select **Gallery view** from the view types.
After the view opens, use **Customize cards**, filters, and sorting to adjust how records appear.
## Set the Cover Image
Gallery view can use an attachment field as the card cover. If the table already has an attachment field, Teable selects one by default.
| Setting | Description |
| - | - |
| Cover field | Choose an attachment field to use as the card cover, or choose **No image** |
| Multiple files | If the selected attachment field has multiple files, the first file is shown first on the card; users can switch between files from the card carousel |
| Fit | When enabled, the whole image fits inside the cover area; when disabled, the image fills the cover area and may be cropped |
## Configure Card Information
Click **Customize cards** in the toolbar to choose which fields appear on cards, reorder fields, and turn **Hide field name** on or off.
Keep only fields that help identify the record, such as name, status, owner, price, or tags. Too many fields make Gallery view harder to scan.
## View and Edit Images
* Click a cover image to open the preview.
* In preview mode, switch between files, zoom or rotate images, or download the file.
* Click the card body to open the record.
## Manage Records
* Click **Add record** in the toolbar to add a record. If an attachment field is available, you can upload files from the record editor.
* Right-click a card to delete the record or use other record actions.
* Use filters and sorting to manage image records by status, category, or owner.
## Notes
* Gallery view works best when attachment images are central to the table. If records are mostly text or numbers, Grid view is usually faster.
* Field display settings in Gallery view only affect the current view. They do not delete field content.
* Create, edit, delete, and file actions depend on your view, record, and field permissions.
# Grid
Source: https://help.teable.ai/en/basic/view/grid
Display records in rows and columns for structured viewing, editing, and data cleanup.
Grid view is the most common view in Teable. Each record appears as a row, and each field appears as a column. Use it for daily data entry, bulk editing, sorting, filtering, and quick checks.
## Use Cases
| Scenario | Recommended setup |
| - | - |
| Maintain data day to day | Enter, edit, copy, and paste records directly in the grid |
| Clean up many records | Combine filters, groups, sorts, and hidden fields |
| Check numeric data | Use selection statistics for average, filled count, and sum |
| Work with wide tables | Freeze key columns so identifying fields stay visible |
## Create a Grid View
Every new table includes a grid view by default. To create another grid view for a specific workflow:
Go to the target table and open the view list on the left.
Click `+` at the top of the view sidebar and choose **Grid view**.
Enter a view name, set the collaboration mode if needed, and create the view.
## Display Settings
### Manage Field Display
| Action | Description |
| - | - |
| Hide fields | Click **Hidden fields** in the toolbar and turn fields on or off |
| Reorder fields | Drag field headers left or right |
| Find fields | Search field names in the hidden fields panel when the table has many fields |
Hidden fields only change the current view. They do not delete fields or record data.
### Adjust Row Height and Field Name Height
Click **Row height** in the toolbar to adjust the display density of the table view.
* **Row height**: Choose Short, Medium, Tall, or Extra tall to adjust record row height.
* **Field name**: Choose 1 line, 2 lines, or 3 lines to control the display height of column names in the table header.
### Freeze Columns
When a table has many fields, freeze key columns so they stay visible while you scroll horizontally.
* Drag the freeze divider to freeze the columns on its left.
* Right-click a field header and choose **Freeze up to this field** to freeze that field and all fields to its left.
* Teable keeps a scrollable area to the right of frozen columns. If the current window is too narrow, **Freeze up to this field** is disabled or Teable shows **Cannot freeze to this area because the current window is too narrow**. Widen the window or freeze fewer columns.
## Edit and Review Data
### Edit and Work in Bulk
* **Edit a cell**: Click any cell and enter or change content.
* **View long content**: Double-click a cell, or select it and press Space, to open the full content.
* **Fill by dragging**: Drag the fill handle at the bottom-right corner of a selected cell to copy values downward.
### Selection Statistics
When you select a range of cells, Teable shows **Average**, **Filled**, and **Sum** for numeric values. Use this for quick checks on amounts, counts, and scores.
### Track Computed Field Activity
When a computed field is waiting, calculating, or has failed, click the calculation activity indicator on the right side of the Grid toolbar to view the current table's status.
| Status | What you can see |
| - | - |
| **Calculating** | Affected records and calculation progress |
| **Waiting** | Fields queued for calculation |
| **Failed** | The latest calculation error |
If a calculated value grows past the size a cell can hold, the field reports `Computed cell value is too large` with the attempted and maximum size. The limit is 256 KB per computed cell. The rest of the table keeps calculating and the cell keeps its previous value, so the field recalculates on the next write once the value fits.
A single piece of text or a number rarely reaches 256 KB. The limit is usually hit when a record links to many other records and a Lookup or Rollup pulls all of their long text into one cell. For example, a customer with 500 follow-up records, each holding a few hundred words of notes, exceeds the limit once every note is looked up.
The fix is to keep the details out of the cell: use a Rollup to count or sum the linked records, or look up a shorter field such as a status or a number. Open the linked table when you need to read the full content.
The same panel can also report these failures:
| Message | What it means | What to do |
| - | - | - |
| `Formula compilation exceeds the computation limit; results have not been updated` | The expanded structure of the formula is over the limit | Simplify the formula, or move intermediate results into their own fields; see [Formula](/en/basic/field/formula) |
| `Computed results have not been updated due to a resource limit` | The calculation hit a database resource limit | Change fewer records at a time; contact an administrator if it keeps happening |
| `Computation did not finish; some results were not updated` | The computation chain is too deep to finish in one pass | Reduce chained references between fields, then edit the source data again to trigger a new calculation |
## Notes
* Hidden fields, sorting, filtering, grouping, and similar settings apply only to the current view.
* To prevent accidental configuration changes, lock the view. Only users with permission can unlock or change it.
# Kanban
Source: https://help.teable.ai/en/basic/view/kanban
Display records as cards grouped by a field, useful for tracking status, stages, and workflows.
Kanban view displays records as cards and groups them into columns by field value. Use it for task status, sales stages, content workflows, recruiting pipelines, and other stage-based work.
## Use Cases
| Scenario | Good for |
| - | - |
| Project tasks | Track tasks by Not started, In progress, Done |
| Sales pipeline | Manage customers by Lead, Opportunity, Negotiation, Closed |
| Content workflow | Track content by Idea, Writing, Review, Published |
| Hiring pipeline | Manage candidates by Screening, Interview, Offer, Hired |
## Create a Kanban View
Click `+` next to the view tabs.
Select **Kanban view** from the view types.
Choose the field used to create stacks, such as status, stage, owner, or date.
## Stack Settings
Kanban view can stack records by most fields. Attachment and Button fields are not available as stacking fields.
| Action | Description |
| - | - |
| Change stacking field | Click **Stacked by \[field]** in the toolbar and choose another stacking field |
| Hide empty stacks | Turn on **Hide empty stack** in stacking field settings |
| Collapse stacks | Choose **Collapse stack** from the stack menu to show the stack as a vertical bar |
| Sort stacks | When stacked by a Single Select field, drag stacks to reorder them |
## Manage Stacks
When the stacking field is a Single Select field, you can manage options directly from the board:
* Click **Add stack** to create a new option.
* Choose **Rename stack** from the stack menu to rename an option.
* Choose **Delete stack** from the stack menu to delete an option.
These actions change the options in the corresponding Single Select field. Confirm the impact before changing stacks used by other views or workflows.
## Configure Cards
Click **Customize cards** in the toolbar to control what appears on each card.
| Setting | Description |
| - | - |
| Visible fields | Choose which fields appear on cards |
| Field order | Adjust the order of fields on cards |
| Cover | Choose an attachment field as the card cover |
| Hide field name | Show only field values to reduce card density |
Show only fields needed to understand the record status, such as title, owner, due date, priority, and key tags.
## Move and Edit Cards
* Drag a card to change its order or move it to another stack.
* Click `+` at the bottom of a stack to open the create-record dialog. Set the stacking field value if you want the new record to appear in that stack.
* Right-click a card to insert a card above or below, expand the card, or delete it.
* Click a card, or choose **Expand card**, to open the record details.
## Notes
* When you drag a card to another stack, Teable updates the value of the stacking field.
* Create, edit, delete, and drag actions depend on your view, record, and field permissions; cards also cannot be dragged between stacks when the stacking field is computed or read-only.
* For team workflows, consider locking important views so grouping and card settings are not changed by accident.
# Error Codes
Source: https://help.teable.ai/en/api-doc/error-code
Teable Web API follows HTTP status code semantics.
* 2xx
Represents success
* 4xx
Client errors
* 5xx
Server errors
Error responses will return a JSON-encoded body containing error and information fields. Here's an example of an error response body:
```json theme={null}
{
"message": "not allowed to operate space|read on spcxxxxxx",
"status": 403,
"code": "restricted_resource"
}
```
## Success Status Codes
### 200 OK
The request has been successfully completed.
### 201 Created
The request has been successfully completed and a new resource has been created.
## Error Codes
### 400 Bad Request
The request body cannot be parsed as `JSON`, or the input body parameters do not meet specification requirements.
### 401 Unauthorized
Unauthorized access to the API.
### 403 Forbidden
Attempting to access a protected resource with API credentials that lack the necessary permissions.
### 404 Not Found
Route or resource not found. This error is returned when accessing a non-existent resource path or when the request method doesn't match.
### 500 Internal Server Error
The server encountered an unexpected condition.
### 503 Service Unavailable
The service is temporarily unavailable, possibly due to processing timeout or database connection failure.
# Getting IDs
Source: https://help.teable.ai/en/api-doc/get-id
## SpaceId
Click on the target space and copy the string starting with 'spc' from the URL, example: `spcXXXXXXXXXX`
## BaseId
Click on the target project and copy the string starting with 'bse' from the URL, example: `bseXXXXXXXXXX`
## TableId
Click on the target table and copy the string starting with 'tbl' from the URL, example: `tblXXXXXXXXXX`
## ViewId
Click on the target view and copy the string starting with 'viw' from the URL, example: `viwXXXXXXXXXX`
## FieldId
**Method 1:**
Click the "More" icon (three dots) in the top left corner, then select "Design" to enter the design interface and view all field IDs
**Method 2:**
Double-click the column header or select "Edit field" to open the field properties. In the "DB field name" section, you can find the Field ID.
## RecordId
Expand the record edit form and copy the string starting with 'rec' after 'recordId=' in the URL, example: `recXXXXXXXXXX`
# OAuth App
Source: https://help.teable.ai/en/api-doc/oauth
Build integrations that allow users to authorize access to their Teable data using OAuth 2.0.
OAuth Apps allow third-party applications to access Teable on behalf of users. This guide explains how to create and configure an OAuth App, implement the OAuth 2.0 authorization flow, and use access tokens to interact with the Teable API.
Teable supports three OAuth 2.0 authorization modes:
* **Authorization Code + Client Secret**: For web applications with a backend server
* **Authorization Code + PKCE**: For native apps, CLI tools, SPAs, and other public clients that cannot securely store a client secret
* **Device Authorization Grant**: For clients that cannot receive a browser redirect at all, such as a CLI running over SSH, in a container, or in a cloud IDE
## Creating an OAuth App
1. Go to [Settings > OAuth Apps](https://app.teable.ai/setting/oauth-app) in your Teable account.
2. Click **New OAuth Apps** to create a new application.
3. Fill in the required information:
* **OAuth App name**: A descriptive name for your application
* **Homepage URL**: The full URL to your application's website
* **Callback URL**: The URL where users will be redirected after authorization
* **Scopes**: The permissions your application needs
* **Enable device flow**: Off by default. Turn it on only if your application signs users in with a device code
4. After creating the app, generate a **Client Secret**. Make sure to copy and store it securely - you won't be able to see it again.
You'll receive a **Client ID** and need to generate a **Client Secret**. Keep these credentials secure and never expose them in client-side code. If using the PKCE flow, a client secret is not required.
## Available Scopes
Scopes define what actions your OAuth App can perform. Available scopes are organized by resource type:
| Resource | Scopes |
| - | - |
| **App** | `app\|create`, `app\|read`, `app\|update`, `app\|delete` |
| **Project** | `base\|create`, `base\|delete`, `base\|read`, `base\|read_all`, `base\|update`, `base\|table_import`, `base\|table_export`, `base\|query_data`, `base\|authority_matrix_config` |
| **Table** | `table\|create`, `table\|delete`, `table\|export`, `table\|import`, `table\|read`, `table\|update`, `table\|trash_read`, `table\|trash_update`, `table\|trash_reset`, `table\|archive_read`, `table\|archive_manage` |
| **View** | `view\|create`, `view\|delete`, `view\|read`, `view\|update` |
| **Field** | `field\|create`, `field\|delete`, `field\|read`, `field\|update` |
| **Record** | `record\|comment`, `record\|create`, `record\|delete`, `record\|read`, `record\|update`, `record\|archive` |
| **Automation** | `automation\|create`, `automation\|delete`, `automation\|read`, `automation\|update` |
| **Routine** | `routine\|create`, `routine\|delete`, `routine\|read`, `routine\|update` |
| **User** | `user\|email_read`, `user\|integrations`, `user\|spaces_read`, `user\|self_hosted_licenses_read`, `user\|notifications_send` |
The following user scopes let your app read account information or reach the user:
| Scope | Purpose |
| - | - |
| `user\|spaces_read` | Adds `spaces` to the response of the user info endpoint `GET /api/auth/user`: the spaces where the user occupies a seat, with each space's subscription tier, seat count, and whether it is on a trial. Returned on Teable Cloud only |
| `user\|self_hosted_licenses_read` | Adds `selfHostedLicenses` to the user info response: the self-hosted licenses the user purchased that are still valid, with subscription tier, seat count, and whether each is a trial. Returned on Teable Cloud only |
| `user\|notifications_send` | Sends in-app notifications to the authorizing user. See [Sending Notifications to Users](#sending-notifications-to-users) |
Request only the scopes your application actually needs. Users will see the requested permissions during authorization.
## OAuth 2.0 Authorization Code Flow
Teable implements the standard OAuth 2.0 Authorization Code flow:
```mermaid theme={null}
sequenceDiagram
participant User
participant App as Your App
participant Teable
App->>Teable: 1. Redirect to /api/oauth/authorize
Teable->>User: 2. Show authorization page
User->>Teable: 3. Approve or deny
Teable->>App: 4. Redirect with authorization code
App->>Teable: 5. Exchange code for tokens
Teable->>App: 6. Return access_token & refresh_token
```
### Step 1: Redirect Users to Authorization
Direct users to the authorization endpoint with your application parameters:
```
GET https://app.teable.ai/api/oauth/authorize
```
**Query Parameters:**
| Parameter | Required | Description |
| - | - | - |
| `response_type` | Yes | Must be `code` |
| `client_id` | Yes | Your OAuth App's Client ID |
| `redirect_uri` | No | Must match one of your registered callback URLs. If omitted, the first registered callback URL will be used |
| `scope` | No | Space-separated list of scopes. If omitted, uses scopes configured in your OAuth App |
| `state` | No | Random string to prevent CSRF attacks. Will be returned in the callback |
**Example:**
```
https://app.teable.ai/api/oauth/authorize?response_type=code&client_id=YOUR_CLIENT_ID&redirect_uri=https://yourapp.com/callback&scope=table|read%20record|read&state=random_state_string
```
### Step 2: User Authorization
Users will see an authorization page showing:
* Your application name and logo
* The requested permissions (scopes)
* Options to approve or deny access
If the user has previously authorized your app (within 7 days by default) and every scope in this request was already approved, they will be redirected immediately without seeing the authorization page again. If the request adds new scopes, the user has to confirm again; after they do, the previously approved scopes are kept.
### Step 3: Handle the Callback
After the user approves (or denies), Teable redirects to your callback URL:
**On success:**
```
https://yourapp.com/callback?code=AUTHORIZATION_CODE&state=random_state_string
```
**On denial:**
```
https://yourapp.com/callback?error=access_denied&state=random_state_string
```
### Step 4: Exchange Code for Tokens
Exchange the authorization code for access and refresh tokens:
```
POST https://app.teable.ai/api/oauth/access_token
Content-Type: application/x-www-form-urlencoded
```
**Request Body:**
| Parameter | Required | Description |
| - | - | - |
| `grant_type` | Yes | Must be `authorization_code` |
| `code` | Yes | The authorization code received |
| `client_id` | Yes | Your OAuth App's Client ID |
| `client_secret` | Yes | Your OAuth App's Client Secret |
| `redirect_uri` | Yes | Must exactly match the redirect\_uri used in authorization |
**Example Request:**
```bash theme={null}
curl -X POST https://app.teable.ai/api/oauth/access_token \
-H "Content-Type: application/x-www-form-urlencoded" \
-d "grant_type=authorization_code" \
-d "code=AUTHORIZATION_CODE" \
-d "client_id=YOUR_CLIENT_ID" \
-d "client_secret=YOUR_CLIENT_SECRET" \
-d "redirect_uri=https://yourapp.com/callback"
```
**Response:**
```json theme={null}
{
"token_type": "Bearer",
"access_token": "teable_xxxxxxxxxxxx",
"refresh_token": "eyJhbGciOiJIUzI1NiIsInR5cCI6IkpXVCJ9...",
"expires_in": 600,
"refresh_expires_in": 2592000,
"scopes": ["table|read", "record|read"]
}
```
| Field | Description |
| - | - |
| `token_type` | Always `Bearer` |
| `access_token` | Token to use for API requests |
| `refresh_token` | Token to obtain new access tokens |
| `expires_in` | Access token lifetime in seconds (default: 600 = 10 minutes) |
| `refresh_expires_in` | Refresh token lifetime in seconds (default: 2592000 = 30 days) |
| `scopes` | Array of granted scopes |
## PKCE Authorization Flow
PKCE (Proof Key for Code Exchange) is designed for applications that cannot securely store a client secret, such as native desktop apps, mobile apps, CLI tools, or single-page applications.
### Step 1: Generate PKCE Parameters
Before initiating authorization, the client needs to generate a pair of PKCE parameters:
```javascript theme={null}
// Generate code_verifier (43-128 character random string)
const codeVerifier = generateRandomString(43);
// Generate code_challenge = BASE64URL(SHA256(code_verifier))
const encoder = new TextEncoder();
const data = encoder.encode(codeVerifier);
const digest = await crypto.subtle.digest('SHA-256', data);
const codeChallenge = btoa(String.fromCharCode(...new Uint8Array(digest)))
.replace(/\+/g, '-').replace(/\//g, '_').replace(/=+$/, '');
```
### Step 2: Redirect Users to Authorization
```
GET https://app.teable.ai/api/oauth/authorize
```
**Query Parameters:**
| Parameter | Required | Description |
| - | - | - |
| `response_type` | Yes | Must be `code` |
| `client_id` | Yes | Your OAuth App's Client ID |
| `redirect_uri` | No | Callback URL. PKCE mode supports loopback addresses |
| `scope` | No | Space-separated list of scopes |
| `state` | No | Random string to prevent CSRF attacks |
| `code_challenge` | Yes | SHA-256 hash of the code\_verifier (Base64URL encoded) |
| `code_challenge_method` | Yes | Must be `S256` |
**Example:**
```
https://app.teable.ai/api/oauth/authorize?response_type=code&client_id=YOUR_CLIENT_ID&redirect_uri=http://127.0.0.1:8080/callback&code_challenge=YOUR_CODE_CHALLENGE&code_challenge_method=S256&state=random_state_string
```
In PKCE mode, `redirect_uri` supports loopback addresses (`http://127.0.0.1`, `http://[::1]`, `http://localhost`) with flexible port matching - you don't need to register each port exactly.
### Step 3: Handle the Callback
Same as the standard authorization code flow - after user approval, the authorization code is returned via redirect.
### Step 4: Exchange Code + code\_verifier for Tokens
```
POST https://app.teable.ai/api/oauth/access_token
Content-Type: application/x-www-form-urlencoded
```
**Request Body:**
| Parameter | Required | Description |
| - | - | - |
| `grant_type` | Yes | Must be `authorization_code` |
| `code` | Yes | The authorization code received |
| `client_id` | Yes | Your OAuth App's Client ID |
| `code_verifier` | Yes | The original random string generated in Step 1 |
| `redirect_uri` | Yes | Must exactly match the redirect\_uri used in authorization |
PKCE mode does not require `client_secret`. The `code_verifier` is used instead to verify the client's identity.
**Example Request:**
```bash theme={null}
curl -X POST https://app.teable.ai/api/oauth/access_token \
-H "Content-Type: application/x-www-form-urlencoded" \
-d "grant_type=authorization_code" \
-d "code=AUTHORIZATION_CODE" \
-d "client_id=YOUR_CLIENT_ID" \
-d "code_verifier=YOUR_CODE_VERIFIER" \
-d "redirect_uri=http://127.0.0.1:8080/callback"
```
The response format is the same as the standard authorization code flow.
## Device Authorization Flow
The Device Authorization Grant ([RFC 8628](https://datatracker.ietf.org/doc/html/rfc8628)) is for clients that cannot receive a browser redirect: a CLI running over SSH, inside a container, or in a cloud IDE. Your client shows a URL and a short code, the user approves in any browser, and nothing is typed back into the terminal.
Teable follows RFC 8628, so most OAuth client libraries can drive this flow without custom code. What follows is what is specific to Teable.
Device flow is off by default. Turn on **Enable device flow** in your OAuth App settings before using it. Anyone who knows your Client ID can start this flow in your app's name, so enable it only if your app needs it. Turning it off again also stops requests that are already waiting for approval.
### Request a Device Code
`POST /api/oauth/device/code` with your `client_id` and an optional `scope`. The endpoint is anonymous and rate limited to 30 requests per 15 minutes per IP address.
```json theme={null}
{
"device_code": "xxxxxxxxxxxx",
"user_code": "BCDF-GHJK",
"verification_uri": "https://app.teable.ai/oauth/device",
"expires_in": 900,
"interval": 5
}
```
Both codes expire after 15 minutes (`BACKEND_OAUTH_DEVICE_CODE_EXPIRE_IN`), and `interval` is the minimum seconds to wait between polls.
Print the `verification_uri` and the `user_code`. On that page the user signs in, enters the code, and reviews your app's name, homepage, and requested scopes before approving or denying. The page warns them not to approve a code they did not start themselves. Each code can be used once.
Teable does not return `verification_uri_complete`, and your client should not build one. An approved code signs the approver into their own Teable account, so a link that already carries the code is exactly what device-code phishing relies on.
### Poll for Tokens
`POST /api/oauth/access_token` with `grant_type=urn:ietf:params:oauth:grant-type:device_code`, the `device_code`, and your `client_id`. Public clients send no `client_secret`; confidential clients add it as in the other flows.
Until someone approves the code, the endpoint answers with an error instead of tokens:
| Error | What your client should do |
| - | - |
| `authorization_pending` | Nobody has approved yet. Keep polling at `interval` |
| `slow_down` | You polled too fast. Wait longer before the next poll |
| `access_denied` | The user denied the request. Stop polling |
| `expired_token` | The code expired or was already used. Start over |
Once the user approves, the response is the same token payload as the other flows.
## Using Access Tokens
Include the access token in the `Authorization` header for API requests:
```bash theme={null}
curl https://app.teable.ai/api/table/TABLE_ID/record \
-H "Authorization: Bearer YOUR_ACCESS_TOKEN"
```
Typically, the first step after obtaining a token is to retrieve all Projects accessible to the current user:
```bash theme={null}
curl https://app.teable.ai/api/base/access/all \
-H "Authorization: Bearer YOUR_ACCESS_TOKEN"
```
This endpoint returns all Projects the current user has permission to access. You can use the `baseId` from the response for subsequent API calls.
## Sending Notifications to Users
With the `user|notifications_send` scope, your app can use the access token to send in-app notifications to that user. Notifications appear in the user's notification center and show which app sent them.
```bash theme={null}
curl -X POST https://app.teable.ai/api/notifications \
-H "Authorization: Bearer YOUR_ACCESS_TOKEN" \
-H "Content-Type: application/json" \
-d '{"externalId": "order-1024-shipped", "text": "Order 1024 has shipped", "url": "https://yourapp.com/orders/1024"}'
```
| Parameter | Required | Description |
| - | - | - |
| `externalId` | Yes | Your app's own notification ID: 1-128 letters, digits, or `_` `.` `:` `-`. Sending the same ID to the same user again does not create a new notification |
| `text` | Yes | Notification body in plain text, up to 500 characters. Teable does not translate it, so write it in the user's language |
| `url` | No | The address opened when the user clicks the notification. It must use https, and its host must match your app's homepage or one of its callback URLs |
In the response, `status` is `created` when the notification was delivered, `duplicate` when that `externalId` was already sent, and `muted` when the user has turned off notifications from your app. Each app can send at most 30 notifications per minute to a single user and 600 per minute across all users. Beyond that, the API returns 429 with a `Retry-After` header.
## Refreshing Access Tokens
When an access token expires, use the refresh token to obtain a new one:
```
POST https://app.teable.ai/api/oauth/access_token
Content-Type: application/x-www-form-urlencoded
```
**Request Body:**
| Parameter | Required | Description |
| - | - | - |
| `grant_type` | Yes | Must be `refresh_token` |
| `refresh_token` | Yes | Your current refresh token |
| `client_id` | Yes | Your OAuth App's Client ID |
| `client_secret` | Conditional | Required for standard authorization code mode, not needed for PKCE mode |
**Example Request:**
```bash theme={null}
curl -X POST https://app.teable.ai/api/oauth/access_token \
-H "Content-Type: application/x-www-form-urlencoded" \
-d "grant_type=refresh_token" \
-d "refresh_token=YOUR_REFRESH_TOKEN" \
-d "client_id=YOUR_CLIENT_ID" \
-d "client_secret=YOUR_CLIENT_SECRET"
```
After refreshing, the previous refresh token becomes invalid (Refresh Token Rotation). Always store the new refresh token from the response.
## Revoking Access
### For OAuth App Owners
Revoke the app's access for **all users** (only the app creator can do this):
```
POST https://app.teable.ai/api/oauth/client/{clientId}/revoke-access
```
This deletes all users' authorization records and tokens, completely preventing the app from accessing any user's data.
### For Users
Revoke **your own** authorization for a specific app:
```
POST https://app.teable.ai/api/oauth/client/{clientId}/revoke-token
```
This only invalidates the current user's access tokens and refresh tokens, without affecting other users.
Users can also revoke access through their [Authorized Apps](https://app.teable.ai/setting/authorized-apps) settings page.
### For Applications
Applications can revoke their own access using an Access Token:
```
GET https://app.teable.ai/api/oauth/client/{clientId}/revoke-token
Authorization: Bearer YOUR_ACCESS_TOKEN
```
This endpoint only accepts Access Token authentication, not session authentication.
## Token Expiration
| Token Type | Default Expiration | Configurable Via |
| - | - | - |
| Authorization Code | 5 minutes | `BACKEND_OAUTH_CODE_EXPIRE_IN` |
| Device Code | 15 minutes | `BACKEND_OAUTH_DEVICE_CODE_EXPIRE_IN` |
| Access Token | 10 minutes | `BACKEND_OAUTH_ACCESS_TOKEN_EXPIRE_IN` |
| Refresh Token | 30 days | `BACKEND_OAUTH_REFRESH_TOKEN_EXPIRE_IN` |
| Authorization Memory | 7 days | `BACKEND_OAUTH_AUTHORIZED_EXPIRE_IN` |
## Error Handling
Common error responses:
| Error | Description |
| - | - |
| `invalid_client` | Invalid Client ID or Client Secret |
| `invalid_grant` | Authorization code expired or already used |
| `invalid_scope` | Requested scope not allowed for this OAuth App |
| `access_denied` | User denied the authorization request |
| `redirect_uri_mismatch` | Redirect URI doesn't match registered URLs |
| `unauthorized_client` | The OAuth App has not enabled the device flow |
| `too_many_requests` | Rate limit exceeded. Token requests default to 30 per 15 minutes, and device code requests to 30 per 15 minutes per IP address |
## Best Practices
1. **Choose the right mode**: Use client secret mode for web apps with a backend, PKCE mode for native apps/CLI/SPA, and device flow when the client cannot receive a browser redirect
2. **Store secrets securely**: Never expose your Client Secret in client-side code
3. **Use state parameter**: Always include a random `state` parameter to prevent CSRF attacks
4. **Request minimal scopes**: Only request permissions your application actually needs
5. **Handle token refresh**: Implement automatic token refresh before expiration
6. **Secure token storage**: Store access and refresh tokens securely on your server
## Complete Examples
### Node.js (Authorization Code + Client Secret)
```javascript theme={null}
const express = require('express');
const crypto = require('crypto');
const app = express();
const CLIENT_ID = 'your_client_id';
const CLIENT_SECRET = 'your_client_secret';
const REDIRECT_URI = 'http://localhost:3000/callback';
const TEABLE_URL = 'https://app.teable.ai';
// Step 1: Redirect user to authorization
app.get('/login', (req, res) => {
const state = crypto.randomBytes(16).toString('hex');
req.session.oauthState = state; // Store state in session
const authUrl = `${TEABLE_URL}/api/oauth/authorize?` +
`response_type=code&` +
`client_id=${CLIENT_ID}&` +
`redirect_uri=${encodeURIComponent(REDIRECT_URI)}&` +
`scope=${encodeURIComponent('record|read table|read')}&` +
`state=${state}`;
res.redirect(authUrl);
});
// Step 2: Handle callback and exchange code for tokens
app.get('/callback', async (req, res) => {
const { code, state } = req.query;
// Verify state to prevent CSRF
if (state !== req.session.oauthState) {
return res.status(403).send('Invalid state');
}
const response = await fetch(`${TEABLE_URL}/api/oauth/access_token`, {
method: 'POST',
headers: { 'Content-Type': 'application/x-www-form-urlencoded' },
body: new URLSearchParams({
grant_type: 'authorization_code',
client_id: CLIENT_ID,
client_secret: CLIENT_SECRET,
code,
redirect_uri: REDIRECT_URI,
}),
});
const tokens = await response.json();
// tokens.access_token — use for API calls
// tokens.refresh_token — use to refresh tokens
res.json({ success: true, scopes: tokens.scopes });
});
app.listen(3000);
```
### Python (PKCE Mode for CLI Tools)
```python theme={null}
import hashlib
import base64
import secrets
import http.server
import urllib.parse
import requests
CLIENT_ID = 'your_client_id'
TEABLE_URL = 'https://app.teable.ai'
PORT = 8080
REDIRECT_URI = f'http://127.0.0.1:{PORT}/callback'
# Step 1: Generate PKCE parameters
code_verifier = secrets.token_urlsafe(32) # 43 characters
code_challenge = base64.urlsafe_b64encode(
hashlib.sha256(code_verifier.encode()).digest()
).rstrip(b'=').decode()
# Step 2: Build authorization URL (open in browser)
auth_url = (
f"{TEABLE_URL}/api/oauth/authorize?"
f"response_type=code&"
f"client_id={CLIENT_ID}&"
f"redirect_uri={urllib.parse.quote(REDIRECT_URI)}&"
f"code_challenge={code_challenge}&"
f"code_challenge_method=S256"
)
print(f"Open in your browser:\n{auth_url}")
# Step 3: Start local server to receive callback
authorization_code = None
class CallbackHandler(http.server.BaseHTTPRequestHandler):
def do_GET(self):
global authorization_code
query = urllib.parse.urlparse(self.path).query
params = urllib.parse.parse_qs(query)
authorization_code = params.get('code', [None])[0]
self.send_response(200)
self.end_headers()
self.wfile.write(b'Authorization successful! You can close this page.')
def log_message(self, format, *args):
pass # Silence logs
server = http.server.HTTPServer(('127.0.0.1', PORT), CallbackHandler)
server.handle_request() # Handle single request
# Step 4: Exchange code + code_verifier for tokens
response = requests.post(f"{TEABLE_URL}/api/oauth/access_token", data={
'grant_type': 'authorization_code',
'client_id': CLIENT_ID,
'code': authorization_code,
'redirect_uri': REDIRECT_URI,
'code_verifier': code_verifier,
})
tokens = response.json()
print(f"Access Token: {tokens['access_token']}")
print(f"Expires in: {tokens['expires_in']}s")
```
# API Overview
Source: https://help.teable.ai/en/api-doc/overview
Everything you need to start calling the Teable API: base URL, authentication, IDs, and common request patterns.
This section helps you start using the Teable API quickly and safely.
## Base URL
* **Teable Cloud**: `https://app.teable.ai`
* **Self-hosted**: use your own domain (for example `https://teable.example.com`)
All API paths in this documentation are relative to the base URL and start with `/api`.
## Authentication
Teable APIs use **Bearer tokens**:
```bash theme={null}
curl -H 'Authorization: Bearer __token__' \
'https://app.teable.ai/api/table/__tableId__/record'
```
You can use either:
* **Personal Access Token**: best for scripts, internal tools, and server-side integrations. See [Access Token](/en/api-doc/token).
* **OAuth Access Token**: best for multi-tenant integrations where end users grant access. See [OAuth App](/en/api-doc/oauth).
## IDs (spaceId / baseId / tableId / viewId / fieldId / recordId)
Most endpoints require IDs like `tbl...`, `rec...`. See [Getting IDs](/en/api-doc/get-id).
## Scopes & permissions
Both Personal Access Tokens and OAuth tokens are permission-scoped. If you get a 403, it usually means the token is missing the required scope.
* See [Error Codes](/en/api-doc/error-code)
* OAuth scopes reference: [OAuth App](/en/api-doc/oauth#available-scopes)
## Pagination (take / skip)
Many list endpoints support:
* `take`: number of items to return (some endpoints cap this, e.g. records max 100 per request, so page with `skip`)
* `skip`: number of items to skip
## Field keys & cell format
Some APIs let you control how record fields are represented:
* `fieldKeyType`: `name` (default) / `id` / `dbFieldName`
* `cellFormat`: `json` (default) / `text`
For record field value structures, see [Record Field Interface](/en/api-doc/record/interface).
## Where to go next
* **Just want to fetch data**: [Get Records](/en/api-doc/record/get)
* **Create/update/delete records**: [Create Records](/en/api-doc/record/create), [Update Record](/en/api-doc/record/update), [Delete Records](/en/api-doc/record/delete)
* **Upload attachments**: [Upload Attachment](/en/api-doc/record/upload-attachment)
* **Full endpoint list**: use the left navigation under **API Reference**
# Create Records
Source: https://help.teable.ai/en/api-doc/record/create
### Path
POST /api/table/\{tableId}/record
### Request
#### Path Parameters
* tableId (string): The unique identifier of the table.
#### Request Body
* **records (required)**
* Description: Array of records to create
* Type: Array
* Example:
```json theme={null}
[
{
"fields": {
"Name": "John Doe",
"Age": 30,
"Email": "john@example.com"
}
},
{
"fields": {
"Name": "Jane Smith",
"Age": 28,
"Email": "jane@example.com"
}
}
]
```
* Note: Each record is an item containing a `fields` object. The `fields` object contains field names and their corresponding values. Each field type has a different value structure, see [Record Field Value Types](/en/api-doc/record/interface) for details.
* Default values: Fields omitted from `fields` use the table's default value when one is configured. If a required field has no default value, or if you explicitly pass `null` to a required field, the request fails.
* **fieldKeyType (optional)**
* Description: Specifies the type of field key
* Type: String
* Possible values:
* "name": Use field name as key
* "id": Use field ID as key
* "dbFieldName": Use field dbFieldName as key
* Example: `"name"` or `"id"` or `"dbFieldName"`
* Note: If not specified, field name is used as key by default.
* Usage:
* When set to "name":
```json theme={null}
{
"fields": {
"Name": "John Doe",
"Age": 30
}
}
```
* When set to "id":
```json theme={null}
{
"fields": {
"fldABCDEFGHIJKLMN": "John Doe",
"fldOPQRSTUVWXYZ12": 30
}
}
```
* **typecast (optional)**
* Description: Whether to automatically convert field value types. By default, strict validation is enforced, requiring input values to match the current field's data type. If enabled, the system will attempt automatic conversion.
* Type: Boolean
* Possible values: true or false
* Example: `true`
* Note: If set to true, the system will attempt to convert input values to the correct field value type.
* Usage examples:
* Link field: Can directly use primary key text for linking
```json theme={null}
{
"User table": "John Smith"
}
```
* Date field: Can use non-standard format date strings
```json theme={null}
{
"Date": "2023-05-15"
}
```
* User field: Can directly use username
```json theme={null}
{
"Assigned To": "John Doe"
}
```
* **order (optional)**
* Description: Specifies the position of new records in a specific view
* Type: Object
* Properties:
* viewId
* Description: View ID [(how to get)](/en/api-doc/get-id#viewid)
* Type: String
* Example: `"viwABCDEFGHIJKLMN"`
* anchorId
* Description: Anchor record ID [(how to get)](/en/api-doc/get-id#recordid)
* Type: String
* Example: `"rec123456789ABCDE"`
* position
* Description: Position relative to the anchor record
* Type: String
* Possible values:
* "before": Before the anchor record
* "after": After the anchor record
* Example: `"after"`
* Complete example:
```json theme={null}
{
"viewId": "viwABCDEFGHIJKLMN",
"anchorId": "rec123456789ABCDE",
"position": "after"
}
```
* Note: Using order allows precise control of new record positions in a specific view.
### Response
#### Success Response
* Status code: 201 Created
* Response body: Returns the created record data.
**Example Response Body**
```json theme={null}
{
"records": [
{
"id": "record789",
"fields": {
"single line text": "text value 1"
}
},
{
"id": "record567",
"fields": {
"single line text": "text value 2"
}
}
]
}
```
### Error Responses
* Status code: 400 Bad Request: Request body format error or missing required fields.
* Status code: 404 Not Found: Specified tableId does not exist.
### Example Code
```bash CURL theme={null}
curl -X POST 'https://app.teable.ai/api/table/__tableId__/record' \
-H 'Authorization: Bearer __token__' \
-H 'Content-Type: application/json' \
-d '{
"records": [
{
"fields": {
"Name": "John Doe",
"Age": 30
}
}
]
}'
```
```js JS SDK theme={null}
import { configApi, createRecords } from '@teable/openapi';
configApi({
endpoint: 'https://app.teable.ai',
token,
});
const response = await createRecords('__tableId__', {
records: [
{
fields: {
Name: 'John Doe',
Age: 30
}
}
]
});
console.log(response.data);
```
```ts TypeScript theme={null}
const response = await fetch('https://app.teable.ai/api/table/__tableId__/record', {
method: 'POST',
headers: {
'Authorization': 'Bearer __token__',
'Content-Type': 'application/json'
},
body: JSON.stringify({
records: [
{
fields: {
Name: 'John Doe',
Age: 30
}
}
]
})
});
console.log(await response.json());
```
```python Python theme={null}
import requests
response = requests.post(
'https://app.teable.ai/api/table/__tableId__/record',
headers={
'Authorization': 'Bearer __token__',
'Content-Type': 'application/json'
},
json={
'records': [
{
'fields': {
'Name': 'John Doe',
'Age': 30
}
}
]
}
)
print(response.json())
```
# Delete Records
Source: https://help.teable.ai/en/api-doc/record/delete
### Path
DELETE /api/table/\{tableId}/record
### Request
**Path Parameters**
* tableId (string): The unique identifier of the table [(how to get)](/en/api-doc/get-id#tableid).
**Query Parameters**
* **recordIds (required)** [(how to get)](/en/api-doc/get-id#recordid)
* Description: Array of record IDs to delete
* Type: Array
* Example: `["rec123456", "rec789012"]`
* Note: Each element is a string representing the ID of a record to be deleted.
#### Response
**Success Response**
* Status code: 200 OK
* Response body: No content
#### Error Responses
* Status code: 400 Bad Request: Request parameter format error or missing required parameters.
* Status code: 404 Not Found: Specified tableId does not exist or some record IDs do not exist.
#### Example Code
```bash CURL theme={null}
curl -X DELETE 'https://app.teable.ai/api/table/__tableId__/record?recordIds[]=rec123456&recordIds[]=rec789012' \
-H 'Authorization: Bearer __token__'
```
```js JS SDK theme={null}
import { configApi, deleteRecords } from '@teable/openapi';
configApi({
endpoint: 'https://app.teable.ai',
token: '__token__',
});
await deleteRecords('__tableId__', ['rec123456', 'rec789012']);
```
```ts TypeScript theme={null}
const response = await fetch('https://app.teable.ai/api/table/__tableId__/record?recordIds[]=rec123456&recordIds[]=rec789012', {
method: 'DELETE',
headers: {
'Authorization': 'Bearer __token__'
}
});
console.log(response.status); // 200 if successful
```
```python Python theme={null}
import requests
response = requests.delete(
'https://app.teable.ai/api/table/__tableId__/record',
headers={
'Authorization': 'Bearer __token__'
},
params={
'recordIds': ['rec123456', 'rec789012']
}
)
print(response.status_code) # 200 if successful
```
# Get Records
Source: https://help.teable.ai/en/api-doc/record/get
We provide developers with a built-in [Query Parameter Builder](https://app.teable.ai/developer/tool/query-builder) that can help construct custom requests based on your existing tables.
### Path
GET /api/table/\{tableId}/record
### Request
#### Path Parameters
tableId (string): The unique identifier of the table [(how to get)](/en/api-doc/get-id#tableid).
#### Basic Query Parameters
All parameters are optional
Specifies the view ID to fetch records from. If not specified, records will be returned in order of creation time, including all records and fields.
Specifies the number of records to retrieve, maximum value is 100. To read more records, page through the data with `skip` and `take` (see [Pagination](/en/api-doc/overview)).
The 100-record cap applies to Teable Cloud personal API keys created on or after September 10, 2026. Keys created before that date, OAuth and plugin tokens, and self-hosted instances still accept up to 1000, but pages of 100 remain the recommended size.
Specifies the number of records to skip, used for pagination.
Defines the key type for fields in records, possible values:
* `name`: Use field names as keys (default)
* `id`: Use field IDs as keys
* `dbFieldName`: Use field dbFieldName as keys
Defines the return format for cell values, possible values:
* `json`: Returns structured JSON data (default)
* `text`: Returns plain text format
If you only need specific fields, specify them through this parameter. Otherwise, all visible fields will be retrieved. Parameter values depend on fieldKeyType setting (using field names or IDs or dbFieldName).
Array of sort objects specifying how records should be ordered.
Complex query condition object for filtering results. Supports complex query conditions based on fields, operators, and values.
Search for records matching specified fields and values.
Array of group objects specifying how records should be grouped.
Array of group IDs to collapse.
Filter selected records by record IDs.
When viewId is specified, setting this to true will ignore the view's filters, sorting, and other settings.
Filter records from the linked table that can be selected by the specified link cell. For example, for one-to-many or one-to-one relationship fields, already selected record IDs will not appear.
Filter records from the linked table that are already selected by this link cell. Note: viewId, filter, and orderBy will not take effect in this case, as selected records have their own order.
# Record Field Interface
Source: https://help.teable.ai/en/api-doc/record/interface
Lookup field is not a specific field type. We can look up any type of field from a linked project. The type of a lookup field is determined by the original field in the linked project and has the isLookup property. Lookup fields cannot be edited.
All field return values may have `isMultipleCellValue: true` in certain cases:
1. This occurs when the field is a lookup field. When the linked value allows multiple selections, the lookup field value will necessarily be an array.
2. Fields can be configured - for example, user fields and link fields can be configured as single or multiple selection. In your code, you can use `field.isMultipleCellValue` to determine if a field accepts multiple values.
Do not use field type to determine write permissions. Instead, use the isComputed property of the field.
### 1. Number Field
* type: number
* Write type: `number`
* Return type:
* `isMultipleCellValue: false`: `number`
* `isMultipleCellValue: true`: `number[]`
Example:
```js theme={null}
// Write value
42
// Return value (isMultipleCellValue: false)
42
// Return value (isMultipleCellValue: true)
[42, 17, 99]
```
### 2. Single Line Text Field
* type: singleLineText
* Write type: `string`
* Return type:
* `isMultipleCellValue: false`: `string`
* `isMultipleCellValue: true`: `string[]`
Example:
```js theme={null}
// Write value
"Hello, Teable!"
// Return value (isMultipleCellValue: false)
"Hello, Teable!"
// Return value (isMultipleCellValue: true)
["Hello, Teable!", "Welcome", "Good day"]
```
### 3. Long Text Field
* type: longText
* Write type: `string`
* Return type:
* `isMultipleCellValue: false`: `string`
* `isMultipleCellValue: true`: `string[]`
Example:
```js theme={null}
// Write value
"This is a long text field that can contain multiple paragraphs..."
// Return value (isMultipleCellValue: false)
"This is a long text field that can contain multiple paragraphs..."
// Return value (isMultipleCellValue: true)
["This is a long text...", "Another long text...", "Yet another long text..."]
```
### 4. Single Select Field
* type: singleSelect
* Write type: `string` (option value)
* Return type:
* `isMultipleCellValue: false`: `string`
* `isMultipleCellValue: true`: `string[]`
Example:
```js theme={null}
// Write value
"Option A"
// Return value (isMultipleCellValue: false)
"Option A"
// Return value (isMultipleCellValue: true)
["Option A", "Option B", "Option C"]
```
### 5. Multiple Select Field
* type: multipleSelect
* Write type: `string[]` (array of option values)
* Return type: `string[]`
Example:
```js theme={null}
// Write value
["Red", "Blue", "Green"]
// Return value
["Red", "Blue", "Green"]
```
### 6. Link Field
* type: link
* Write type:
* `isMultipleCellValue: false`: `{ id: string }`
* `isMultipleCellValue: true`: `{ id: string }[]`
* Return type:
* `isMultipleCellValue: false`: `{ id: string, title?: string }`
* `isMultipleCellValue: true`: `{ id: string, title?: string }[]`
Example:
```js theme={null}
// Write value (isMultipleCellValue: false)
{ id: "rec123456" }
// Write value (isMultipleCellValue: true)
[{ id: "rec123456" }, { id: "rec789012" }]
// Return value (isMultipleCellValue: false)
{ id: "rec123456", title: "Related Record 1" }
// Return value (isMultipleCellValue: true)
[
{ id: "rec123456", title: "Related Record 1" },
{ id: "rec789012", title: "Related Record 2" }
]
```
### 7. Formula Field
* type: formula
* Write type: Cannot be written directly
* Return type: Depends on formula result, can be `string | number | boolean` or their array forms
Example:
```js theme={null}
// Return value (isMultipleCellValue: false)
42 // or "Result" or true
// Return value (isMultipleCellValue: true)
[42, 17, 99] // or ["Result1", "Result2"] or [true, false, true]
```
### 8. Attachment Field
To upload an attachment to an attachment field, use the dedicated API. For details, see the [Upload Attachment](/en/api-doc/record/upload-attachment) section.
* type: attachment
* Write type:
```ts theme={null}
{
id: string;
name: string;
path: string;
token: string; // Unique identifier
size: number; // File size in bytes
mimetype: string; // File type
presignedUrl?: string; // File preview/download URL
width?: number; // Image width
height?: number; // Image height
}[]
```
* Return type:
```ts theme={null}
{
id: string;
name: string;
path: string;
token: string; // Unique identifier
size: number; // File size in bytes
mimetype: string; // File type
presignedUrl?: string; // File preview/download URL
width?: number; // Image width
height?: number; // Image height
}[]
```
Example:
```js theme={null}
// Write value
[
{
name: "document.pdf",
type: "application/pdf",
token: "abc123",
size: 1024000
}
]
// Return value
[
{
id: "att123",
name: "document.pdf",
path: "/uploads/document.pdf",
token: "abc123",
size: 1024000,
mimetype: "application/pdf",
presignedUrl: "https://app.teable.ai/preview/document.pdf",
},
{
id: "att456",
name: "image.jpg",
path: "/uploads/image.jpg",
token: "def456",
size: 2048000,
mimetype: "image/jpeg",
presignedUrl: "https://app.teable.ai/preview/image.jpg",
width: 1920,
height: 1080
}
]
```
### 9. Date Field
* type: date
* Write type: `string` (ISO 8601 format)
* Return type:
* `isMultipleCellValue: false`: `string` (ISO 8601 format)
* `isMultipleCellValue: true`: `string[]` (ISO 8601 format)
You can use `new Date().toISOString()` to get the ISO 8601 time format
Example:
```js theme={null}
// Write value
"2024-09-02T02:51:03.875Z"
// Return value (isMultipleCellValue: false)
"2024-09-02T02:51:03.875Z"
// Return value (isMultipleCellValue: true)
["2024-09-02T02:51:03.875Z", "2024-09-02T02:51:03.875Z"]
```
### 10. Created Time Field
* type: createdTime
* Write type: Cannot be written directly
* Return type:
* `isMultipleCellValue: false`: `string` (ISO 8601 format)
* `isMultipleCellValue: true`: `string[]` (ISO 8601 format)
Example:
```js theme={null}
// Return value (isMultipleCellValue: false)
"2024-09-02T02:51:03.875Z"
// Return value (isMultipleCellValue: true)
["2024-09-02T02:51:03.875Z", "2024-09-02T02:51:03.875Z"]
```
### 11. Last Modified Time Field
* type: lastModifiedTime
* Write type: Cannot be written directly
* Return type:
* `isMultipleCellValue: false`: `string` (ISO 8601 format)
* `isMultipleCellValue: true`: `string[]` (ISO 8601 format)
Example:
```js theme={null}
// Return value (isMultipleCellValue: false)
"2023-04-15T10:30:00Z"
// Return value (isMultipleCellValue: true)
["2023-04-15T10:30:00Z", "2023-04-16T14:45:00Z"]
```
### 12. Checkbox Field
* type: checkbox
* Write type: `boolean`
* Return type:
* `isMultipleCellValue: false`: `boolean`
* `isMultipleCellValue: true`: `boolean[]`
Example:
```js theme={null}
// Write value
true
// Return value (isMultipleCellValue: false)
true
// Return value (isMultipleCellValue: true)
[true, false, true]
```
### 13. Rollup Field
* type: rollup
* Write type: Cannot be written directly
* Return type: Depends on rollup configuration, can be `number | string` or their array forms
Example:
```js theme={null}
// Return value (isMultipleCellValue: false)
42 // or "Summary Result"
// Return value (isMultipleCellValue: true)
[42, 17, 99] // or ["Summary 1", "Summary 2"]
```
### 14. Rating Field
* type: rating
* Write type: `number`
* Return type:
* `isMultipleCellValue: false`: `number`
* `isMultipleCellValue: true`: `number[]`
Example:
```js theme={null}
// Write value
4
// Return value (isMultipleCellValue: false)
4
// Return value (isMultipleCellValue: true)
[4, 3, 5]
```
### 15. Auto Number Field
* type: autoNumber
* Write type: Cannot be written directly
* Return type:
* `isMultipleCellValue: false`: `number`
* `isMultipleCellValue: true`: `number[]`
Example:
```js theme={null}
// Return value (isMultipleCellValue: false)
42
// Return value (isMultipleCellValue: true)
[42, 43, 44]
```
### 16. User Field
* type: user
* Write type:
* `isMultipleCellValue: false`: `{ id: string, title: string }`
* `isMultipleCellValue: true`: `{ id: string, title: string }[]`
* Return type:
* `isMultipleCellValue: false`: `{ id: string, title: string, email?: string, avatar?: string }`
* `isMultipleCellValue: true`: `{ id: string, title: string, email?: string, avatar?: string }[]`
Example:
```js theme={null}
// Write value (isMultipleCellValue: false)
{ id: "user123", title: "John Doe" }
// Write value (isMultipleCellValue: true)
[
{ id: "user123", title: "John Doe" },
{ id: "user456", title: "Jane Smith" }
]
// Return value (isMultipleCellValue: false)
{
id: "user123",
title: "John Doe",
email: "john@example.com",
avatar: "https://example.com/avatar.jpg"
}
// Return value (isMultipleCellValue: true)
[
{
id: "user123",
title: "John Doe",
email: "john@example.com",
avatar: "https://example.com/avatar1.jpg"
},
{
id: "user456",
title: "Jane Smith",
email: "jane@example.com",
avatar: "https://example.com/avatar2.jpg"
}
]
```
### 17. Created By Field
* Write type: Cannot be written directly
* Return type:
* `isMultipleCellValue: false`: `{ id: string, title: string, email?: string, avatar?: string }`
* `isMultipleCellValue: true`: `{ id: string, title: string, email?: string, avatar?: string }[]`
Example:
```js theme={null}
// Return value (isMultipleCellValue: false)
{
id: "user123",
title: "John Doe",
email: "john@example.com",
avatar: "https://example.com/avatar.jpg"
}
// Return value (isMultipleCellValue: true)
[
{
id: "user123",
title: "John Doe",
email: "john@example.com",
avatar: "https://example.com/avatar1.jpg"
},
{
id: "user456",
title: "Jane Smith",
email: "jane@example.com",
avatar: "https://example.com/avatar2.jpg"
}
]
```
### 18. Last Modified By Field
* Write type: Cannot be written directly
* Return type:
* `isMultipleCellValue: false`: `{ id: string, title: string, email?: string, avatar?: string }`
* `isMultipleCellValue: true`: `{ id: string, title: string, email?: string, avatar?: string }[]`
Example:
```js theme={null}
// Return value (isMultipleCellValue: false)
{
id: "user123",
title: "John Doe",
email: "john@example.com",
avatar: "https://example.com/avatar.jpg"
}
// Return value (isMultipleCellValue: true)
[
{
id: "user123",
title: "John Doe",
email: "john@example.com",
avatar: "https://example.com/avatar1.jpg"
},
{
id: "user456",
title: "Jane Smith",
email: "jane@example.com",
avatar: "https://example.com/avatar2.jpg"
}
]
```
# Update Record
Source: https://help.teable.ai/en/api-doc/record/update
### Path
PATCH /api/table/\{tableId}/record/\{recordId}
### Request
#### Path Parameters
* tableId (string): The unique identifier of the table [(how to get)](/en/api-doc/get-id#tableid).
* recordId (string): The unique identifier of the record to update [(how to get)](/en/api-doc/get-id#recordid).
#### Request Body
* **record (required)**
* Description: The record data to update
* Type: Object
* Example:
```json theme={null}
{
"fields": {
"Name": "John Doe",
"Age": 31,
"Email": "john.doe@example.com"
}
}
```
* Note: The `fields` object contains field names and their corresponding new values. Each field type has a different value structure, see [Record Field Value Types](/en/api-doc/record/interface) for details.
To clear a field's value, explicitly pass `null`. If a field name is not included, no update will be performed for that field.
* **fieldKeyType (optional)**
* Description: Specifies the type of field key
* Type: String
* Possible values:
* "name": Use field name as key
* "id": Use field ID as key
* "dbFieldName": Use field dbFieldName as key
* Example: `"name"` or `"id"` or `"dbFieldName"`
* Note: If not specified, field name is used as key by default.
* Usage:
* When set to "name":
```json theme={null}
{
"fields": {
"Name": "John Doe",
"Age": 30
}
}
```
* When set to "id":
```json theme={null}
{
"fields": {
"fldABCDEFGHIJKLMN": "John Doe",
"fldOPQRSTUVWXYZ12": 30
}
}
```
* **typecast (optional)**
* Description: Whether to automatically convert field value types. By default, strict validation is enforced, requiring input values to match the current field's data type. If enabled, the system will attempt automatic conversion.
* Type: Boolean
* Possible values: true or false
* Example: `true`
* Note: If set to true, the system will attempt to convert input values to the correct field value type.
* Usage examples:
* Link field: Can directly use primary key text for linking
```json theme={null}
{
"User table": "John Smith"
}
```
* Date field: Can use non-standard format date strings
```json theme={null}
{
"Date": "2023-05-15"
}
```
* User field: Can directly use username
```json theme={null}
{
"Assigned To": "John Doe"
}
```
For uploading new files to attachment fields, please refer to the [Upload Attachment](/en/api-doc/record/upload-attachment) section.
* **order (optional)**
* Description: After updating the record, move it to a specified position in a specified view.
* Type: Object
* Properties:
* viewId: View ID
* anchorId: Anchor record ID
* position: Position relative to the anchor record. Possible values: `"before"` or `"after"`
* Example:
```json theme={null}
{
"viewId": "viwABCDEFGHIJKLMN",
"anchorId": "rec123456789ABCDE",
"position": "after"
}
```
### Response
#### Success Response
* Status code: 200 OK
* Response body: Returns the updated record data.
**Example Response Body**
```json theme={null}
{
"id": "rec123456789ABCDE",
"fields": {
"Name": "John Doe",
"Age": 31,
"Email": "john.doe@example.com"
}
}
```
#### Error Responses
* Status code: 400 Bad Request: Request body format error or missing required fields.
* Status code: 404 Not Found: Specified tableId or recordId does not exist.
#### Example Code
```bash CURL theme={null}
curl -X PATCH 'https://app.teable.ai/api/table/__tableId__/record/__recordId__' \
-H 'Authorization: Bearer __token__' \
-H 'Content-Type: application/json' \
-d '{
"record": {
"fields": {
"Name": "John Doe",
"Age": 31
}
}
}'
```
```js JS SDK theme={null}
import { configApi, updateRecord } from '@teable/openapi';
configApi({
endpoint: 'https://app.teable.ai',
token,
});
const response = await updateRecord('__tableId__', '__recordId__', {
record: {
fields: {
Name: 'John Doe',
Age: 31
}
}
});
console.log(response.data);
```
```ts TypeScript theme={null}
const response = await fetch('https://app.teable.ai/api/table/__tableId__/record/__recordId__', {
method: 'PATCH',
headers: {
'Authorization': 'Bearer __token__',
'Content-Type': 'application/json'
},
body: JSON.stringify({
record: {
fields: {
Name: 'John Doe',
Age: 31
}
}
})
});
console.log(await response.json());
```
```python Python theme={null}
import requests
response = requests.patch(
'https://app.teable.ai/api/table/__tableId__/record/__recordId__',
headers={
'Authorization': 'Bearer __token__',
'Content-Type': 'application/json'
},
json={
'record': {
'fields': {
'Name': 'John Doe',
'Age': 31
}
}
}
)
print(response.json())
```
# Upload Attachment
Source: https://help.teable.ai/en/api-doc/record/upload-attachment
Upload local files or files via URL to the end of an attachment field in a specified record
### Path
POST /api/table/\{tableId}/record/\{recordId}/\{fieldId}/uploadAttachment
### Request
#### Path Parameters
* tableId (string): The unique identifier of the table [(how to get)](/en/api-doc/get-id#tableid).
* recordId (string): The unique identifier of the record to update [(how to get)](/en/api-doc/get-id#recordid).
* fieldId (string): The ID of the attachment field to upload to [(how to get)](/en/api-doc/get-id#fieldid)
Attachment fields can contain multiple attachments. This API allows uploading one attachment at a time to the end of the cell.
To delete or reorder attachments, use the [Update Record API](/en/api-doc/record/update).
fieldId must be an attachment type field.
Through the API, uploaded attachments are limited to 100MB in the cloud version, with no limit in the self-hosted version.
#### Request Body
Type: formData
Parameters:
* **file (optional)**
* Description: The record data to update
* Type: Buffer or ReadStream
* **fileUrl (optional)**
* Description: The URL to upload from
* Type: String
* Example: `https://example.com/image.jpg`
* Note: Only one of file or fileUrl can be specified at a time. If both are specified, file takes precedence.
### Response
#### Success Response
* Status code: 201 Created
* Response body: Returns the updated record data.
**Example Response Body**
```json theme={null}
{
"id": "rec123456789ABCDE",
"fields": {
"fld123456789ABCDE": [
{
"id": "act75TiSyhcS7hfrizW",
"name": "example.jpg",
"path": "table/example",
"size": 392903,
"token": "tokenxxxxx",
"width": 976,
"height": 1000,
"mimetype": "image/jpeg",
"presignedUrl": "https://app.teable.ai/preview/previewURL"
}
],
}
}
```
#### Error Responses
* Status code: 400 Bad Request: Request body format error or missing required fields.
* Status code: 404 Not Found: Specified tableId or recordId does not exist.
### Example Code
```bash CURL theme={null}
# Upload via file
curl -X POST 'https://app.teable.ai/api/table/__tableId__/record/__recordId__/__fieldId__/uploadAttachment' \
-H 'Authorization: Bearer __token__' \
-H 'Content-Type: multipart/form-data' \
-F 'file=@/path/to/your/file.jpg'
# Upload via URL
curl -X POST 'https://app.teable.ai/api/table/__tableId__/record/__recordId__/__fieldId__/uploadAttachment' \
-H 'Authorization: Bearer __token__' \
-H 'Content-Type: multipart/form-data' \
-F 'fileUrl=https://example.com/image.jpg'
```
```js JS SDK theme={null}
import { configApi, uploadAttachment } from '@teable/openapi';
configApi({
endpoint: 'https://app.teable.ai',
token: '__token__',
});
// Node.js environment: Upload local file
const fileStream = fs.createReadStream('/path/to/your/file.jpg');
const response = await uploadAttachment('__tableId__', '__recordId__', '__fieldId__', fileStream);
console.log(response.data);
// Upload URL (works in both Node.js and browser environments)
const response = await uploadAttachment('__tableId__', '__recordId__', '__fieldId__', 'https://example.com/image.jpg');
console.log(response.data);
// Browser environment: Upload file
// Assuming there's a file input element:
document.getElementById('fileInput').addEventListener('change', async (event) => {
const file = event.target.files[0];
if (file) {
const response = await uploadAttachment('__tableId__', '__recordId__', '__fieldId__', file);
console.log(response.data);
}
});
```
```ts TypeScript theme={null}
import FormData from 'form-data';
import fs from 'fs';
// Node.js environment: Upload local file
const formData = new FormData();
formData.append('file', fs.createReadStream('/path/to/your/file.jpg'));
const response = await fetch('https://app.teable.ai/api/table/__tableId__/record/__recordId__/__fieldId__/uploadAttachment', {
method: 'POST',
headers: {
'Authorization': 'Bearer __token__',
...formData.getHeaders()
},
body: formData
});
console.log(await response.json());
// Upload URL (works in both Node.js and browser environments)
const formDataUrl = new FormData();
formDataUrl.append('fileUrl', 'https://example.com/image.jpg');
const responseUrl = await fetch('https://app.teable.ai/api/table/__tableId__/record/__recordId__/__fieldId__/uploadAttachment', {
method: 'POST',
headers: {
'Authorization': 'Bearer __token__',
...formDataUrl.getHeaders()
},
body: formDataUrl
});
console.log(await responseUrl.json());
// Browser environment: Upload file
// Assuming there's a file input element:
document.getElementById('fileInput').addEventListener('change', async (event: Event) => {
const fileInput = event.target as HTMLInputElement;
const file = fileInput.files?.[0];
if (file) {
const formData = new FormData();
formData.append('file', file);
const response = await fetch('https://app.teable.ai/api/table/__tableId__/record/__recordId__/__fieldId__/uploadAttachment', {
method: 'POST',
headers: {
'Authorization': 'Bearer __token__'
},
body: formData
});
console.log(await response.json());
}
});
```
```python Python theme={null}
import requests
import mimetypes
import os
# Upload local file
file_path = '/path/to/your/file.jpg'
with open(file_path, 'rb') as file:
file_name = os.path.basename(file_path)
mime_type, _ = mimetypes.guess_type(file_path)
files = {'file': (file_name, file, mime_type)}
response = requests.post(
'https://app.teable.ai/api/table/__tableId__/record/__recordId__/__fieldId__/uploadAttachment',
headers={
'Authorization': 'Bearer __token__'
},
files=files
)
print(response.json())
# Upload URL
response_url = requests.post(
'https://app.teable.ai/api/table/__tableId__/record/__recordId__/__fieldId__/uploadAttachment',
headers={
'Authorization': 'Bearer __token__'
},
data={'fileUrl': 'https://example.com/image.jpg'}
)
print(response_url.json())
```
# Access Token
Source: https://help.teable.ai/en/api-doc/token
Personal access tokens are used for authentication and authorization.
Personal Access Tokens are best for scripts, internal tools, and server-side integrations.
If you're building a multi-tenant integration for external users, use OAuth instead: see [OAuth App](/en/api-doc/oauth).
## Create a token
1. Go to the [Token Management Page](https://app.teable.ai/setting/personal-access-token) and click the "Create Token" button to create a new personal access token.
2. Choose an expiration period for your token. Note that this period cannot be modified once set.
3. Add appropriate permission scopes to your token.
4. Specify which projects and spaces the token can access.
Once your token is created, it will only be displayed once. We recommend copying and storing it in a secure location.
## Use the token
Send the token in the `Authorization` header:
```bash theme={null}
curl -H 'Authorization: Bearer __token__' \
'https://app.teable.ai/api/table/__tableId__/record'
```
Need help finding IDs like `tbl...`? See [Getting IDs](/en/api-doc/get-id).
# Auto-fill a cell by AI
Source: https://help.teable.ai/en/api-reference/record/auto-fill-a-cell-by-ai
/swagger.json post /table/{tableId}/record/{recordId}/{fieldId}/auto-fill
Automatically fill a cell in a specific record and field
Required token scopes: `record|update`
# Button click
Source: https://help.teable.ai/en/api-reference/record/button-click
/swagger.json post /table/{tableId}/record/{recordId}/{fieldId}/button-click
Button click
Required token scopes: `record|read`
# Button reset
Source: https://help.teable.ai/en/api-reference/record/button-reset
/swagger.json post /table/{tableId}/record/{recordId}/{fieldId}/button-reset
Button reset
Required token scopes: `record|update`
# Create records
Source: https://help.teable.ai/en/api-reference/record/create-records
/swagger.json post /table/{tableId}/record
Create one or multiple records with support for field value typecast and custom record ordering.
Required token scopes: `record|create`
# Delete record
Source: https://help.teable.ai/en/api-reference/record/delete-record
/swagger.json delete /table/{tableId}/record/{recordId}
Permanently delete a single record by its ID.
Required token scopes: `record|delete`
# Delete records
Source: https://help.teable.ai/en/api-reference/record/delete-records
/swagger.json delete /table/{tableId}/record
Permanently delete multiple records by their IDs in a single request.
Required token scopes: `record|delete`
# Duplicate record
Source: https://help.teable.ai/en/api-reference/record/duplicate-record
/swagger.json post /table/{tableId}/record/{recordId}/duplicate
Create a copy of an existing record with optional custom positioning in the view.
Required token scopes: `record|create`, `record|read`
# Get record
Source: https://help.teable.ai/en/api-reference/record/get-record
/swagger.json get /table/{tableId}/record/{recordId}
Retrieve a single record by its ID with options to specify field projections and output format.
Required token scopes: `record|read`
# Get record history
Source: https://help.teable.ai/en/api-reference/record/get-record-history
/swagger.json get /table/{tableId}/record/{recordId}/history
Retrieve the change history of a specific record, including field modifications and user information.
Required token scopes: `record|update`
# Get record status
Source: https://help.teable.ai/en/api-reference/record/get-record-status
/swagger.json get /table/{tableId}/record/{recordId}/status
Retrieve the visibility and deletion status of a specific record.
Required token scopes: `table|read`
# Get table recordcollaborators
Source: https://help.teable.ai/en/api-reference/record/get-table-recordcollaborators
/swagger.json get /table/{tableId}/record/collaborators
Get collaborators of a record.
Required token scopes: `record|read`
# Get table records history
Source: https://help.teable.ai/en/api-reference/record/get-table-records-history
/swagger.json get /table/{tableId}/record/history
Retrieve the change history of all records in a table, including field modifications and user information.
Required token scopes: `table_record_history|read`
# Insert attachments at anchor
Source: https://help.teable.ai/en/api-reference/record/insert-attachments-at-anchor
/swagger.json post /table/{tableId}/record/{recordId}/{fieldId}/insertAttachment
Insert attachments after the anchor in the cell (append to end if anchor not found or not provided)
Required token scopes: `record|update`
# List records
Source: https://help.teable.ai/en/api-reference/record/list-records
/swagger.json get /table/{tableId}/record
Retrieve a list of records with support for filtering, sorting, grouping, and pagination. The response includes record data and optional group information.
Required token scopes: `record|read`
# Post table undo redoredo
Source: https://help.teable.ai/en/api-reference/record/post-table-undo-redoredo
/swagger.json post /table/{tableId}/undo-redo/redo
Redo the last operation
Required token scopes: `table|read`
# Post table undo redoredo stream
Source: https://help.teable.ai/en/api-reference/record/post-table-undo-redoredo-stream
/swagger.json post /table/{tableId}/undo-redo/redo-stream
Redo the last operation with SSE progress
Required token scopes: `table|read`
# Post table undo redoundo
Source: https://help.teable.ai/en/api-reference/record/post-table-undo-redoundo
/swagger.json post /table/{tableId}/undo-redo/undo
Undo the last operation
Required token scopes: `table|read`
# Post table undo redoundo stream
Source: https://help.teable.ai/en/api-reference/record/post-table-undo-redoundo-stream
/swagger.json post /table/{tableId}/undo-redo/undo-stream
Undo the last operation with SSE progress
Required token scopes: `table|read`
# Submit form
Source: https://help.teable.ai/en/api-reference/record/submit-form
/swagger.json post /table/{tableId}/record/form-submit
Submit a record through a form view. This will trigger "When form submitted" automations.
Required token scopes: `record|create`
# Update multiple records
Source: https://help.teable.ai/en/api-reference/record/update-multiple-records
/swagger.json patch /table/{tableId}/record
Update multiple records in a single request with support for field value typecast and record reordering.
Required token scopes: `record|update`
# Update record
Source: https://help.teable.ai/en/api-reference/record/update-record
/swagger.json patch /table/{tableId}/record/{recordId}
Update a single record by its ID with support for field value typecast and record reordering.
Required token scopes: `record|update`
# Upload attachment
Source: https://help.teable.ai/en/api-reference/record/upload-attachment
/swagger.json post /table/{tableId}/record/{recordId}/{fieldId}/uploadAttachment
Upload an attachment from a file or URL and append it to the cell
Required token scopes: `record|update`
# Delete space
Source: https://help.teable.ai/en/api-reference/space/delete-space
/swagger.json delete /space/{spaceId}
Delete a space by spaceId
Required token scopes: `space|delete`
# Delete space collaborators
Source: https://help.teable.ai/en/api-reference/space/delete-space-collaborators
/swagger.json delete /space/{spaceId}/collaborators
Delete a collaborator
Required token scopes: `space|read`
# Delete space collaboratorsbase
Source: https://help.teable.ai/en/api-reference/space/delete-space-collaboratorsbase
/swagger.json delete /space/{spaceId}/collaborators/base
Delete all of a principal's project-level collaborator rows within the space
Required token scopes: `space|read`
# Delete space invitationlink
Source: https://help.teable.ai/en/api-reference/space/delete-space-invitationlink
/swagger.json delete /space/{spaceId}/invitation/link/{invitationId}
Delete a invitation link to your
Required token scopes: `space|invite_link`
# Get space
Source: https://help.teable.ai/en/api-reference/space/get-space
/swagger.json get /space/{spaceId}
Get a space by spaceId
Required token scopes: `space|read`
# Get space base entry map
Source: https://help.teable.ai/en/api-reference/space/get-space-base-entry-map
/swagger.json get /space/{spaceId}/base-entry-map
Resolve the entry URL (last visited table and view) of the accessible projects in a space, so project-list clicks can navigate straight to the final URL
Required token scopes: `base|read`
# Get space collaborators
Source: https://help.teable.ai/en/api-reference/space/get-space-collaborators
/swagger.json get /space/{spaceId}/collaborators
List a space collaborator
Required token scopes: `space|read`
# Get space collaboratorsunique
Source: https://help.teable.ai/en/api-reference/space/get-space-collaboratorsunique
/swagger.json get /space/{spaceId}/collaborators/unique
List space collaborators deduplicated by principal, with space role and project permission count
Required token scopes: `space|read`
# Get space data db
Source: https://help.teable.ai/en/api-reference/space/get-space-data-db
/swagger.json get /space/{spaceId}/data-db
Get the data database binding summary for a space
Required token scopes: `space|read`
# Get space data dbmigration
Source: https://help.teable.ai/en/api-reference/space/get-space-data-dbmigration
/swagger.json get /space/{spaceId}/data-db/migration/{jobId}
Get detailed status for a space data database migration job
Required token scopes: `space|read`
# Get space integration
Source: https://help.teable.ai/en/api-reference/space/get-space-integration
/swagger.json get /space/{spaceId}/integration
Get integration list by query
Required token scopes: `space|update`
# Get space invitationlink
Source: https://help.teable.ai/en/api-reference/space/get-space-invitationlink
/swagger.json get /space/{spaceId}/invitation/link
List a invitation link to your
Required token scopes: `space|invite_link`
# Get space list
Source: https://help.teable.ai/en/api-reference/space/get-space-list
/swagger.json get /space
Get space list by query
Required token scopes: `space|read`
# Patch space
Source: https://help.teable.ai/en/api-reference/space/patch-space
/swagger.json patch /space/{spaceId}
Update a space info
Required token scopes: `space|update`
# Patch space avatar
Source: https://help.teable.ai/en/api-reference/space/patch-space-avatar
/swagger.json patch /space/{spaceId}/avatar
Update space avatar
Required token scopes: `space|update`
# Patch space collaborators
Source: https://help.teable.ai/en/api-reference/space/patch-space-collaborators
/swagger.json patch /space/{spaceId}/collaborators
Update a space collaborator
Required token scopes: `space|read`
# Patch space data db
Source: https://help.teable.ai/en/api-reference/space/patch-space-data-db
/swagger.json patch /space/{spaceId}/data-db
Update PostgreSQL credentials or connection parameters for the existing BYODB database
Required token scopes: `space|update`
# Patch space invitationlink
Source: https://help.teable.ai/en/api-reference/space/patch-space-invitationlink
/swagger.json patch /space/{spaceId}/invitation/link/{invitationId}
Update a invitation link to your
Required token scopes: `space|invite_link`
# Post space
Source: https://help.teable.ai/en/api-reference/space/post-space
/swagger.json post /space
Create a space
Required token scopes: `space|create`
# Post space collaborator
Source: https://help.teable.ai/en/api-reference/space/post-space-collaborator
/swagger.json post /space/{spaceId}/collaborator
Add a collaborator to a space
Required token scopes: `space|read`
# Post space data dbmigration cancel
Source: https://help.teable.ai/en/api-reference/space/post-space-data-dbmigration-cancel
/swagger.json post /space/{spaceId}/data-db/migration/{jobId}/cancel
Cancel a pre-copy space data database migration job
Required token scopes: `space|update`
# Post space data dbmigration rollback
Source: https://help.teable.ai/en/api-reference/space/post-space-data-dbmigration-rollback
/swagger.json post /space/{spaceId}/data-db/migration/{jobId}/rollback
Rollback a completed space data database migration when no post-switch writes exist
Required token scopes: `space|update`
# Post space data dbretest
Source: https://help.teable.ai/en/api-reference/space/post-space-data-dbretest
/swagger.json post /space/{spaceId}/data-db/retest
Retest the PostgreSQL data database connection for a BYODB space
Required token scopes: `space|update`
# Post space data dbretry
Source: https://help.teable.ai/en/api-reference/space/post-space-data-dbretry
/swagger.json post /space/{spaceId}/data-db/retry
Retry pending PostgreSQL data database migrations for a BYODB space
Required token scopes: `space|update`
# Post space invitationemail
Source: https://help.teable.ai/en/api-reference/space/post-space-invitationemail
/swagger.json post /space/{spaceId}/invitation/email
Send invitations by e-mail
Required token scopes: `space|invite_email`
# Post space invitationlink
Source: https://help.teable.ai/en/api-reference/space/post-space-invitationlink
/swagger.json post /space/{spaceId}/invitation/link
Create a invitation link to your
Required token scopes: `space|invite_link`
# Post spacedata dbpreflight
Source: https://help.teable.ai/en/api-reference/space/post-spacedata-dbpreflight
/swagger.json post /space/data-db/preflight
Validate a PostgreSQL data database before binding it to a space
Required token scopes: `space|create`
# Delete trash
Source: https://help.teable.ai/en/api-reference/trash/delete-trash
/swagger.json delete /trash/{trashId}
Permanently delete a trash item by trashId
# Get deleted record snapshots of a trash item
Source: https://help.teable.ai/en/api-reference/trash/get-deleted-record-snapshots-of-a-trash-item
/swagger.json get /trash/{trashId}/records
List the record snapshots contained in a record-type table trash item in deletion order (newest first), cursor-paginated across hot and cold storage. Record-level filters narrow the stream. Records that were restored or permanently deleted are omitted.
# Get trashitems
Source: https://help.teable.ai/en/api-reference/trash/get-trashitems
/swagger.json get /trash/items
Get trash items for project or table
# AI Generation Queue
Source: https://help.teable.ai/en/basic/admin-panel/ai-generation-queue
Review AI field generation status in the current self-hosted instance.
Available for self-hosted Business plan and above
Path: Admin Panel → AI generation queue
Use **AI generation queue** to check whether AI field generation is moving normally in the current self-hosted instance.
## Read the Health Status
**Watchdog** is the automatic recovery check that identifies stalled generations and handles work that can be recovered.
The status beside the page title summarizes the current queue:
| Status | Meaning |
| - | - |
| **Healthy** | AI generation is running normally. |
| **Degraded** | Teable found stalled work, an aging backlog, a high recent failure rate, a mismatch in processing capacity, orphaned work, or a disabled Watchdog. |
The summary cards show:
| Card | What it shows |
| - | - |
| **Waiting to enqueue** | Generations that have not entered the queue and the longest wait |
| **In queue** | Generations that are queued or processing |
| **Last hour** | Recent successes, failures, and failure rate |
| **Watchdog** | When the recovery scan last ran and what it handled |
## Review Spaces and Tasks
The **Spaces** table ranks spaces with unfinished AI generation work. Click **View tasks** to review progress or cancel a task.
Only tasks with unfinished generations appear here. Use **Audit log** to review completed work.
## Handle Stalled Generations
When Teable finds generations without recent progress, the **Stalled generations** section shows how long they have been stalled and whether their queue job is still active. A slow but active job is left running. Recovery for a job that is gone or no longer active is handled by the Watchdog.
## Cancel a Task
In a space's task list, click **Cancel task** to stop the task and all unfinished generations.
# AI Settings
Source: https://help.teable.ai/en/basic/admin-panel/ai-setting
Configure AI Chat, AI fields, AI automation, and App Builder for a self-hosted instance.
Available for self-hosted Business plan and above
Path: Admin Panel → AI Settings
The **AI Settings** page is used to configure **AI Chat**, **AI fields**, **AI automation**, and **App Builder**. The **Pending configuration** panel on the right shows which required items are still missing.
## Before you start
Before you open the AI Settings page, make sure the following items are ready.
| Requirement | Required? | Notes |
| - | - | - |
| **Agent Runtime setup** | Required for AI Chat and App Builder | Used by AI Chat and App Builder |
| **Custom provider** | Required when AI Chat or App Builder uses your own key (BYOK) | Use an **OpenAI Compatible** or **Anthropic** provider |
| **OpenAI API Key** | Optional | Only needed if you want to enable **Voice input** in AI Chat |
| **Public access** | Required when the **Vercel** deployment engine is selected | Your **Teable instance** and **object storage (MinIO / S3)** must be publicly accessible to Vercel |
## Setup steps
Start with the AI Chat runtime, app deployment, and model setup:
Choose a [deployment option](/en/deploy/choose) and complete the deployment, then click **Run test** and **Test Connection**.
Set up your model connection and complete the initial test.
Choose the recommended models for AI fields and AI automation.
Choose a model for each of the four chat model tiers.
### Configure the runtime
Click **Run test** to verify the AI Chat runtime.
### Configure LLM API
In **LLM API**, add a model provider and test its models. If you use your own key (BYOK), choose **OpenAI Compatible** or **Anthropic** as the provider type.
A model's context window and maximum output per response are resolved automatically from the **Model catalog**; there is nothing to fill in. To check the values resolved for a model, open **Model catalog**, choose a **Scope** under **Inspect model** and select the model; **Parameter details** then lists the context, max output, and the source of each value.
When the catalog holds no matching entry (a newly released or self-built model, for example), the model runs on the values set under **Nothing matched** in **Matching rules**: a context window of 200000 and a max output of 32000 by default, with **Matching rule** shown as the source of both in **Parameter details**. If those values do not fit the model, adjust them in **Matching rules** and click **Save**.
### Configure Recommended Models
Choose the recommended models users can select in **AI fields** and **AI automation**.
### Set chat model tiers
In **Chat model tiers**, pick a model for **Ultra**, **Smart**, **Standard**, and **Lite**; the models you can pick are the ones connected in step 2. Users choose by tier in the model menu of sidebar **AI Chat** and see the tier name rather than the model name, so you can swap the model behind a tier at any time without affecting anyone who already picked it.
| Tier | Description |
| - | - |
| **Ultra** | Top capability, for demanding work. Left empty it shows **Not offered** and stays out of the user's model menu. |
| **Smart** | The main model. AI fields, background tasks, and any tier without its own model use it, so it must be set. |
| **Standard** | Everyday chat and general tasks; also used for medium background tasks. Left empty it falls back to **Smart**. |
| **Lite** | Low-cost, high-frequency routine work; also used for lightweight tasks such as generating chat titles. Left empty it falls back to **Smart**. |
Each tier has two more controls on its right:
* **Set as default**: the tier users land on when they open the model menu. An **Ultra** with no model cannot be the default.
* **Enabled**: turn it off and the tier is no longer offered to users. The default tier cannot be turned off.
### Enable AI features
In **AI Capabilities**, enable **AI Field** and **AI Chat** as needed. Configure the runtime before using **AI Chat**.
### Configure App Builder
In **Deployment Engine**, choose how apps are deployed:
| Deployment engine | Setup requirements |
| - | - |
| **Vercel** | Enter a Vercel access token, click **Test Connection**, and use **Test Public Access** to confirm that Vercel can reach your Teable instance and object storage. |
| **Teable Infra** | Uses the configured Teable Infra container runtime. No additional credentials or public access test is required here. |
You can add these optional App Builder settings when needed:
| Optional item | When you need it |
| - | - |
| **Custom domain** | When you want to publish apps under your own domain |
| **App Auth** | When generated apps need **Email OTP** or **Google** sign-in |
In **App Auth**, you can configure sign-in providers for generated apps:
* **Email OTP** uses an independent SMTP mailbox for app login verification emails.
* **Google OAuth** requires a Client ID and Client Secret. Add the redirect URI shown on this page to the authorized redirect URI list in Google Cloud Console.
**Teable** sign-in is available by default. **Email OTP** appears in App Builder only after the SMTP settings are complete, and **Google** appears only after both OAuth credentials are configured.
**Auto-inject AI API Key into apps** is on by default, so apps can call the platform's AI models. Turn it off and apps can no longer reach them.
### Optional. Configure Voice input
To use voice input in AI Chat, enable the feature and enter an **OpenAI API Key**. Configure the **Transcription Endpoint** only when using a custom transcription service. You can also limit the recording length and requests per minute.
### Verify the setup
After the setup is done, first confirm that all required items in the **Pending configuration** panel are green. Then test **AI Chat**, **AI fields**, **AI automation**, and **App Builder** one by one.
## FAQ
Check the account or provider used by your configured model service. Top up or change the model configuration if needed.
# Announcements
Source: https://help.teable.ai/en/basic/admin-panel/announcements
Publish in-app announcements to everyone, to selected spaces, or to selected users, and withdraw them when they no longer apply.
Available for self-hosted Business plan and above
Path: Admin Panel → Announcements
**Announcements** lets administrators put a message in front of signed-in users without sending email: planned maintenance, an incident and its resolution, a policy change, or a new feature you want people to find. Each announcement runs inside a scheduled window and can be aimed at the whole instance or at a specific group.
## Publish an Announcement
Click **Publish announcement** and fill in the form. The preview on the side shows the announcement as users will see it.
| Setting | What it controls |
| - | - |
| **Form** | Where the announcement appears: **Banner** across the top of the app, **Toast** as a transient notification, **Modal** as a dialog that interrupts, or **Sidebar card** in the space and project sidebars. |
| **Level** | The tone users see: **Info**, **Maintenance**, **Critical**, or **Resolved**. |
| Title and **Body** | The announcement text. |
| **Starts at** / **Ends at** | The window during which the announcement is delivered. The end time must be after the start time. |
| **Link text** / **Link URL** | An optional destination. A sidebar card is itself a link, so it always offers the URL field; the other forms show it once the body uses the `{link}` placeholder. |
| **Audience** | **Everyone**, **Specific spaces**, or **Specific users**. |
Choose the strongest form the message deserves. A banner and a sidebar card sit alongside the user's work; a modal blocks it. Users can dismiss an announcement themselves, and when several are active at once, banners collapse behind a **N more announcements** toggle.
### Target Specific Spaces or Users
For **Specific spaces** or **Specific users**, paste identifiers into the audience box (space IDs or names, or user IDs, names, or emails, separated by commas), then click **Match**. Matched entries become chips, and anything Teable could not resolve stays in the box under **Not matched:** so you can correct and retry.
Space membership is evaluated when the announcement is delivered, so collaborators added later still receive a space-targeted announcement.
### Insert Live Values
Use **Insert placeholder** in the body to add values that Teable fills in at display time, so one message stays accurate for every reader:
| Placeholder | Renders as |
| - | - |
| `{startTime}` / `{endTime}` | The window's start or end, in the reader's language and time zone |
| `{time:…}` | A specific instant you choose |
| `{duration}` | How long the window lasts |
| `{countdown}` | A live countdown to the start |
| `{link}` | The link, shown with your **Link text** |
`{link}` is unavailable for the sidebar card, because the whole card is already the link.
### Translate the Content
Write the announcement in one language, then use **AI translate** to fill the other shipped interface languages. Choose **Fill blanks only** to keep translations you already wrote, or **Overwrite all** to re-translate everything. Review each language tab afterwards: the translation is a draft, not a final proofread. Readers see the language that matches their interface, falling back to English.
## Manage Published Announcements
The list shows every announcement with its **Status**, **Title**, **Form**, **Level**, **Audience**, **Window**, and **Created by**. Open a row to inspect its full content.
| Status | Meaning |
| - | - |
| **Scheduled** | The start time has not arrived yet. |
| **Active** | Currently being delivered. |
| **Expired** | The end time has passed. |
| **Withdrawn** | Stopped early by an administrator. |
Click **Withdraw** on an active announcement to stop delivering it immediately. An announcement that has already expired cannot be withdrawn, and its record stays as it was.
# Audit log
Source: https://help.teable.ai/en/basic/admin-panel/audit-log
Review instance-wide activity, filter operation history, and inspect audit log details in the Admin Panel.
Available for self-hosted Business plan and above
Path: Admin Panel → Audit log
**Audit log** lets administrators review activity across the instance and trace who performed an operation, when it happened, and what area it affected.
## What You Can Review
The audit log covers common administration and collaboration activity, including spaces, projects, tables, views, fields, records, sharing, invitations, access tokens, and the Authority Matrix.
Each log entry shows the operation time, operator, action type, related project or space, and request source. Open a log entry to view its details.
## Act on an Operator
Open a log entry and use **Operator actions** beside the operator to handle that account without leaving the page. Each action asks for confirmation first.
| Action | What it does |
| - | - |
| **Deactivate user** | Blocks the account from reaching this instance. Not offered for your own account, for instance administrators, or for deleted users. |
| **Reactivate user** | Restores access for a deactivated account. The user can work again right away, without signing in again or replacing any credential. |
## Filter Logs
Use the filters at the top of the page to narrow the log list:
* **Select Operator**: Show actions performed by a specific user.
* **Select Space**: Show activity within a specific space.
* **Select Project**: Show activity for a specific project.
* **Select Action**: Filter by operation type, such as records, fields, views, tables, projects, sharing, Authority Matrix, Authority Matrix roles, spaces, invitations, users, and access tokens.
If a user, project, or space has been deleted, the entry remains in the log and the resource is marked as deleted.
## Browse Large Log Lists
The grouped audit log shows 50 entries per page. Use **Previous** and **Next** at the bottom of the list to move through results, both in the grouped list and after you open a grouped entry to view the events inside that operation.
## Notes
* Only instance administrators can access the Admin Panel.
# Automation management
Source: https://help.teable.ai/en/basic/admin-panel/automation-management
View automation run status, success rate, and run history in the Admin Panel.
Available for self-hosted Business plan and above
Path: Admin Panel → Automation management
**Automation management** is used to view automation run status across the instance.
## Summary Metrics
The top of the page shows the overall status for the selected time range:
| Metric | Description |
| - | - |
| **Active workflows** | Number of automations that are currently active |
| **Total runs** | Total runs in the selected time range |
| **Success rate** | Percentage of successful runs among all runs |
| **Failed runs** | Number of failed runs in the selected time range |
| **Health overview** | Automation health grouped by healthy, warning, and critical states |
| **Run status distribution** | Run distribution by successful, failed, running, pending, and canceled states |
## Filters
The main page supports filters:
* **Date range**: Last 30 minutes, 1 hour, 6 hours, 1 day, 3 days, 7 days, or 30 days.
* **Trigger**: Filter automations by trigger type.
## Automation List
The list shows a run summary for each automation:
* Last run
* Total runs
* Average duration
* Current health status
* Whether attention is required
If an automation is inactive, the list shows **Inactive**.
## Run History
Open an automation to view **Run history**:
| Field | Description |
| - | - |
| **Status** | Whether the run is successful, failed, running, pending, or canceled |
| **Start time** | When the run started |
| **Duration** | How long the run took |
| **Error** | Error information shown for failed runs |
Run history can be filtered by successful, failed, running, pending, or canceled status.
## Actions
From the automation list, you can:
* **Deactivate**: Stop the automation from being triggered.
* **Mark for deletion**: Mark the automation for deletion.
# Computed Outbox
Source: https://help.teable.ai/en/basic/admin-panel/computed-outbox
Monitor BullMQ delivery and computed task backlog in the Admin Panel.
Available for self-hosted Business plan and above
Path: Admin Panel → Computed Outbox
Use **Computed Outbox** when formula, lookup, or other computed field values stop updating or take much longer than expected. The page shows the overall task health, the jobs moving through the queue, tasks that may need recovery, and any space whose computed tasks are currently paused.
## Read the Health Status
The status beside the page title shows whether computed tasks need attention:
| Status | Meaning |
| - | - |
| **Healthy** | Computed tasks are running normally. |
| **Degraded** | Teable found failures, timed-out tasks, or a growing backlog. |
| **Critical** | BullMQ is unavailable or no worker is available to process tasks. |
When the status needs attention, the page lists the reason.
## Find a Task in the Queue
**Live BullMQ queue** lists the jobs Teable still retains, so you can follow one computed task or look for slow ones.
Each row is one task by default, and it moves through states in place as Teable retries it. Switch to **Deliveries** when you need the full attempt history of a task or want to hunt for slow runs.
To narrow the list:
* Click the state tiles above the table to filter by state: **Waiting**, **Active**, **Delayed**, **Failed**, **Completed (retained)**, and so on. You can select several at once, and hovering a tile explains what that state means.
* Filter by **Space**, **Project**, **Cause**, or **Outcome**, search for a task, Project, Space, or error, or set a minimum processing time to surface slow tasks.
* Click a row to open **Computed lineage**: queue timestamps, delivery lag, processing time, the full failure reason with the redacted SQL for a failed delivery, and the propagation detail described below.
**Completed** does not mean the task did work. The outcome badge says what the delivery actually did: **Processed** ran the task, **No-op** found nothing left to do, **Deferred** rescheduled it for later, and **Parked** means its scope is paused. The **Outcome** filter narrows the list by that result and shows how many deliveries each one covers, so pairing **Completed (retained)** with **Processed** leaves only the deliveries that really ran the task.
A failed row is the history of one delivery attempt, not a stuck task. The durable task keeps retrying on its own, so read the **Ledger state** column to decide whether to act: **Settled** means a later retry already succeeded, and **Dead letter** links to anomaly maintenance. Settled failures are hidden by default; a banner shows how many there are and lets you reveal them.
**Clear failed history** removes the retained failed-job records from the queue only. It repairs nothing, and dead letters remain in **Anomaly maintenance**.
A state tile can also count entries whose job data no longer exists in Redis, usually left behind after eviction or data loss. The list cannot show them, so the page explains the gap under the table. Teable sweeps such leftovers out of the failed state on its own; **Clear failed history** removes them right away.
## Trace How a Value Propagated
When a computed value looks wrong or arrived late, open **Computed lineage** to see the whole chain behind it. Click any queue row, or click **Lineage** beside a task ID in anomaly detail.
| Section | What it answers |
| - | - |
| Summary | End-to-end latency, when the source changed, when the value converged, and which table and fields triggered the run. A **Computing** badge means the chain is still running. |
| **Timeline** | Three lanes side by side: **End-to-end** runs from the source change to the computed writes settling, **This task** covers claim to commit, and **Wakeup job** is the wakeup that ran it. The task lane is split into queue wait, claim / setup, and compute. The wakeup job also drains other due work on the same database, so it normally outlasts end-to-end. |
| **Task chain** | Every task in the cascade, nested under the task that enqueued it, so you can see where a branch came from. Partial batches split off the same stage are a serial queue and stay flat at one level instead of nesting deeper. Each row shows its state, plan steps, **Write target** (the table and fields that task updates), **Estimated complexity**, cascade depth, enqueue time, and duration. |
| **Field propagation** | Which fields the run read and wrote, and how the change traveled between them. Dashed blue is the origin that led to this write, gray is an input that was not written this run, green is written this run, and the arrows are field dependencies or link hops rather than step order. Only origins that actually reach this run's writes are drawn. Use **Expand** to open the graph full screen when a wide chain is hard to follow inline. |
The lineage ledger only records tasks created after this feature shipped and keeps 7 days of history. An older task shows its queue facts without a propagation graph. A seed task the worker has not planned yet shows only its trigger fields. When a change produced no downstream computed writes, the graph says so: nothing depended on those fields through a formula, lookup, rollup, or link title.
## Handle Anomalous Tasks
The **Failed** count and **Anomaly maintenance** show different types of problems, so their numbers may differ.
**Anomaly maintenance** collects anomalies into problem groups, one per Project, source table, and error, so a single root cause is easy to spot. Review the failure reason and fix the underlying problem before you recover anything. Expand a group to read its error details and the tasks it covers; those rows are for inspection, and recovery always runs on the group as a whole.
The actions a group offers depend on its type:
| Anomaly type | Action | What happens |
| - | - | - |
| **Dead letter** | **Recover entire group** | Restores every dead letter currently in that group to the durable queue and redelivers them. Every other group stays untouched. |
| **Dead letter** | **Discard group** (in the **More actions** menu) | Permanently deletes the dead letters in that group. They cannot be recovered or replayed afterwards, so use it only when a replay is pointless. |
| **Timed out** | **Re-arm latest timeout** | Wakes the queue for the newest task in the group so a worker can take it over. |
After a group recovery, Teable reports how many tasks it restored, how many were newly queued or already queued, and how many were delivered or deferred. Workers then consume the group under the current concurrency and task-splitting limits.
A group marked **Project deleted** belongs to a Project that no longer exists. Recovering it would fail again immediately, so **Discard group** is the only action offered.
Moving a table to the trash no longer creates anomalies here. A computed task that still references a trashed table skips the steps that read it, finishes the steps that target live tables, and completes.
Recovery is also unavailable when the data itself caused the failure, such as a value that exceeds a size limit or breaks a field constraint. Replaying the same task would fail the same way, so discard the group and fix the source data or the field definition instead; later writes recompute those fields automatically.
## Pause Computed Tasks for a Space
When one space's computed tasks are making an incident worse, pause that space in **Computed task pauses** rather than stopping the whole instance.
Click **Pause a space**.Search by space ID or name, then select it from the results.Set **Pause duration** to 15, 30, 60, or 120 minutes.Note the incident or maintenance window in **Reason**.Click **Confirm pause**.
A pause only stops workers from claiming new computed tasks for that space. Tasks already running are not interrupted, and matching tasks wait until the pause ends rather than being dropped.
A pause always expires on its own, and two hours is the longest you can set. If the incident outlasts it, click **Extend** on the pause row, choose how much longer to keep it paused, and confirm. The new auto-resume time is counted from the moment you confirm, again up to two hours, so the space is never released in between.
The list shows every active pause with who created it, why, and when it auto-resumes, along with how many pending tasks the active pauses are holding, so you can judge the backlog a resume will release. To lift one early, click **Resume** on its row and confirm.
## Adjust Concurrency
The queue section has two concurrency controls. Each one writes a cluster-wide override that every process picks up within about 15 seconds, with no restart, and each can be reset so processes return to their own environment setting. An **Overridden** badge marks a control that is no longer on its default.
| Control | What it limits |
| - | - |
| **Per-process concurrency** | How many computed tasks each worker process handles at once. |
| **Per-project claim caps** | How many computed tasks run at the same time for one Project (**Per project**) and for one source table within it (**Per seed table**). Both default to 2 and accept values from 1 to 16. |
Raise the claim caps when one busy Project is the bottleneck, and per-process concurrency when many Projects are queued at the same time.
Higher concurrency puts more load on your database. Spaces that store their data in a [database tenant](/en/basic/admin-panel/database-tenant) keep the environment defaults for the claim caps, because their connection pools are sized for those values.
# Database Tenant
Source: https://help.teable.ai/en/basic/admin-panel/database-tenant
Host Teable Space data in a customer-managed PostgreSQL database.
Available for self-hosted Business plan and above
Path: Admin Panel → BYODB
A database tenant is useful when a specific customer or business Space needs separately managed data storage. The Space's business data is stored in a designated PostgreSQL database instead of sharing the instance's default data database with other Spaces, reducing the impact of one tenant's database load or failure on other Spaces. Your organization can also manage the database's deployment location, database access controls, backups, and monitoring.
## What You Can Do
From **Admin Panel** → **BYODB**, an instance administrator can:
* Create a new Space that uses a customer-managed PostgreSQL database.
* Move an existing Space to the target database.
* Check the connection, migration status, and recent errors.
For an existing Space, Teable tests the migration without switching databases by default. After validation, the administrator decides whether to switch. Switching briefly pauses writes, so plan it for a suitable maintenance window.
## FAQ
No. It refers to the Teable Space whose data is stored in that database.
No. It changes where Teable stores and manages its own Space data. You provide a PostgreSQL database hosted elsewhere, and Teable creates and manages its own data there. Existing tables and records in that database are not connected to Teable or automatically imported as Projects.
# Overview
Source: https://help.teable.ai/en/basic/admin-panel/overview
Teable's self-hosted Admin Panel is used to manage instance users, spaces, and system configuration.
Available for self-hosted Business plan and above
The Admin Panel provides centralized management for your Teable instance. Administrators can manage users, spaces, templates, instance settings, and AI settings here.
## Accessing the Admin Panel
After signing in as an instance administrator, select **Admin Panel** in the upper-left corner.
Only instance administrators can access the admin panel. The first registered user automatically becomes an instance administrator.
## Admin Panel Modules
The Admin Panel groups its pages by purpose:
### Instance configuration
* **[Instance settings](/en/basic/admin-panel/settings)**: Configure system-wide settings, permissions, email, and system limits
* **[AI settings](/en/basic/admin-panel/ai-setting)**: Configure AI features and models
* **[Skills](/en/basic/admin-panel/skills)**: Publish skills that every AI agent in the instance can use
* **[Template admin](/en/basic/admin-panel/template-admin)**: Configure template center and custom templates
* **[Self-hosted license](/en/deploy/activate)**: Register, update, and view the current instance license
### Organization & spaces
* **[Users](/en/basic/admin-panel/users)**: Manage user accounts, permissions, and access
* **[Spaces](/en/basic/admin-panel/spaces)**: Manage spaces and auto-join settings
* **[Database Tenant](/en/basic/admin-panel/database-tenant)**: Create and manage database tenants that use customer-managed PostgreSQL databases
### Operations & audit
* **[Automation management](/en/basic/admin-panel/automation-management)**: View automation run status and run history
* **[Table Query Ops](/en/basic/admin-panel/table-query-ops)**: Configure search coverage per table, create indexes, and follow the results
* **[Computed Outbox](/en/basic/admin-panel/computed-outbox)**: Monitor computed task delivery, queue health, and database backlog
* **[AI generation queue](/en/basic/admin-panel/ai-generation-queue)**: Review AI field generation status in the current self-hosted instance
* **[Sandbox Agent](/en/basic/admin-panel/sandbox-agent)**: Configure and manage Sandbox Agent
* **[Schema integrity](/en/basic/admin-panel/schema-integrity)**: Run schema checks on any project and repair what they find
* **[Audit log](/en/basic/admin-panel/audit-log)**: Review recent instance activity and operation details
## Administrator Permissions
Instance administrators have full control over the instance:
* Manage all users and spaces
* Configure system-wide settings
* Register and update licenses
* Not subject to user-level restrictions
Administrator permissions are very powerful. Use them carefully to avoid unintended changes.
## Frequently Asked Questions
**How do I add other administrators?**
In the Users page, click the action menu for any user and select "Make Admin". The system requires at least one administrator at all times.
# Sandbox Agent
Source: https://help.teable.ai/en/basic/admin-panel/sandbox-agent
Configure and manage Sandbox Agent.
Available for self-hosted Business plan and above
Path: Admin Panel → Sandbox Agent
The **Sandbox Agent** page contains **Settings** and **Sandboxes** tabs for configuring how AI Chat runs in sandboxes.
For self-hosted setup, deploy the full-featured runtime plane first. See [Architecture](/en/deploy/architecture).
## Runtime Limits
Configure runtime limits in the **Settings** tab:
| Setting | Description |
| - | - |
| **Stream Idle Timeout** | Set when an idle stream is terminated |
| **Idle Timeout** | Set when an inactive sandbox is recycled |
| **Concurrent Chat Limit** | Set how many Agents each user can run at the same time. AI Chat and App Builder are both Agents |
| **vCPUs** | Set the number of virtual CPUs for each sandbox instance |
| **Memory** | Set the memory limit for each sandbox instance |
| **Temporary Disk** | Set the ephemeral storage limit for each sandbox instance |
| **Thinking Effort** | Set the default thinking effort for agents |
## Sandboxes Tab
Use the **Sandboxes** tab to view and manage current sandbox sessions.
Ending active sessions interrupts running Agent work or app previews. Follow the in-product confirmation prompts before continuing.
# Schema integrity
Source: https://help.teable.ai/en/basic/admin-panel/schema-integrity
Investigate and repair mismatches between a project's field definitions and its database structure.
Available for self-hosted Business plan and above
Path: Admin Panel → Schema integrity
The field definitions Teable holds and the actual structure in the database are meant to match one another. When they drift apart, users see fields that will not open, link fields that return nothing, or a table whose reads and writes keep failing, with no visible cause. **Schema integrity** locates problems of this kind and repairs them.
An instance admin can check any project in the instance without joining its space first, tenants on a customer-managed database (BYODB) included.
## Run a Check
Find the project with the search box, by project, space, table id, or name. The result list shows the **Space** it belongs to, the **Data DB** it uses (default or BYODB), and its **Runtime** (v1 or v2), which is how you confirm you have the right one. The same project name in different spaces is common.
Click **Check** on that row, then **Run Check** in the **Schema Integrity** dialog.
## Read the Results
Results are listed per field and rule, in four states:
| State | Meaning | What to do |
| - | - | - |
| **Error** | The field's link target no longer exists, or the field configuration does not match the actual structure in the database | This is the direct cause of failing reads and writes, and needs repair |
| **Warning** | It deviates from the expected structure but still reads and writes correctly | Repair it, or note it and watch |
| **Skipped** | The rule does not apply to this field and made no judgement | Nothing to do |
| **Success** | It matches what is expected | Nothing to do |
Start with **Error**: a fault a user reported almost always lands in this category. A **Warning** does not explain the current fault, but it can turn into an error as the field structure keeps changing, so it is worth clearing once the errors are handled.
## Repair
You can **Repair** rule by rule, or work in bulk with **Repair warnings only** or **Repair warnings and errors**. While chasing a live fault, repair the errors one at a time and confirm the fault is gone before handling warnings, so that a new problem can be traced to a single change.
A repair changes the table structure only; it does not change record content. Before running one, use the preview next to the repair button: **Confirm repair details** shows the reasoning and the SQL the dry run produced, and nothing is executed until you confirm.
Some rules cannot be repaired automatically and show **Manual** instead; the dialog then explains why the problem needs a person. When the dry run returns no executable SQL, the dialog says so explicitly, and that case needs a person too.
After repairing, click **Re-check** to confirm the problem is gone.
# Instance Settings
Source: https://help.teable.ai/en/basic/admin-panel/settings
Manage instance-level switches, email settings, and system pending items.
Available for self-hosted Business plan and above
Path: Admin Panel → Instance Settings
The **Instance Settings** page is used to manage the core settings of the whole instance, including **General Settings**, **Email**, and the system checks shown in the **Pending configuration** panel.
## Overview
This page mainly covers instance-level basics. The main settings are grouped as follows:
| Setting type | Description |
| - | - |
| **General Settings** | Includes **Allow creating new accounts**, **Banned email domains**, **Allow sending space invitations**, **Allow everyone to create new spaces**, and **Enable email verification** |
| **Email** | Includes **Notification Email** and **Automation Email** for password reset, email verification, notification emails, and invitation emails |
| **System limits** | Shows the effective table data, field, view, and text limits for the instance |
To enable system emails, complete the setup in **Email**.
Use **Banned email domains** to prevent email addresses from listed domains from signing up. Teable rejects those domains before sending signup verification codes, and no invitation emails involving those domains are sent.
If email is not fully configured, the **Email** item in the **Pending configuration** panel will not turn green.
## System limits
**System limits** shows the current instance-level limits for table data and related configuration. If you need to adjust a limit, use the environment variable shown on that page.
After changing an environment variable, restart the service for the new value to take effect.
## Pending configuration
The **Pending configuration** panel on the right is a system checklist. It shows which important settings are still missing for the instance.
Common checks on this page include:
| Item | Impact |
| - | - |
| **PUBLIC\_ORIGIN environment variable** | Affects features that rely on an external access URL, such as attachments and imports |
| **Enable HTTPS** | Affects capabilities that rely on HTTPS, such as copy and paste |
| **Email** | Affects password reset, email verification, notifications, and similar features |
If these items are not completed, the instance may still open normally, but some features can remain unavailable.
## Relationship to AI Settings
**Instance Settings** shows part of the system-level checks, but it is not where you configure **AI models**, the **AI Chat runtime**, or **App Builder**.
Go here for those settings:
* [AI Settings](/en/basic/admin-panel/ai-setting)
You can think of the split like this:
* **Instance Settings**: Covers the core capabilities of the instance itself
* **AI Settings**: Covers AI Chat, AI fields, AI automation, and App Builder
## Check order
If you are preparing a new self-hosted deployment or going live for the first time, check these items in order:
Make sure **PUBLIC\_ORIGIN** is configured correctly.
Make sure the instance already has **HTTPS** enabled.
Make sure **SMTP** is configured and can send emails successfully.
After the basic items are confirmed, continue with [AI Settings](/en/basic/admin-panel/ai-setting).
This makes it easier to turn the **Pending configuration** items green in order and helps with troubleshooting.
## FAQ
This usually means the instance is reachable, but one or more important runtime requirements are still missing. Follow the prompts in the right-side panel and complete them one by one instead of relying only on whether the page opens.
Check whether the saved SMTP settings are complete, whether they match the intended sending purpose, and whether verification or notification emails can be sent reliably.
Many features that rely on an external access URL depend on it. If the configured value does not match the actual access URL, features such as imports, attachments, or redirects may not work correctly.
# Skills
Source: https://help.teable.ai/en/basic/admin-panel/skills
Publish skills that every AI agent in the instance can use.
Available for self-hosted Business plan and above
Path: Admin Panel → Skills
Use **Skills** to publish skills for the whole instance. A skill added here is available in every AI Chat, App Builder, and bot conversation, so use it for working methods your organization should share by default, such as a house writing style, a reporting convention, or a shared integration procedure.
Skills added by users elsewhere stay in their own scope. See [AI Chat](/en/basic/ai/ai-chat) for personal, project, and space skills.
## Add a Skill
Click **Import Skill** and choose where the skill comes from:
| Source | What to provide |
| - | - |
| **GitHub URL** | The link to the skill folder in a repository, for example `https://github.com/owner/repo/tree/main/skills/my-skill` |
| **ZIP / Skill File** | A `.zip` or `.skill` file that contains `SKILL.md` |
If a skill with the same name already exists in this scope, importing replaces it.
## Manage Published Skills
The list groups skills by scope and shows where each one came from. Built-in skills are listed at the bottom for reference and are not editable.
* Use the switch on a row to enable or disable a skill without deleting it. A disabled skill stays in the list but is not offered to agents.
* For a skill imported from GitHub, click the refresh button to pull the latest version from its source.
* Click a row to read its `SKILL.md`, edit its name and description, download it, replace its files, or delete it.
Only instance administrators can add, change, or remove skills on this page. Every signed-in user can use the published skills in their conversations.
## When a Name Is Used Twice
A skill published here is the instance default. If a project, space, personal, app, or bot skill uses the same name, the narrower one is in effect for that conversation, and the instance skill is ignored there.
# Spaces
Source: https://help.teable.ai/en/basic/admin-panel/spaces
Manage all spaces in your instance through the admin panel, including viewing space information, deleting spaces, and configuring auto-join settings.
Available for self-hosted Business plan and above
### Space Information
* **Space Name**: The display name of the space
* **Projects**: The total number of projects contained in the space
* **Collaborators**: The total number of users who have access to the space
* **Created Time**: When the space was created
* **Auto-join**: Whether the space allows new users to join automatically
### Space Operations
#### Auto-join
* **Allow Auto-join**: When enabled, all newly registered users will automatically join this space with [Read permission](/en/basic/space/space-invite). Useful for public or company-wide spaces.
* **Disallow Auto-join**: Disable automatic joining for new users.
#### Delete Space
Spaces deleted from the admin panel **cannot be recovered**. Unlike regular space deletion, spaces deleted here do not enter the trash bin system.
When you delete a space from the admin panel:
* The space is immediately marked as deleted
* All projects and data within the space become inaccessible
* Collaborators lose access to the space
* This operation cannot be undone
**Before deleting a space:**
1. Notify all collaborators about the deletion
2. Export or backup important data
3. Confirm that the space is no longer needed
4. Consider using the deactivate option if temporary removal is needed
# Table Query Ops
Source: https://help.teable.ai/en/basic/admin-panel/table-query-ops
Review search coverage and indexes table by table, configure search, create indexes, and follow the results.
Available for self-hosted Business plan and above
Path: Admin Panel → Table Query Ops
Use **Table search and indexes** when views, filters, relations, or searches on a large table become slow. Teable watches the query workload in the background and summarizes each table: how it is searched today, which fields are covered, which physical indexes exist, and how many slow queries it saw recently. Instance administrators configure search coverage, create indexes, and follow the results here.
The page only queues tasks; it never changes the database directly. Every change runs asynchronously in the background, so confirm the outcome under **Tasks / history**.Table Query Ops is off by default. Set `V2_TABLE_QUERY_OPS_ENABLED` to `true` on the backend and restart, and the page starts collecting observations.
## Find the table to work on
The page opens on the table list. The state buttons across the top carry their own counts and narrow the list:
| State | Meaning |
| - | - |
| **All tables** | Every observed table. |
| **Needs attention** | Tables with slow queries, timeouts, pending recommendations, or failed tasks. Start here. |
| **Indexed search** | Tables whose index metadata is published and usable and whose runtime switch is on, so search really runs on the index. |
| **Configured search** | Tables with a saved search configuration or existing index metadata, including those not yet published. |
| **Unconfigured** | Tables with no search coverage yet. |
| **Unavailable** | Tables that cannot use indexed search right now. The row states why. |
The search box accepts table, Project, and Space names or IDs. Sorting is either **Most slow queries** or **Table name**. **Observation window** covers the last 1 hour or 24 hours, and every observation figure in the list follows that window. Observations are kept for 2 days; anything older no longer appears in the list.
Each row gives the table's estimated rows and size, the requests and slow queries within the window, the current search method and field coverage, the number of filter/sort indexes, and the counts of pending recommendations and active tasks. Click a table name to open its detail.
**About index states**, next to the state buttons, explains how these counts are measured.
## Read the index state
The table list and the table detail both show an index state next to the search method:
| State | Meaning | What to do next |
| - | - | - |
| **Not configured** | No saved search configuration and no index metadata. | Choose **Configure search** if the table needs indexed search. |
| **Configured · pending publication** | The configuration is saved; the index is not published yet. | Check **Tasks / history** for a task still running. |
| **Published · ready** | The index metadata is published and usable. | Nothing to do. |
| **Unusable metadata** | The index metadata is broken and cannot serve search. | Run **Update selection / rebuild** again. |
Two lines can appear below the state. **Configured: pg\_bigm / pg\_trgm** means the saved provider differs from the search method in use, and **Indexed-search runtime switch: off** means the index is ready but the runtime is off, so search still runs `ILIKE`.
A published index does not mean every search hits it: a probe that is too short, or a field outside the coverage, still falls back to `ILIKE`. This page reports the state of the index, not proof that recent requests hit it.
## Configure search coverage
The **Search coverage** tab shows the table's current search method, how many fields are covered, and the **Serving coverage** of each field. **Show uncovered fields** narrows the list to the fields not yet included; fields marked **Not eligible** cannot contribute to a substring search index.
Serving coverage requires published, usable index metadata and the runtime switch on; a saved configuration alone does not count. Coverage is explicit, so fields you add later are not included automatically; configure the table again to bring them in.
Choose **Configure search** on a table that has never been configured, or **Update selection / rebuild** on one that has, which opens with the provider and field selection saved last time. The dialog asks for:
| Item | What to enter |
| - | - |
| **Search provider** | `pg_bigm` or `pg_trgm`. If the extension is missing, the dialog says what is missing and who can provision it. |
| **Representative search text** | Text your users would really search for. It checks substring semantics and collects plan evidence, and is never saved. If it is too short, the dialog names the minimum length. |
| **Fields** | Select the fields users actually search. Do not select everything on a wide table; building a search document for every field is expensive. |
**Analyze and dry-run** runs the change without committing it and reports the covered field count, estimated rows, whether plan evidence exists, and the impact of creating or rebuilding. Tables estimated at 50,000 rows or more, or of unknown size, also require the maintenance-window acknowledgement. Then choose **Confirm and queue task**.
Creating or rebuilding search coverage generates a search column and a GIN index. It can rewrite the whole table and hold locks, and indexed search is briefly interrupted while it runs. Schedule it inside a maintenance window.
What the dialog returns is a task receipt, not a result. Close it and follow the task under **Tasks / history**. Submitting the same change again returns the existing task.
## Manage filter and sort indexes
The **Filter / sort indexes** tab lists the physical indexes that serve filter predicates and ordering on this table, each with its validity, whether Teable manages it, its size, and its definition. These are managed separately from substring search indexes.
**Pending actions** below holds the system's index recommendations and says whether plan evidence backs each one. **Review index creation** shows the proposed index, the database it runs against, and the evidence; after you confirm, Teable runs `CREATE INDEX CONCURRENTLY` asynchronously. Large tables and tables of unknown size need the maintenance-window acknowledgement here too.
This page does not delete indexes. Unmanaged and system indexes may protect constraints or serve other workloads, so they are left alone.
## Diagnose specific queries
When someone reports a slow table and no recommendation covers it, open the **Query diagnosis** tab and choose **Analyze queries**. The analysis only reads saved query shapes and available plan evidence; it creates nothing.
The conclusion is one of **Plan-backed index opportunities found**, **No index opportunity confirmed by the available plans**, or **Insufficient evidence**. Insufficient evidence does not mean a sequential scan happened: a slow observation alone does not establish that the access path is at fault. Below it, each affected query is listed with whether it came from real traffic or a saved view configuration, and the estimated plan cost before and after the proposed index (plan cost, not milliseconds).
## Follow the results
The **Tasks / history** tab holds three parts:
* **Tasks**: background tasks for this table, with status, attempt count, task kind, and failure reason. When a task eventually succeeded after failing, the error is labelled as a prior attempt.
* **Search configuration history**: the provider, status, and field list of each past coverage configuration.
* **Recommendation history**: recommendations that were accepted, dismissed, or superseded.
History loads only the most recent entries; when there are more, a line above the list gives the total.
While a table has a queued or running task, the buttons for configuring search and creating indexes stay disabled. Wait for the task to finish.
# Template Admin
Source: https://help.teable.ai/en/basic/admin-panel/template-admin
Manage workflow templates for your organization, enabling users to quickly start with pre-configured projects.
Available for self-hosted Business plan and above
### Template Management
In the Template Admin interface, you can create and configure templates that will be available in your organization's template center.
#### Template Information
* **Cover**: The cover image for the template card
* **Name & Description**: The title and short description displayed in the template center
* **Markdown Description**: Detailed description supporting rich text formatting
* **Category**: Group templates by business scenarios (e.g., HR, Sales, Engineering)
* **System**: Indicates if the template is an official system template
* **Solution**: When marked, using this template opens the integration setup first instead of copying the project straight away. The **Integrations** column lists the platforms it connects to
* **Source**: The original project used to create this template
#### Template Operations
* **New Template**: Create a new template configuration
* **Publish Snapshot**: Capture the current state of the source project. You must publish a snapshot before you can list the template.
* **Status (Publish)**: Toggle to list/unlist the template in the template center. Requires a name, description, and snapshot.
* **Pin**: Pin important templates to the top of the list
* **Delete**: Remove the template configuration
### Using Official Templates
Self-hosted users can import templates from the official Teable Cloud:
1. **Download**: Get the `.tea` file from the [Official Template Center](https://teable.ai/templates)
2. **Import**: Import the `.tea` file as a new project in your space
3. **Create Template**: Go to Template Admin > New Template
4. **Select Source**: Choose the imported project as the source
5. **Publish**: Configure details, publish snapshot, and enable status
# Users
Source: https://help.teable.ai/en/basic/admin-panel/users
Manage all users in your instance through the admin panel, including viewing user information, deactivating and deleting users.
Available for self-hosted Business plan and above
### User Information
* **Username**: The user's display name
* **Last login**: The most recent time the user logged into the system
* **Signed up**: The time when the user first registered their account
* **Status**: The current status of the user account (Active, Deactivated, or Deleted)
### User Operations
#### Permissions
* **Make Admin**: Grants full instance administration rights
* **Remove Admin**: Revokes administrator rights
#### Account Status
* **Deactivate**: User cannot log in but data is retained
* **Activate**: Restore access for a deactivated user
#### Sessions
Open a user's action menu and select **Sessions** to see the devices where the user is currently signed in, along with their login history. Click **Sign out** on a single device, or click **Sign out all devices**, to force the user to sign in again. Unless the account is deactivated, the user can still sign back in.
#### Password Reset
Open a user's action menu and select **Reset password**. After you confirm, Teable generates a one-time link that you can copy and send to the user. If notification email is configured, Teable also sends the link by email.
The user's current password remains valid until they set a new one through the link. Teable shows the expiration time when it generates the link, and each link can be used only once.
**Reset password** is not available when password login is disabled for the instance.
#### Deletion
* **Delete**: Soft-delete user (marked as deleted)
* **Restore**: Recover a soft-deleted user
* **Permanent Delete**: Completely remove user data (irreversible)
# Overview
Source: https://help.teable.ai/en/basic/authority-matrix
Set access scopes for different teams in the same project, so members only see, edit, or export the data they need.
Available for Business plan and above
When sales, finance, operations, and leadership share the same project,
permissions decide who can enter the project, which data they can see or edit,
and whether they can import or export data. The Authority Matrix helps teams
keep data in one place while separating access by responsibility.
You can assign custom roles to members or departments, then let each role
access only the tables, apps, and workflows it needs. For tables, you can also
limit visible views, visible records, editable fields, and import or export
permissions. For example, sales can maintain their own customers, finance can
view billing fields, and leadership can view the full dataset.
## When to Use It
| Scenario | Good for |
| - | - |
| Department-level access | Sales can maintain customer records, while finance only sees billing fields. |
| Assignee-based records | Sales reps can view and update only records assigned to them. |
| Restricted data entry | Members can create new records without editing or deleting existing records. |
| Sensitive fields in a shared project | Members can view order records without seeing payment or cost fields. |
| Controlled apps and workflows | Roles can open selected apps or workflows, while unauthorized nodes stay hidden. |
## How Permissions Work
The Authority Matrix assigns access by role. Users can receive permissions
from roles assigned directly to them or from department roles. When multiple
roles apply, Teable combines the permissions allowed by those roles.
Space users with the **Manager** permission and Authority Matrix administrators can manage the Authority Matrix and are not restricted by it.
The role list includes an `Administrators` section and a `Custom roles`
section:
Use `Add role` to create a custom role. In the role detail page, assign
collaborators, write a short description, and configure access for each node in
the project:
## Configure Role Access
Each table, app, and workflow has its own access setting.
| Node type | Available setting |
| - | - |
| Table | Choose `Can edit` or `No access`. After a table is set to `Can edit`, configure its detailed permissions. |
| App | Choose `Can access` or `No access`. This controls whether the role can open the app. |
| Workflow | Choose `Can access` or `No access`. This controls whether the role can open the workflow. |
| Folder | Folders are shown for navigation. If none of the child nodes are accessible, the folder is hidden for the role. |
To configure view, record, field, and other detailed table permissions, set the
table to `Can edit` first. A table with `No access` is hidden from members in
that role.
## Table Permissions
When a table is set to `Can edit`, configure these permission areas:
| Permission area | What it controls |
| - | - |
| View permissions | Whether the role can create, update, or delete views, and whether it can view `All views` or only `Specific views`. |
| Record permissions | Whether the role can create, update, delete, comment on, or copy records. Visible records can be `All records` or records that match filter conditions. |
| Field permissions | Whether the role can view, update, or create values in specific fields. The primary field must remain visible. |
| Import and export permissions | Whether the role can import data into the table or export table data. |
Record filters work well for access scopes that change by owner, department,
or similar fields. For example, a condition such as `Sales owner` `is`
`current user` lets each salesperson see only their own records. Field
permissions can further hide or lock sensitive field values in records the
role can access.
## Default Role
Use `Default role` for members who have not been assigned any custom role. You
can select an enabled custom role, or choose `Permission denied` so these
members cannot access content controlled by the Authority Matrix.
## Notes
* After the Authority Matrix is enabled, users whose Space permission is below
`Manager` are restricted by it unless they are added as Authority Matrix
administrators.
* The user who enables the Authority Matrix is automatically added to
`Administrators`.
* New custom roles are enabled when they are created from `Add role`, but each
table, app, and workflow still needs its own access setting.
* A table set to `No access` for a role is hidden from that role, even if its
detailed permission options were edited earlier.
* Assigning a role from `Add user` or `Add from organization` can add selected
members or departments as project collaborators. The Authority Matrix then
narrows what they can access inside the project.
To learn about basic Space and project permission levels, see [Collaboration Permissions](/en/basic/space/space-permission).
# Authority Matrix Guidelines
Source: https://help.teable.ai/en/basic/authority-matrix/authority-matrix-practical-guide
Configure Authority Matrix roles for a sales team that needs shared data, ownership-based record access, and restricted data entry.
This guide uses a sales project with three tables: `Customers`, `Sales Orders`,
and `Products`. The goal is to let each role work with the data it needs
without exposing the whole project.
| Role | Access goal |
| - | - |
| Sales Director | View customer and sales data, comment on products, and avoid changing product prices. |
| Sales Rep | View and update only their own customers and orders, create new customers, and avoid deleting completed orders. |
| Data Entry Clerk | Add new products without seeing existing products, customers, or orders. |
Turn on the Authority Matrix before relying on role permissions.
## Create the Roles
Open the Authority Matrix page in the project and turn on the main switch. The
user who enables it is added as an administrator.
Click `Add role` and create `Sales Director`, `Sales Rep`, and `Data Entry
Clerk`.
## Configure Sales Director
The Sales Director needs broad visibility, but product prices should stay
protected from accidental edits.
| Node | Setting |
| - | - |
| Customers | Set the table to `Can edit`. Keep record and field permissions open so the role can view customer data. |
| Sales Orders | Set the table to `Can edit`. Keep record and field permissions open so the role can review sales activity. |
| Products | Set the table to `Can edit`, then allow only `Read record` and `Comment on record` in record permissions. |
Assign members from the role list with `Add user` or `Add from organization`,
then make sure the role switch is enabled.
After setup, a Sales Director can review customer and order data, comment on
products, and avoid changing product records.
## Configure Sales Rep
The Sales Rep role uses record filters so each rep works only with records
where they are the owner.
### Customers
Set `Customers` to `Can edit`.
| Permission area | Setting |
| - | - |
| Record permissions | Choose records that match specific conditions. Add a filter such as `Sales Rep` `is` `Me (current user)`. |
| Record operations | Allow `Read record`, `Update record`, and `Create record`. Leave `Delete record` off if reps should not delete customer records. |
### Sales Orders
Set `Sales Orders` to `Can edit`.
| Permission area | Setting |
| - | - |
| Record permissions | Use the same owner-based filter, such as `Sales Rep` `is` `Me (current user)`. |
| Record operations | Allow `Read record` and `Create record`. Leave `Update record` and `Delete record` off if completed orders should stay unchanged. |
| Field permissions | Hide sensitive fields such as `Payment Method` by turning off `Read record` for that field. |
Assign sales reps to the role and keep the role enabled.
Each sales rep now sees only the customer and order records that match the
owner filter.
## Configure Data Entry Clerk
The Data Entry Clerk only needs to add products.
| Node | Setting |
| - | - |
| Products | Set the table to `Can edit`. In record permissions, allow only `Create record`. |
| Product fields | If linked order data should stay hidden, turn off `Read record` for the `Orders` linked field. |
| Customers and Sales Orders | Keep these tables as `No access`. |
Assign clerks to the role and keep the role enabled.
After setup, the Data Entry Clerk can add new product records but cannot browse
existing product, customer, or order data.
## Sales Review View
Use this setup for sales reviews: reps can see the full customer list, but can only edit customers they own.
During a review, reps may need to see every customer record to compare follow-up
patterns and customer status. Day-to-day editing should still stay limited to
the customers they own, so they do not change another rep's records by mistake.
Keep the existing `Sales Rep` role, then add a read-only role for company-wide
customer visibility. A rep can use the read-only role to view all customers and
use the `Sales Rep` role to update only the customers they own.
### Create a Read-Only Role
Click `Add role` and create a read-only role, such as `Global Customer Viewer`.
### Configure Customer Access
Set `Customers` to `Can edit`. In record permissions, allow only `Read record`.
Do not enable `Update record`, `Delete record`, or `Create record`. Leave the
record filter empty so this role can view all customer records.
### Assign Sales Reps
Return to the role list and add the sales reps who need review access to
`Global Customer Viewer`.
When a user has both `Sales Rep` and `Global Customer Viewer`, Teable combines
the permissions. The user can view all customer records, but can update only
records allowed by the owner-based `Sales Rep` role.
# Auth0 SSO
Source: https://help.teable.ai/en/basic/sso/auth0
Configure Auth0 as your SSO authentication provider for Teable
Available for Business plan and above
## Step 1: Create Authentication Provider in Teable
1. Navigate to your Teable SSO settings
2. Create a new authentication provider and name it **Auth0** and select **OpenID Connect**
## Step 2: Access Auth0 Dashboard
1. Log in to your [Auth0 Dashboard](https://manage.auth0.com)
2. Select your Auth0 tenant
3. Navigate to **Applications** → **Applications** in the left menu
## Step 3: Create a New Application
1. Click **Create Application**
2. Enter application details:
* **Name**: Teable SSO
* **Application Type**: Select **Regular Web Applications**
3. Click **Create**
## Step 4: Configure Application Settings
After creating the application, go to the **Settings** tab:
### Basic Information
1. Copy your **Domain** (e.g., `your-tenant.auth0.com` or `your-tenant.us.auth0.com`)
2. Copy the **Client ID**
3. Copy the **Client Secret**
4. Paste these values into the Teable SSO configuration
### Application URIs
Scroll down to the **Application URIs** section:
1. **Allowed Callback URLs**: Paste the **Callback URL** from Teable
2. **Allowed Logout URLs**: (Optional) `https://app.teable.ai`
3. **Allowed Web Origins**: (Optional) `https://app.teable.ai`
4. Click **Save Changes** at the bottom of the page
Make sure to save your changes before leaving the page.
## Step 5: Configure OAuth Endpoints
In Teable, fill in the following OAuth endpoints using your Auth0 domain:
* **Authorization URL**: `https://{yourDomain}/authorize`
* **Token URL**: `https://{yourDomain}/oauth/token`
* **User Info URL**: `https://{yourDomain}/userinfo`
* **Issuer**: `https://{yourDomain}/`
Replace `{yourDomain}` with your actual Auth0 domain from Step 4.
## Step 6: Configure Connections (Optional)
Auth0 allows you to enable multiple identity providers. To configure which login methods are available:
1. In your application settings, go to the **Connections** tab
2. Enable the authentication methods you want to support:
* **Database**: Username/Password authentication
* **Social**: Google, Microsoft, GitHub, etc.
* **Enterprise**: SAML, Active Directory, etc.
3. Configure each connection as needed
## Step 7: Customize Login Experience (Optional)
### Universal Login Page
1. Go to **Branding** → **Universal Login** in the Auth0 dashboard
2. Customize the login page appearance
3. Add your company logo and brand colors
### Email Templates
1. Go to **Branding** → **Email Templates**
2. Customize email templates for verification, password reset, etc.
## Step 8: Configure User Permissions
### Define Scopes
1. Go to **Applications** → **APIs** in the Auth0 dashboard
2. Select **Auth0 Management API** or create a custom API
3. Define the scopes/permissions needed for your application
### Assign Roles (Optional)
1. Go to **User Management** → **Roles**
2. Create roles for different user types
3. Assign permissions to each role
4. Assign users to appropriate roles
## Step 9: Test SSO Login
You have two options to enable SSO login:
**Option 1: Direct Authentication URL**
* Use the authorization URL as your SSO login URL
**Option 2: Domain Verification**
1. In Teable, configure domain verification
2. Verify your custom domain
3. Visit [https://app.teable.ai](https://app.teable.ai)
4. Click the SSO login button
5. Enter your email address under the verified domain to log in
## Additional Configuration (Optional)
### Enable Multi-Factor Authentication
1. Go to **Security** → **Multi-Factor Auth** in the Auth0 dashboard
2. Enable your preferred MFA methods (SMS, authenticator app, etc.)
3. Define MFA policies and rules
### Configure Rules for Custom Logic
1. Go to **Auth Pipeline** → **Rules**
2. Create custom rules to:
* Add custom claims to tokens
* Enforce conditional access
* Integrate with external services
* Enrich user profiles
### Set Up Organizations (Auth0 Organizations Feature)
If using Auth0 Organizations:
1. Go to **Organizations** in the Auth0 dashboard
2. Create organizations for different tenants/companies
3. Configure organization-specific branding and connections
4. Enable organization support in your Teable application
# Authentik SSO
Source: https://help.teable.ai/en/basic/sso/authentik
Configure Authentik as your SSO authentication provider for Teable
Available for Business plan and above
## Step 1: Create Authentication Provider in Teable
1. Navigate to your Teable SSO settings
2. Create a new authentication provider and name it **Authentik** and select **OpenID Connect**
## Step 2: Access Authentik Admin Interface
1. Log in to your Authentik instance admin interface
2. The default URL is typically `https://your-authentik-domain/if/admin/`
3. Use your administrator credentials to log in
## Step 3: Create a New Provider
1. Navigate to **Applications** → **Providers** in the left menu
2. Click **Create** button
3. Select **OAuth2/OpenID Provider**
4. Configure the provider settings:
### Basic Settings
* **Name**: Teable SSO Provider
* **Authorization flow**: Select your preferred flow (typically **default-authentication-flow**)
* **Client type**: **Confidential**
* **Client ID**: (Auto-generated, you can customize if needed)
* **Client Secret**: (Auto-generated, copy this value)
### Redirect URIs
* **Redirect URIs/Origins (RegEx)**: Paste the **Callback URL** from Teable
* For exact match: `https://app.teable.ai/api/auth/authentication/__providerId__/callback`
* For regex pattern: `https://app\.teable\.ai/api/auth/authentication/.*/callback`
Replace `__providerId__` in the URL with the providerId shown after creating the authentication provider in Teable, or copy the callback URL directly from the Teable page.
### Advanced Settings
* **Scopes**: Make sure the following scopes are available:
* `openid`
* `email`
* `profile`
* **Subject mode**: **Based on the User's hashed ID**
* **Include claims in id\_token**: Check this option
Click **Finish** to create the provider.
## Step 4: Save Client Credentials
After creating the provider:
1. Copy the **Client ID** from the provider details
2. Copy the **Client Secret** (this is shown only once during creation)
3. Paste both values into the Teable SSO configuration
Store the Client Secret securely. You can regenerate it later if needed.
## Step 5: Create an Application
1. Navigate to **Applications** → **Applications** in the left menu
2. Click **Create** button
3. Configure the application:
* **Name**: Teable
* **Slug**: `teable` (or your preferred slug)
* **Provider**: Select the **Teable SSO Provider** you created in Step 3
* **Launch URL**: (Optional) `https://app.teable.ai`
* **UI settings**: (Optional) Upload Teable logo and customize appearance
Click **Create** to finish.
## Step 6: Configure OAuth Endpoints
In Teable, fill in the following OAuth endpoints using your Authentik domain:
* **Authorization URL**: `https://{your-authentik-domain}/application/o/authorize/`
* **Token URL**: `https://{your-authentik-domain}/application/o/token/`
* **User Info URL**: `https://{your-authentik-domain}/application/o/userinfo/`
* **Issuer**: `https://{your-authentik-domain}/application/o/{application-slug}/`
Replace `{your-authentik-domain}` with your actual Authentik instance domain and `{application-slug}` with the slug you configured (e.g., `teable`).
## Step 7: Configure Application Access
### Create or Use Existing Flow
1. Navigate to **Flows & Stages** → **Flows**
2. You can use the default flows or create custom ones
3. Typical flows needed:
* **Authentication flow**: For user login
* **Authorization flow**: For OAuth2/OIDC authorization
### Assign Access Policy (Optional)
1. Go back to your application settings
2. Scroll to **Policy / Group / User Bindings** section
3. Click **Bind existing policy** to restrict access based on:
* **Groups**: Only allow specific groups
* **Users**: Only allow specific users
* **Custom policies**: Create complex access rules
## Step 8: Configure Scopes and Claims (Optional)
### Review Scopes
1. Navigate to **Customization** → **Property Mappings**
2. Review the **Scope Mappings** for OAuth2/OIDC
3. Ensure the following scopes include the right claims:
* `openid`: Contains `sub` claim
* `email`: Contains `email` and `email_verified`
* `profile`: Contains `name`, `given_name`, `family_name`, etc.
### Add Custom Claims
If you need custom user attributes:
1. Go to **Customization** → **Property Mappings**
2. Click **Create** → **Scope Mapping**
3. Define your custom claims:
* **Name**: Custom claim name
* **Scope name**: Scope identifier (e.g., `custom_claims`)
* **Expression**: Python expression to extract user data
4. Attach the scope to your provider
## Step 9: Test SSO Login
You have two options to enable SSO login:
**Option 1: Direct Authentication URL**
* Use the authorization URL as your SSO login URL
* Users will be redirected to Authentik for authentication
**Option 2: Domain Verification**
1. In Teable, configure domain verification
2. Verify your custom domain
3. Visit [https://app.teable.ai](https://app.teable.ai)
4. Click the SSO login button
5. Enter your email address under the verified domain to log in
## Additional Configuration (Optional)
### Configure Multi-Factor Authentication
1. Navigate to **Flows & Stages** → **Stages**
2. Create MFA stages (e.g., TOTP, WebAuthn, SMS)
3. Go to **Flows & Stages** → **Flows**
4. Edit your authentication flow
5. Add MFA stages to the flow
6. Configure MFA policies and bindings
### Set Up User Enrollment
1. Navigate to **Flows & Stages** → **Flows**
2. Create or edit an enrollment flow
3. Add stages for:
* User details collection
* Email verification
* Password setup
4. Link the enrollment flow to your application
### Configure Password Policies
1. Navigate to **Flows & Stages** → **Policies**
2. Create password policies with requirements like:
* Minimum length
* Complexity requirements
* Password history
* Expiration rules
### Enable Session Management
1. Navigate to **Events** → **Sessions**
2. Monitor active user sessions
3. Configure session timeout settings in **System** → **Settings**
### Custom Branding
1. Navigate to **Customization** → **Tenants**
2. Edit your tenant settings
3. Customize:
* Logo and favicon
* Theme colors
* Footer text and links
4. Users will see your branding when logging in through Authentik
### Enable Audit Logging
1. Navigate to **Events** → **Logs**
2. Review authentication events and errors
3. Set up notification rules for important events
4. Configure event retention policies in **System** → **Settings**
# Azure Entra ID SSO
Source: https://help.teable.ai/en/basic/sso/azure-entra-id
Configure Azure Entra ID as your SSO authentication provider for Teable
Available for Business plan and above
## Step 1: Create Authentication Provider in Teable
1. Navigate to your Teable SSO settings
2. Create a new authentication provider and name it **Azure Entra ID** and select **OpenID Connect**
## Step 2: Access Azure Entra ID
1. Log in to your Azure account
2. Navigate to **Microsoft Entra ID** (formerly Azure Active Directory)
## Step 3: Configure OAuth Endpoints
Fill in the following OAuth endpoints in Teable using your **Tenant ID**:
* **Authorization URL**: `https://login.microsoftonline.com/_YOUR_TENANT_ID_/oauth2/v2.0/authorize`
* **Token URL**: `https://login.microsoftonline.com/_YOUR_TENANT_ID_/oauth2/v2.0/token`
* **User Info URL**: `https://graph.microsoft.com/oidc/userinfo`
* **Issuer**: `https://login.microsoftonline.com/_YOUR_TENANT_ID_/v2.0`
Replace `_YOUR_TENANT_ID_` with your actual Azure Tenant ID.
## Step 4: Register a New Application
1. In Azure Entra ID, click **App registrations** in the left menu
2. Click **+ New registration**
## Step 5: Configure Application Registration
Fill in the application registration form:
* **Name**: Teable SSO
* **Supported account types**: Select based on your needs
* **Platform**: Web
* **Redirect URI**: Paste the **Callback URL** from Teable
Click **Register** to create the application.
## Step 6: Save the Client ID
1. Copy the **Application (client) ID** from the application overview page
2. Paste the Client ID into the Teable SSO configuration
## Step 7: Create Client Secret
1. In your application, click **Certificates & secrets** in the left menu
2. Click **+ Add a certificate or secret**
3. Add a description and set the expiration period
4. Click **Add**
5. **Important**: Copy the secret **Value** immediately and save it as your Client Secret in Teable
The secret value is only visible once. Make sure to save it immediately.
## Step 8: Configure API Permissions
1. Click **API permissions** in the left menu
2. Click **+ Add a permission**
3. Select **Microsoft Graph**
4. Choose **Delegated permissions**
5. Add the following permissions:
* `email`
* `openid`
* `profile`
6. Click **Add permissions**
7. Click **Grant admin consent for \[Your Directory]** to approve the permissions
## Step 9: Test SSO Login
You have two options to enable SSO login:
**Option 1: Direct Authentication URL**
* Use the authentication URL as your SSO login URL
**Option 2: Domain Verification**
1. Click **Domain verification** in the left menu
2. Verify your custom domain
3. Visit your teable login page
4. Click the SSO login button
5. Enter your email address under the verified domain to log in
# Google Workspace SSO
Source: https://help.teable.ai/en/basic/sso/google-workspace
Configure Google Workspace as your SSO authentication provider for Teable
Available for Business plan and above
## Step 1: Create Authentication Provider in Teable
1. Navigate to your Teable SSO settings
2. Create a new authentication provider and name it **Google Workspace** and select **OpenID Connect**
## Step 2: Access Google Cloud Console
1. Go to [Google Cloud Console](https://console.cloud.google.com)
2. Log in with your Google Workspace admin account
3. Select or create a project for Teable SSO integration
## Step 3: Enable Google Identity Services
1. In the Google Cloud Console, navigate to **APIs & Services** → **Library**
2. Search for **Google Identity** or **Google+ API**
3. Click **Enable** if not already enabled
## Step 4: Configure OAuth Consent Screen
1. Go to **APIs & Services** → **OAuth consent screen**
2. Select **Internal** (for Google Workspace users only) or **External**
3. Fill in the required information:
* **App name**: Teable SSO
* **User support email**: Your email address
* **App logo**: (Optional) Upload Teable logo
* **Authorized domains**: Add your Teable domain
* **Developer contact information**: Your email address
4. Click **Save and Continue**
### Configure Scopes
1. Click **Add or Remove Scopes**
2. Add the following scopes:
* `openid`
* `email`
* `profile`
3. Click **Update** and then **Save and Continue**
### Add Test Users (if using External)
If you selected "External", add test users during development:
1. Click **Add Users**
2. Enter email addresses of test users
3. Click **Save and Continue**
## Step 5: Create OAuth Client ID
1. Go to **APIs & Services** → **Credentials**
2. Click **Create Credentials** → **OAuth client ID**
3. Select **Web application** as the application type
4. Configure the client:
* **Name**: Teable SSO Client
* **Authorized JavaScript origins**: (Optional) `https://app.teable.ai`
* **Authorized redirect URIs**: Paste the **Callback URL** from Teable
5. Click **Create**
## Step 6: Save Client Credentials
After creating the OAuth client, a dialog will appear with your credentials:
1. Copy the **Client ID**
2. Copy the **Client Secret**
3. Click **OK**
4. Paste both values into the Teable SSO configuration
You can always retrieve these credentials later from the Credentials page.
## Step 7: Configure OAuth Endpoints
In Teable, fill in the following OAuth endpoints:
* **Authorization URL**: `https://accounts.google.com/o/oauth2/v2/auth`
* **Token URL**: `https://oauth2.googleapis.com/token`
* **User Info URL**: `https://openidconnect.googleapis.com/v1/userinfo`
* **Issuer**: `https://accounts.google.com`
## Step 8: Test SSO Login
You have two options to enable SSO login:
**Option 1: Direct Authentication URL**
* Use the authorization URL as your SSO login URL
**Option 2: Domain Verification**
1. In Teable, configure domain verification
2. Verify your Google Workspace domain
3. Visit [https://app.teable.ai](https://app.teable.ai)
4. Click the SSO login button
5. Enter your Google Workspace email address to log in
## Additional Configuration (Optional)
### Restrict Access by Domain
If you want to restrict access to specific Google Workspace domains:
1. In your application code or Teable settings, configure domain restrictions
2. Only allow email addresses from your verified domain(s)
### Configure Session Duration
1. In Google Admin Console, go to **Security** → **Authentication**
2. Configure **Google session control** settings
3. Set session duration and re-authentication policies
### Enable 2-Step Verification
1. In Google Admin Console, go to **Security** → **Authentication** → **2-Step Verification**
2. Enable 2-Step Verification for your organization
3. Configure enforcement policies for users
# Okta SSO
Source: https://help.teable.ai/en/basic/sso/okta
Configure Okta as your SSO authentication provider for Teable
Available for Business plan and above
## Step 1: Create Authentication Provider in Teable
1. Navigate to your Teable SSO settings
2. Create a new authentication provider and name it **Okta** and select **OpenID Connect**
## Step 2: Access Okta Admin Console
1. Log in to your Okta account
2. Navigate to **Admin Dashboard**
3. Go to **Applications** → **Applications** in the left menu
## Step 3: Create a New Application
1. Click **Create App Integration**
2. Select **OIDC - OpenID Connect** as the sign-in method
3. Select **Web Application** as the application type
4. Click **Next**
## Step 4: Configure Application Settings
Fill in the application configuration form:
* **App integration name**: Teable SSO
* **Grant type**: Select **Authorization Code**
* **Sign-in redirect URIs**: Paste the **Callback URL** from Teable
* **Sign-out redirect URIs**: (Optional) `https://app.teable.ai`
* **Controlled access**: Choose who can access this application
Click **Save** to create the application.
## Step 5: Save Client Credentials
After creating the application, you'll see the application details page:
1. Copy the **Client ID**
2. Copy the **Client Secret** (click "Show" if needed)
3. Paste both values into the Teable SSO configuration
Keep your Client Secret secure and never share it publicly.
## Step 6: Configure OAuth Endpoints
In Teable, fill in the following OAuth endpoints:
* **Authorization URL**: `https://{yourOktaDomain}/oauth2/v1/authorize`
* **Token URL**: `https://{yourOktaDomain}/oauth2/v1/token`
* **User Info URL**: `https://{yourOktaDomain}/oauth2/v1/userinfo`
* **Issuer**: `https://{yourOktaDomain}`
Replace `{yourOktaDomain}` with your actual Okta domain (e.g., `dev-123456.okta.com` or `mycompany.okta.com`)
## Step 7: Assign Users or Groups
1. In your Okta application, go to the **Assignments** tab
2. Click **Assign** → **Assign to People** or **Assign to Groups**
3. Select the users or groups who should have access to Teable via SSO
4. Click **Assign** and **Done**
## Step 8: Test SSO Login
You have two options to enable SSO login:
**Option 1: Direct Authentication URL**
* Use the authorization URL as your SSO login URL
**Option 2: Domain Verification**
1. In Teable, configure domain verification
2. Verify your custom domain
3. Visit [https://app.teable.ai](https://app.teable.ai)
4. Click the SSO login button
5. Enter your email address under the verified domain to log in
## Additional Configuration (Optional)
### Configure Custom Claims
If you need to map additional user attributes:
1. Go to **Security** → **API** in Okta Admin
2. Select your authorization server (usually "default")
3. Go to the **Claims** tab
4. Add custom claims as needed (e.g., department, role)
### Enable Multi-Factor Authentication
1. Go to **Security** → **Authenticators** in Okta Admin
2. Configure your preferred MFA methods
3. Create an authentication policy for your Teable application
# OneLogin SSO
Source: https://help.teable.ai/en/basic/sso/onelogin
Configure OneLogin as your SSO authentication provider for Teable
Available for Business plan and above
## Step 1: Create Authentication Provider in Teable
1. Navigate to your Teable SSO settings
2. Create a new authentication provider and name it **OneLogin** and select **OpenID Connect**
## Step 2: Access OneLogin Admin Portal
1. Log in to your [OneLogin Admin Portal](https://app.onelogin.com/login)
2. Ensure you have administrator privileges
3. Navigate to **Applications** in the top menu
## Step 3: Add a New Application
1. Click **Applications** → **Applications** in the menu
2. Click **Add App** button
3. Search for **OpenId Connect (OIDC)** in the search box
4. Select **OpenId Connect (OIDC)** from the results
5. Click **Save**
## Step 4: Configure Application Settings
### Display Information
In the **Configuration** tab:
1. **Display Name**: Teable SSO
2. **Description**: (Optional) SSO integration for Teable
3. **Logo**: (Optional) Upload Teable logo
4. Click **Save**
### Configuration Settings
Go to the **Configuration** tab and configure:
1. **Redirect URIs**: Paste the **Callback URL** from Teable
2. **Login Url**: (Optional) `https://app.teable.ai`
3. **Application Type**: Web
4. Click **Save**
## Step 5: Get Client Credentials
Go to the **SSO** tab:
1. Find the **Client ID** field and copy the value
2. Find the **Client Secret** field and copy the value (you may need to click "Show" first)
3. Paste both values into the Teable SSO configuration
Keep your Client Secret secure. You can regenerate it if needed from this page.
## Step 6: Configure OAuth Endpoints
In the **SSO** tab, you'll find your OneLogin subdomain. Use it to configure the endpoints in Teable:
* **Authorization URL**: `https://{subdomain}.onelogin.com/oidc/2/auth`
* **Token URL**: `https://{subdomain}.onelogin.com/oidc/2/token`
* **User Info URL**: `https://{subdomain}.onelogin.com/oidc/2/me`
* **Issuer**: `https://{subdomain}.onelogin.com/oidc/2`
Replace `{subdomain}` with your actual OneLogin subdomain (e.g., `mycompany.onelogin.com`). You can find this in your OneLogin portal URL.
## Step 7: Configure Application Access
### Assign Roles
Go to the **Access** tab:
1. **Roles**: Select which roles should have access to this application
2. You can select:
* Specific roles
* All users
* Custom conditions
3. Click **Save**
### Assign Users
Go to the **Users** tab:
1. Click **Add Users** or **Add Users by Role**
2. Select the users who should have access to Teable via SSO
3. Click **Continue** and **Save**
## Step 8: Configure Parameters (Optional)
Go to the **Parameters** tab to map user attributes:
1. Click **Add parameter** to create custom claims
2. Configure standard OIDC claims:
* **email**: User email address
* **name**: User full name
* **given\_name**: User first name
* **family\_name**: User last name
3. Map each parameter to the corresponding OneLogin user field
4. Click **Save**
## Step 9: Enable the Application
1. Make sure all configurations are saved
2. The application should now be enabled and visible to assigned users
3. Users will see the Teable app in their OneLogin portal
## Step 10: Test SSO Login
You have three options to enable SSO login:
**Option 1: Direct Authentication URL**
* Use the authorization URL as your SSO login URL
**Option 2: OneLogin Portal**
* Users can log in to their OneLogin portal and click the Teable application icon
**Option 3: Domain Verification**
1. In Teable, configure domain verification
2. Verify your custom domain
3. Visit [https://app.teable.ai](https://app.teable.ai)
4. Click the SSO login button
5. Enter your email address under the verified domain to log in
## Additional Configuration (Optional)
### Configure MFA
1. In OneLogin Admin Portal, go to **Security** → **Multi-Factor Authentication**
2. Enable MFA policies for your organization or specific users
3. Configure MFA requirements (e.g., always require, require for new devices)
### Set Up Provisioning (SCIM)
If you want to automatically provision users from OneLogin to Teable:
1. Go to the **Provisioning** tab in your Teable application
2. Enable provisioning
3. Configure the SCIM endpoint (if Teable supports SCIM)
4. Map user attributes
5. Enable user creation, updates, and deletion
### Configure Session Duration
1. Go to **Settings** → **Sessions** in OneLogin
2. Configure session timeout settings
3. Set idle timeout and maximum session duration
### Custom Branding
1. Go to **Customization** → **Portal** in OneLogin
2. Customize the OneLogin portal appearance
3. Add your company logo, colors, and custom CSS
4. This affects what users see when they log in to OneLogin
# Single Sign-On (SSO)
Source: https://help.teable.ai/en/basic/sso/overview
Configure SSO for a Teable space.
Available for Business plan and above
## Overview
In Teable Cloud, enter the target space:
1. Click `···` in the upper-right corner of the space
2. Open **Space Settings**
3. Go to **Authentication**
4. Add or manage an SSO provider
## Supported Identity Providers
Configure SSO using Microsoft Azure Entra ID (formerly Azure Active Directory)
Configure SSO using Okta identity platform
Configure SSO using Google Workspace accounts
Configure SSO using Auth0 identity platform
Configure SSO using OneLogin identity management
Configure SSO using Authentik open-source identity provider
## How It Works
All integrations use the **OpenID Connect (OIDC)** protocol based on OAuth 2.0:
1. User clicks SSO login on Teable
2. User is redirected to your identity provider
3. User authenticates with their credentials
4. Identity provider sends user information back to Teable
5. User is logged into Teable
## For Self-Hosted Users
If you're running a self-hosted instance, you can configure any OIDC-compatible identity provider:
Configure OIDC authentication for your self-hosted instance
# Calendar
Source: https://help.teable.ai/en/basic/view/calendar
View and manage records by date, such as meetings, events, schedules, and project timelines.
Calendar view displays records on a calendar. If a table has a single-value date field, you can use Calendar view to track tasks, meetings, events, publishing plans, or project milestones.
## Use Cases
| Scenario | Good for |
| - | - |
| Meetings and appointments | Meeting times, customer visits, interviews |
| Project scheduling | Start dates, due dates, milestones |
| Content planning | Publish dates, campaign dates, marketing schedules |
| Multi-day items | Projects, events, leave requests, or work with start and end dates |
## Create a Calendar View
Click `+` next to the view tabs.
Select **Calendar view** from the view types.
Teable selects suitable date fields when available. Open **Calendar config** to change the **Start date field**, **End date field**, or **Title field**.
## Date Field Settings
| Setting | Description |
| - | - |
| Start date field | Controls which day the record appears on |
| End date field | Shows records that span multiple days or have a duration |
| Title field | Controls the text shown on calendar records |
If the table does not have a date field, Teable may prompt you to add start and end date fields.
## Color Settings
Calendar records can use colors to separate different types of work.
| Color display | Description |
| - | - |
| Customize color | Uses one fixed color for this Calendar view |
| Align with records | Uses colors from a Single Select field, such as status or type |
## Navigate the Calendar
* Use the left and right arrows to switch months.
* Click **Today** to return to the current date.
* Click a record on the calendar to open its details.
## Create and Adjust Events
* Hover over a date cell and click `+` to create a new record on that date.
* To create a multi-day item, set an end date in the record details, or drag the event edge when separate start and end date fields are configured.
* Drag an existing record to another date to update its date fields.
* Right-click a record to duplicate or delete it.
## Notes
* Calendar view depends on single-value date fields. If a configured date field is deleted or changed, review **Calendar config**.
* Calendar view changes how records are displayed. It does not change existing fields unless you choose to add date fields from the Calendar prompt.
* Create, edit, delete, drag, and resize actions depend on your view, record, and field permissions.
# View Toolbar
Source: https://help.teable.ai/en/basic/view/toolbar
Use filters, groups, sorting, sharing, and view collaboration settings in the current view.
The view toolbar controls how the current view displays and shares records. Filters, groups, sorts, visible fields, row height, and related settings affect the current view only. They do not delete records or change other views.
Filter, group, and sort settings are independent in each view. Changes in one view do not affect other views.
## Toolbar Overview
| Tool | Use it for | Common scenarios |
| - | - | - |
| Filter | Show only records that match conditions | Open tasks, your own records, records in a date range |
| Group | Group records by field values | Workload by owner, progress by status, records by date |
| Sort | Reorder records by field values | Recently updated records, task priority, sales ranking |
| Share | Publish the current view as a link | Share a filtered, sorted, grouped, hidden-field, or layout-specific result |
| View Collaboration | Choose whether view settings sync to everyone or only apply to you | Temporary view changes, or a team view everyone uses |
## Filter
Filters show records that match specific conditions in the current view. They hide records that do not match. They do not delete records.
Click `Filter` in the view toolbar.
Choose a field, an operator, and a comparison value.
For multiple conditions, choose **Meeting all conditions** or **Meeting any conditions**.
| Relationship | Description |
| - | - |
| Meeting all conditions | A record appears only when every condition in that level is met |
| Meeting any conditions | A record appears when any condition in that level is met |
### Condition Groups
Use **condition groups** for more complex filter logic. For example, "A and B, or C and D" can be expressed as two groups.
* Click `Add condition group` to create a group.
* Groups can use **Meeting all conditions** or **Meeting any conditions**.
* A group can contain nested groups.
* Condition groups support up to **3 levels**.
### Common Filter Operators
| Field type | Common operators | Input |
| - | - | - |
| Single Line Text, Long Text | Equals, Does not equal, Contains, Does not contain, Is empty, Is not empty | Text input |
| User | Equals, Does not equal, Contains any, Does not contain any, Is empty, Is not empty | User list, current user |
| Attachment | Is empty, Is not empty | No input |
| Multiple Select | Contains any, Contains all, Exactly matches, Does not contain any, Is empty, Is not empty | Option list |
| Single Select | Equals, Does not equal, Contains any, Does not contain any | Option list |
| Date, Created Time, Last Modified Time | Equals, Does not equal, Within, Before, After, On or before, On or after, Is empty, Is not empty | Preset range or exact date |
| Number, Rating, Auto Number | `=`, `≠`, `>`, `≥`, `<`, `≤`, Is empty, Is not empty | Number |
| Link | Equals, Does not equal, Contains, Does not contain, Contains any, Contains all, Exactly matches, Does not contain any, Is empty, Is not empty | Linked record selector |
| Created By, Last Modified By | Equals, Does not equal | User list, current user |
Formula and Rollup operators depend on the result type.
### Invalid Condition Warnings
If a field type changes, a field is deleted, or an older filter setup is no longer compatible, Teable ignores the invalid condition so the view can still open.
* The `Filter` button in the toolbar shows a warning icon.
* After you open the filter panel, the invalid condition shows a warning icon.
* Hover over the icon to see the reason and fix the condition.
## Group
Grouping records by field values helps you review distribution, summaries, and hierarchy.
Click `Group` in the view toolbar.
Choose the field you want to group by.
Click `Add another group` when you need multiple grouping levels.
| Field type | Recommended use |
| - | - |
| Single Select, Multiple Select | Group by fixed options such as status, priority, or type |
| User | Group by owner, collaborator, or submitter |
| Date | Group records by time period |
| Checkbox, Link, Number, Rating | Group by clear values or results |
* Grouping supports up to **3 levels**.
* You can collapse or expand groups. Records inside each group still follow the current sort order.
* Each group shows a summary bar at the top so you can review its summary results.
* Empty values are placed into separate uncategorized, unassigned, or empty groups depending on the field type.
## Sort
Sorting reorders records by field values. It changes the display order in the current view and does not edit record content.
Click `Sort` in the view toolbar.
Choose the field you want to sort by.
Choose ascending or descending. Add more sort conditions when you need multi-level sorting.
Multi-level sorting follows the order of the conditions. Teable sorts by the first condition first; if records have the same value, it then applies the next condition.
| Field type | Sort behavior |
| - | - |
| Text, Attachment | Sort alphabetically or in reverse order. Attachments are sorted by filename |
| Number, Duration, Rating | Sort by value in ascending or descending order |
| Date, Created Time, Last Modified Time | Sort from earliest to latest, or latest to earliest |
| Checkbox | Sort from unchecked to checked, or in the reverse order |
| Single Select, Multiple Select | Sort by the option order in the field configuration, or in the reverse order |
Formula and Rollup fields are sorted according to their result type.
Use the `Auto-sort records` toggle in the sort menu.
| Status | Behavior |
| - | - |
| On | Records stay sorted by the current rules. When a field value changes, the record moves to its new position. You cannot manually drag records while auto-sort is on |
| Off | Records are sorted again only after you reapply sorting. You can manually drag records, and data updates do not move them automatically |
## Share View
**Share view** publishes the current view as a link. Visitors see the data and layout in that view. This is not the same as inviting them as project collaborators.
To share an entire project, a specific table, or a folder, use project sharing in [Project](/en/basic/base).
| Share option | Best for |
| - | - |
| Share table | Giving external people broader access to the current table |
| Share view | Publishing only the current view, such as a filtered, sorted, grouped, hidden-field, or layout-specific result |
A view share link follows the current view configuration. If you later change filters, sorting, grouping, hidden fields, or layout, the shared page changes as well.
Go to the view you want to share.
Click **Share** in the view toolbar.
Switch to **Share view**.
Turn on **Share view to web**.
Copy the generated link, or share the QR code.
If you do not have permission to share the view, the sharing switch is unavailable. After **Share view to web** is turned off, existing share links can no longer be opened.
Public links can be forwarded. Before enabling sharing, confirm that the current view does not include fields or records that should not be public.
Different view types show different advanced options.
| Option | Applies to | Description |
| - | - | - |
| Allow viewers to copy data out of this view | Grid view | Controls whether visitors can copy data from the shared grid view |
| Show all fields in expanded records | Grid view | Controls whether visitors can see hidden fields when opening record details |
| Allow signed-in viewers to edit visible data | All views | Lets signed-in visitors edit records and fields within the shared view's scope |
| Restrict by password | All view shares | Adds a password to the share link. Visitors must enter the correct password before opening it. A random password is generated when you turn it on, and **Copy link and password** copies both together |
| Require login to submit | Form view | Requires visitors to log in before submitting the form |
When **Allow signed-in viewers to edit visible data** is enabled, anonymous visitors remain read-only and see a sign-in prompt. Signed-in visitors can create, update, or delete records only within the shared view's visible data. Records outside the current view filter and fields hidden from the view cannot be edited through the share link.
Share views can be embedded in other webpages. Click **Embed config** to preview the embed, copy iframe code, hide the toolbar, and choose a theme.
```html theme={null}
```
| Embed option | Description |
| - | - |
| Hide toolbar | Adds `hideToolBar=true` to the link and hides filter, sort, search, and other toolbar controls. This does not apply to Form view |
| Theme | Supports system, light, and dark themes |
## View Collaboration
View collaboration controls whether view settings are shared with everyone or kept as your own personal adjustments. It affects filters, sorts, groups, visible fields, row height, and other view settings. It does not affect record data.
| Mode | Use case | Setting behavior |
| - | - | - |
| Collaboration mode | The team needs to use the same view setup | View settings are synced to everyone using this view |
| Personal mode | You want a temporary view setup, or you want to view data in your own way | Filters, sorts, groups, visible fields, and row height apply only to you |
Click `Personal` in the toolbar to switch between collaboration mode and personal mode.
If the view is not locked and you have permission to update the view, turning off personal mode gives you two choices.
| Option | Result |
| - | - |
| `Exit and sync` | Sync your personal-mode view settings to everyone |
| `Confirm exit` | Discard your personal-mode view settings and leave personal mode |
If the view is locked, or you do not have permission to edit the view, you can still use personal mode for your own temporary adjustments, but you cannot sync those changes to others.
## FAQ
If the shared view includes link fields, use **Restrict scope** in the share panel to limit which linked records and fields visitors can see or select from those link fields.
## Notes
* Changing filters, groups, sorts, visible fields, or row height affects everyone using the current view, unless you are in personal mode.
* Share view publishes the current view result, not full project permissions. For ongoing collaboration, use member permissions or project sharing.
* In either mode, edits to cell values are still synced to everyone.
# Teable vs Excel
Source: https://help.teable.ai/en/compare/teable-vs-excel
Compare Teable's modern database capabilities with Excel's spreadsheet functionality. Discover which solution better handles data security, collaboration at scale, and complex analytics for your business needs.
## Database vs Spreadsheet: Key Differences Explained
When managing business data, understanding the distinction between modern database solutions like Teable and traditional spreadsheets like Excel is crucial. Here's our comprehensive comparison:
### 1. Data Security and Access Control
Teable provides enterprise-grade security with:
* Granular user permissions
* Role-based access controls
* Audit trails for data changes
Excel offers basic password protection but lacks:
* User-specific access levels
* Change tracking at scale
* Enterprise authentication integration
### 2. Collaborative Data Management
For team-based workflows:
* **Teable** enables real-time collaboration with:
* Simultaneous multi-user editing
* Conflict-free merge operations
* Version history tracking
* **Excel** requires manual reconciliation of:
* Conflicting document versions
* Disconnected file sharing
* Email-based collaboration
### 3. Handling Large Datasets
Teable's database architecture supports:
* Millions of records with consistent performance
* Advanced indexing for fast queries
* Automatic memory optimization
Excel struggles with:
* Performance degradation beyond 100k rows
* Manual optimization requirements
* Frequent crashes with complex calculations
### 4. Advanced Data Operations
Teable enables professional data workflows through:
* SQL query support
* Cross-table relationships
* Automated data pipelines
* BI tool integrations (Tableau, Power BI)
Excel limits users to:
* Basic formulas and pivot tables
* Manual data imports/exports
* Static chart generation
### 5. Data Integrity and Compliance
Teable ensures accuracy with:
* Custom validation rules
* Type enforcement
* Audit-compliant versioning
* Automatic backups
Excel risks include:
* Human entry errors
* Version confusion
* Manual backup dependencies
## When to Choose Which Solution
**Opt for Teable when:**
* Managing sensitive business data
* Collaborating across teams/departments
* Processing >100,000 records
* Requiring real-time analytics
**Use Excel for:**
* Personal data analysis
* Quick ad-hoc calculations
* Small datasets
* Simple visualizations
## FAQ: Common User Questions
**Q: Can Teable replace Excel entirely?**\
A: While Teable handles complex data operations better, Excel remains useful for quick personal analysis.
**Q: How difficult is transitioning from Excel to Teable?**\
A: Teable offers spreadsheet-like interfaces alongside database features, making transition smooth for Excel users.
**Q: Which offers better value for teams?**\
A: Teable's collaboration features and centralized data management typically provide better ROI for growing organizations.
# Subscribe and Activate License
Source: https://help.teable.ai/en/deploy/activate
Learn how to buy, subscribe, and activate a Teable self-hosted license. Get your license key and unlock premium features for your self-hosted deployment.
This guide will walk you through the process of subscribing to a Teable self-hosted plan and activating your license.
## Overview
Teable offers different plans for self-hosted deployments, each with its own set of features. To unlock these features, you need to first install Teable, get your Instance ID, subscribe to a plan, and then activate your instance with a license key.
## Step 1: Install Teable
Before subscribing to a plan, you need to have Teable installed and running on your server.
If you haven't installed Teable yet, please follow one of these installation guides:
* [Docker Deployment](/en/deploy/docker) (Recommended for quick setup)
* [Full-featured platform](/en/deploy/architecture) (AI features and App Builder, Docker or Kubernetes)
Make sure your Teable instance is up and running before proceeding to the next steps.
## Step 2: Access the Admin Panel
After successfully installing Teable:
1. Log in to your self-hosted Teable instance
2. Navigate to the **Admin Panel**
3. You can access the Admin Panel from the user menu
If this is your first time opening the instance, sign up on the instance URL first. Teable does not provide a default administrator account; the first registered user becomes the instance administrator.
## Step 3: Copy Your Instance ID
In the Admin Panel, navigate to **Self-hosted License** to find your unique Instance ID:
1. Go to **Admin Panel** → **Self-hosted License**
2. Click the **Copy** button to copy your Instance ID
3. Keep this Instance ID ready - you'll need it during the subscription process
Your Instance ID is a unique identifier for your self-hosted installation. It's required to bind your license to your specific instance.
## Step 4: Subscribe to a Plan
Now that you have your Instance ID, you can proceed to subscribe:
1. Visit the [Teable Self-Hosted Pricing Page](https://app.teable.ai/public/pricing?host=self-hosted)
2. Compare features across different plans
3. Choose the plan that meets your requirements
4. Complete the subscription process
5. During subscription, you'll be asked to provide your **Instance ID**
6. After successful subscription, you'll receive a **License Key**
Make sure to copy your License Key immediately after subscription. You'll need it in the next step.
## Step 5: Activate Your License
Once you have your License Key, return to your Teable instance to activate it:
1. Go back to the **Admin Panel** in your self-hosted Teable instance
2. Navigate to **Self-hosted License** section
3. Paste your **License Key** into the activation field
4. Click the activation button
5. Wait for the confirmation message
After successful activation, your instance will immediately have access to all features included in your subscribed plan.
## Step 6: Manage Your License
You can view and manage your licenses at any time:
* Visit the [License Management Page](https://app.teable.ai/setting/license)
* Here you can:
* View all your active licenses
* Check license expiration dates
* Renew or upgrade your licenses
* View usage details
* Manage multiple instances if you have more than one
## Auto-renew Your License
When registering or updating a license in **Admin Panel** → **Self-hosted License**, turn on **Auto-renew** if your instance can reach the Teable license server: Teable tests the connection before saving the setting, renews the license after each billing period, shows administrators a banner with **Retry** if renewal fails, and still requires manual updates when the instance cannot reach Teable Cloud.
## Frequently Asked Questions
No, your Instance ID remains constant throughout application updates. It's a permanent identifier for your self-hosted installation.
When migrating environments, perform a complete database migration. This ensures your Instance ID remains unchanged, as the Instance ID is stored in the database. Simply migrate your entire PostgreSQL database to the new environment.
If your **billable user count** exceeds the subscribed seats in a paid plan, usage will be restricted and users will receive blocking notifications when attempting to access features. To restore full functionality, you'll need to upgrade your subscription to accommodate more seats.
**Billable users** are counted at the **instance level** and include users with **Editor** role or higher (Owner, Creator, Editor). Users with **Commenter** or **Viewer** (Read-only) roles are free and do not count towards your seat limit.
Administrators can disable "Allow everyone to create new spaces" in **Admin Panel** → **Instance settings** to prevent users from creating spaces that add billable collaborators.
When your subscription expires, your Teable instance will revert to the basic version. However, all your data will be preserved and remain safe. Once you renew and reactivate your subscription, all premium features will be immediately restored.
Teable provides a 7-day grace period after subscription expiration. During this grace period:
* All features remain fully functional
* Administrators receive email reminders
* You have time to renew without service interruption
We recommend renewing before the grace period ends to ensure uninterrupted access to premium features.
For Docker Compose deployments, you have several backup options:
**Option 1: Full Virtual Machine Backup** (Recommended for simplicity)
* Regularly backup the entire virtual machine hosting Teable
* Provides complete system recovery capability
**Option 2: Docker Volume Backup**
* Backup all Docker volumes defined in your `docker-compose.yaml`
* Use `docker volume ls` to list volumes
* Use `docker run --rm -v :/data -v $(pwd):/backup alpine tar czf /backup/.tar.gz /data`
**Option 3: Component-Level Backup** (Recommended for granular control)
* **PostgreSQL database**: Backup using `pg_dump` (contains all table data)
```bash theme={null}
docker exec teable-db pg_dump -U teable teable > backup.sql
```
* **Redis database**: Backup RDB file (contains automation queue data)
```bash theme={null}
docker exec teable-cache redis-cli --rdb /data/dump.rdb
```
* **Data directory**: Backup the `teable-data` volume (contains all attachment files)
For production environments, we recommend setting up automated daily backups with retention policies.
## Troubleshooting
If your license activation fails, please check:
* The License Key is copied correctly without extra spaces
* The license hasn't expired
If issues persist, contact support at [support@teable.ai](mailto:support@teable.ai)
If features don't appear immediately after activation:
* Try refreshing your browser
* Clear your browser cache
* Verify the activation status in the License Management Page
* Check that your subscription is active and not expired
## Next Steps
After activating your license, you can:
* Configure additional features available in your plan
* Set up team members and permissions
* Explore enterprise features
For more information on deployment and configuration, see:
* [Docker Deployment](/en/deploy/docker)
* [Environment Configuration](/en/deploy/env)
* [Email Configuration](/en/deploy/email)
# Architecture
Source: https://help.teable.ai/en/deploy/architecture
Deploying Teable gives you four platforms in one: a secure agent sandbox, a resource-efficient app deployment platform, an AI workflow engine, and a full-featured collaboration platform on PostgreSQL.
Self-hosting Teable deploys four platforms in one:
* **A secure, scalable agent sandbox** — every AI session runs in its own
isolated container, started on demand and gone when the session ends.
* **A resource-efficient app deployment platform** — every app your team
builds and publishes runs as its own lightweight, long-lived container.
* **An AI workflow engine** — automations triggered by record changes,
schedules, and webhooks, with AI steps, running right where your data lives.
* **A full-featured database collaboration platform on PostgreSQL** — tables,
views, and API.
Self-hosting Teable wraps your own compute into an **agent-ready, fully
controlled productivity environment** — putting AI in the hands of everyone
on your team.
This page explains the services behind this and how they fit together. The
deployable assets (compose files, Helm chart, values) live in
[teableio/teable-deployment](https://github.com/teableio/teable-deployment).
AI features are available for self-hosted Business plan and above.
## What a deployment runs
| Service | Purpose |
| - | - |
| **Teable app** | Web UI, API, automations, AI chat — a single image: `ghcr.io/teableio/teable` |
| **PostgreSQL** | The main database: all your tables, views, and metadata |
| **Redis** | Cache, queues, realtime collaboration |
| **Object storage** | S3-compatible file storage with three buckets: **public** (avatars and other public assets), **private** (attachments), **build artifacts** (App Builder output) |
| **Infra Service** | The single entry point the Teable app connects to; coordinates builds and app deployments, with its own console and API |
| **Sandbox engine** | Runs every AI session in its own isolated container |
| **Git registry** | Stores the source code of the apps you build (App Builder pushes here) |
| **Preview gateway** | Routes browsers to sandbox previews and deployed apps |
The last four make up the runtime plane. The deployment assets install all of
this as one platform.
## How it fits together
```mermaid theme={null}
graph LR
U["Browser"]
subgraph "App & data"
T["Teable app"]
P[("PostgreSQL")]
R[("Redis")]
S[("Object storage")]
end
subgraph "Runtime plane"
I["Infra Service"]
E["Sandboxes — one per AI session"]
A["Deployed apps — one container each"]
G["Git registry"]
W["Preview gateway"]
end
U --> T
T --> P
T --> R
T -- "attachments" --> S
T -- "AI sessions" --> I
I -- "starts" --> E
I -- "deploys" --> A
E -. "source" .-> G
E -. "artifacts" .-> S
U -- "sandbox previews" --> W
U -- "deployed apps" --> W
W --> E
W --> A
style T fill:#0D9373,stroke:#0a7a5e,color:#fff
style E fill:#F59E0B,stroke:#b45309,color:#fff
style A fill:#F59E0B,stroke:#b45309,color:#fff
```
The Teable app talks to the runtime plane through **one connection**: the
Infra Service (`TEABLE_INFRA_API_URL` / `TEABLE_INFRA_API_KEY`). Everything
behind it is internal. Two kinds of workload do the real work — and they are
what consume your machine:
* **Sandboxes.** Every AI chat or App Builder session gets its own isolated
container, started when the session begins and removed when it ends. This
is the platform's main load, and it arrives in bursts: size your machine by
**peak concurrent AI sessions**, not by user count (per-sandbox resource
limits can be set in the admin panel).
* **Deployed apps.** Every app someone publishes runs as its own long-lived
container, served at `*.app.`. Sandboxes come and go; deployed apps
add up and keep running.
The other services play supporting roles: building happens inside the
session's sandbox, the git registry and object storage keep what it produces
(source code and build artifacts), and the gateway routes each browser
request to the right sandbox or app.
## One domain, four DNS records
Everything is served under **one base domain** — typically a subdomain of
yours, such as `teable.example.com`:
| Record | Serves |
| - | - |
| `` | The Teable app |
| `infra.` | The Infra Service console and API; git (`/git`) and object storage are also served from paths on this host |
| `*.app.` | Apps you built and deployed |
| `*.sandbox.` | Sandbox previews in the browser |
Each name is only a default, and every hostname can be overridden individually
(see the values example in the deployment repository).
## Versioning
The platform ships as **platform releases** (`v..`) of the
deployment repository:
* A release **tag** is a verified snapshot: `versions.yaml` locks the exact
version of every component, and the repository's `CHANGELOG.md` says what
changed and what, if anything, you must do.
* The repository's `main` branch is the rolling latest.
* The bundled **doctor** script compares what your deployment actually runs
against the release and reports one of three results: compatible, upgrade
the Teable app, or an unknown (unverified) combination.
The Teable app has its own release line (date-based tags; `latest` is the
stable channel) — see [Version Upgrade](/en/deploy/upgrade). Each platform
release states which app versions it has been verified with, and the doctor
checks this for you. The sandbox agent behind AI sessions always follows the
app's version on its own — there is nothing extra to upgrade or manage.
## Deploy it
Both paths install the whole platform and are covered end to end in the
deployment repository:
Everything on one machine — first full deployment, `local` or `server` mode.
A single Helm chart on an existing cluster; only `global.baseDomain` is required.
Don't need AI yet? You can run just the app with PostgreSQL, Redis, and
storage — a **standalone** deployment ([Docker Deployment](/en/deploy/docker))
— and attach the runtime plane later with your data in place.
Related topics, all maintained in the deployment repository:
* **Already running standalone Teable?** Your data stays in place — the
runtime plane installs next to it: [migration guide](https://github.com/teableio/teable-deployment/blob/main/migration/2026-07-basic-to-full-featured.md)
* **Company-internal certificates?** If your domain uses a private or
corporate CA, sandboxes need to be told to trust it —
[private-ca.md](https://github.com/teableio/teable-deployment/blob/main/helm/private-ca.md)
* **Sizing, versions and mirrors**: [VERSIONS.md](https://github.com/teableio/teable-deployment/blob/main/VERSIONS.md) ·
[images/README.md](https://github.com/teableio/teable-deployment/blob/main/images/README.md)
* **When something fails**: run the doctor first, then
[TROUBLESHOOTING.md](https://github.com/teableio/teable-deployment/blob/main/TROUBLESHOOTING.md)
After deploying, connect the Teable app to the runtime plane with
`TEABLE_INFRA_API_URL` / `TEABLE_INFRA_API_KEY` (the deployment guides cover
this), then set resource limits in
[Admin Panel → Sandbox Agent](/en/basic/admin-panel/sandbox-agent).
# Deployment
Source: https://help.teable.ai/en/deploy/choose
Pick between Teable Cloud, standalone self-hosting, and the full-featured self-hosted platform.
Three ways to run Teable — pick by what you need:
| | **Teable Cloud** | **Full-featured self-host** | **Standalone self-host** |
| - | - | - | - |
| Tables, collaboration, API, automation | ✅ | ✅ | ✅ |
| AI features (chat, agents) | ✅ | ✅ | ❌ |
| App Builder (build & deploy apps) | ✅ | ✅ | ❌ |
| Sandboxes / previews | ✅ | ✅ | ❌ |
| Runs on | [teable.ai](https://teable.ai) — nothing to deploy | one machine (Docker) or a Kubernetes cluster | one machine: app + PostgreSQL |
| Start here | [teable.ai](https://teable.ai) | [Architecture](/en/deploy/architecture) → [teableio/teable-deployment](https://github.com/teableio/teable-deployment) | [Docker Deployment](/en/deploy/docker) |
**Already running Teable?** Upgrading an existing deployment to the
full-featured platform is covered step by step by the
[migration guide](https://github.com/teableio/teable-deployment/blob/main/migration/2026-07-basic-to-full-featured.md)
in the deployment repository: the runtime plane installs next to your existing
Teable, and your data stays in place.
## Let an AI agent deploy it
The deployment repository is written to be driven by AI agents. Point your
agent harness (Claude Code, Codex, …) at
[teableio/teable-deployment](https://github.com/teableio/teable-deployment),
tell it which environment you're deploying to, and it can take the deployment
end to end. Prepare three things:
1. **A domain** — everything derives from one base domain, e.g.
`teable.example.com`.
2. **A DNS token** — an API token for the platform hosting your DNS
(Cloudflare, Route 53, …), so DNS records and TLS certificates can be set
up automatically. Scope it to that one zone.
3. **Access to the deployment target:**
| Target | What to hand the agent |
| - | - |
| Your own machine — Docker all-in-one, `local` mode | Just Docker on the machine — no domain or DNS token needed (everything runs on `*.localhost`) |
| A cloud server — Docker all-in-one | SSH access to the machine |
| A managed cluster on AWS (EKS) / GCP (GKE) / Azure (AKS) | Create the cluster, then hand over its `kubeconfig` |
| Any existing Kubernetes cluster | A `kubeconfig` that can install Helm releases |
That's all it takes — the repository's guides, doctor scripts, and version
manifests carry the agent through the rest.
# Configure Email Service
Source: https://help.teable.ai/en/deploy/email
Enable email service to activate in-app email notifications, self-service password reset, invitation emails, and other features.
## Configuration Methods
Teable supports two ways to configure email service:
Visual configuration with live testing. No restart required.
Traditional configuration via `.env` file. Requires container restart.
***
## Option 1: Admin Panel (Recommended)
The easiest way to configure email is through the Admin Panel:
1. Log in as an administrator (the first registered user)
2. Go to **Admin Panel** → **Instance settings**
3. Find the **Email** section
4. Configure **Notify email** and **Automation email** as needed
The Admin Panel configuration supports **live testing** — you can verify your SMTP settings work before saving.
* **Notify email**: Used for user verification, password reset, invitations, system notifications, and similar emails. It is also what makes **Sign in with email code** available on the login page.
* **Automation email**: Used as the default mail service for automation Send Email actions. A single Send Email action can also configure its own [custom SMTP server](/en/basic/automation/actions/communication/smtp-sender).
### Configuration sources and priority
We recommend configuring mail service in **Admin Panel → Instance settings → Email** first. The effective priority is:
1. **Custom mail server inside the Send Email action**: Applies only to that specific Send Email action in the current automation.
2. **Admin Panel → Instance settings → Email → Automation email**: Used by automation emails when the Send Email action does not configure its own mail server.
3. **Admin Panel → Instance settings → Email → Notify email**: Used for user verification, password reset, invitations, system notifications, and similar emails. It is also used as the fallback for automation emails if Automation email is not configured.
4. **`BACKEND_MAIL_*` environment variables**: Deployment-level default mail configuration. Used only as a fallback when the corresponding mailbox is not configured in the Admin Panel.
### Configuration Fields
| Field | Description | Example |
| - | - | - |
| Server address | SMTP server address | `smtp.gmail.com` |
| Port | SMTP port | `465` (SSL) or `587` (TLS) |
| SSL/TLS | Whether to use SSL/TLS | `true` |
| Username | SMTP authentication user | `noreply@company.com` |
| Password | SMTP password or app password | `xxxxxxxxxxxxxx` |
| Sender address | From address | `noreply@company.com` |
| Sender name | Display name | `Teable Notification` |
***
## Option 2: Environment Variables
For deployments where you prefer file-based configuration, use environment variables:
We recommend configuring Notify email and Automation email in **Admin Panel → Instance settings → Email** first. Environment variables are mainly used as deployment-level defaults and fallback configuration.
```sh theme={null}
BACKEND_MAIL_HOST=smtp.example.com
BACKEND_MAIL_PORT=465
BACKEND_MAIL_SECURE=true
BACKEND_MAIL_SENDER=noreply@company.com
BACKEND_MAIL_SENDER_NAME=Teable
BACKEND_MAIL_AUTH_USER=username
BACKEND_MAIL_AUTH_PASS=your_password
```
After changing environment variables, you must **restart** the Teable container for changes to take effect.
***
## SMTP Provider Examples
```sh theme={null}
# How to obtain: AWS Console → Simple Email Service → SMTP Settings → Create SMTP Credentials
BACKEND_MAIL_HOST=email-smtp.us-east-1.amazonaws.com # Replace with your region
BACKEND_MAIL_PORT=465
BACKEND_MAIL_SECURE=true
BACKEND_MAIL_SENDER=noreply@yourdomain.com # Must be a verified sender address
BACKEND_MAIL_SENDER_NAME=Teable Notification
BACKEND_MAIL_AUTH_USER=your_smtp_username # AWS SMTP username
BACKEND_MAIL_AUTH_PASS=xxxxxxxxxxxxxx # AWS SMTP password
```
```sh theme={null}
# How to obtain: Google Account → Security → 2-Step Verification → App Passwords
BACKEND_MAIL_HOST=smtp.gmail.com
BACKEND_MAIL_PORT=465
BACKEND_MAIL_SECURE=true
BACKEND_MAIL_SENDER=you@gmail.com
BACKEND_MAIL_SENDER_NAME=Teable Notification
BACKEND_MAIL_AUTH_USER=you@gmail.com
BACKEND_MAIL_AUTH_PASS=xxxxxxxxxxxxxx # 16-digit app password
```
```sh theme={null}
# How to obtain: Microsoft 365 admin center → Security → Policies & rules → Email authentication
BACKEND_MAIL_HOST=smtp.office365.com
BACKEND_MAIL_PORT=587
BACKEND_MAIL_SECURE=true
BACKEND_MAIL_SENDER=your.name@yourdomain.com
BACKEND_MAIL_SENDER_NAME=Teable Notification
BACKEND_MAIL_AUTH_USER=your.name@yourdomain.com
BACKEND_MAIL_AUTH_PASS=xxxxxxxxxxxxxx # Your Microsoft 365 password or app password
```
```sh theme={null}
# How to obtain: SendGrid Dashboard → Settings → API Keys → Create API Key
BACKEND_MAIL_HOST=smtp.sendgrid.net
BACKEND_MAIL_PORT=465
BACKEND_MAIL_SECURE=true
BACKEND_MAIL_SENDER=noreply@yourdomain.com
BACKEND_MAIL_SENDER_NAME=Teable Notification
BACKEND_MAIL_AUTH_USER=apikey
BACKEND_MAIL_AUTH_PASS=xxxxxxxxxxxxxx # Your SendGrid API Key
```
***
## Related Documentation
* [Environment Variables Reference](/en/deploy/env)
* [Admin Panel Overview](/en/basic/admin-panel/overview)
# Environment Variables
Source: https://help.teable.ai/en/deploy/env
Here are all available environment variables in Teable and their explanations
| Environment Variable | Description | Default Value | Required | Example |
| - | - | - | - | - |
| **Core Configuration** | | | | |
| PUBLIC\_ORIGIN | Public origin for generating complete URLs, must be set to your app's access address | - | Yes | [https://app.teable.ai](https://app.teable.ai) |
| SECRET\_KEY | Root secret for JWTs, sessions, and sharing. Generate a strong random value | - | Yes | `openssl rand -base64 32` |
| BACKEND\_JWT\_SECRET | Signs auth, share, and plugin JWTs. Falls back to SECRET\_KEY | SECRET\_KEY | - | `openssl rand -base64 32` |
| BACKEND\_SESSION\_SECRET | Signs login session cookies. Falls back to SECRET\_KEY | SECRET\_KEY | - | `openssl rand -base64 32` |
| BACKEND\_STORAGE\_ENCRYPTION\_KEY | Encrypts attachment access tokens. Required when BACKEND\_STORAGE\_PROVIDER is `local` | - | Yes | 16-char random string |
| BACKEND\_STORAGE\_ENCRYPTION\_IV | Encryption IV paired with BACKEND\_STORAGE\_ENCRYPTION\_KEY | - | Yes | 16-char random string |
| BACKEND\_ACCESS\_TOKEN\_ENCRYPTION\_KEY | Encrypts personal access tokens | - | Yes | 16-char random string |
| BACKEND\_ACCESS\_TOKEN\_ENCRYPTION\_IV | Encryption IV paired with BACKEND\_ACCESS\_TOKEN\_ENCRYPTION\_KEY | - | Yes | 16-char random string |
| PORT | Port on which the application runs | 3000 | - | 3000 |
| LOG\_LEVEL | Log level, options: fatal, error, warn, info, debug, trace | info | - | debug |
| **Storage Configuration** | | | | |
| BACKEND\_STORAGE\_PROVIDER | Storage provider, options: local, minio, s3, aliyun | local | - | s3 |
| BACKEND\_STORAGE\_LOCAL\_PATH | Local storage path | .assets/uploads | - | .assets/uploads |
| BACKEND\_STORAGE\_PUBLIC\_BUCKET | Public bucket name | public | - | teable-public |
| BACKEND\_STORAGE\_PRIVATE\_BUCKET | Private bucket name for attachments, app files, archived data, and other protected content | private | - | teable-private |
| BACKEND\_STORAGE\_PUBLIC\_URL | Public URL override for public bucket (optional) | - | - | [https://cdn.example.com](https://cdn.example.com) |
| BACKEND\_STORAGE\_PRIVATE\_BUCKET\_ENDPOINT | Private bucket endpoint override (optional) | - | - | [https://private-bucket.endpoint](https://private-bucket.endpoint) |
| BACKEND\_STORAGE\_S3\_REGION | S3 storage region, required when BACKEND\_STORAGE\_PROVIDER is s3 | - | - | us-east-2 |
| BACKEND\_STORAGE\_S3\_ENDPOINT | S3 storage endpoint, required when BACKEND\_STORAGE\_PROVIDER is s3 | - | - | [https://s3.us-east-2.amazonaws.com](https://s3.us-east-2.amazonaws.com) |
| BACKEND\_STORAGE\_S3\_INTERNAL\_ENDPOINT | S3 internal endpoint (optional) | - | - | [http://s3.internal](http://s3.internal) |
| BACKEND\_STORAGE\_S3\_FORCE\_PATH\_STYLE | Use path-style URLs (`endpoint/bucket/key`) for browser-facing S3 requests. Enable this when the public endpoint cannot serve bucket subdomains. Cannot be combined with BACKEND\_STORAGE\_PRIVATE\_BUCKET\_ENDPOINT | false | - | true |
| BACKEND\_STORAGE\_S3\_INTERNAL\_FORCE\_PATH\_STYLE | Override path-style addressing for internal S3 requests. When unset, it inherits the public setting if both clients share an endpoint; a separate internal endpoint keeps virtual-hosted addressing | - | - | true |
| BACKEND\_STORAGE\_S3\_ACCESS\_KEY | S3 storage access key, required when BACKEND\_STORAGE\_PROVIDER is s3 | - | - | your\_access\_key |
| BACKEND\_STORAGE\_S3\_SECRET\_KEY | S3 storage secret key, required when BACKEND\_STORAGE\_PROVIDER is s3 | - | - | your\_secret\_key |
| BACKEND\_STORAGE\_S3\_MAX\_SOCKETS | S3 max sockets (optional) | 100 | - | 100 |
| BACKEND\_STORAGE\_MINIO\_ENDPOINT | MinIO storage endpoint | - | - | minio.example.com |
| BACKEND\_STORAGE\_MINIO\_PORT | MinIO port | 9000 | - | 443 |
| BACKEND\_STORAGE\_MINIO\_USE\_SSL | Whether MinIO uses SSL | false | - | true |
| BACKEND\_STORAGE\_MINIO\_ACCESS\_KEY | MinIO access key | - | - | access-key |
| BACKEND\_STORAGE\_MINIO\_SECRET\_KEY | MinIO secret key | - | - | secret-key |
| BACKEND\_STORAGE\_MINIO\_INTERNAL\_ENDPOINT | MinIO internal endpoint (optional, no HTTPS) | - | - | minio.internal |
| BACKEND\_STORAGE\_MINIO\_INTERNAL\_PORT | MinIO internal port (optional) | 9000 | - | 9000 |
| BACKEND\_STORAGE\_MINIO\_REGION | MinIO region (optional) | - | - | us-east-1 |
| BACKEND\_STORAGE\_UPLOAD\_METHOD | Upload method | put | - | put |
| STORAGE\_PREFIX | Storage prefix, defaults to PUBLIC\_ORIGIN | PUBLIC\_ORIGIN | - | [http://localhost:3000](http://localhost:3000) |
| **Cache Configuration** | | | | |
| BACKEND\_CACHE\_PROVIDER | Cache provider, options: sqlite, memory, redis | sqlite | - | redis |
| BACKEND\_CACHE\_REDIS\_URI | Required Redis connection URI for computed task delivery; also used for cache when BACKEND\_CACHE\_PROVIDER is redis | - | Yes | redis\://default:teable\@127.0.0.1:6379/0 |
| **Performance Cache Configuration** | | | | |
| BACKEND\_PERFORMANCE\_CACHE | Performance cache Redis URL for query result caching, improves multi-user collaboration efficiency. Recommended to use separate Redis instance from BACKEND\_CACHE\_REDIS\_URI | - | - | redis\://default:teable\@127.0.0.1:6379/0 |
| **Authentication Configuration** | | | | |
| SOCIAL\_AUTH\_PROVIDERS | List of social auth providers, comma-separated | - | - | github,google,oidc |
| BACKEND\_GITHUB\_CLIENT\_ID | GitHub OAuth client ID | - | - | github\_client\_id |
| BACKEND\_GITHUB\_CLIENT\_SECRET | GitHub OAuth client secret | - | - | github\_client\_secret |
| BACKEND\_GOOGLE\_CLIENT\_ID | Google OAuth client ID | - | - | google\_client\_id |
| BACKEND\_GOOGLE\_CLIENT\_SECRET | Google OAuth client secret | - | - | google\_client\_secret |
| BACKEND\_OIDC\_CLIENT\_ID | OIDC client ID | - | - | google\_client\_id |
| BACKEND\_OIDC\_CLIENT\_SECRET | OIDC client secret | - | - | google\_client\_secret |
| BACKEND\_OIDC\_CALLBACK\_URL | OIDC callback URL | - | - | [https://app.teable.ai/api/auth/oidc/callback](https://app.teable.ai/api/auth/oidc/callback) |
| BACKEND\_SIGNIN\_VERIFICATION\_EXPIRES\_IN | Sign-in verification code lifetime. Falls back to BACKEND\_EMAIL\_CODE\_EXPIRES\_IN when unset | 10m | - | 10m |
| BACKEND\_SIGNIN\_VERIFICATION\_MAX\_ATTEMPTS | Wrong guesses allowed per sign-in code; beyond that the code is discarded and a new one must be requested | 5 | - | 5 |
| **Security & Verification** | | | | |
| TURNSTILE\_SITE\_KEY | Cloudflare Turnstile site key for authentication verification | - | - | 1x00000000000000000000AA |
| TURNSTILE\_SECRET\_KEY | Cloudflare Turnstile secret key for authentication verification | - | - | 1x0000000000000000000000000000000AA |
| TEABLE\_SSRF\_PROTECTION\_DISABLED | Disable protection that blocks outbound requests to loopback, private, link-local, and other reserved network addresses. Set to true only in trusted self-hosted deployments that must access internal endpoints | false | - | true |
| BACKEND\_SIGNUP\_VERIFICATION\_CODE\_RATE\_LIMIT\_SECONDS | Rate limit interval (seconds) for sending signup verification emails | - | - | 30 |
| BACKEND\_TRUST\_PROXY | Reverse proxy trust setting used to resolve the client IP behind a proxy. Affects audit logs and related security records. Accepts `true`, `false`, a hop count, or an IP/CIDR/preset list. Empty trusts private-network proxies | loopback, linklocal, uniquelocal | - | loopback, linklocal, uniquelocal |
| **Email Configuration (Deprecated - Use Admin Panel > Instance settings > Email)** | | | | |
| BACKEND\_MAIL\_HOST | Default mail server address. We recommend configuring Notify email and Automation email visually in Admin Panel > Instance settings > Email | smtp.teable.ai | - | smtp.gmail.com |
| BACKEND\_MAIL\_PORT | Default mail server port | 465 | - | 465 |
| BACKEND\_MAIL\_SECURE | Whether the default mail service uses SSL/TLS | true | - | true |
| BACKEND\_MAIL\_SENDER | Default sender address | noreply.teable.ai | - | [noreply@company.com](mailto:noreply@company.com) |
| BACKEND\_MAIL\_SENDER\_NAME | Default sender name | Teable | - | Teable |
| BACKEND\_MAIL\_AUTH\_USER | Default mail server authentication username | - | - | username |
| BACKEND\_MAIL\_AUTH\_PASS | Default mail server authentication password | - | - | usertoken |
| BACKEND\_MAIL\_INVITE\_USER\_NAME\_MAX\_LENGTH | Maximum inviter name length in invitation email subjects. Empty or 0 disables truncation | - | - | 32 |
| BACKEND\_MAIL\_INVITE\_SPACE\_NAME\_MAX\_LENGTH | Maximum space or Project name length in invitation email subjects. Empty or 0 disables truncation | - | - | 32 |
| **Session/JWT Configuration** | | | | |
| BACKEND\_SESSION\_EXPIRES\_IN | Session expiration time | 7d | - | 7d |
| BACKEND\_SESSION\_COOKIE\_SECURE | Whether to secure session cookie | false | - | true |
| BACKEND\_SESSION\_ORIGIN\_CHECK\_ENABLED | Enable Origin and Fetch Metadata checks for unsafe browser session-cookie API requests. Enable only when your reverse proxy or CDN preserves these headers | false | - | false |
| BACKEND\_JWT\_EXPIRES\_IN | JWT expiration time | 20d | - | 20d |
| BACKEND\_RESET\_PASSWORD\_EMAIL\_EXPIRES\_IN | Reset password email expiration time | 30m | - | 30m |
| **Resource Limits** | | | | |
| MAX\_COPY\_CELLS | Maximum number of cells to copy in a single request | - | - | 50000 |
| MAX\_READ\_ROWS | Maximum number of rows to read in a single request | - | - | 10000 |
| MAX\_ATTACHMENT\_UPLOAD\_SIZE | Maximum attachment upload size (bytes) | - | - | 2147483648 |
| TASK\_MAX\_FIELDS\_PER\_BATCH | Maximum number of AI fields sent to the model in one batch request. Values are clamped from 1 to 20 | 5 | - | 5 |
| TASK\_MAX\_CONCURRENCY | Maximum pending AI field task runs dispatched in one scheduling cycle. Values are clamped from 1 to 20 | 5 | - | 5 |
| TABLE\_LIMIT\_FIELD\_OPTIONS\_MAX\_BYTES | Maximum serialized field option bytes | 262144 | - | 262144 |
| TABLE\_LIMIT\_SELECT\_CHOICES\_MAX | Maximum select choices per select field | 1000 | - | 1000 |
| TABLE\_LIMIT\_SELECT\_CHOICE\_NAME\_MAX\_LENGTH | Maximum select choice name length | 1000 | - | 1000 |
| TABLE\_LIMIT\_SELECT\_DEFAULT\_VALUES\_MAX | Maximum select default values | 100 | - | 100 |
| TABLE\_LIMIT\_CELL\_VALUE\_MAX\_BYTES | Maximum cell value bytes | 262144 | - | 262144 |
| TABLE\_LIMIT\_RECORD\_FIELDS\_MAX\_BYTES | Maximum serialized record fields bytes | 1048576 | - | 1048576 |
| TABLE\_LIMIT\_RECORDS\_PER\_MUTATION\_MAX | Maximum records per mutation | 20000 | - | 20000 |
| TABLE\_LIMIT\_COMPUTED\_CELL\_VALUE\_MAX\_BYTES | Maximum computed cell value bytes | 262144 | - | 262144 |
| TABLE\_LIMIT\_FORMULA\_MAX\_LENGTH | Maximum formula length | 8192 | - | 8192 |
| TABLE\_LIMIT\_TABLES\_PER\_BASE\_MAX | Maximum tables per project | 1000 | - | 1000 |
| TABLE\_LIMIT\_FIELDS\_PER\_TABLE\_MAX | Maximum fields per table | 500 | - | 500 |
| TABLE\_LIMIT\_VIEWS\_PER\_TABLE\_MAX | Maximum views per table | 100 | - | 100 |
| TABLE\_LIMIT\_CREATE\_TABLE\_FIELDS\_MAX | Maximum fields accepted when creating a table | 1000 | - | 1000 |
| TABLE\_LIMIT\_CREATE\_TABLE\_VIEWS\_MAX | Maximum views accepted when creating a table | 20 | - | 20 |
| TABLE\_LIMIT\_CREATE\_TABLE\_RECORDS\_MAX | Maximum records accepted when creating a table | 20000 | - | 20000 |
| TABLE\_LIMIT\_RECORDS\_PER\_TABLE\_MAX | Maximum rows per table. Empty means no instance-level row limit | - | - | 1000000 |
| TABLE\_LIMIT\_VIEW\_FILTER\_ITEMS\_MAX | Maximum filter items in a view | 100 | - | 100 |
| TABLE\_LIMIT\_VIEW\_FILTER\_DEPTH\_MAX | Maximum nested filter depth in a view | 5 | - | 5 |
| TABLE\_LIMIT\_VIEW\_SORT\_ITEMS\_MAX | Maximum sort items in a view | 20 | - | 20 |
| TABLE\_LIMIT\_VIEW\_GROUP\_ITEMS\_MAX | Maximum group items in a view | 3 | - | 3 |
| TABLE\_LIMIT\_VIEW\_OPTIONS\_MAX\_BYTES | Maximum serialized view option bytes | 262144 | - | 262144 |
| TABLE\_LIMIT\_NAME\_MAX\_LENGTH | Maximum display name length for supported table objects | 100 | - | 100 |
| TABLE\_LIMIT\_DESCRIPTION\_MAX\_LENGTH | Maximum description length for supported table objects | 2000 | - | 2000 |
| AUTOMATION\_MIN\_SCHEDULED\_MINUTES\_INTERVAL | Shortest interval (minutes) a scheduled trigger may use with the Minutes frequency. Set above 60 to disable minute-level schedules | 10 | - | 15 |
| AUTOMATION\_MIN\_EMAIL\_POLL\_INTERVAL\_MINUTES | Shortest mailbox poll interval (minutes) an email trigger may use | 10 | - | 15 |
| **AI & App Builder (runtime plane connection)** | | | | |
| SANDBOX\_PROVIDER | Sandbox provider for AI sessions; `opensandbox` connects to a self-hosted runtime plane | - | - | opensandbox |
| TEABLE\_INFRA\_API\_URL | Runtime plane entry URL — must be the public entry (it routes `/v1` to the sandbox engine), not an internal service address | - | - | [https://infra.teable.example.com](https://infra.teable.example.com) |
| TEABLE\_INFRA\_API\_KEY | API key shared with the runtime plane | - | - | your-infra-api-key |
| TEABLE\_INFRA\_BUCKET | Bucket for the AI workspace data plane | teable-agent | - | teable-agent |
| SANDBOX\_OPENSANDBOX\_IMAGE | Sandbox agent image **prefix without a tag** — Teable appends its own release tag so the agent always matches the app version. China deployments use the Aliyun mirror prefix | - | - | ghcr.io/teableio/teable-sandbox-agent |
| SANDBOX\_OPENSANDBOX\_RUNTIME | Sandbox engine runtime type: `kubernetes` or `docker`. Must be `docker` on Docker deployments | kubernetes | - | docker |
| SANDBOX\_OPENSANDBOX\_USE\_SERVER\_PROXY | Route sandbox endpoints through the engine's path-based proxy instead of per-port subdomains (used by Docker local mode) | false | - | true |
| APP\_DEPLOY\_PROVIDER | App Builder deployment backend; full-featured self-host uses `docker-runtime` | vercel | - | docker-runtime |
| SANDBOX\_JWT\_SECRET | Secret signing sandbox sessions. Generate a random value per host, and use the same value in the sandbox service | - | Yes | random string |
| SANDBOX\_CPU | vCPUs per sandbox (admin panel settings take precedence) | 2 | - | 2 |
| SANDBOX\_MEMORY | Memory (GiB) per sandbox (admin panel settings take precedence) | 4 | - | 4 |
| SANDBOX\_DISK | Ephemeral disk (GiB) per sandbox (admin panel settings take precedence) | 15 | - | 15 |
| **Feature Toggles** | | | | |
| RECORD\_HISTORY\_DISABLED | Whether to disable record history, defaults to false | false | - | true |
| BACKEND\_STORAGE\_COLD\_ARCHIVE\_DISABLED | Whether to stop scheduled archiving of historical data. Already-archived data stays readable | false | - | true |
| PASSWORD\_LOGIN\_DISABLED | Whether to disable password login (OAuth and OIDC still available) | false | - | true |
| V2\_TABLE\_QUERY\_OPS\_ENABLED | Whether to enable Table Query Ops; while off, the **Table Query Ops** admin page has no data. Restart after changing it | false | - | true |
| **Analytics & Monitoring** | | | | |
| MICROSOFT\_CLARITY\_ID | Microsoft Clarity metrics ID, for enabling Microsoft Clarity analytics | - | - | your-metrics-id |
| OTEL\_EXPORTER\_OTLP\_ENDPOINT | OpenTelemetry OTLP endpoint | - | - | [http://jaeger:4317](http://jaeger:4317) |
| TELEMETRY\_REPORT\_DISABLED | Disable self-hosted telemetry reporting, including license compliance reports from connected instances | false | - | true |
| **Database Configuration** | | | | |
| PRISMA\_DATABASE\_URL | Database connection URL, must be configured | - | Yes | postgresql://teable:teable\@127.0.0.1:5432/teable |
| PUBLIC\_DATABASE\_PROXY | Externally reachable database address (host:port) used in the credentials generated by the project "Database Connection" panel; set it to enable external read-only SQL access | - | - | db.example.com:42345 |
| PRISMA\_TRANSACTION\_TIMEOUT | Maximum time (ms) a transaction can run before timing out. Increase for long-running transactions (e.g., bulk updates with many foreign keys) | 5000 | - | 60000 |
| PRISMA\_TRANSACTION\_MAX\_WAIT | Maximum time (ms) to wait to acquire a transaction from the pool | 2000 | - | 5000 |
| BIG\_TRANSACTION\_TIMEOUT | Timeout (ms) for large internal transactions, such as exporting large projects | 600000 | - | 1200000 |
## Secrets and rotation
Every value above marked as a secret should come from your own configuration.
The server checks them once at startup, but a missing secret never blocks
startup: Teable falls back to the default built into older versions, logs the
missing variables, and starts. Those built-in values are public, so anyone can
forge tokens or decrypt data protected by them. That is fine for a quick local
try-out and unsafe for anything else.
**Upgrading an existing deployment.** An instance that ran without these
variables was implicitly using the old built-in values, and still is. The
startup warning prints the exact block to add so current sessions, tokens, and
encrypted data keep working. Copy it as-is, restart, then plan a rotation. If
your configuration format needs it, remember to escape `$` in the values.
**New deployment.** Generate fresh values instead:
```bash theme={null}
openssl rand -base64 32
```
Use `openssl rand -hex 8` for the 16-character `*_ENCRYPTION_KEY` and
`*_ENCRYPTION_IV` slots.
The startup log also warns when a secret is explicitly set to a publicly known
former default. The instance keeps running so your data stays reachable, but
anyone can forge tokens or decrypt data protected by that value. Rotate it.
# OIDC Single Sign-On
Source: https://help.teable.ai/en/deploy/oidc
Configure OpenID Connect (OIDC) authentication for your self-hosted Teable instance.
Teable supports OIDC single sign-on, allowing you to integrate with external identity providers for user authentication.
## Environment Variables
To enable OIDC in your self-hosted Teable, configure these environment variables:
```sh theme={null}
# Core OIDC Configuration
BACKEND_OIDC_CLIENT_ID=your_client_id
BACKEND_OIDC_CLIENT_SECRET=your_client_secret
BACKEND_OIDC_CALLBACK_URL=https://your-teable-domain.com/api/auth/oidc/callback
# OAuth Endpoints (from your IdP)
BACKEND_OIDC_AUTHORIZATION_URL=https://your-idp.com/authorize
BACKEND_OIDC_TOKEN_URL=https://your-idp.com/token
BACKEND_OIDC_USER_INFO_URL=https://your-idp.com/userinfo
BACKEND_OIDC_ISSUER=https://your-idp.com
# Additional Options
BACKEND_OIDC_OTHER={"scope":["email","profile"]}
# Enable OIDC as auth provider
SOCIAL_AUTH_PROVIDERS=oidc
```
## Configuration Reference
| Variable | Description |
| - | - |
| `BACKEND_OIDC_CLIENT_ID` | Client ID from your identity provider |
| `BACKEND_OIDC_CLIENT_SECRET` | Client secret from your identity provider |
| `BACKEND_OIDC_CALLBACK_URL` | Teable's callback URL (must match IdP configuration) |
| `BACKEND_OIDC_AUTHORIZATION_URL` | IdP's authorization endpoint |
| `BACKEND_OIDC_TOKEN_URL` | IdP's token endpoint |
| `BACKEND_OIDC_USER_INFO_URL` | IdP's user info endpoint |
| `BACKEND_OIDC_ISSUER` | IdP's issuer identifier |
| `BACKEND_OIDC_OTHER` | Additional options in JSON format (e.g., scopes) |
| `SOCIAL_AUTH_PROVIDERS` | Include `oidc` to enable OIDC login button |
## Enabling Multiple Auth Providers
You can enable multiple authentication methods:
```sh theme={null}
SOCIAL_AUTH_PROVIDERS=github,google,oidc
```
This allows users to log in via GitHub, Google, or your OIDC provider.
***
## Identity Provider Security Requirements
Teable trusts the email address returned by your IdP and uses it to automatically link OIDC logins to existing accounts with the same email. The identity provider you connect **must guarantee that user email addresses are verified**.
Do not connect identity providers that let users set arbitrary, unverified email addresses (for example, multi-tenant IdPs with open registration). On such providers, an attacker can register an account using the email address of an existing user on your instance and take over that account by signing in via OIDC. This risk is especially acute when local password login is also enabled on the same instance.
Recommendations:
* Only connect enterprise-grade IdPs under your control (such as Okta, Azure Entra ID, Google Workspace, or Keycloak) with email verification enabled.
* If your instance uses SSO exclusively, set [`PASSWORD_LOGIN_DISABLED=true`](/en/deploy/env) to disable local password login and further reduce the attack surface.
***
## Important Notes
1. **HTTPS Required**: All URLs must use HTTPS in production
2. **Callback URL Must Match**: The callback URL in Teable must exactly match what's configured in your IdP
3. **Restart Required**: After changing environment variables, restart Teable for changes to take effect
4. **Secure Storage**: Never commit secrets to version control; use environment variables or secret managers
5. **IdP Must Verify Emails**: See [Identity Provider Security Requirements](#identity-provider-security-requirements) above
***
## Related Documentation
* [Environment Variables Reference](/en/deploy/env)
# One-Click Cloud Deployment (Deprecated)
Source: https://help.teable.ai/en/deploy/one-key
Deploy Teable quickly using cloud provider templates, then subscribe to unlock paid features and activate your license.
**Deprecated.** One-click templates are no longer a recommended way to deploy
Teable — start from [Deployment](/en/deploy/choose). If you already run Teable
from one of them, here is what you have and where to go next: these templates
give you a **standalone** Teable (app + PostgreSQL + Redis): tables,
collaboration, API, and automations, but no AI features. One-click platforms
cannot start containers, so the [runtime plane](/en/deploy/architecture) that
powers AI sessions, App Builder, and app deployments cannot run on them. Two
ways to the full platform:
1. **Keep your platform and attach a runtime plane**: deploy it on a machine
you control following the
[migration guide](https://github.com/teableio/teable-deployment/blob/main/migration/2026-07-basic-to-full-featured.md),
then add the connection environment variables from the guide to your
platform service and redeploy. Your data stays in place, and rollback is
just removing the variables again.
2. **Migrate to the [standard deployment](/en/deploy/choose)**: back up a
PostgreSQL dump plus your uploaded files, restore them into a Docker
all-in-one or Kubernetes install, and repoint your domain.
## One-Click Cloud Deployment
One-click templates help you bootstrap a Teable environment quickly. After deployment, if you want paid features (for self-hosted plans), you should **subscribe** and **activate your license** using your Instance ID.
## Step 1: Deploy with a template
Choose a template below and deploy.
[](https://railway.app/template/NtH5uD?referralCode=rE4BjB)
[](https://zeabur.com/templates/QF8695)
[](https://repocloud.io/details/?app_id=273)
[](https://elest.io/open-source/teable)
## Step 2: Subscribe (paid features)
If you are deploying **self-hosted** and need paid features, subscribe with your **Instance ID**:
1. Open the Admin Panel in your deployed instance and copy the **Instance ID**
2. Go to the self-hosted pricing page and subscribe: `https://app.teable.ai/public/pricing?host=self-hosted`
3. After subscribing, you will get a **License Key**
Then activate it in your instance:
* Documentation: [Subscribe and Activate License](/en/deploy/activate)
If you are using **Teable Cloud** (hosted by Teable), manage your plan in-app:
see [Billing & Subscription](/en/basic/space/billing).
## Need help?
If you have questions about subscription or licensing, contact `support@teable.ai`.
# Telemetry
Source: https://help.teable.ai/en/deploy/telemetry
Learn how Teable self-hosted telemetry works, what is reported, and how to disable it.
## Overview
License activation can work offline after you obtain and enter a valid License Key.
If a self-hosted instance can reach the Internet, it may send a minimal telemetry report for license compliance, security review, fraud prevention, and investigation of unauthorized distributions.
This telemetry is separate from optional product analytics. It is designed for self-hosted administration and compliance, similar to common service ping, license validation, and anonymous usage reporting practices in self-managed software.
## What May Be Reported
Telemetry reports may include product authorization identifiers such as Instance ID and, when a license is installed, License ID; license plan, seat limit, and expiration dates when available; software edition, application version, build version, image digest, and build channel; aggregated usage counts and buckets; instance last activity time; hashed public origin hostname and hashed machine hostname; platform, CPU architecture, and Node.js version; and compliance risk signals.
Product authorization identifiers such as Instance ID and License ID may be sent in their original form because they are used to validate the deployment and license status.
Customer or host identifying values such as public origin hostname and machine hostname are hashed before transmission.
## What Is Not Reported
Telemetry reports do not include customer workspace content, table records, schema names, field values, SQL queries, application secrets, access credentials, authentication tokens, License Keys, user email lists, user names, or the full public origin URL.
## Transmission and Retention
Telemetry reports are encrypted in transit.
Teable retains raw telemetry events only for as long as reasonably necessary for license compliance, security review, fraud prevention, dispute handling, and audit purposes. Teable may retain aggregated or derived compliance status for the duration of the customer relationship and any legally required retention period.
## Disable Telemetry Reporting
Self-hosted administrators can disable telemetry reporting by setting:
```env theme={null}
TELEMETRY_REPORT_DISABLED=true
```
Disabling telemetry reporting does not by itself prevent offline license activation, but may limit Teable's ability to verify license compliance, detect unauthorized distributions, or investigate license disputes.
# Version Upgrade
Source: https://help.teable.ai/en/deploy/upgrade
This document describes how to upgrade a self-hosted Teable deployment.
## Release channels and version tags
The Teable app publishes **date-based release tags** in the form
`release..` (for example
`release.2026-07-14T12-24-39Z.2228`), plus two floating channels:
| Tag | Meaning |
| - | - |
| `latest` | The **stable** channel — always points at the most recent stable release |
| `beta` | The rolling channel — the newest build, ahead of stable |
| `release..` | An immutable, specific release |
Releases ship frequently (often several per week); you decide when to upgrade.
All tags are listed on
[GitHub Packages](https://github.com/teableio/teable/pkgs/container/teable).
Before performing any upgrade, we strongly recommend backing up your data first.
## Routine updates: follow the changelog
New features and fixes are announced in the [Changelog](/en/changelog), and
every Teable release tag carries its build date — so "do I have this yet?" is
just a date comparison. To pick up something you read about, move your Teable
image to any release dated at or after that entry:
* **Docker deployments** can simply ride the `latest` channel:
```bash theme={null}
cd teable # your deployment directory
docker compose pull
docker compose up -d
```
Containers are recreated on the new image; your data lives in Docker volumes
(or your external database) and is not touched.
* **Kubernetes deployments** should not run a floating tag: keep the Teable
image pinned and **bump the pinned tag deliberately on each update**. The
deployment repository's `pin-image.sh` resolves which concrete release
`latest` currently points to.
## Best practice: upgrade the whole platform together
A full-featured deployment has two version lines — the Teable app and the
platform itself (see [Architecture](/en/deploy/architecture)). The most
reliable routine ties them together, with
[`VERSIONS.md`](https://github.com/teableio/teable-deployment/blob/main/VERSIONS.md)
as the upgrade sheet. On each round:
1. Upgrade the runtime plane to the **newest platform release**
(`v..`): each git tag is a verified snapshot of every
runtime component, and its
[`CHANGELOG.md`](https://github.com/teableio/teable-deployment/blob/main/CHANGELOG.md)
entry states what changed and what, if anything, you must do (most releases
are hot-swappable). Work from the repository checked out at that tag.
2. Move the Teable app to the **concrete release tag that `latest` currently
corresponds to** (`pin-image.sh` resolves it) — a pinned, verified
combination instead of a floating channel.
3. Run the bundled **doctor** — it checks health and compares what is actually
running against the platform release manifest (compatible / upgrade the
Teable app / unknown combination).
## Required secrets
Teable no longer falls back to built-in default secrets. If your deployment
relied on those defaults, the first start after upgrading stops with a list of
the environment variables it needs and a copy-paste block that preserves your
existing sessions, tokens, and encrypted data. Add the block, restart, then
plan a rotation. See [Secrets and rotation](/en/deploy/env#secrets-and-rotation).
## Database migration
Teable executes database migrations automatically on startup; no manual step
is required. If anything looks wrong after an upgrade, check the logs:
```bash theme={null}
docker compose logs teable | grep -i migration
```
## Rollback
If you hit issues after upgrading:
1. Set the image tag in `docker-compose.yaml` back to the previous release tag
(this is why pinning beats `latest`: the previous version is written down).
2. `docker compose up -d`
Rolling back **after** a release that migrated the database schema may not be
safe — restore from your pre-upgrade backup in that case. This is the main
reason for the backup recommendation above.
## FAQ
No. Your data is stored in Docker volumes or external databases, and upgrading containers will not affect your data. However, we still recommend backing up before upgrading.
No. Your Instance ID remains unchanged during application updates. It is a permanent identifier for your self-hosted installation.
Typically, pulling new images takes a few minutes (depending on network speed), and container restart only takes a few seconds. The entire process usually completes within 5-10 minutes.
Using `docker compose up -d` there will be a brief service interruption (usually a few seconds to tens of seconds).
You can check the current version by:
* Viewing the version number at the bottom left of the Teable interface
* Using an admin account to access the admin panel
* Running `docker inspect --format='{{.Config.Image}}'` to check the image version. If you run the `latest` channel, the full-featured deployment ships a `pin-image.sh` helper that resolves which release `latest` currently is.
1. First check container logs to troubleshoot: `docker compose logs teable`
2. If it's a database migration issue, try restoring from backup
3. If the issue persists, rollback to the previous version
4. Contact support at [support@teable.ai](mailto:support@teable.ai)
# Get authmobileweb session
Source: https://help.teable.ai/en/api-reference/auth/get-authmobileweb-session
/swagger.json get /auth/mobile/web-session
Sign the browser in with a web-session code and redirect (a navigation, not an XHR)
# Get authuser
Source: https://help.teable.ai/en/api-reference/auth/get-authuser
/swagger.json get /auth/user
Get user information via access token
# Get authwaitlist
Source: https://help.teable.ai/en/api-reference/auth/get-authwaitlist
/swagger.json get /auth/waitlist
Get waitlist
Required token scopes: `instance|read`
# Post authinvite waitlist
Source: https://help.teable.ai/en/api-reference/auth/post-authinvite-waitlist
/swagger.json post /auth/invite-waitlist
Invite waitlist
Required token scopes: `instance|update`
# Post authjoin waitlist
Source: https://help.teable.ai/en/api-reference/auth/post-authjoin-waitlist
/swagger.json post /auth/join-waitlist
Join waitlist
# Post authmobileexchange
Source: https://help.teable.ai/en/api-reference/auth/post-authmobileexchange
/swagger.json post /auth/mobile/exchange
Exchange a mobile sign-in code for a session; the response sets the session cookie
# Post authreset password
Source: https://help.teable.ai/en/api-reference/auth/post-authreset-password
/swagger.json post /auth/reset-password
Reset password
# Post authsend reset password email
Source: https://help.teable.ai/en/api-reference/auth/post-authsend-reset-password-email
/swagger.json post /auth/send-reset-password-email
Send reset password email
# Post authsend signin verification code
Source: https://help.teable.ai/en/api-reference/auth/post-authsend-signin-verification-code
/swagger.json post /auth/send-signin-verification-code
Send a one-time sign-in verification code to a registered email. No captcha is required.
# Post authsend signup verification code
Source: https://help.teable.ai/en/api-reference/auth/post-authsend-signup-verification-code
/swagger.json post /auth/send-signup-verification-code
Send signup verification code
# Post authsignin
Source: https://help.teable.ai/en/api-reference/auth/post-authsignin
/swagger.json post /auth/signin
Sign in
# Post authsignin with code
Source: https://help.teable.ai/en/api-reference/auth/post-authsignin-with-code
/swagger.json post /auth/signin-with-code
Sign in with the verification code sent to the email
# Post authsignup
Source: https://help.teable.ai/en/api-reference/auth/post-authsignup
/swagger.json post /auth/signup
Sign up
# Post authwaitlist invite code
Source: https://help.teable.ai/en/api-reference/auth/post-authwaitlist-invite-code
/swagger.json post /auth/waitlist-invite-code
Gen waitlist invite code
Required token scopes: `instance|update`
# Analyze Google Sheets import source
Source: https://help.teable.ai/en/api-reference/base/analyze-a-google-sheets-import-source
/swagger.json post /base/import-google-sheet/analyze
List the tabs (worksheets) of a picked Google spreadsheet before import
# Analyze Airtable import source
Source: https://help.teable.ai/en/api-reference/base/analyze-an-airtable-import-source
/swagger.json post /base/import-airtable/analyze
List accessible Airtable bases or summarize one base schema before import
# Cancel project database move job
Source: https://help.teable.ai/en/api-reference/base/cancel-project-data-db-move-job
/swagger.json post /base/{baseId}/move-job/{jobId}/cancel
Cancel a cross-data-DB project move job (only before switch)
# Check project duplication requirements
Source: https://help.teable.ai/en/api-reference/base/check-cross-space-affected-fields-for-project-duplicate
/swagger.json get /base/{baseId}/duplicate-check
Check the cross-space link/lookup/rollup fields that would be converted if this project were duplicated into the given target space.
# Check project move requirements
Source: https://help.teable.ai/en/api-reference/base/check-cross-space-affected-fields-for-project-move
/swagger.json get /base/{baseId}/move-check
Check the cross-space link/lookup/rollup fields that would be converted if this project were moved into the given target space (both outgoing and incoming references), and whether a physical cross-data-DB move is required.
# Create or update project from template
Source: https://help.teable.ai/en/api-reference/base/create-a-project-from-template-or-apply-a-template-to-a-project
/swagger.json post /base/create-from-template
Create a project from a template or apply a template to an existing project.
# Delete project
Source: https://help.teable.ai/en/api-reference/base/delete-base
/swagger.json delete /base/{baseId}
Move a project to the trash by its ID.
# Delete project invitation link
Source: https://help.teable.ai/en/api-reference/base/delete-base-invitationlink
/swagger.json delete /base/{baseId}/invitation/link/{invitationId}
Delete a project's invitation link by its ID.
# Reset personal project order
Source: https://help.teable.ai/en/api-reference/base/delete-basepersonal-order
/swagger.json delete /base/personal-order/{spaceId}
Forget the caller's own arrangement of a space's projects; the personal list goes back to last-visit recency.
# Clear project or table trash
Source: https://help.teable.ai/en/api-reference/base/delete-trashreset-items
/swagger.json delete /trash/reset-items
Clear trash items for the specified project or table.
# Execute project SQL query
Source: https://help.teable.ai/en/api-reference/base/execute-sql-query
/swagger.json post /base/{baseId}/sql-query
Execute a SQL query on tables in a project.
# List accessible projects
Source: https://help.teable.ai/en/api-reference/base/get-all-project-list
/swagger.json get /base/access/all
List projects accessible to the current user using the supplied query.
# Get project
Source: https://help.teable.ai/en/api-reference/base/get-base
/swagger.json get /base/{baseId}
Retrieve a project by its ID.
# List project collaborators
Source: https://help.teable.ai/en/api-reference/base/get-base-collaborators
/swagger.json get /base/{baseId}/collaborators
List the collaborators of a project.
# Get project relationship diagram
Source: https://help.teable.ai/en/api-reference/base/get-base-erd
/swagger.json get /base/{baseId}/erd
Retrieve the entity relationship diagram for a project.
# Export project
Source: https://help.teable.ai/en/api-reference/base/get-base-export
/swagger.json get /base/{baseId}/export
Export a project by its ID.
# Export project with progress
Source: https://help.teable.ai/en/api-reference/base/get-base-export-stream
/swagger.json get /base/{baseId}/export-stream
Export a project by its ID and receive progress updates and the final result through server-sent events.
# List project invitation links
Source: https://help.teable.ai/en/api-reference/base/get-base-invitationlink
/swagger.json get /base/{baseId}/invitation/link
List invitation links for a project.
# Get project permissions
Source: https://help.teable.ai/en/api-reference/base/get-base-permission
/swagger.json get /base/{baseId}/permission
Retrieve the current user's permissions for a project.
# List project collaborator users
Source: https://help.teable.ai/en/api-reference/base/get-project-collaborator-user-list
/swagger.json get /base/{baseId}/collaborators/users
List the user accounts that collaborate on a project.
# Get project database move job
Source: https://help.teable.ai/en/api-reference/base/get-project-data-db-move-job-status
/swagger.json get /base/{baseId}/move-job/{jobId}
Get status of a cross-data-DB project move job
# List projects in space
Source: https://help.teable.ai/en/api-reference/base/get-space-base
/swagger.json get /space/{spaceId}/base
List projects in the specified space using the supplied query.
# Import Google spreadsheet with progress
Source: https://help.teable.ai/en/api-reference/base/import-a-google-spreadsheet-with-sse-progress-events
/swagger.json post /base/import-google-sheet/stream
import a Google spreadsheet with SSE progress stream
# Import project
Source: https://help.teable.ai/en/api-reference/base/import-a-project
/swagger.json post /base/import
Import a project into the target space.
# Import project with progress
Source: https://help.teable.ai/en/api-reference/base/import-a-project-with-sse-progress-events
/swagger.json post /base/import-stream
Import a project and receive progress updates through server-sent events.
# Import Airtable base with progress
Source: https://help.teable.ai/en/api-reference/base/import-an-airtable-base-with-sse-progress-events
/swagger.json post /base/import-airtable/stream
import an Airtable base with SSE progress stream
# Move project
Source: https://help.teable.ai/en/api-reference/base/move-a-project-to-another-space
/swagger.json put /base/{baseId}/move
Move a project to another space. Same data-DB moves complete synchronously. Cross-data-DB moves return a jobId and run asynchronously.
# Patch project
Source: https://help.teable.ai/en/api-reference/base/patch-base
/swagger.json patch /base/{baseId}
Update a project's name or icon.
# Update project invitation link
Source: https://help.teable.ai/en/api-reference/base/patch-base-invitationlink
/swagger.json patch /base/{baseId}/invitation/link/{invitationId}
Update a project's invitation link settings.
# Create project
Source: https://help.teable.ai/en/api-reference/base/post-base
/swagger.json post /base
Create a project in the specified space.
# Invite project collaborators by email
Source: https://help.teable.ai/en/api-reference/base/post-base-invitationemail
/swagger.json post /base/{baseId}/invitation/email
Send email invitations to join a project.
# Create project invitation link
Source: https://help.teable.ai/en/api-reference/base/post-base-invitationlink
/swagger.json post /base/{baseId}/invitation/link
Create a link for inviting collaborators to a project.
# Duplicate project
Source: https://help.teable.ai/en/api-reference/base/post-baseduplicate
/swagger.json post /base/duplicate
Create a copy of a project in the target space.
# Duplicate project with progress
Source: https://help.teable.ai/en/api-reference/base/post-baseduplicate-stream
/swagger.json post /base/duplicate-stream
Duplicate a project and receive progress updates and the final result through server-sent events.
# Publish or unpublish project
Source: https://help.teable.ai/en/api-reference/base/publish-or-unpublish-a-project
/swagger.json post /base/{baseId}/publish
Change whether a project is published for sharing.
# Put project order
Source: https://help.teable.ai/en/api-reference/base/put-base-order
/swagger.json put /base/{baseId}/order
Change a project's position in its space.
# Update personal project order
Source: https://help.teable.ai/en/api-reference/base/put-base-personal-order
/swagger.json put /base/{baseId}/personal-order
Move a project before/after another one in the caller's own arrangement of that space (see `GET /base/access/all?orderBy=personal`). The first move in a space freezes the order the caller currently sees; nobody else is affected.
# Retry project database move job
Source: https://help.teable.ai/en/api-reference/base/retry-project-data-db-move-job
/swagger.json post /base/{baseId}/move-job/{jobId}/retry
Retry a failed cross-data-DB project move job
# Sign project attachment URLs
Source: https://help.teable.ai/en/api-reference/base/sign-attachment-urls
/swagger.json post /base/{baseId}/sign-attachment-urls
Generate signed URLs for attachment files in a project.
# Delete project dashboard
Source: https://help.teable.ai/en/api-reference/dashboard/delete-base-dashboard
/swagger.json delete /base/{baseId}/dashboard/{id}
Delete a dashboard by id
# Get project dashboard
Source: https://help.teable.ai/en/api-reference/dashboard/get-base-dashboard
/swagger.json get /base/{baseId}/dashboard
Get a list of dashboards in project
# Get project dashboard 1
Source: https://help.teable.ai/en/api-reference/dashboard/get-base-dashboard-1
/swagger.json get /base/{baseId}/dashboard/{id}
Get a dashboard by id
# Patch project dashboard rename
Source: https://help.teable.ai/en/api-reference/dashboard/patch-base-dashboard-rename
/swagger.json patch /base/{baseId}/dashboard/{dashboardId}/rename
Rename a dashboard by id
# Post project dashboard
Source: https://help.teable.ai/en/api-reference/dashboard/post-base-dashboard
/swagger.json post /base/{baseId}/dashboard
Create a new dashboard
# Delete space authentication
Source: https://help.teable.ai/en/api-reference/space/delete-space-authentication
/swagger.json delete /space/{spaceId}/authentication/{id}
Delete a space authentication
Required token scopes: `space|update`
# Delete space domain verification
Source: https://help.teable.ai/en/api-reference/space/delete-space-domain-verification
/swagger.json delete /space/{spaceId}/domain-verification
Delete a space domain verification
Required token scopes: `space|update`
# Delete space integration
Source: https://help.teable.ai/en/api-reference/space/delete-space-integration
/swagger.json delete /space/{spaceId}/integration/{integrationId}
Delete a integration by integrationId
Required token scopes: `space|update`
# Get space authentication
Source: https://help.teable.ai/en/api-reference/space/get-space-authentication
/swagger.json get /space/{spaceId}/authentication/{id}
Get a space authentication
Required token scopes: `space|update`
# Get space authentication 1
Source: https://help.teable.ai/en/api-reference/space/get-space-authentication-1
/swagger.json get /space/{spaceId}/authentication
Get a space authentication list
Required token scopes: `space|update`
# Get space domain verification
Source: https://help.teable.ai/en/api-reference/space/get-space-domain-verification
/swagger.json get /space/{spaceId}/domain-verification
Get a space domain verification list
Required token scopes: `space|update`
# Get space scheduling limits
Source: https://help.teable.ai/en/api-reference/space/get-space-scheduling-limits
/swagger.json get /space/{spaceId}/scheduling-limits
Get the space concurrency limits with their defaults and maxima
Required token scopes: `space|update`
# Get space search
Source: https://help.teable.ai/en/api-reference/space/get-space-search
/swagger.json get /space/{spaceId}/search
Search projects and nodes within a space
Required token scopes: `space|read`
# Get spaceauthenticationproviders
Source: https://help.teable.ai/en/api-reference/space/get-spaceauthenticationproviders
/swagger.json get /space/authentication/providers
Get space authentication providers
# Patch space integration
Source: https://help.teable.ai/en/api-reference/space/patch-space-integration
/swagger.json patch /space/{spaceId}/integration/{integrationId}
Update a integration to a space
Required token scopes: `space|update`
# Patch space scheduling limits
Source: https://help.teable.ai/en/api-reference/space/patch-space-scheduling-limits
/swagger.json patch /space/{spaceId}/scheduling-limits
Update the space concurrency limits (bounded by the instance-configured maxima)
Required token scopes: `space|update`
# Post space authentication
Source: https://help.teable.ai/en/api-reference/space/post-space-authentication
/swagger.json post /space/{spaceId}/authentication
Create a space authentication
Required token scopes: `space|update`
# Post space domain verification
Source: https://help.teable.ai/en/api-reference/space/post-space-domain-verification
/swagger.json post /space/{spaceId}/domain-verification
Create a space domain verification
Required token scopes: `space|update`
# Post space domain verificationsend verification email
Source: https://help.teable.ai/en/api-reference/space/post-space-domain-verificationsend-verification-email
/swagger.json post /space/{spaceId}/domain-verification/send-verification-email
Send space email verification
Required token scopes: `space|update`
# Post space integration
Source: https://help.teable.ai/en/api-reference/space/post-space-integration
/swagger.json post /space/{spaceId}/integration
Create a integration to a space
Required token scopes: `space|update`
# Post trashrestore
Source: https://help.teable.ai/en/api-reference/space/post-trashrestore
/swagger.json post /trash/restore/{trashId}
restore a space, project, table, etc.
# Put space authentication
Source: https://help.teable.ai/en/api-reference/space/put-space-authentication
/swagger.json put /space/{spaceId}/authentication/{id}
Update a space authentication
Required token scopes: `space|update`
# Restore field trash with SSE progress
Source: https://help.teable.ai/en/api-reference/space/restore-field-trash-with-sse-progress
/swagger.json post /trash/restore-field/{trashId}/stream
Restore deleted fields and stream realtime v2 record value progress.
# Delete table view
Source: https://help.teable.ai/en/api-reference/view/delete-table-view
/swagger.json delete /table/{tableId}/view/{viewId}
Delete a view
Required token scopes: `view|delete`
# Get table view
Source: https://help.teable.ai/en/api-reference/view/get-table-view
/swagger.json get /table/{tableId}/view/{viewId}
Get a view
Required token scopes: `view|read`
# Get table view filter link records
Source: https://help.teable.ai/en/api-reference/view/get-table-view-filter-link-records
/swagger.json get /table/{tableId}/view/{viewId}/filter-link-records
Getting associated records for a view filter configuration.
Required token scopes: `view|read`
# Get table view plugin
Source: https://help.teable.ai/en/api-reference/view/get-table-view-plugin
/swagger.json get /table/{tableId}/view/{viewId}/plugin
Get a view install plugin by id
Required token scopes: `view|read`
# Get view list
Source: https://help.teable.ai/en/api-reference/view/get-view-list
/swagger.json get /table/{tableId}/view
Get view list
Required token scopes: `view|read`
# Patch table view options
Source: https://help.teable.ai/en/api-reference/view/patch-table-view-options
/swagger.json patch /table/{tableId}/view/{viewId}/options
Update view option
Required token scopes: `view|update`
# Patch table view plugin
Source: https://help.teable.ai/en/api-reference/view/patch-table-view-plugin
/swagger.json patch /table/{tableId}/view/{viewId}/plugin/{pluginInstallId}
Update storage of a plugin in a view
Required token scopes: `view|update`
# Post table view
Source: https://help.teable.ai/en/api-reference/view/post-table-view
/swagger.json post /table/{tableId}/view
Create a view
Required token scopes: `view|create`
# Post table view disable share
Source: https://help.teable.ai/en/api-reference/view/post-table-view-disable-share
/swagger.json post /table/{tableId}/view/{viewId}/disable-share
Disable view share
Required token scopes: `view|update`
# Post table view duplicate
Source: https://help.teable.ai/en/api-reference/view/post-table-view-duplicate
/swagger.json post /table/{tableId}/view/{viewId}/duplicate
Duplicate a view
Required token scopes: `view|create`
# Post table view enable share
Source: https://help.teable.ai/en/api-reference/view/post-table-view-enable-share
/swagger.json post /table/{tableId}/view/{viewId}/enable-share
Enable view share
Required token scopes: `view|share`
# Post table view refresh share id
Source: https://help.teable.ai/en/api-reference/view/post-table-view-refresh-share-id
/swagger.json post /table/{tableId}/view/{viewId}/refresh-share-id
Refresh view share id
Required token scopes: `view|share`
# Post table viewplugin
Source: https://help.teable.ai/en/api-reference/view/post-table-viewplugin
/swagger.json post /table/{tableId}/view/plugin
Install a plugin to a view
Required token scopes: `view|create`
# Put table view column meta
Source: https://help.teable.ai/en/api-reference/view/put-table-view-column-meta
/swagger.json put /table/{tableId}/view/{viewId}/column-meta
Update view column meta
Required token scopes: `view|update`
# Put table view description
Source: https://help.teable.ai/en/api-reference/view/put-table-view-description
/swagger.json put /table/{tableId}/view/{viewId}/description
Update view description
Required token scopes: `view|update`
# Put table view filter
Source: https://help.teable.ai/en/api-reference/view/put-table-view-filter
/swagger.json put /table/{tableId}/view/{viewId}/filter
Update view filter
Required token scopes: `view|update`
# Put table view group
Source: https://help.teable.ai/en/api-reference/view/put-table-view-group
/swagger.json put /table/{tableId}/view/{viewId}/group
Update view group condition
Required token scopes: `view|update`
# Put table view locked
Source: https://help.teable.ai/en/api-reference/view/put-table-view-locked
/swagger.json put /table/{tableId}/view/{viewId}/locked
Update the locked status of the view
Required token scopes: `view|update`
# Put table view manual sort
Source: https://help.teable.ai/en/api-reference/view/put-table-view-manual-sort
/swagger.json put /table/{tableId}/view/{viewId}/manual-sort
Update view raw order
Required token scopes: `view|update`
# Put table view name
Source: https://help.teable.ai/en/api-reference/view/put-table-view-name
/swagger.json put /table/{tableId}/view/{viewId}/name
Update view name
Required token scopes: `view|update`
# Put table view order
Source: https://help.teable.ai/en/api-reference/view/put-table-view-order
/swagger.json put /table/{tableId}/view/{viewId}/order
Update view order
Required token scopes: `view|update`
# Put table view record order
Source: https://help.teable.ai/en/api-reference/view/put-table-view-record-order
/swagger.json put /table/{tableId}/view/{viewId}/record-order
Update record order in view
Required token scopes: `view|update`
# Put table view share meta
Source: https://help.teable.ai/en/api-reference/view/put-table-view-share-meta
/swagger.json put /table/{tableId}/view/{viewId}/share-meta
Update view share meta
Required token scopes: `view|share`
# Put table view sort
Source: https://help.teable.ai/en/api-reference/view/put-table-view-sort
/swagger.json put /table/{tableId}/view/{viewId}/sort
Update view sort condition
Required token scopes: `view|update`
# Delete adminenterprise license
Source: https://help.teable.ai/en/api-reference/admin/delete-adminenterprise-license
/swagger.json delete /admin/enterprise-license
Delete the current enterprise license
Required token scopes: `instance|update`
# Delete adminobservabilityworkflow
Source: https://help.teable.ai/en/api-reference/admin/delete-adminobservabilityworkflow
/swagger.json delete /admin/observability/workflow/{workflowId}
Delete a workflow observability
Required token scopes: `instance|update`
# Delete adminorganization
Source: https://help.teable.ai/en/api-reference/admin/delete-adminorganization
/swagger.json delete /admin/organization/{organizationId}
Delete an organization by organization ID for admin
# Delete adminspace
Source: https://help.teable.ai/en/api-reference/admin/delete-adminspace
/swagger.json delete /admin/space/{spaceId}
Delete a space by space ID for admin
Required token scopes: `instance|update`
# Delete adminuser
Source: https://help.teable.ai/en/api-reference/admin/delete-adminuser
/swagger.json delete /admin/user/{userId}
Delete a user by user ID for admin
# Delete adminuser permanent delete
Source: https://help.teable.ai/en/api-reference/admin/delete-adminuser-permanent-delete
/swagger.json delete /admin/user/{userId}/permanent-delete
Permanent delete a user by user ID for admin
# Get adminaudit logs
Source: https://help.teable.ai/en/api-reference/admin/get-adminaudit-logs
/swagger.json get /admin/audit-logs
Get audit logs with filtering and pagination
Required token scopes: `instance|read`
# Get adminaudit logsbases
Source: https://help.teable.ai/en/api-reference/admin/get-adminaudit-logsbases
/swagger.json get /admin/audit-logs/bases
Search projects for the audit-log Project filter
Required token scopes: `instance|read`
# Get adminaudit logsoperators
Source: https://help.teable.ai/en/api-reference/admin/get-adminaudit-logsoperators
/swagger.json get /admin/audit-logs/operators
Search operators (users) for the audit-log operator filter
Required token scopes: `instance|read`
# Get adminenterprise license
Source: https://help.teable.ai/en/api-reference/admin/get-adminenterprise-license
/swagger.json get /admin/enterprise-license
Get enterprise license information
Required token scopes: `instance|read`
# Get adminenterprise licensestatus
Source: https://help.teable.ai/en/api-reference/admin/get-adminenterprise-licensestatus
/swagger.json get /admin/enterprise-license/status
Get enterprise license expiration status
# Get adminobservabilitytable query ops
Source: https://help.teable.ai/en/api-reference/admin/get-adminobservabilitytable-query-ops
/swagger.json get /admin/observability/table-query-ops
Get Table Query Ops observation, recommendation, and task overview
Required token scopes: `instance|read`
# Get adminobservabilitytable query opsanalyze
Source: https://help.teable.ai/en/api-reference/admin/get-adminobservabilitytable-query-opsanalyze
/swagger.json get /admin/observability/table-query-ops/analyze
Analyze saved view query shapes and validate Table Query Ops index candidates
Required token scopes: `instance|read`
# Get adminobservabilitytable query opstables
Source: https://help.teable.ai/en/api-reference/admin/get-adminobservabilitytable-query-opstables
/swagger.json get /admin/observability/table-query-ops/tables
List current table search and index management state
Required token scopes: `instance|read`
# Get adminobservabilityworkflow
Source: https://help.teable.ai/en/api-reference/admin/get-adminobservabilityworkflow
/swagger.json get /admin/observability/workflow
get observability workflow list
Required token scopes: `instance|read`
# Get adminobservabilityworkflow run history
Source: https://help.teable.ai/en/api-reference/admin/get-adminobservabilityworkflow-run-history
/swagger.json get /admin/observability/workflow/{workflowId}/run-history
get workflow run history
Required token scopes: `instance|read`
# Get adminobservabilityworkflowsummary
Source: https://help.teable.ai/en/api-reference/admin/get-adminobservabilityworkflowsummary
/swagger.json get /admin/observability/workflow/summary
Retrieves a summary of workflow observability
Required token scopes: `instance|read`
# Get adminorganization
Source: https://help.teable.ai/en/api-reference/admin/get-adminorganization
/swagger.json get /admin/organization
Get paginated organizations for the instance
# Get adminorganization admin
Source: https://help.teable.ai/en/api-reference/admin/get-adminorganization-admin
/swagger.json get /admin/organization/{organizationId}/admin
Get organization admin users
# Get adminsetting
Source: https://help.teable.ai/en/api-reference/admin/get-adminsetting
/swagger.json get /admin/setting
Get the instance settings
Required token scopes: `instance|read`
# Get adminsettingai key stats
Source: https://help.teable.ai/en/api-reference/admin/get-adminsettingai-key-stats
/swagger.json get /admin/setting/ai-key-stats
Get per-key usage statistics for AI Gateway API keys
Required token scopes: `instance|read`
# Get adminsettingpublic
Source: https://help.teable.ai/en/api-reference/admin/get-adminsettingpublic
/swagger.json get /admin/setting/public
Get the public instance settings
# Get adminsettingtest public access
Source: https://help.teable.ai/en/api-reference/admin/get-adminsettingtest-public-access
/swagger.json get /admin/setting/test-public-access
Test if this Teable instance is publicly accessible from the internet
Required token scopes: `instance|update`
# Get adminspace
Source: https://help.teable.ai/en/api-reference/admin/get-adminspace
/swagger.json get /admin/space
Get paginated spaces for the instance
Required token scopes: `instance|read`
# Get adminspace data db
Source: https://help.teable.ai/en/api-reference/admin/get-adminspace-data-db
/swagger.json get /admin/space/{spaceId}/data-db
Get the data database binding summary for a space from the admin panel
Required token scopes: `instance|read`
# Get adminspace data dbmigration
Source: https://help.teable.ai/en/api-reference/admin/get-adminspace-data-dbmigration
/swagger.json get /admin/space/{spaceId}/data-db/migration/{jobId}
Get detailed data database migration status for a space from the admin panel
Required token scopes: `instance|read`
# Get adminspace v2 rollout
Source: https://help.teable.ai/en/api-reference/admin/get-adminspace-v2-rollout
/swagger.json get /admin/space/{spaceId}/v2-rollout
Get admin v2 rollout overview for a space
Required token scopes: `instance|read`
# Get adminspace v2 rolloutcheck stream
Source: https://help.teable.ai/en/api-reference/admin/get-adminspace-v2-rolloutcheck-stream
/swagger.json get /admin/space/{spaceId}/v2-rollout/check-stream
Stream v2 schema integrity check results for all projects in a space for admin
Required token scopes: `instance|read`
# Get adminuser
Source: https://help.teable.ai/en/api-reference/admin/get-adminuser
/swagger.json get /admin/user
Get paginated users for the instance
# Patch adminenterprise license
Source: https://help.teable.ai/en/api-reference/admin/patch-adminenterprise-license
/swagger.json patch /admin/enterprise-license/{licenseId}
Update a enterprise license by license ID
Required token scopes: `instance|update`
# Patch adminenterprise licenseauto fetch
Source: https://help.teable.ai/en/api-reference/admin/patch-adminenterprise-licenseauto-fetch
/swagger.json patch /admin/enterprise-license/auto-fetch
Update enterprise license auto-renew setting
Required token scopes: `instance|update`
# Patch adminplugin publish
Source: https://help.teable.ai/en/api-reference/admin/patch-adminplugin-publish
/swagger.json patch /admin/plugin/{pluginId}/publish
Publish a plugin
Required token scopes: `instance|update`
# Patch adminplugin unpublish
Source: https://help.teable.ai/en/api-reference/admin/patch-adminplugin-unpublish
/swagger.json patch /admin/plugin/{pluginId}/unpublish
Admin unpublish a plugin
Required token scopes: `instance|update`
# Patch adminsetting
Source: https://help.teable.ai/en/api-reference/admin/patch-adminsetting
/swagger.json patch /admin/setting
Get the instance settings
Required token scopes: `instance|update`
# Patch adminsettingai config
Source: https://help.teable.ai/en/api-reference/admin/patch-adminsettingai-config
/swagger.json patch /admin/setting/ai-config
Update one AI configuration section
Required token scopes: `instance|update`
# Patch adminsettingapp config
Source: https://help.teable.ai/en/api-reference/admin/patch-adminsettingapp-config
/swagger.json patch /admin/setting/app-config
Update one App Builder configuration section
Required token scopes: `instance|update`
# Patch adminsettinglogo
Source: https://help.teable.ai/en/api-reference/admin/patch-adminsettinglogo
/swagger.json patch /admin/setting/logo
Upload logo
Required token scopes: `instance|update`
# Patch adminspace
Source: https://help.teable.ai/en/api-reference/admin/patch-adminspace
/swagger.json patch /admin/space/{spaceId}
update enterprise space information
Required token scopes: `instance|update`
# Patch adminspace data db
Source: https://help.teable.ai/en/api-reference/admin/patch-adminspace-data-db
/swagger.json patch /admin/space/{spaceId}/data-db
Bind or update a BYODB data database for a space from the admin panel
Required token scopes: `instance|update`
# Patch adminuser
Source: https://help.teable.ai/en/api-reference/admin/patch-adminuser
/swagger.json patch /admin/user/{userId}
Update a user info
# Patch adminuser admin
Source: https://help.teable.ai/en/api-reference/admin/patch-adminuser-admin
/swagger.json patch /admin/user/{userId}/admin
Set or unset admin privilege for a user
# Patch adminusers activate
Source: https://help.teable.ai/en/api-reference/admin/patch-adminusers-activate
/swagger.json patch /admin/users/{userId}/activate
Reactivate a deactivated user
Required token scopes: `instance|update`
# Patch adminusers deactivate
Source: https://help.teable.ai/en/api-reference/admin/patch-adminusers-deactivate
/swagger.json patch /admin/users/{userId}/deactivate
Deactivate a user
Required token scopes: `instance|update`
# Post adminenterprise license
Source: https://help.teable.ai/en/api-reference/admin/post-adminenterprise-license
/swagger.json post /admin/enterprise-license
Create a enterprise license
Required token scopes: `instance|update`
# Post adminenterprise licenseauto fetchretry
Source: https://help.teable.ai/en/api-reference/admin/post-adminenterprise-licenseauto-fetchretry
/swagger.json post /admin/enterprise-license/auto-fetch/retry
Retry enterprise license auto-renewal immediately
Required token scopes: `instance|update`
# Post adminenterprise licensetest connectivity
Source: https://help.teable.ai/en/api-reference/admin/post-adminenterprise-licensetest-connectivity
/swagger.json post /admin/enterprise-license/test-connectivity
Test connectivity to the Teable license server
Required token scopes: `instance|update`
# Post adminobservabilitytable query opsrecommendationsaccept
Source: https://help.teable.ai/en/api-reference/admin/post-adminobservabilitytable-query-opsrecommendationsaccept
/swagger.json post /admin/observability/table-query-ops/recommendations/accept
Accept a Table Query Ops recommendation and enqueue its index task
Required token scopes: `instance|update`
# Post adminobservabilitytable query opssearch access pathsanalyze
Source: https://help.teable.ai/en/api-reference/admin/post-adminobservabilitytable-query-opssearch-access-pathsanalyze
/swagger.json post /admin/observability/table-query-ops/search-access-paths/analyze
Analyze generated text GIN access paths for exact substring search
Required token scopes: `instance|read`
# Post adminobservabilitytable query opssearch access pathsexecute
Source: https://help.teable.ai/en/api-reference/admin/post-adminobservabilitytable-query-opssearch-access-pathsexecute
/swagger.json post /admin/observability/table-query-ops/search-access-paths/execute
Dry-run, create, or rebuild a generated text substring search access path
Required token scopes: `instance|update`
# Post adminobservabilitytable query opssearch vectorsanalyze
Source: https://help.teable.ai/en/api-reference/admin/post-adminobservabilitytable-query-opssearch-vectorsanalyze
/swagger.json post /admin/observability/table-query-ops/search-vectors/analyze
Compatibility alias for substring search access-path analysis
Required token scopes: `instance|read`
# Post adminobservabilitytable query opssearch vectorsexecute
Source: https://help.teable.ai/en/api-reference/admin/post-adminobservabilitytable-query-opssearch-vectorsexecute
/swagger.json post /admin/observability/table-query-ops/search-vectors/execute
Compatibility alias for substring search access-path execution
Required token scopes: `instance|update`
# Post adminobservabilityworkflow deactivate
Source: https://help.teable.ai/en/api-reference/admin/post-adminobservabilityworkflow-deactivate
/swagger.json post /admin/observability/workflow/{workflowId}/deactivate
Deactivate a workflow observability
Required token scopes: `instance|update`
# Post adminorganization
Source: https://help.teable.ai/en/api-reference/admin/post-adminorganization
/swagger.json post /admin/organization
Create a new organization
# Post adminsettingbatch test llm
Source: https://help.teable.ai/en/api-reference/admin/post-adminsettingbatch-test-llm
/swagger.json post /admin/setting/batch-test-llm
Batch test all configured LLM models to verify compatibility with AI field features
Required token scopes: `instance|update`
# Post adminsettingtest api key
Source: https://help.teable.ai/en/api-reference/admin/post-adminsettingtest-api-key
/swagger.json post /admin/setting/test-api-key
Test API key validity for AI Gateway, optionally test attachment transfer modes
Required token scopes: `instance|update`
# Post adminsettingtest llm
Source: https://help.teable.ai/en/api-reference/admin/post-adminsettingtest-llm
/swagger.json post /admin/setting/test-llm
Test LLM provider configuration
Required token scopes: `instance|update`
# Post adminspace
Source: https://help.teable.ai/en/api-reference/admin/post-adminspace
/swagger.json post /admin/space
Create a space from the admin panel
Required token scopes: `instance|update`
# Post adminspace data dbmigration cancel
Source: https://help.teable.ai/en/api-reference/admin/post-adminspace-data-dbmigration-cancel
/swagger.json post /admin/space/{spaceId}/data-db/migration/{jobId}/cancel
Cancel a pre-switch data database migration from the admin panel
Required token scopes: `instance|update`
# Post adminspace data dbmigration rollback
Source: https://help.teable.ai/en/api-reference/admin/post-adminspace-data-dbmigration-rollback
/swagger.json post /admin/space/{spaceId}/data-db/migration/{jobId}/rollback
Rollback a completed data database migration from the admin panel when safe
Required token scopes: `instance|update`
# Post adminspace data dbretest
Source: https://help.teable.ai/en/api-reference/admin/post-adminspace-data-dbretest
/swagger.json post /admin/space/{spaceId}/data-db/retest
Retest the existing BYODB data database binding for a space from the admin panel
Required token scopes: `instance|update`
# Post adminspace v2 rolloutenable
Source: https://help.teable.ai/en/api-reference/admin/post-adminspace-v2-rolloutenable
/swagger.json post /admin/space/{spaceId}/v2-rollout/enable
Enable v2 canary rollout for a space from admin
Required token scopes: `instance|update`
# Post adminspace v2 rolloutrepair stream
Source: https://help.teable.ai/en/api-reference/admin/post-adminspace-v2-rolloutrepair-stream
/swagger.json post /admin/space/{spaceId}/v2-rollout/repair-stream
Stream v2 schema integrity repair results for all projects in a space for admin
Required token scopes: `instance|update`
# Post adminspace v2 rollouttable repair stream
Source: https://help.teable.ai/en/api-reference/admin/post-adminspace-v2-rollouttable-repair-stream
/swagger.json post /admin/space/{spaceId}/v2-rollout/table/{tableId}/repair-stream
Stream v2 schema integrity repair results for one table in a space for admin
Required token scopes: `instance|update`
# Post adminspacedata dbpreflight
Source: https://help.teable.ai/en/api-reference/admin/post-adminspacedata-dbpreflight
/swagger.json post /admin/space/data-db/preflight
Validate a PostgreSQL data database before binding it from the admin panel
Required token scopes: `instance|update`
# Post adminuser reset password
Source: https://help.teable.ai/en/api-reference/admin/post-adminuser-reset-password
/swagger.json post /admin/user/{userId}/reset-password
Generate a one-time password reset link for the user, and email it to the user when mail is configured
# Post adminuser restore delete
Source: https://help.teable.ai/en/api-reference/admin/post-adminuser-restore-delete
/swagger.json post /admin/user/{userId}/restore-delete
Restore a deleted user
# Put adminorganization admin
Source: https://help.teable.ai/en/api-reference/admin/put-adminorganization-admin
/swagger.json put /admin/organization/{organizationId}/admin
Update organization admin status for a user
# Put adminsettingset mail transport config
Source: https://help.teable.ai/en/api-reference/admin/put-adminsettingset-mail-transport-config
/swagger.json put /admin/setting/set-mail-transport-config
Set mail transporter
Required token scopes: `instance|update`
# Post attachmentsnotify
Source: https://help.teable.ai/en/api-reference/attachments/post-attachmentsnotify
/swagger.json post /attachments/notify/{token}
Get Attachment information
# Post attachmentssignature
Source: https://help.teable.ai/en/api-reference/attachments/post-attachmentssignature
/swagger.json post /attachments/signature
Retrieve upload signature.
# Post attachmentsupload
Source: https://help.teable.ai/en/api-reference/attachments/post-attachmentsupload
/swagger.json post /attachments/upload/{token}
Upload attachment
# Delete project dashboard plugin
Source: https://help.teable.ai/en/api-reference/dashboard/delete-base-dashboard-plugin
/swagger.json delete /base/{baseId}/dashboard/{dashboardId}/plugin/{pluginInstallId}
Remove a plugin from a dashboard
# Duplicate a dashboard
Source: https://help.teable.ai/en/api-reference/dashboard/duplicate-a-dashboard
/swagger.json post /base/{baseId}/dashboard/{id}/duplicate
Duplicate a dashboard
Required token scopes: `base|update`
# Duplicate a dashboard installed plugin
Source: https://help.teable.ai/en/api-reference/dashboard/duplicate-a-dashboard-installed-plugin
/swagger.json post /base/{baseId}/dashboard/{id}/plugin/{installedId}/duplicate
Duplicate a dashboard installed plugin
Required token scopes: `base|update`
# Get project dashboard plugin
Source: https://help.teable.ai/en/api-reference/dashboard/get-base-dashboard-plugin
/swagger.json get /base/{baseId}/dashboard/{dashboardId}/plugin/{pluginInstallId}
Get a dashboard install plugin by id
# Patch project dashboard layout
Source: https://help.teable.ai/en/api-reference/dashboard/patch-base-dashboard-layout
/swagger.json patch /base/{baseId}/dashboard/{id}/layout
Update a dashboard layout by id
# Patch project dashboard plugin rename
Source: https://help.teable.ai/en/api-reference/dashboard/patch-base-dashboard-plugin-rename
/swagger.json patch /base/{baseId}/dashboard/{dashboardId}/plugin/{pluginInstallId}/rename
Rename a plugin in a dashboard
# Patch project dashboard plugin update storage
Source: https://help.teable.ai/en/api-reference/dashboard/patch-base-dashboard-plugin-update-storage
/swagger.json patch /base/{baseId}/dashboard/{dashboardId}/plugin/{pluginInstallId}/update-storage
Update storage of a plugin in a dashboard
# Post project dashboard plugin
Source: https://help.teable.ai/en/api-reference/dashboard/post-base-dashboard-plugin
/swagger.json post /base/{baseId}/dashboard/{id}/plugin
Install a plugin to a dashboard
# Post mail sender send
Source: https://help.teable.ai/en/api-reference/mail/post-mail-sender-send
/swagger.json post /mail-sender/{baseId}/send
Send an email
Required token scopes: `base|update`
# Get pluginchart dashboard query
Source: https://help.teable.ai/en/api-reference/plugin/get-pluginchart-dashboard-query
/swagger.json get /plugin/chart/{pluginInstallId}/dashboard/{positionId}/query
Get a dashboard install plugin query by id
Required token scopes: `base|read`
# Get pluginchart plugin panel query
Source: https://help.teable.ai/en/api-reference/plugin/get-pluginchart-plugin-panel-query
/swagger.json get /plugin/chart/{pluginInstallId}/plugin-panel/{positionId}/query
Get a plugin panel install plugin query by id
Required token scopes: `table|read`
# Post plugin authcode
Source: https://help.teable.ai/en/api-reference/plugin/post-plugin-authcode
/swagger.json post /plugin/{pluginId}/authCode
Get an auth code
Required token scopes: `base|read`
# Post plugin refreshtoken
Source: https://help.teable.ai/en/api-reference/plugin/post-plugin-refreshtoken
/swagger.json post /plugin/{pluginId}/refreshToken
Refresh a token
# Post plugin token
Source: https://help.teable.ai/en/api-reference/plugin/post-plugin-token
/swagger.json post /plugin/{pluginId}/token
Get a token
# Delete template
Source: https://help.teable.ai/en/api-reference/template/delete-template
/swagger.json delete /template/{templateId}
delete a template
Required token scopes: `instance|update`
# Delete templatecategory
Source: https://help.teable.ai/en/api-reference/template/delete-templatecategory
/swagger.json delete /template/category/{templateCategoryId}
delete a template category
Required token scopes: `instance|update`
# Get template
Source: https://help.teable.ai/en/api-reference/template/get-template
/swagger.json get /template
get template list
Required token scopes: `instance|update`
# get template detail by templateId
Source: https://help.teable.ai/en/api-reference/template/get-template-detail-by-templateid
/swagger.json get /template/{templateId}
get template detail by templateId
# Get template permalink redirect URL
Source: https://help.teable.ai/en/api-reference/template/get-template-permalink-redirect-url
/swagger.json get /template/permalink/{identifier}
Get template redirect URL for permalink
# Get templatepublished
Source: https://help.teable.ai/en/api-reference/template/get-templatepublished
/swagger.json get /template/published
get published template list
# Increment template visit count
Source: https://help.teable.ai/en/api-reference/template/increment-template-visit-count
/swagger.json patch /template/{templateId}/visit
Increment template visit count
# Patch template
Source: https://help.teable.ai/en/api-reference/template/patch-template
/swagger.json patch /template/{templateId}
update a template
Required token scopes: `instance|update`
# Patch template pin top
Source: https://help.teable.ai/en/api-reference/template/patch-template-pin-top
/swagger.json patch /template/{templateId}/pin-top
pin top a template
Required token scopes: `instance|update`
# Patch templatecategory
Source: https://help.teable.ai/en/api-reference/template/patch-templatecategory
/swagger.json patch /template/category/{templateCategoryId}
update a template category name
Required token scopes: `instance|update`
# Post template snapshot
Source: https://help.teable.ai/en/api-reference/template/post-template-snapshot
/swagger.json post /template/{templateId}/snapshot
create a template snapshot
Required token scopes: `instance|update`
# Post templatecategorycreate
Source: https://help.teable.ai/en/api-reference/template/post-templatecategorycreate
/swagger.json post /template/category/create
create a template category
Required token scopes: `instance|update`
# Post templatecreate
Source: https://help.teable.ai/en/api-reference/template/post-templatecreate
/swagger.json post /template/create
create a template
Required token scopes: `instance|update`
# Put template order
Source: https://help.teable.ai/en/api-reference/template/put-template-order
/swagger.json put /template/{templateId}/order
Update template order
Required token scopes: `instance|update`
# Put templatecategory order
Source: https://help.teable.ai/en/api-reference/template/put-templatecategory-order
/swagger.json put /template/category/{templateCategoryId}/order
Update template category order
Required token scopes: `instance|update`
# Delete adminsandbox
Source: https://help.teable.ai/en/api-reference/admin/delete-adminsandbox
/swagger.json delete /admin/sandbox/{principalId}
Destroy a sandbox by scope key (admin)
Required token scopes: `instance|update`
# Export admin reward list as CSV
Source: https://help.teable.ai/en/api-reference/admin/export-admin-reward-list-as-csv
/swagger.json get /admin/reward/export/{spaceId}
Export all reward records for a specific space as CSV file. Supports filtering by date range.
Required token scopes: `instance|update`
# Get admin reward detail
Source: https://help.teable.ai/en/api-reference/admin/get-admin-reward-detail
/swagger.json get /admin/reward/{rewardId}
Get detailed information of a specific reward including full metadata
Required token scopes: `instance|update`
# Get admin reward list
Source: https://help.teable.ai/en/api-reference/admin/get-admin-reward-list
/swagger.json get /admin/reward/list
Get paginated and filtered list of reward for admin management. Supports filtering by space, status, platform, verification result, and search.
Required token scopes: `instance|update`
# Get admin reward overview by spaces
Source: https://help.teable.ai/en/api-reference/admin/get-admin-reward-overview-by-spaces
/swagger.json get /admin/reward/overview
Get aggregated reward statistics grouped by space for admin management. Returns pending, approved, consumed, available and expiring amounts per space.
Required token scopes: `instance|update`
# Get adminannouncement
Source: https://help.teable.ai/en/api-reference/admin/get-adminannouncement
/swagger.json get /admin/announcement
List announcements, newest first
Required token scopes: `instance|update`
# Get adminintegritybases
Source: https://help.teable.ai/en/api-reference/admin/get-adminintegritybases
/swagger.json get /admin/integrity/bases
Search bases for instance-admin schema integrity checks
Required token scopes: `instance|read`
# Get adminintegritybases check stream
Source: https://help.teable.ai/en/api-reference/admin/get-adminintegritybases-check-stream
/swagger.json get /admin/integrity/bases/{baseId}/check-stream
Stream v2 schema integrity checks for a base as instance admin
Required token scopes: `instance|read`
# Get adminintegritytables check stream
Source: https://help.teable.ai/en/api-reference/admin/get-adminintegritytables-check-stream
/swagger.json get /admin/integrity/tables/{tableId}/check-stream
Stream v2 schema integrity checks for a table as instance admin
Required token scopes: `instance|read`
# Get adminjwt credentialsapps
Source: https://help.teable.ai/en/api-reference/admin/get-adminjwt-credentialsapps
/swagger.json get /admin/jwt-credentials/apps
List every app with the signing-secret generation of its stored Teable access token and its AI-proxy JWT deploy freshness
Required token scopes: `instance|read`
# Get adminobservabilitycomputed outbox
Source: https://help.teable.ai/en/api-reference/admin/get-adminobservabilitycomputed-outbox
/swagger.json get /admin/observability/computed-outbox
Get the current BullMQ and durable computed outbox health snapshot
Required token scopes: `instance|read`
# Get adminobservabilitycomputed outboxanomalies
Source: https://help.teable.ai/en/api-reference/admin/get-adminobservabilitycomputed-outboxanomalies
/swagger.json get /admin/observability/computed-outbox/anomalies
List dead-letter and stale computed outbox tasks grouped by shared root-cause signature
Required token scopes: `instance|read`
# Get adminobservabilitycomputed outboxpauses
Source: https://help.teable.ai/en/api-reference/admin/get-adminobservabilitycomputed-outboxpauses
/swagger.json get /admin/observability/computed-outbox/pauses
List active computed-update pauses across default and BYODB storage targets
Required token scopes: `instance|read`
# Get adminobservabilitycomputed outboxpausesspaces
Source: https://help.teable.ai/en/api-reference/admin/get-adminobservabilitycomputed-outboxpausesspaces
/swagger.json get /admin/observability/computed-outbox/pauses/spaces
Find spaces that can be paused and report their current data-database route
Required token scopes: `instance|read`
# Get adminobservabilitycomputed outboxqueuejobs
Source: https://help.teable.ai/en/api-reference/admin/get-adminobservabilitycomputed-outboxqueuejobs
/swagger.json get /admin/observability/computed-outbox/queue/jobs
List BullMQ computed wake-up jobs by state with space/project/cause filters and pagination
Required token scopes: `instance|read`
# Get adminobservabilitycomputed outboxreliability
Source: https://help.teable.ai/en/api-reference/admin/get-adminobservabilitycomputed-outboxreliability
/swagger.json get /admin/observability/computed-outbox/reliability
Required token scopes: `instance|read`
# Get adminobservabilitycomputed outboxreliability 1
Source: https://help.teable.ai/en/api-reference/admin/get-adminobservabilitycomputed-outboxreliability-1
/swagger.json get /admin/observability/computed-outbox/reliability/{issueId}
Required token scopes: `instance|read`
# Get adminobservabilitycomputed outboxtasks lineage
Source: https://help.teable.ai/en/api-reference/admin/get-adminobservabilitycomputed-outboxtasks-lineage
/swagger.json get /admin/observability/computed-outbox/tasks/{taskId}/lineage
Resolve one computed task's lineage: trigger source, run chain across the outbox / dead-letter / run-history ledgers, DAG plan (steps + edges), and source-change to converged-write latency
Required token scopes: `instance|read`
# Get adminobservabilitytable query opstables 1
Source: https://help.teable.ai/en/api-reference/admin/get-adminobservabilitytable-query-opstables-1
/swagger.json get /admin/observability/table-query-ops/tables/{tableId}
Inspect current table indexes, coverage, recommendations and tasks
Required token scopes: `instance|read`
# Get adminobservabilitytask queue
Source: https://help.teable.ai/en/api-reference/admin/get-adminobservabilitytask-queue
/swagger.json get /admin/observability/task-queue
Get the AI field generation queue health snapshot with the per-space ranking
Required token scopes: `instance|read`
# Get adminobservabilitytask queuespaces tasks
Source: https://help.teable.ai/en/api-reference/admin/get-adminobservabilitytask-queuespaces-tasks
/swagger.json get /admin/observability/task-queue/spaces/{spaceId}/tasks
List the in-flight AI generation tasks of a space
Required token scopes: `instance|read`
# Get adminobservabilitytask queuestalled
Source: https://help.teable.ai/en/api-reference/admin/get-adminobservabilitytask-queuestalled
/swagger.json get /admin/observability/task-queue/stalled
List task runs stuck in Queued/Processing with a dead or absent BullMQ job
Required token scopes: `instance|read`
# Get adminsandbox observabilitystream
Source: https://help.teable.ai/en/api-reference/admin/get-adminsandbox-observabilitystream
/swagger.json get /admin/sandbox/{sandboxId}/observability/stream
Stream sandbox observability metrics over SSE (admin)
Required token scopes: `instance|update`
# Get adminsandboxinfra status
Source: https://help.teable.ai/en/api-reference/admin/get-adminsandboxinfra-status
/swagger.json get /admin/sandbox/infra-status
Get sandbox infra connectivity/compatibility diagnostics (admin)
Required token scopes: `instance|update`
# Get adminsandboxinfra testpreheat readiness
Source: https://help.teable.ai/en/api-reference/admin/get-adminsandboxinfra-testpreheat-readiness
/swagger.json get /admin/sandbox/infra-test/preheat-readiness
Poll agent image preheat readiness on the infra (admin live test step 2)
Required token scopes: `instance|update`
# Get adminsandboxsessions
Source: https://help.teable.ai/en/api-reference/admin/get-adminsandboxsessions
/swagger.json get /admin/sandbox/sessions
List sandbox sessions (admin)
Required token scopes: `instance|update`
# Get adminsandboxsessions chats
Source: https://help.teable.ai/en/api-reference/admin/get-adminsandboxsessions-chats
/swagger.json get /admin/sandbox/sessions/{principalId}/chats
List all chats for a sandbox principal (admin)
Required token scopes: `instance|update`
# Get adminsandboxsessions messages
Source: https://help.teable.ai/en/api-reference/admin/get-adminsandboxsessions-messages
/swagger.json get /admin/sandbox/sessions/{principalId}/messages
Get chat messages for a sandbox principal (admin)
Required token scopes: `instance|update`
# Get adminsettingapp ai key injection
Source: https://help.teable.ai/en/api-reference/admin/get-adminsettingapp-ai-key-injection
/swagger.json get /admin/setting/app-ai-key-injection
Get the platform AI key injection setting
Required token scopes: `instance|update`
# Get adminsettingapp deploy provider
Source: https://help.teable.ai/en/api-reference/admin/get-adminsettingapp-deploy-provider
/swagger.json get /admin/setting/app-deploy-provider
Get the effective app deploy provider for new deployments
Required token scopes: `instance|update`
# Get adminsettingim
Source: https://help.teable.ai/en/api-reference/admin/get-adminsettingim
/swagger.json get /admin/setting/im
Get the IM integration configuration
Required token scopes: `instance|update`
# Get adminsettingsandbox
Source: https://help.teable.ai/en/api-reference/admin/get-adminsettingsandbox
/swagger.json get /admin/setting/sandbox
Get the sandbox agent configuration
Required token scopes: `instance|update`
# Get adminsettingtable data safety limits
Source: https://help.teable.ai/en/api-reference/admin/get-adminsettingtable-data-safety-limits
/swagger.json get /admin/setting/table-data-safety-limits
Get the effective table data safety limits and plugin contributions
Required token scopes: `instance|update`
# Get adminsystem field backfilljobs
Source: https://help.teable.ai/en/api-reference/admin/get-adminsystem-field-backfilljobs
/swagger.json get /admin/system-field-backfill/jobs/{jobId}
Get a system field backfill job
Required token scopes: `instance|read`
# Get adminsystem field backfilljobslatest
Source: https://help.teable.ai/en/api-reference/admin/get-adminsystem-field-backfilljobslatest
/swagger.json get /admin/system-field-backfill/jobs/latest
Get the latest system field backfill job, or null when no jobs exist
Required token scopes: `instance|read`
# Get adminv2 rolloutjobs
Source: https://help.teable.ai/en/api-reference/admin/get-adminv2-rolloutjobs
/swagger.json get /admin/v2-rollout/jobs/{jobId}
Get an EE v2 rollout job detail
Required token scopes: `instance|read`
# Get adminv2 rolloutjobs events
Source: https://help.teable.ai/en/api-reference/admin/get-adminv2-rolloutjobs-events
/swagger.json get /admin/v2-rollout/jobs/{jobId}/events
Get EE v2 rollout job events
Required token scopes: `instance|read`
# Get adminv2 rolloutjobs events stream
Source: https://help.teable.ai/en/api-reference/admin/get-adminv2-rolloutjobs-events-stream
/swagger.json get /admin/v2-rollout/jobs/{jobId}/events-stream
Stream EE v2 rollout job events with SSE
Required token scopes: `instance|read`
# Get adminv2 rolloutjobslatest
Source: https://help.teable.ai/en/api-reference/admin/get-adminv2-rolloutjobslatest
/swagger.json get /admin/v2-rollout/jobs/latest
Get the latest EE v2 rollout job detail
Required token scopes: `instance|read`
# Get all spaces with reward records
Source: https://help.teable.ai/en/api-reference/admin/get-all-spaces-with-reward-records
/swagger.json get /admin/reward/spaces
Get a list of all spaces that have reward records for admin filtering
Required token scopes: `instance|update`
# Patch adminannouncement withdraw
Source: https://help.teable.ai/en/api-reference/admin/patch-adminannouncement-withdraw
/swagger.json patch /admin/announcement/{announcementId}/withdraw
Withdraw an announcement. Idempotent: re-withdrawing returns the same result
Required token scopes: `instance|update`
# Patch adminsettingapp ai key injection
Source: https://help.teable.ai/en/api-reference/admin/patch-adminsettingapp-ai-key-injection
/swagger.json patch /admin/setting/app-ai-key-injection
Update the platform AI key injection setting
Required token scopes: `instance|update`
# Patch adminsettingim
Source: https://help.teable.ai/en/api-reference/admin/patch-adminsettingim
/swagger.json patch /admin/setting/im
Update the IM integration configuration
Required token scopes: `instance|update`
# Patch adminsettingsandbox
Source: https://help.teable.ai/en/api-reference/admin/patch-adminsettingsandbox
/swagger.json patch /admin/setting/sandbox
Update the sandbox agent configuration
Required token scopes: `instance|update`
# Post adminannouncement
Source: https://help.teable.ai/en/api-reference/admin/post-adminannouncement
/swagger.json post /admin/announcement
Publish an announcement
Required token scopes: `instance|update`
# Post adminannouncementmatch audience
Source: https://help.teable.ai/en/api-reference/admin/post-adminannouncementmatch-audience
/swagger.json post /admin/announcement/match-audience
Resolve audience tokens to users or spaces by exact match
Required token scopes: `instance|update`
# Post adminannouncementtranslate
Source: https://help.teable.ai/en/api-reference/admin/post-adminannouncementtranslate
/swagger.json post /admin/announcement/translate
Translate announcement content into other supported languages
Required token scopes: `instance|update`
# Post admincipher reencrypt
Source: https://help.teable.ai/en/api-reference/admin/post-admincipher-reencrypt
/swagger.json post /admin/cipher-reencrypt
Converge stored ciphertexts (BYODB database URLs, app env variables, AI config secrets) onto the current primary cipher entry — for AI config this also encrypts legacy plaintext; dryRun=true only reports counts
Required token scopes: `instance|update`
# Post adminintegritybases repair stream
Source: https://help.teable.ai/en/api-reference/admin/post-adminintegritybases-repair-stream
/swagger.json post /admin/integrity/bases/{baseId}/repair-stream
Stream v2 schema integrity repair for a base as instance admin
Required token scopes: `instance|update`
# Post adminintegritytables repair stream
Source: https://help.teable.ai/en/api-reference/admin/post-adminintegritytables-repair-stream
/swagger.json post /admin/integrity/tables/{tableId}/repair-stream
Stream v2 schema integrity repair for a table as instance admin
Required token scopes: `instance|update`
# Post adminjwt credentialsappsrefresh envs
Source: https://help.teable.ai/en/api-reference/admin/post-adminjwt-credentialsappsrefresh-envs
/swagger.json post /admin/jwt-credentials/apps/refresh-envs
Queue a runtime-env refresh of the given apps: the current version is re-deployed with freshly built envs (stored Teable token + freshly signed AI-proxy JWT) without creating a new app version. Runs serially in the background.
Required token scopes: `instance|update`
# Post adminjwt credentialsappsrefresh teable tokens
Source: https://help.teable.ai/en/api-reference/admin/post-adminjwt-credentialsappsrefresh-teable-tokens
/swagger.json post /admin/jwt-credentials/apps/refresh-teable-tokens
Re-mint the stored Teable access token of the given apps with the current JWT secret (non-destructive: the previous token keeps working until BACKEND_JWT_SECRET_OLD is removed; apps pick the new token up on their next deploy)
Required token scopes: `instance|update`
# Post adminobservabilitycomputed outboxanomalies recover
Source: https://help.teable.ai/en/api-reference/admin/post-adminobservabilitycomputed-outboxanomalies-recover
/swagger.json post /admin/observability/computed-outbox/anomalies/{taskId}/recover
Restore a dead-letter task or re-arm a stale task for BullMQ delivery
Required token scopes: `instance|update`
# Post adminobservabilitycomputed outboxanomaliesdiscard group
Source: https://help.teable.ai/en/api-reference/admin/post-adminobservabilitycomputed-outboxanomaliesdiscard-group
/swagger.json post /admin/observability/computed-outbox/anomalies/discard-group
Permanently drop every current dead-letter task from one exact root-cause group without replaying it (e.g. when the project no longer exists)
Required token scopes: `instance|update`
# Post adminobservabilitycomputed outboxanomaliesrecover group
Source: https://help.teable.ai/en/api-reference/admin/post-adminobservabilitycomputed-outboxanomaliesrecover-group
/swagger.json post /admin/observability/computed-outbox/anomalies/recover-group
Restore every current dead-letter task from one exact root-cause group
Required token scopes: `instance|update`
# Post adminobservabilitycomputed outboxpauses
Source: https://help.teable.ai/en/api-reference/admin/post-adminobservabilitycomputed-outboxpauses
/swagger.json post /admin/observability/computed-outbox/pauses
Pause future computed task claims for a space in its currently routed data database
Required token scopes: `instance|update`
# Post adminobservabilitycomputed outboxpausesextend
Source: https://help.teable.ai/en/api-reference/admin/post-adminobservabilitycomputed-outboxpausesextend
/swagger.json post /admin/observability/computed-outbox/pauses/extend
Extend one active computed-update pause lease in its exact storage target without shortening it
Required token scopes: `instance|update`
# Post adminobservabilitycomputed outboxpausesresume
Source: https://help.teable.ai/en/api-reference/admin/post-adminobservabilitycomputed-outboxpausesresume
/swagger.json post /admin/observability/computed-outbox/pauses/resume
Remove one computed-update pause from its exact storage target
Required token scopes: `instance|update`
# Post adminobservabilitycomputed outboxqueueclaim concurrency
Source: https://help.teable.ai/en/api-reference/admin/post-adminobservabilitycomputed-outboxqueueclaim-concurrency
/swagger.json post /admin/observability/computed-outbox/queue/claim-concurrency
Set or clear the cluster-wide outbox claim concurrency override (active processing tasks per project / per seed table). Primary-storage claim paths hot-apply it within seconds without a restart; BYODB projects keep their env defaults.
Required token scopes: `instance|update`
# Post adminobservabilitycomputed outboxqueueclean failed
Source: https://help.teable.ai/en/api-reference/admin/post-adminobservabilitycomputed-outboxqueueclean-failed
/swagger.json post /admin/observability/computed-outbox/queue/clean-failed
Clear retained failed BullMQ wake-up jobs from Redis. The durable outbox ledger is untouched: dead letters stay recoverable in the anomaly maintenance list.
Required token scopes: `instance|update`
# Post adminobservabilitycomputed outboxqueueworker concurrency
Source: https://help.teable.ai/en/api-reference/admin/post-adminobservabilitycomputed-outboxqueueworker-concurrency
/swagger.json post /admin/observability/computed-outbox/queue/worker-concurrency
Set or clear the cluster-wide BullMQ worker concurrency override for computed wake-ups. Consumers hot-apply it within seconds without a restart.
Required token scopes: `instance|update`
# Post adminobservabilitycomputed outboxreliability confirm
Source: https://help.teable.ai/en/api-reference/admin/post-adminobservabilitycomputed-outboxreliability-confirm
/swagger.json post /admin/observability/computed-outbox/reliability/{issueId}/confirm
Required token scopes: `instance|update`
# Post adminobservabilitycomputed outboxreliability not applicable
Source: https://help.teable.ai/en/api-reference/admin/post-adminobservabilitycomputed-outboxreliability-not-applicable
/swagger.json post /admin/observability/computed-outbox/reliability/{issueId}/not-applicable
Required token scopes: `instance|update`
# Post adminobservabilitytask queuetasks cancel
Source: https://help.teable.ai/en/api-reference/admin/post-adminobservabilitytask-queuetasks-cancel
/swagger.json post /admin/observability/task-queue/tasks/{taskId}/cancel
Cancel one AI generation task and every run of it that is not yet terminal
Required token scopes: `instance|update`
# Post adminsandboxdestroy batch
Source: https://help.teable.ai/en/api-reference/admin/post-adminsandboxdestroy-batch
/swagger.json post /admin/sandbox/destroy-batch
Destroy sandboxes in bulk by filter (admin)
Required token scopes: `instance|update`
# Post adminsandboxinfra testchat
Source: https://help.teable.ai/en/api-reference/admin/post-adminsandboxinfra-testchat
/swagger.json post /admin/sandbox/infra-test/chat
Find or create the dedicated sandbox live-test chat for the current admin (in the most recently visited project) so a real conversation can be rendered inline (admin live test step 3)
Required token scopes: `instance|update`
# Post adminsandboxinfra testpreheat
Source: https://help.teable.ai/en/api-reference/admin/post-adminsandboxinfra-testpreheat
/swagger.json post /admin/sandbox/infra-test/preheat
Trigger an agent image preheat on the infra (admin live test step 1)
Required token scopes: `instance|update`
# Post adminsettingapp archive repairrepair stream
Source: https://help.teable.ai/en/api-reference/admin/post-adminsettingapp-archive-repairrepair-stream
/swagger.json post /admin/setting/app-archive-repair/repair-stream
Stream app builder archive repair progress and results
Required token scopes: `instance|update`
# Post adminsettingapp configtest deploy
Source: https://help.teable.ai/en/api-reference/admin/post-adminsettingapp-configtest-deploy
/swagger.json post /admin/setting/app-config/test-deploy
Test connectivity of the selected app deployment provider
Required token scopes: `instance|update`
# Post adminsystem field backfilljobs
Source: https://help.teable.ai/en/api-reference/admin/post-adminsystem-field-backfilljobs
/swagger.json post /admin/system-field-backfill/jobs
Create a system field backfill job that fills NULL __last_modified_time/__last_modified_by from created values
Required token scopes: `instance|update`
# Post adminsystem field backfilljobs cancel
Source: https://help.teable.ai/en/api-reference/admin/post-adminsystem-field-backfilljobs-cancel
/swagger.json post /admin/system-field-backfill/jobs/{jobId}/cancel
Cancel a running system field backfill job
Required token scopes: `instance|update`
# Post adminsystem field backfilljobs resume
Source: https://help.teable.ai/en/api-reference/admin/post-adminsystem-field-backfilljobs-resume
/swagger.json post /admin/system-field-backfill/jobs/{jobId}/resume
Resume a failed or canceled system field backfill job from its checkpoint
Required token scopes: `instance|update`
# Post adminv2 rolloutjobs
Source: https://help.teable.ai/en/api-reference/admin/post-adminv2-rolloutjobs
/swagger.json post /admin/v2-rollout/jobs
Create an EE v2 rollout job
Required token scopes: `instance|update`
# Post adminv2 rolloutjobs cancel
Source: https://help.teable.ai/en/api-reference/admin/post-adminv2-rolloutjobs-cancel
/swagger.json post /admin/v2-rollout/jobs/{jobId}/cancel
Cancel an EE v2 rollout job
Required token scopes: `instance|update`
# Post adminv2 rolloutjobs pause
Source: https://help.teable.ai/en/api-reference/admin/post-adminv2-rolloutjobs-pause
/swagger.json post /admin/v2-rollout/jobs/{jobId}/pause
Pause an EE v2 rollout job
Required token scopes: `instance|update`
# Post adminv2 rolloutjobs resume
Source: https://help.teable.ai/en/api-reference/admin/post-adminv2-rolloutjobs-resume
/swagger.json post /admin/v2-rollout/jobs/{jobId}/resume
Resume an EE v2 rollout job
Required token scopes: `instance|update`
# Post adminv2 rolloutjobs rollback
Source: https://help.teable.ai/en/api-reference/admin/post-adminv2-rolloutjobs-rollback
/swagger.json post /admin/v2-rollout/jobs/{jobId}/rollback
Rollback spaces switched by an EE v2 rollout switch job
Required token scopes: `instance|update`
# Auto-fill a field by AI
Source: https://help.teable.ai/en/api-reference/field/auto-fill-a-field-by-ai
/swagger.json post /table/{tableId}/field/{fieldId}/auto-fill
Automatically generate suggestions for filling a specific field
Required token scopes: `record|update`
# Check cross-space affected fields for field duplicate
Source: https://help.teable.ai/en/api-reference/field/check-cross-space-affected-fields-for-field-duplicate
/swagger.json get /base/{baseId}/table/{tableId}/field/{fieldId}/duplicate-check
Check whether this field would be downgraded to single line text on duplicate due to cross-space references. Returns an empty list when no downgrade is needed.
Required token scopes: `field|create`
# Convert field type
Source: https://help.teable.ai/en/api-reference/field/convert-field-type
/swagger.json put /table/{tableId}/field/{fieldId}/convert
Convert field to a different type with automatic type casting and symmetric field handling
Required token scopes: `field|update`
# Create field
Source: https://help.teable.ai/en/api-reference/field/create-field
/swagger.json post /table/{tableId}/field
Create a new field in the specified table with the given configuration
Required token scopes: `field|create`
# Delete field
Source: https://help.teable.ai/en/api-reference/field/delete-field
/swagger.json delete /table/{tableId}/field/{fieldId}
Permanently remove a field from the specified table
Required token scopes: `field|delete`
# Delete multiple fields
Source: https://help.teable.ai/en/api-reference/field/delete-multiple-fields
/swagger.json delete /table/{tableId}/field
Permanently remove multiple fields from the specified table
Required token scopes: `field|delete`
# Duplicate field
Source: https://help.teable.ai/en/api-reference/field/duplicate-field
/swagger.json post /table/{tableId}/field/{fieldId}/duplicate
Duplicate field
Required token scopes: `field|create`
# Get a field
Source: https://help.teable.ai/en/api-reference/field/get-a-field
/swagger.json get /table/{tableId}/field/{fieldId}
Retrieve detailed information about a specific field by its ID
Required token scopes: `field|read`
# Get linked records for filter
Source: https://help.teable.ai/en/api-reference/field/get-linked-records-for-filter
/swagger.json get /table/{tableId}/field/{fieldId}/filter-link-records
Retrieve associated records that match the view filter configuration for a linked field
Required token scopes: `field|update`
# Get table fielddelete references
Source: https://help.teable.ai/en/api-reference/field/get-table-fielddelete-references
/swagger.json get /table/{tableId}/field/delete-references
Get resources that reference the given fields (for delete impact analysis)
Required token scopes: `field|delete`
# List fields
Source: https://help.teable.ai/en/api-reference/field/list-fields
/swagger.json get /table/{tableId}/field
Retrieve a list of fields in a table with optional filtering
Required token scopes: `field|read`
# Stop auto-fill a field by AI
Source: https://help.teable.ai/en/api-reference/field/stop-auto-fill-a-field-by-ai
/swagger.json post /table/{tableId}/field/{fieldId}/stop-fill
Stop auto-fill a field by AI
Required token scopes: `record|update`
# Update field
Source: https://help.teable.ai/en/api-reference/field/update-field
/swagger.json patch /table/{tableId}/field/{fieldId}
Update common properties of a field (name, description, dbFieldName). For other property changes, use the convert field API
Required token scopes: `field|update`
# Check cross-space affected fields for table duplicate
Source: https://help.teable.ai/en/api-reference/table/check-cross-space-affected-fields-for-table-duplicate
/swagger.json get /base/{baseId}/table/{tableId}/duplicate-check
Check the cross-space link/lookup/rollup fields that would be converted if this table were duplicated.
Required token scopes: `table|read`
# Create table
Source: https://help.teable.ai/en/api-reference/table/create-table
/swagger.json post /base/{baseId}/table/
Create a new table in the specified project with customizable fields, views, and initial records. Default configurations will be applied if not specified.
Required token scopes: `table|create`
# Delete table
Source: https://help.teable.ai/en/api-reference/table/delete-table
/swagger.json delete /base/{baseId}/table/{tableId}
Move a table to trash. The table can be restored within the retention period.
Required token scopes: `table|delete`
# Get table details
Source: https://help.teable.ai/en/api-reference/table/get-table-details
/swagger.json get /base/{baseId}/table/{tableId}
Retrieve detailed information about a specific table, including its schema, name, and configuration.
Required token scopes: `table|read`
# List tables
Source: https://help.teable.ai/en/api-reference/table/list-tables
/swagger.json get /base/{baseId}/table
Retrieve a list of all tables in the specified project, including their basic information and configurations.
Required token scopes: `table|read`
# Permanently delete table
Source: https://help.teable.ai/en/api-reference/table/permanently-delete-table
/swagger.json delete /base/{baseId}/table/{tableId}/permanent
Permanently delete a table and all its data. This action cannot be undone.
Required token scopes: `table|delete`
# Update table description
Source: https://help.teable.ai/en/api-reference/table/update-table-description
/swagger.json put /base/{baseId}/table/{tableId}/description
Update or remove the description of a table. Set to null to remove the description.
Required token scopes: `table|update`
# Update table name
Source: https://help.teable.ai/en/api-reference/table/update-table-name
/swagger.json put /base/{baseId}/table/{tableId}/name
Update the display name of a table. This will not affect the underlying database table name.
Required token scopes: `table|update`
# Update table order
Source: https://help.teable.ai/en/api-reference/table/update-table-order
/swagger.json put /base/{baseId}/table/{tableId}/order
Update the display order of a table in the project. This affects the order in which tables are shown in the UI.
Required token scopes: `table|update`
# Update table tcon
Source: https://help.teable.ai/en/api-reference/table/update-table-tcon
/swagger.json put /base/{baseId}/table/{tableId}/icon
Update or remove the emoji icon of a table. The icon must be a valid emoji character. Set to null to remove the icon.
Required token scopes: `table|update`
# Aggregate a contiguous row range for grid selection
Source: https://help.teable.ai/en/api-reference/aggregation/aggregate-a-contiguous-row-range-for-grid-selection
/swagger.json get /table/{tableId}/aggregation/selection
Same shape as GET /aggregation, plus skip/take to scope the aggregation to a contiguous slice [skip, skip+take) of the view-ordered rows. Used by the grid selection statistic chip when the selection covers rows not loaded on the client.
Required token scopes: `record|read`
# Get aggregated statistics
Source: https://help.teable.ai/en/api-reference/aggregation/get-aggregated-statistics
/swagger.json get /table/{tableId}/aggregation
Returns statistical aggregations of table data based on specified functions and grouping criteria
Required token scopes: `record|read`
# Get daily calendar data
Source: https://help.teable.ai/en/api-reference/aggregation/get-daily-calendar-data
/swagger.json get /table/{tableId}/aggregation/calendar-daily-collection
Returns records and count distribution across dates based on specified date range and fields
Required token scopes: `record|read`
# Get group points
Source: https://help.teable.ai/en/api-reference/aggregation/get-group-points
/swagger.json get /table/{tableId}/aggregation/group-points
Returns the distribution and count of records across different group points in the view
Required token scopes: `record|read`
# Get record index
Source: https://help.teable.ai/en/api-reference/aggregation/get-record-index
/swagger.json get /table/{tableId}/aggregation/record-index
Returns the 0-based row index of a specific record in the current query context (respecting view filters, sort order, link filters)
Required token scopes: `record|read`
# Get record indices for search
Source: https://help.teable.ai/en/api-reference/aggregation/get-record-indices-for-search
/swagger.json get /table/{tableId}/aggregation/search-index
Returns the indices and record IDs of records matching the search criteria
Required token scopes: `record|read`
# Get task status collection
Source: https://help.teable.ai/en/api-reference/aggregation/get-task-status-collection
/swagger.json get /table/{tableId}/aggregation/task-status-collection
Returns records and count distribution across task status based on specified date range and fields
Required token scopes: `record|read`
# Get total count of search
Source: https://help.teable.ai/en/api-reference/aggregation/get-total-count-of-search
/swagger.json get /table/{tableId}/aggregation/search-count
Returns the total count of records matching the specified search criteria and filters
Required token scopes: `record|read`
# Get total row count
Source: https://help.teable.ai/en/api-reference/aggregation/get-total-row-count
/swagger.json get /table/{tableId}/aggregation/row-count
Returns the total number of rows in a view based on applied filters and criteria
Required token scopes: `record|read`
# Archive records
Source: https://help.teable.ai/en/api-reference/archive/archive-records
/swagger.json post /table/{tableId}/record/archive
Move records out of the table into the archive. Archived records are read-only and can be restored from the archive.
Required token scopes: `record|archive`
# Archive records with SSE progress
Source: https://help.teable.ai/en/api-reference/archive/archive-records-with-sse-progress
/swagger.json post /table/{tableId}/record/archive-stream
Required token scopes: `record|archive`
# Clear table archive
Source: https://help.teable.ai/en/api-reference/archive/clear-table-archive
/swagger.json delete /table/{tableId}/archive/reset
Permanently delete all archive snapshots of the table. This cannot be undone.
Required token scopes: `table|archive_manage`
# Export archived records as CSV with SSE progress
Source: https://help.teable.ai/en/api-reference/archive/export-archived-records-as-csv-with-sse-progress
/swagger.json post /table/{tableId}/archive/export-stream
Required token scopes: `table|archive_read`, `table|export`
# Get archived records
Source: https://help.teable.ai/en/api-reference/archive/get-archived-records
/swagger.json get /table/{tableId}/archive/items
List archived records of a table with fixed-dimension filters (archived time, record created time/by, record last modified by) and cursor pagination.
Required token scopes: `table|archive_read`
# Permanently delete archived records
Source: https://help.teable.ai/en/api-reference/archive/permanently-delete-archived-records
/swagger.json delete /table/{tableId}/archive/items
Permanently delete archive snapshots. This cannot be undone.
Required token scopes: `table|archive_manage`
# Restore archived records
Source: https://help.teable.ai/en/api-reference/archive/restore-archived-records
/swagger.json post /table/{tableId}/archive/restore
Rebuild archived records back into the table from their archive snapshots.
Required token scopes: `table|archive_manage`
# Delete space billingsubscription
Source: https://help.teable.ai/en/api-reference/billing/delete-space-billingsubscription
/swagger.json delete /space/{spaceId}/billing/subscription
Cancel subscription for a space
Required token scopes: `space|update`
# Get billingadd on products
Source: https://help.teable.ai/en/api-reference/billing/get-billingadd-on-products
/swagger.json get /billing/add-on-products
Get add-on products list
# Get billingall products
Source: https://help.teable.ai/en/api-reference/billing/get-billingall-products
/swagger.json get /billing/all-products
Get all products collection
# Get billingbase products
Source: https://help.teable.ai/en/api-reference/billing/get-billingbase-products
/swagger.json get /billing/base-products
Get base products list
# Get space billing
Source: https://help.teable.ai/en/api-reference/billing/get-space-billing
/swagger.json get /space/{spaceId}/billing
Get space billing details
Required token scopes: `space|update`
# Get space billingcredit detail
Source: https://help.teable.ai/en/api-reference/billing/get-space-billingcredit-detail
/swagger.json get /space/{spaceId}/billing/credit-detail
Get space credit usage detail for a billing cycle (defaults to the current one)
Required token scopes: `space|update`
# Get space billingcredit history
Source: https://help.teable.ai/en/api-reference/billing/get-space-billingcredit-history
/swagger.json get /space/{spaceId}/billing/credit-history
Get space credit history list with cursor pagination
Required token scopes: `space|update`
# Get space billingcredit summary
Source: https://help.teable.ai/en/api-reference/billing/get-space-billingcredit-summary
/swagger.json get /space/{spaceId}/billing/credit-summary
Get space credit summary
Required token scopes: `space|read`
# Get space billinginvoicebase list
Source: https://help.teable.ai/en/api-reference/billing/get-space-billinginvoicebase-list
/swagger.json get /space/{spaceId}/billing/invoice/base-list
Get paginated invoice list by spaceId
Required token scopes: `space|update`
# Get space billingmanage portal
Source: https://help.teable.ai/en/api-reference/billing/get-space-billingmanage-portal
/swagger.json get /space/{spaceId}/billing/manage-portal
Get Stripe customer portal URL for managing billing details
Required token scopes: `space|update`
# Get space billingrow count detail
Source: https://help.teable.ai/en/api-reference/billing/get-space-billingrow-count-detail
/swagger.json get /space/{spaceId}/billing/row-count-detail
Get per-project row count breakdown for a space
Required token scopes: `space|read`
# Get space billingsubscription
Source: https://help.teable.ai/en/api-reference/billing/get-space-billingsubscription
/swagger.json get /space/{spaceId}/billing/subscription
Get subscription detail by spaceId
Required token scopes: `space|update`
# Get space billingsubscriptionplan
Source: https://help.teable.ai/en/api-reference/billing/get-space-billingsubscriptionplan
/swagger.json get /space/{spaceId}/billing/subscription/plan
Retrieves the plan subscription
Required token scopes: `space|read`
# Get space billingsubscriptionscheduled change
Source: https://help.teable.ai/en/api-reference/billing/get-space-billingsubscriptionscheduled-change
/swagger.json get /space/{spaceId}/billing/subscription/scheduled-change
Get the base-plan change scheduled for the end of the current billing period
Required token scopes: `space|update`
# Get space billingsubscriptionsummary
Source: https://help.teable.ai/en/api-reference/billing/get-space-billingsubscriptionsummary
/swagger.json get /space/{spaceId}/billing/subscription/summary
Retrieves a summary of subscription information for a space
Required token scopes: `space|read`
# Post space billingattachment sizerefresh
Source: https://help.teable.ai/en/api-reference/billing/post-space-billingattachment-sizerefresh
/swagger.json post /space/{spaceId}/billing/attachment-size/refresh
Recalculate the attachment storage usage for a space
Required token scopes: `space|update`
# Post space billingrow countrefresh
Source: https://help.teable.ai/en/api-reference/billing/post-space-billingrow-countrefresh
/swagger.json post /space/{spaceId}/billing/row-count/refresh
Recount row usage for a space and stream progress via SSE
Required token scopes: `space|update`
# Post space billingsubscriptioncheckout
Source: https://help.teable.ai/en/api-reference/billing/post-space-billingsubscriptioncheckout
/swagger.json post /space/{spaceId}/billing/subscription/checkout
Get checkout session url for a space
Required token scopes: `space|update`
# Post space billingsubscriptionperiod end changerevert
Source: https://help.teable.ai/en/api-reference/billing/post-space-billingsubscriptionperiod-end-changerevert
/swagger.json post /space/{spaceId}/billing/subscription/period-end-change/revert
Undo what is pending for the end of the current billing period — a scheduled plan change, a cancellation, or both — so the subscription keeps renewing as it is
Required token scopes: `space|update`
# Delete comment
Source: https://help.teable.ai/en/api-reference/comment/delete-comment-
/swagger.json delete /comment/{tableId}/{recordId}/{commentId}
delete record comment
Required token scopes: `record|comment`
# Delete comment reaction
Source: https://help.teable.ai/en/api-reference/comment/delete-comment--reaction
/swagger.json delete /comment/{tableId}/{recordId}/{commentId}/reaction
delete record comment reaction
Required token scopes: `record|comment`
# Get comment
Source: https://help.teable.ai/en/api-reference/comment/get-comment-
/swagger.json get /comment/{tableId}/{recordId}/{commentId}
Get record comment detail
Required token scopes: `record|read`
# Get comment list
Source: https://help.teable.ai/en/api-reference/comment/get-comment-list
/swagger.json get /comment/{tableId}/{recordId}/list
Get record comment list
Required token scopes: `record|read`
# Patch comment
Source: https://help.teable.ai/en/api-reference/comment/patch-comment-
/swagger.json patch /comment/{tableId}/{recordId}/{commentId}
update record comment
Required token scopes: `record|comment`
# Patch comment reaction
Source: https://help.teable.ai/en/api-reference/comment/patch-comment--reaction
/swagger.json patch /comment/{tableId}/{recordId}/{commentId}/reaction
create record comment reaction
Required token scopes: `record|comment`
# Post comment create
Source: https://help.teable.ai/en/api-reference/comment/post-comment-create
/swagger.json post /comment/{tableId}/{recordId}/create
create record comment
Required token scopes: `record|comment`
# Delete project connection
Source: https://help.teable.ai/en/api-reference/db-connection/delete-base-connection
/swagger.json delete /base/{baseId}/connection
Delete a db connection
# Get project connection
Source: https://help.teable.ai/en/api-reference/db-connection/get-base-connection
/swagger.json get /base/{baseId}/connection
Get db connection info
# Post project connection
Source: https://help.teable.ai/en/api-reference/db-connection/post-base-connection
/swagger.json post /base/{baseId}/connection
Create a db connection url
# Get export
Source: https://help.teable.ai/en/api-reference/export/get-export
/swagger.json get /export/{tableId}
export csv from table
Required token scopes: `table|export`
# Create tables from a file with SSE progress
Source: https://help.teable.ai/en/api-reference/import/create-tables-from-a-file-with-sse-progress
/swagger.json post /import/{baseId}/stream
Create one table per worksheet and stream realtime import progress for each committed row batch.
Required token scopes: `base|table_import`
# Get importanalyze
Source: https://help.teable.ai/en/api-reference/import/get-importanalyze
/swagger.json get /import/analyze
Get a column info from analyze sheet
# Import records into an existing table with SSE progress
Source: https://help.teable.ai/en/api-reference/import/import-records-into-an-existing-table-with-sse-progress
/swagger.json patch /import/{baseId}/{tableId}/stream
Append records from a file into an existing table and stream realtime import progress for each committed row batch.
Required token scopes: `table|import`
# Patch import
Source: https://help.teable.ai/en/api-reference/import/patch-import-
/swagger.json patch /import/{baseId}/{tableId}
import table inplace
Required token scopes: `table|import`
# Post import
Source: https://help.teable.ai/en/api-reference/import/post-import
/swagger.json post /import/{baseId}
create table from file
Required token scopes: `base|table_import`
# Delete table field plan
Source: https://help.teable.ai/en/api-reference/plan/delete-table-field-plan
/swagger.json delete /table/{tableId}/field/{fieldId}/plan
Generate calculation plan for deleting the field
Required token scopes: `field|delete`
# Get table field plan
Source: https://help.teable.ai/en/api-reference/plan/get-table-field-plan
/swagger.json get /table/{tableId}/field/{fieldId}/plan
Generate calculation plan for the field
Required token scopes: `field|read`
# Post table fieldplan
Source: https://help.teable.ai/en/api-reference/plan/post-table-fieldplan
/swagger.json post /table/{tableId}/field/plan
Generate calculation plan for creating the field
Required token scopes: `field|create`
# Put table field plan
Source: https://help.teable.ai/en/api-reference/plan/put-table-field-plan
/swagger.json put /table/{tableId}/field/{fieldId}/plan
Generate calculation plan for converting the field
Required token scopes: `field|update`
# Clear selected range content
Source: https://help.teable.ai/en/api-reference/selection/clear-selected-range-content
/swagger.json patch /table/{tableId}/selection/clear
Remove all content from the selected table range
Required token scopes: `record|update`
# Clear selected range content with SSE progress
Source: https://help.teable.ai/en/api-reference/selection/clear-selected-range-content-with-sse-progress
/swagger.json patch /table/{tableId}/selection/clear-stream
Clear selected table cells and stream realtime progress for each committed chunk.
Required token scopes: `record|update`
# Clear selected records and fields by id
Source: https://help.teable.ai/en/api-reference/selection/clear-selected-records-and-fields-by-id
/swagger.json patch /table/{tableId}/selection/clear-by-id
Clear selected cells using record and field identifiers instead of row ranges.
Required token scopes: `record|update`
# Clear selected records and fields by id with SSE progress
Source: https://help.teable.ai/en/api-reference/selection/clear-selected-records-and-fields-by-id-with-sse-progress
/swagger.json patch /table/{tableId}/selection/clear-by-id-stream
Clear selected cells by id and stream realtime progress.
Required token scopes: `record|update`
# Copy selected table content
Source: https://help.teable.ai/en/api-reference/selection/copy-selected-table-content
/swagger.json get /table/{tableId}/selection/copy
Copy content from selected table ranges including headers if specified
Required token scopes: `record|read`, `record|copy`
# Copy selected table content by record and field ids
Source: https://help.teable.ai/en/api-reference/selection/copy-selected-table-content-by-record-and-field-ids
/swagger.json post /table/{tableId}/selection/copy-by-id
Copy content using record and field identifiers instead of row ranges.
Required token scopes: `record|read`, `record|copy`
# Delete selected range data
Source: https://help.teable.ai/en/api-reference/selection/delete-selected-range-data
/swagger.json delete /table/{tableId}/selection/delete
Delete records or fields within the selected table range
Required token scopes: `record|delete`
# Delete selected range data with SSE progress
Source: https://help.teable.ai/en/api-reference/selection/delete-selected-range-data-with-sse-progress
/swagger.json get /table/{tableId}/selection/delete-stream
Delete records within the selected table range and stream realtime progress. Each successful chunk commits independently; disconnecting the client will not roll back already committed chunks.
Required token scopes: `record|delete`
# Delete selected records by id
Source: https://help.teable.ai/en/api-reference/selection/delete-selected-records-by-id
/swagger.json post /table/{tableId}/selection/delete-by-id
Delete selected records using record identifiers or a query scope with exclusions.
Required token scopes: `record|delete`
# Delete selected records by ids with SSE progress
Source: https://help.teable.ai/en/api-reference/selection/delete-selected-records-by-ids-with-sse-progress
/swagger.json patch /table/{tableId}/selection/delete-by-id-stream
Required token scopes: `record|delete`
# Duplicate selected records with SSE progress
Source: https://help.teable.ai/en/api-reference/selection/duplicate-selected-records-with-sse-progress
/swagger.json get /table/{tableId}/selection/duplicate-stream
Duplicate records within the selected table range and stream realtime progress. Each successful chunk commits independently; disconnecting the client will not roll back already committed chunks.
Required token scopes: `record|read`, `record|create`
# Get ids from range
Source: https://help.teable.ai/en/api-reference/selection/get-ids-from-range
/swagger.json get /table/{tableId}/selection/range-to-id
Retrieve record and field identifiers based on the selected range coordinates in a table
Required token scopes: `record|read`
# Paste content by record and field ids with SSE progress
Source: https://help.teable.ai/en/api-reference/selection/paste-content-by-record-and-field-ids-with-sse-progress
/swagger.json patch /table/{tableId}/selection/paste-by-id-stream
Required token scopes: `record|update`
# Paste content by selected record and field ids
Source: https://help.teable.ai/en/api-reference/selection/paste-content-by-selected-record-and-field-ids
/swagger.json patch /table/{tableId}/selection/paste-by-id
Apply paste content using record and field identifiers instead of row ranges.
Required token scopes: `record|update`
# Paste content into selected range
Source: https://help.teable.ai/en/api-reference/selection/paste-content-into-selected-range
/swagger.json patch /table/{tableId}/selection/paste
Apply paste operation to insert content into the selected table range
Required token scopes: `record|update`
# Paste content with SSE progress
Source: https://help.teable.ai/en/api-reference/selection/paste-content-with-sse-progress
/swagger.json patch /table/{tableId}/selection/paste-stream
Apply paste operation to the selected table range and stream realtime progress for each committed chunk.
Required token scopes: `record|update`
# Preview paste operation results
Source: https://help.teable.ai/en/api-reference/selection/preview-paste-operation-results
/swagger.json patch /table/{tableId}/selection/temporaryPaste
Preview the results of a paste operation without applying changes to the table
Required token scopes: `record|read`
# Button click
Source: https://help.teable.ai/en/api-reference/share/button-click
/swagger.json post /share/{shareId}/view/record/{recordId}/{fieldId}/button-click
Button click
# Get share view
Source: https://help.teable.ai/en/api-reference/share/get-share-view
/swagger.json get /share/{shareId}/view
get share view info
# Get share viewaggregations
Source: https://help.teable.ai/en/api-reference/share/get-share-viewaggregations
/swagger.json get /share/{shareId}/view/aggregations
Get share view aggregations
# Get share viewcalendar daily collection
Source: https://help.teable.ai/en/api-reference/share/get-share-viewcalendar-daily-collection
/swagger.json get /share/{shareId}/view/calendar-daily-collection
Get calendar daily collection for the share view
# Get share viewcollaborators
Source: https://help.teable.ai/en/api-reference/share/get-share-viewcollaborators
/swagger.json get /share/{shareId}/view/collaborators
View collaborators in a view with a user field selector.
# Get share viewcopy
Source: https://help.teable.ai/en/api-reference/share/get-share-viewcopy
/swagger.json get /share/{shareId}/view/copy
Copy operations in Share view
# Get share viewgroup points
Source: https://help.teable.ai/en/api-reference/share/get-share-viewgroup-points
/swagger.json get /share/{shareId}/view/group-points
Get group points for the share view
# Get share viewlink records
Source: https://help.teable.ai/en/api-reference/share/get-share-viewlink-records
/swagger.json get /share/{shareId}/view/link-records
In a view with a field selector, link the records list of the associated field selector to get the. Linking the desired ones inside the share view should fetch the ones that have already been selected.
# Get share viewrecords
Source: https://help.teable.ai/en/api-reference/share/get-share-viewrecords
/swagger.json get /share/{shareId}/view/records
Get records for the share view
# Get share viewrow count
Source: https://help.teable.ai/en/api-reference/share/get-share-viewrow-count
/swagger.json get /share/{shareId}/view/row-count
Get row count for the share view
# Get share viewsearch count
Source: https://help.teable.ai/en/api-reference/share/get-share-viewsearch-count
/swagger.json get /share/{shareId}/view/search-count
Get share view search result count with query
# Get share viewsearch index
Source: https://help.teable.ai/en/api-reference/share/get-share-viewsearch-index
/swagger.json get /share/{shareId}/view/search-index
Get share view record index with search query
# Post share viewauth
Source: https://help.teable.ai/en/api-reference/share/post-share-viewauth
/swagger.json post /share/{shareId}/view/auth
share view auth password
# Post share viewform submit
Source: https://help.teable.ai/en/api-reference/share/post-share-viewform-submit
/swagger.json post /share/{shareId}/view/form-submit
share form view submit new record
# Resolve a short link
Source: https://help.teable.ai/en/api-reference/short-link/resolve-a-short-link
/swagger.json get /short-link/{code}
Resolve a short link code to its target path
# Duplicate a table
Source: https://help.teable.ai/en/api-reference/table/duplicate-a-table
/swagger.json post /base/{baseId}/table/{tableId}/duplicate
Duplicate a table
Required token scopes: `table|create`
# Get abnormal indexes
Source: https://help.teable.ai/en/api-reference/table/get-abnormal-indexes
/swagger.json get /base/{baseId}/table/{tableId}/abnormal-index
Retrieve a list of abnormal database indexes for a specific table by index type. This helps identify potential performance or maintenance issues.
Required token scopes: `table|read`
# Get activated index
Source: https://help.teable.ai/en/api-reference/table/get-activated-index
/swagger.json get /base/{baseId}/table/{tableId}/activated-index
Get the activated index of a table
Required token scopes: `table|read`
# Get base table delete references
Source: https://help.teable.ai/en/api-reference/table/get-base-table-delete-references
/swagger.json get /base/{baseId}/table/{tableId}/delete-references
Get fields on other tables that will be converted or errored when this table is deleted
Required token scopes: `table|read`
# Get default view id
Source: https://help.teable.ai/en/api-reference/table/get-default-view-id
/swagger.json get /base/{baseId}/table/{tableId}/default-view-id
Get default view id
Required token scopes: `table|read`
# Get table permissions
Source: https://help.teable.ai/en/api-reference/table/get-table-permissions
/swagger.json get /base/{baseId}/table/{tableId}/permission
Retrieve the current user's permissions for a table, including access rights for table operations, views, records, and fields.
Required token scopes: `table|read`
# Get table search vector status
Source: https://help.teable.ai/en/api-reference/table/get-table-search-vector-status
/swagger.json get /base/{baseId}/table/{tableId}/search-vector-status
Returns the read-only generated full-text search status for a table
Required token scopes: `table|read`
# Repair table index
Source: https://help.teable.ai/en/api-reference/table/repair-table-index
/swagger.json patch /base/{baseId}/table/{tableId}/index/repair
Repair table index
Required token scopes: `table|update`
# Toggle table index
Source: https://help.teable.ai/en/api-reference/table/toggle-table-index
/swagger.json post /base/{baseId}/table/{tableId}/index
Toggle table index
Required token scopes: `table|update`
# Update db table name
Source: https://help.teable.ai/en/api-reference/table/update-db-table-name
/swagger.json put /base/{baseId}/table/{tableId}/db-table-name
Update the physical database table name. Must be 1-63 characters, start with letter or underscore, contain only letters, numbers and underscore, and be unique within the project.
Required token scopes: `table|update`
# Get project usage
Source: https://help.teable.ai/en/api-reference/usage/get-base-usage
/swagger.json get /base/{baseId}/usage
Get usage information for the project
# Get instanceusage
Source: https://help.teable.ai/en/api-reference/usage/get-instanceusage
/swagger.json get /instance/usage
Get usage information for the instance
# Get space usage
Source: https://help.teable.ai/en/api-reference/usage/get-space-usage
/swagger.json get /space/{spaceId}/usage
Get usage information for the space
Required token scopes: `space|read`
# Get aiconfig
Source: https://help.teable.ai/en/api-reference/ai/get--aiconfig
/swagger.json get /{baseId}/ai/config
Get the configuration of ai, including instance and space configuration
Required token scopes: `base|read`
# Get aidisable ai actions
Source: https://help.teable.ai/en/api-reference/ai/get--aidisable-ai-actions
/swagger.json get /{baseId}/ai/disable-ai-actions
Get the disable ai actions
Required token scopes: `base|read`
# Post api aigenerate
Source: https://help.teable.ai/en/api-reference/ai/post-api-aigenerate
/swagger.json post /api/{baseId}/ai/generate
Generate AI text (non-streaming)
Required token scopes: `base|read`
# Post api aigenerate stream
Source: https://help.teable.ai/en/api-reference/ai/post-api-aigenerate-stream
/swagger.json post /api/{baseId}/ai/generate-stream
Generate ai stream
Required token scopes: `base|read`
# Delete project workflow
Source: https://help.teable.ai/en/api-reference/automation/delete-base-workflow
/swagger.json delete /base/{baseId}/workflow/{workflowId}
delete a automation workflow
# Delete project workflow action
Source: https://help.teable.ai/en/api-reference/automation/delete-base-workflow-action
/swagger.json delete /base/{baseId}/workflow/{workflowId}/action/{actionId}
delete a automation workflow action
# Delete project workflow logic
Source: https://help.teable.ai/en/api-reference/automation/delete-base-workflow-logic
/swagger.json delete /base/{baseId}/workflow/{workflowId}/logic/{logicId}
delete a automation workflow logic
# Get project workflow
Source: https://help.teable.ai/en/api-reference/automation/get-base-workflow
/swagger.json get /base/{baseId}/workflow/{workflowId}
get a automation workflow
# Get project workflow 1
Source: https://help.teable.ai/en/api-reference/automation/get-base-workflow-1
/swagger.json get /base/{baseId}/workflow
get automation workflow list in project
# Get project workflow action script input
Source: https://help.teable.ai/en/api-reference/automation/get-base-workflow-action-script-input
/swagger.json get /base/{baseId}/workflow/{workflowId}/action/{actionId}/script-input
Get script integrations for a workflow action
# Get project workflow active snapshot
Source: https://help.teable.ai/en/api-reference/automation/get-base-workflow-active-snapshot
/swagger.json get /base/{baseId}/workflow/{workflowId}/active-snapshot
Get the currently active (published) snapshot of a workflow. Returns the version that is actually running, as opposed to the draft version returned by getWorkflow.
# Get project workflow run
Source: https://help.teable.ai/en/api-reference/automation/get-base-workflow-run
/swagger.json get /base/{baseId}/workflow/{workflowId}/run/{runId}
get automation workflow run list
# Get project workflow run 1
Source: https://help.teable.ai/en/api-reference/automation/get-base-workflow-run-1
/swagger.json get /base/{baseId}/workflow/{workflowId}/run
get automation workflow run history list
# Get project workflow runsummary
Source: https://help.teable.ai/en/api-reference/automation/get-base-workflow-runsummary
/swagger.json get /base/{baseId}/workflow/{workflowId}/run/summary
get automation workflow run summary statistics
# Get base workflow trigger list mailboxes
Source: https://help.teable.ai/en/api-reference/automation/get-base-workflow-trigger-list-mailboxes
/swagger.json get /base/{baseId}/workflow/{workflowId}/trigger/{triggerId}/list-mailboxes
List available mailbox folders for the configured email connection
Required token scopes: `automation|update`
# Post project workflow
Source: https://help.teable.ai/en/api-reference/automation/post-base-workflow
/swagger.json post /base/{baseId}/workflow
Create a automation workflow
# Post project workflow action
Source: https://help.teable.ai/en/api-reference/automation/post-base-workflow-action
/swagger.json post /base/{baseId}/workflow/{workflowId}/action
Create a automation workflow action
# Post project workflow action duplicate
Source: https://help.teable.ai/en/api-reference/automation/post-base-workflow-action-duplicate
/swagger.json post /base/{baseId}/workflow/{workflowId}/action/{actionId}/duplicate
duplicate a automation workflow action
# Post project workflow logic
Source: https://help.teable.ai/en/api-reference/automation/post-base-workflow-logic
/swagger.json post /base/{baseId}/workflow/{workflowId}/logic
Create a automation workflow logic
# Post base workflow run rerun
Source: https://help.teable.ai/en/api-reference/automation/post-base-workflow-run-rerun
/swagger.json post /base/{baseId}/workflow/{workflowId}/run/{runId}/rerun
rerun a failed automation workflow run
Required token scopes: `automation|update`
# Post base workflow run rerunplan
Source: https://help.teable.ai/en/api-reference/automation/post-base-workflow-run-rerunplan
/swagger.json post /base/{baseId}/workflow/{workflowId}/run/{runId}/rerun/plan
Check whether a failed run supports resume-from-step rerun
Required token scopes: `automation|update`
# Post project workflow trigger
Source: https://help.teable.ai/en/api-reference/automation/post-base-workflow-trigger
/swagger.json post /base/{baseId}/workflow/{workflowId}/trigger
Create a automation workflow trigger
# Post project workflow trigger generate webhook token
Source: https://help.teable.ai/en/api-reference/automation/post-base-workflow-trigger-generate-webhook-token
/swagger.json post /base/{baseId}/workflow/{workflowId}/trigger/{triggerId}/generate-webhook-token
Generate a new webhook token for the trigger
# Put project workflow
Source: https://help.teable.ai/en/api-reference/automation/put-base-workflow
/swagger.json put /base/{baseId}/workflow/{workflowId}
update a automation workflow
# Put project workflow action
Source: https://help.teable.ai/en/api-reference/automation/put-base-workflow-action
/swagger.json put /base/{baseId}/workflow/{workflowId}/action/{actionId}
update a automation workflow action
# Put project workflow active
Source: https://help.teable.ai/en/api-reference/automation/put-base-workflow-active
/swagger.json put /base/{baseId}/workflow/{workflowId}/active
active or inactive a automation workflow
# Put project workflow logic
Source: https://help.teable.ai/en/api-reference/automation/put-base-workflow-logic
/swagger.json put /base/{baseId}/workflow/{workflowId}/logic/{logicId}
update a automation workflow logic
# Put project workflow trigger
Source: https://help.teable.ai/en/api-reference/automation/put-base-workflow-trigger
/swagger.json put /base/{baseId}/workflow/{workflowId}/trigger/{triggerId}
update a automation workflow trigger
# Delete project node
Source: https://help.teable.ai/en/api-reference/base-node/delete-base-node
/swagger.json delete /base/{baseId}/node/{nodeId}
Delete a node from a project by its ID.
# Permanently delete project node
Source: https://help.teable.ai/en/api-reference/base-node/delete-base-node-permanent
/swagger.json delete /base/{baseId}/node/{nodeId}/permanent
Permanently delete a node from a project by its ID.
# Delete project folder
Source: https://help.teable.ai/en/api-reference/base-node/delete-base-nodefolder
/swagger.json delete /base/{baseId}/node/folder/{folderId}
Delete a folder from a project and move its children to the parent.
# Get project node
Source: https://help.teable.ai/en/api-reference/base-node/get-base-node
/swagger.json get /base/{baseId}/node/{nodeId}
Retrieve a node in a project by its ID.
# List project nodes
Source: https://help.teable.ai/en/api-reference/base-node/get-base-nodelist
/swagger.json get /base/{baseId}/node/list
Retrieve a flat list of nodes in a project.
# Get project node tree
Source: https://help.teable.ai/en/api-reference/base-node/get-base-nodetree
/swagger.json get /base/{baseId}/node/tree
Retrieve the node hierarchy and maximum folder depth for a project.
# Rename project folder
Source: https://help.teable.ai/en/api-reference/base-node/patch-base-nodefolder
/swagger.json patch /base/{baseId}/node/folder/{folderId}
Rename a folder in a project.
# Create project node
Source: https://help.teable.ai/en/api-reference/base-node/post-base-node
/swagger.json post /base/{baseId}/node
Create a node in a project hierarchy.
# Duplicate project node
Source: https://help.teable.ai/en/api-reference/base-node/post-base-node-duplicate
/swagger.json post /base/{baseId}/node/{nodeId}/duplicate
Create a copy of a node in a project.
# Create project folder
Source: https://help.teable.ai/en/api-reference/base-node/post-base-nodefolder
/swagger.json post /base/{baseId}/node/folder
Create a folder in a project hierarchy.
# Update project node
Source: https://help.teable.ai/en/api-reference/base-node/put-base-node
/swagger.json put /base/{baseId}/node/{nodeId}
Update a node in a project by its ID.
# Move project node
Source: https://help.teable.ai/en/api-reference/base-node/put-base-node-move
/swagger.json put /base/{baseId}/node/{nodeId}/move
Move or reorder a node within a project hierarchy.
# Delete project share link
Source: https://help.teable.ai/en/api-reference/base-share/delete-base-share
/swagger.json delete /base/{baseId}/share/{shareId}
Delete a project share link by its ID.
# List shared project node IDs
Source: https://help.teable.ai/en/api-reference/base-share/get-base-share
/swagger.json get /base/{baseId}/share
List the IDs of shared nodes in a project.
# Get project share by node
Source: https://help.teable.ai/en/api-reference/base-share/get-base-sharenode
/swagger.json get /base/{baseId}/share/node/{nodeId}
Retrieve the share link settings for a node in a project.
# Get shared project
Source: https://help.teable.ai/en/api-reference/base-share/get-share-base
/swagger.json get /share/{shareId}/base
Retrieve shared project information using a share link ID.
# Update project share link
Source: https://help.teable.ai/en/api-reference/base-share/patch-base-share
/swagger.json patch /base/{baseId}/share/{shareId}
Update the settings of a project share link.
# Create project share link
Source: https://help.teable.ai/en/api-reference/base-share/post-base-share
/swagger.json post /base/{baseId}/share
Create a project share link.
# Refresh project share link
Source: https://help.teable.ai/en/api-reference/base-share/post-base-share-refresh
/swagger.json post /base/{baseId}/share/{shareId}/refresh
Generate a new ID for a project share link.
# Authenticate shared project
Source: https://help.teable.ai/en/api-reference/base-share/post-share-baseauth
/swagger.json post /share/{shareId}/base/auth
Authenticate with a password to access a shared project.
# Copy shared project
Source: https://help.teable.ai/en/api-reference/base-share/post-share-basecopy
/swagger.json post /share/{shareId}/base/copy
Copy a shared project to the target space.
# Delete comment subscribe
Source: https://help.teable.ai/en/api-reference/comment/delete-comment-subscribe
/swagger.json delete /comment/{tableId}/{recordId}/subscribe
unsubscribe record comment
Required token scopes: `record|read`
# Get comment attachment
Source: https://help.teable.ai/en/api-reference/comment/get-comment-attachment
/swagger.json get /comment/{tableId}/{recordId}/attachment/{path}
Get record comment attachment url
Required token scopes: `record|read`
# Get comment count
Source: https://help.teable.ai/en/api-reference/comment/get-comment-count
/swagger.json get /comment/{tableId}/{recordId}/count
Get record comment count
Required token scopes: `record|read`
# Get comment subscribe
Source: https://help.teable.ai/en/api-reference/comment/get-comment-subscribe
/swagger.json get /comment/{tableId}/{recordId}/subscribe
get record comment subscribe detail
Required token scopes: `record|read`
# Post comment count
Source: https://help.teable.ai/en/api-reference/comment/post-comment-count
/swagger.json post /comment/{tableId}/count
Get comment counts for loaded records
Required token scopes: `record|read`
# Post comment subscribe
Source: https://help.teable.ai/en/api-reference/comment/post-comment-subscribe
/swagger.json post /comment/{tableId}/{recordId}/subscribe
subscribe record comment's active
Required token scopes: `record|read`
# Get integrityproject link check
Source: https://help.teable.ai/en/api-reference/integrity/get-integritybase-link-check
/swagger.json get /integrity/base/{baseId}/link-check
Check integrity of link fields in a project
# Get v2integritybase check stream
Source: https://help.teable.ai/en/api-reference/integrity/get-v2integritybase-check-stream
/swagger.json get /v2/integrity/base/{baseId}/check-stream
Stream v2 schema integrity check results for a project
Required token scopes: `base|read`
# Get v2integritybase decision
Source: https://help.teable.ai/en/api-reference/integrity/get-v2integritybase-decision
/swagger.json get /v2/integrity/base/{baseId}/decision
Resolve whether the current project should use the v2 schema integrity flow
Required token scopes: `base|read`
# Get v2integritytable check stream
Source: https://help.teable.ai/en/api-reference/integrity/get-v2integritytable-check-stream
/swagger.json get /v2/integrity/table/{tableId}/check-stream
Stream v2 schema integrity check results for a table
Required token scopes: `table|read`
# Post integrityproject link fix
Source: https://help.teable.ai/en/api-reference/integrity/post-integritybase-link-fix
/swagger.json post /integrity/base/{baseId}/link-fix
Fix integrity of link fields in a project
# Post v2integritybase repair stream
Source: https://help.teable.ai/en/api-reference/integrity/post-v2integritybase-repair-stream
/swagger.json post /v2/integrity/base/{baseId}/repair-stream
Stream v2 schema integrity repair results for a project
Required token scopes: `base|update`
# Post v2integritytable repair stream
Source: https://help.teable.ai/en/api-reference/integrity/post-v2integritytable-repair-stream
/swagger.json post /v2/integrity/table/{tableId}/repair-stream
Stream v2 schema integrity repair results for a table
Required token scopes: `table|update`
# Delete table plugin context menu
Source: https://help.teable.ai/en/api-reference/plugin-context-menu/delete-table-plugin-context-menu
/swagger.json delete /table/{tableId}/plugin-context-menu/{pluginInstallId}
Remove a plugin context menu
Required token scopes: `table|update`
# Get table plugin context menu
Source: https://help.teable.ai/en/api-reference/plugin-context-menu/get-table-plugin-context-menu
/swagger.json get /table/{tableId}/plugin-context-menu/{pluginInstallId}
Required token scopes: `table|read`
# Get table plugin context menu 1
Source: https://help.teable.ai/en/api-reference/plugin-context-menu/get-table-plugin-context-menu-1
/swagger.json get /table/{tableId}/plugin-context-menu
Required token scopes: `table|read`
# Get table plugin context menu storage
Source: https://help.teable.ai/en/api-reference/plugin-context-menu/get-table-plugin-context-menu-storage
/swagger.json get /table/{tableId}/plugin-context-menu/{pluginInstallId}/storage
Required token scopes: `table|read`
# Patch table plugin context menu rename
Source: https://help.teable.ai/en/api-reference/plugin-context-menu/patch-table-plugin-context-menu-rename
/swagger.json patch /table/{tableId}/plugin-context-menu/{pluginInstallId}/rename
Rename a plugin context menu
Required token scopes: `table|update`
# Post table plugin context menuinstall
Source: https://help.teable.ai/en/api-reference/plugin-context-menu/post-table-plugin-context-menuinstall
/swagger.json post /table/{tableId}/plugin-context-menu/install
Install a plugin context menu
Required token scopes: `table|update`
# Put table plugin context menu move
Source: https://help.teable.ai/en/api-reference/plugin-context-menu/put-table-plugin-context-menu-move
/swagger.json put /table/{tableId}/plugin-context-menu/{pluginInstallId}/move
Required token scopes: `table|update`
# Put table plugin context menu update storage
Source: https://help.teable.ai/en/api-reference/plugin-context-menu/put-table-plugin-context-menu-update-storage
/swagger.json put /table/{tableId}/plugin-context-menu/{pluginInstallId}/update-storage
Required token scopes: `table|update`
# Delete table plugin panel
Source: https://help.teable.ai/en/api-reference/plugin-panel/delete-table-plugin-panel
/swagger.json delete /table/{tableId}/plugin-panel/{pluginPanelId}
Delete a plugin panel
Required token scopes: `table|update`
# Delete table plugin panel plugin
Source: https://help.teable.ai/en/api-reference/plugin-panel/delete-table-plugin-panel-plugin
/swagger.json delete /table/{tableId}/plugin-panel/{pluginPanelId}/plugin/{pluginInstallId}
Remove a plugin from a plugin panel
Required token scopes: `table|update`
# Duplicate a dashboard installed plugin
Source: https://help.teable.ai/en/api-reference/plugin-panel/duplicate-a-dashboard-installed-plugin
/swagger.json post /table/{tableId}/plugin-panel/{pluginPanelId}/plugin/{installedId}/duplicate
Duplicate a dashboard installed plugin
Required token scopes: `table|update`
# Duplicate a plugin panel
Source: https://help.teable.ai/en/api-reference/plugin-panel/duplicate-a-plugin-panel
/swagger.json post /table/{tableId}/plugin-panel/{pluginPanelId}/duplicate
Duplicate a plugin panel
Required token scopes: `table|update`
# Get table plugin panel
Source: https://help.teable.ai/en/api-reference/plugin-panel/get-table-plugin-panel
/swagger.json get /table/{tableId}/plugin-panel/{pluginPanelId}
Get a plugin panel
Required token scopes: `table|read`
# Get table plugin panel 1
Source: https://help.teable.ai/en/api-reference/plugin-panel/get-table-plugin-panel-1
/swagger.json get /table/{tableId}/plugin-panel
Get all plugin panels
Required token scopes: `table|read`
# Get table plugin panel plugin
Source: https://help.teable.ai/en/api-reference/plugin-panel/get-table-plugin-panel-plugin
/swagger.json get /table/{tableId}/plugin-panel/{pluginPanelId}/plugin/{pluginInstallId}
Get a plugin in plugin panel
Required token scopes: `table|read`
# Patch table plugin panel layout
Source: https://help.teable.ai/en/api-reference/plugin-panel/patch-table-plugin-panel-layout
/swagger.json patch /table/{tableId}/plugin-panel/{pluginPanelId}/layout
Update the layout of a plugin panel
Required token scopes: `table|update`
# Patch table plugin panel plugin rename
Source: https://help.teable.ai/en/api-reference/plugin-panel/patch-table-plugin-panel-plugin-rename
/swagger.json patch /table/{tableId}/plugin-panel/{pluginPanelId}/plugin/{pluginInstallId}/rename
Rename a plugin in a plugin panel
Required token scopes: `table|update`
# Patch table plugin panel plugin update storage
Source: https://help.teable.ai/en/api-reference/plugin-panel/patch-table-plugin-panel-plugin-update-storage
/swagger.json patch /table/{tableId}/plugin-panel/{pluginPanelId}/plugin/{pluginInstallId}/update-storage
Update storage of a plugin in a plugin panel
Required token scopes: `table|update`
# Patch table plugin panel rename
Source: https://help.teable.ai/en/api-reference/plugin-panel/patch-table-plugin-panel-rename
/swagger.json patch /table/{tableId}/plugin-panel/{pluginPanelId}/rename
Rename a plugin panel
Required token scopes: `table|update`
# Post table plugin panel
Source: https://help.teable.ai/en/api-reference/plugin-panel/post-table-plugin-panel
/swagger.json post /table/{tableId}/plugin-panel
Create a plugin panel
Required token scopes: `table|update`
# Post table plugin panel install
Source: https://help.teable.ai/en/api-reference/plugin-panel/post-table-plugin-panel-install
/swagger.json post /table/{tableId}/plugin-panel/{pluginPanelId}/install
Install a plugin to a table plugin panel
Required token scopes: `table|update`
# Get unsubscribe
Source: https://help.teable.ai/en/api-reference/unsubscribe/get-unsubscribe
/swagger.json get /unsubscribe/{token}
Get unsubscribe information
# Get unsubscribeexport list
Source: https://help.teable.ai/en/api-reference/unsubscribe/get-unsubscribeexport-list
/swagger.json get /unsubscribe/export-list/{baseId}
Export unsubscribe list
Required token scopes: `base|update`
# Get unsubscribelist
Source: https://help.teable.ai/en/api-reference/unsubscribe/get-unsubscribelist
/swagger.json get /unsubscribe/list/{baseId}
Get paginated unsubscribe list by baseId
Required token scopes: `base|update`
# Post unsubscribe
Source: https://help.teable.ai/en/api-reference/unsubscribe/post-unsubscribe
/swagger.json post /unsubscribe/{token}
Update subscription status
# Post unsubscribeimport list
Source: https://help.teable.ai/en/api-reference/unsubscribe/post-unsubscribeimport-list
/swagger.json post /unsubscribe/import-list/{baseId}
Import unsubscribe list
Required token scopes: `base|update`
# Connect a Composio toolkit with an entered credential
Source: https://help.teable.ai/en/api-reference/user-integration/connect-a-composio-toolkit-with-an-entered-credential
/swagger.json post /user-integrations/composio/{toolkit}/connect
Hands the entered values to Composio, which verifies them and holds them. Teable stores only the resulting connected-account reference. Responds with the reconciled toolkit list.
Required token scopes: `user|integrations`
# Delete user integrations
Source: https://help.teable.ai/en/api-reference/user-integration/delete-user-integrations
/swagger.json delete /user-integrations/{integrationId}
Delete user integration
Required token scopes: `user|integrations`
# Disconnect a Composio integration
Source: https://help.teable.ai/en/api-reference/user-integration/disconnect-a-composio-integration
/swagger.json delete /user-integrations/composio/{integrationId}
Releases the authorization upstream and removes the local record.
Required token scopes: `user|integrations`
# Execute a Composio tool
Source: https://help.teable.ai/en/api-reference/user-integration/execute-a-composio-tool
/swagger.json post /user-integrations/composio/tools/execute
Run one tool as the caller, through the caller's Composio connections. The toolkit must be on the deployment allowlist.
Required token scopes: `user|integrations`
# Fields to connect a Composio toolkit with an entered credential
Source: https://help.teable.ai/en/api-reference/user-integration/fields-to-connect-a-composio-toolkit-with-an-entered-credential
/swagger.json get /user-integrations/composio/{toolkit}/auth-fields
What the user has to enter to connect the toolkit, as Composio describes it. Only for toolkits whose `needsCredential` is true.
Required token scopes: `user|integrations`
# Get user integrations
Source: https://help.teable.ai/en/api-reference/user-integration/get-user-integrations
/swagger.json get /user-integrations
Get user integration list
Required token scopes: `user|integrations`
# List Composio toolkits
Source: https://help.teable.ai/en/api-reference/user-integration/list-composio-toolkits
/swagger.json get /user-integrations/composio/toolkits
List the Composio toolkits enabled on this deployment and the caller connection status for each.
Required token scopes: `user|integrations`
# Post user integrations token
Source: https://help.teable.ai/en/api-reference/user-integration/post-user-integrations-token
/swagger.json post /user-integrations/{integrationId}/token
Get a valid access token for a user integration (auto-refreshes if expired)
Required token scopes: `user|integrations`
# Put user integrations name
Source: https://help.teable.ai/en/api-reference/user-integration/put-user-integrations-name
/swagger.json put /user-integrations/{integrationId}/name
Update user integration name
Required token scopes: `user|integrations`
# Reconcile Composio connections
Source: https://help.teable.ai/en/api-reference/user-integration/reconcile-composio-connections
/swagger.json post /user-integrations/composio/sync
Pull the caller connection state from Composio into user_integration. Call this after the user returns from a Connect Link.
Required token scopes: `user|integrations`
# Search Composio tools
Source: https://help.teable.ai/en/api-reference/user-integration/search-composio-tools
/swagger.json post /user-integrations/composio/tools/search
Discover tools for a task. Callers must never hardcode a tool slug — resolve it here first.
Required token scopes: `user|integrations`
# Start a Composio connection
Source: https://help.teable.ai/en/api-reference/user-integration/start-a-composio-connection
/swagger.json post /user-integrations/composio/{toolkit}/authorize
Returns a hosted Connect Link for the toolkit. Teable never builds a provider OAuth flow for this source.
Required token scopes: `user|integrations`
# Delete app
Source: https://help.teable.ai/en/api-reference/app/delete-app
/swagger.json delete /base/{baseId}/app/{appId}
Delete app by its ID.
Required token scopes: `app|delete`
# Disable AI proxy access for an app
Source: https://help.teable.ai/en/api-reference/app/disable-ai-proxy-access-for-an-app
/swagger.json delete /base/{baseId}/app/{appId}/integrations/ai-key
Revokes the app AI proxy api_key and clears the pointer on the app row.
Required token scopes: `app|update`
# Enable AI proxy access for an app
Source: https://help.teable.ai/en/api-reference/app/enable-ai-proxy-access-for-an-app
/swagger.json post /base/{baseId}/app/{appId}/integrations/ai-key
Provisions a long-lived AI proxy api_key for the app and returns its JWT exactly once.
Required token scopes: `app|update`
# Get an app's AI proxy access key state
Source: https://help.teable.ai/en/api-reference/app/get-an-apps-ai-proxy-access-key-state
/swagger.json get /base/{baseId}/app/{appId}/integrations/ai-key
Returns the instance-level injection switch plus the AI proxy api_key metadata for the app (null metadata when AI access is disabled).
Required token scopes: `app|update`
# Get base app chatgenerationstatus
Source: https://help.teable.ai/en/api-reference/app/get-base-app-chatgenerationstatus
/swagger.json get /base/{baseId}/app/{appId}/chat/generation/status
Get durable App Builder generation status
Required token scopes: `app|update`
# Get base app chatsandboxfilesgrant
Source: https://help.teable.ai/en/api-reference/app/get-base-app-chatsandboxfilesgrant
/swagger.json get /base/{baseId}/app/{appId}/chat/sandbox/files/grant
Issue a scoped grant (base URL + token) for direct access to the app sandbox files
Required token scopes: `app|update`
# Get base app chatsandboxfilesstorage usage
Source: https://help.teable.ai/en/api-reference/app/get-base-app-chatsandboxfilesstorage-usage
/swagger.json get /base/{baseId}/app/{appId}/chat/sandbox/files/storage-usage
Get whole-sandbox storage usage (uploads + outputs) for the app sandbox meter
Required token scopes: `app|update`
# Get base app code
Source: https://help.teable.ai/en/api-reference/app/get-base-app-code
/swagger.json get /base/{baseId}/app/{appId}/code
Download the app source code of the current version as a ZIP file (env files excluded)
Required token scopes: `app|update`
# Get project app deploystatus
Source: https://help.teable.ai/en/api-reference/app/get-base-app-deploystatus
/swagger.json get /base/{baseId}/app/{appId}/deploy/status
Get app deployment status
# Get project app export code
Source: https://help.teable.ai/en/api-reference/app/get-base-app-export-code
/swagger.json get /base/{baseId}/app/{appId}/export-code
Export app source code as a ZIP file
# Get base app files
Source: https://help.teable.ai/en/api-reference/app/get-base-app-files
/swagger.json get /base/{baseId}/app/{appId}/files
Get app source files (loaded lazily by the editor, not by the preview path)
Required token scopes: `app|update`
# Get base app site info
Source: https://help.teable.ai/en/api-reference/app/get-base-app-site-info
/swagger.json get /base/{baseId}/app/{appId}/site-info
Get the published-site metadata (title/description/favicon) of an app
Required token scopes: `app|read`
# Patch project app files
Source: https://help.teable.ai/en/api-reference/app/patch-base-app-files
/swagger.json patch /base/{baseId}/app/{appId}/files
Update app files
# Patch base app login config
Source: https://help.teable.ai/en/api-reference/app/patch-base-app-login-config
/swagger.json patch /base/{baseId}/app/{appId}/login-config
Update app login config. Backend decides whether the sandbox dev server needs a restart based on the diff.
Required token scopes: `app|update`
# Patch project app props
Source: https://help.teable.ai/en/api-reference/app/patch-base-app-props
/swagger.json patch /base/{baseId}/app/{appId}/props
Update app props
# Patch base app site info
Source: https://help.teable.ai/en/api-reference/app/patch-base-app-site-info
/swagger.json patch /base/{baseId}/app/{appId}/site-info
Update the published-site metadata (title/description/favicon) of an app
Required token scopes: `app|update`
# Patch base app system domain prefix
Source: https://help.teable.ai/en/api-reference/app/patch-base-app-system-domain-prefix
/swagger.json patch /base/{baseId}/app/{appId}/system-domain-prefix
Update app system domain prefix
Required token scopes: `app|update`
# Permanently delete app
Source: https://help.teable.ai/en/api-reference/app/permanently-delete-app
/swagger.json delete /base/{baseId}/app/{appId}/permanent
Permanently delete an app and all its data. This action cannot be undone.
Required token scopes: `app|delete`
# Post base app access linkrefresh
Source: https://help.teable.ai/en/api-reference/app/post-base-app-access-linkrefresh
/swagger.json post /base/{baseId}/app/{appId}/access-link/refresh
Refresh app access link
Required token scopes: `app|update`
# Post project app deploy
Source: https://help.teable.ai/en/api-reference/app/post-base-app-deploy
/swagger.json post /base/{baseId}/app/{appId}/deploy
Deploy app
# Post base app deploystream
Source: https://help.teable.ai/en/api-reference/app/post-base-app-deploystream
/swagger.json post /base/{baseId}/app/{appId}/deploy/stream
Deploy app and stream progress events
Required token scopes: `app|update`
# Post project app import code
Source: https://help.teable.ai/en/api-reference/app/post-base-app-import-code
/swagger.json post /base/{baseId}/app/{appId}/import-code
Import app source code from a ZIP file
# Post base app restart preview
Source: https://help.teable.ai/en/api-reference/app/post-base-app-restart-preview
/swagger.json post /base/{baseId}/app/{appId}/restart-preview
Restart the app preview
Required token scopes: `app|update`
# Post project app run
Source: https://help.teable.ai/en/api-reference/app/post-base-app-run
/swagger.json post /base/{baseId}/app/{appId}/run
Run the app code
# Post base app unpublish
Source: https://help.teable.ai/en/api-reference/app/post-base-app-unpublish
/swagger.json post /base/{baseId}/app/{appId}/unpublish
Unpublish an app by deleting all Vercel deployments. The Vercel project, env vars, and custom domain configuration are preserved so the app can be republished later.
Required token scopes: `app|update`
# Rotate an app's AI proxy access key
Source: https://help.teable.ai/en/api-reference/app/rotate-an-apps-ai-proxy-access-key
/swagger.json post /base/{baseId}/app/{appId}/integrations/ai-key/rotate
Keeps the api_key row id but replaces its sign and returns a fresh one-time JWT; the previous JWT stops validating.
Required token scopes: `app|update`
# Delete project authority matrix role
Source: https://help.teable.ai/en/api-reference/authority-matrix/delete-base-authority-matrix-role
/swagger.json delete /base/{baseId}/authority-matrix-role/{authorityMatrixRoleId}
Delete authority matrix role
# Get project authority matrix
Source: https://help.teable.ai/en/api-reference/authority-matrix/get-base-authority-matrix
/swagger.json get /base/{baseId}/authority-matrix
Get authority matrix
# Get project authority matrix role
Source: https://help.teable.ai/en/api-reference/authority-matrix/get-base-authority-matrix-role
/swagger.json get /base/{baseId}/authority-matrix-role
Get authority matrix role list
# Get project authority matrix role 1
Source: https://help.teable.ai/en/api-reference/authority-matrix/get-base-authority-matrix-role-1
/swagger.json get /base/{baseId}/authority-matrix-role/{authorityMatrixRoleId}
Get authority matrix role
# Get project authority matrix role table filter link records
Source: https://help.teable.ai/en/api-reference/authority-matrix/get-base-authority-matrix-role-table-filter-link-records
/swagger.json get /base/{baseId}/authority-matrix-role-table/{tableId}/filter-link-records
Get authority matrix table link records
# Patch project authority matrix role description
Source: https://help.teable.ai/en/api-reference/authority-matrix/patch-base-authority-matrix-role-description
/swagger.json patch /base/{baseId}/authority-matrix-role/{authorityMatrixRoleId}/description
Update authority matrix role description
# Patch project authority matrix role name
Source: https://help.teable.ai/en/api-reference/authority-matrix/patch-base-authority-matrix-role-name
/swagger.json patch /base/{baseId}/authority-matrix-role/{authorityMatrixRoleId}/name
Update authority matrix role name
# Patch project authority matrix role status
Source: https://help.teable.ai/en/api-reference/authority-matrix/patch-base-authority-matrix-role-status
/swagger.json patch /base/{baseId}/authority-matrix-role/{authorityMatrixRoleId}/status
Update authority matrix role status
# Patch project authority matrix role user
Source: https://help.teable.ai/en/api-reference/authority-matrix/patch-base-authority-matrix-role-user
/swagger.json patch /base/{baseId}/authority-matrix-role/{authorityMatrixRoleId}/user
Update authority matrix role user
# Patch project authority matrixadmin user
Source: https://help.teable.ai/en/api-reference/authority-matrix/patch-base-authority-matrixadmin-user
/swagger.json patch /base/{baseId}/authority-matrix/admin-user
Update admin user
# Patch project authority matrixstatus
Source: https://help.teable.ai/en/api-reference/authority-matrix/patch-base-authority-matrixstatus
/swagger.json patch /base/{baseId}/authority-matrix/status
Enable authority
# Post project authority matrix role
Source: https://help.teable.ai/en/api-reference/authority-matrix/post-base-authority-matrix-role
/swagger.json post /base/{baseId}/authority-matrix-role
Add authority matrix role
# Post project authority matrix role duplicate
Source: https://help.teable.ai/en/api-reference/authority-matrix/post-base-authority-matrix-role-duplicate
/swagger.json post /base/{baseId}/authority-matrix-role/{authorityMatrixRoleId}/duplicate
Duplicate authority matrix role
# Put project authority matrix
Source: https://help.teable.ai/en/api-reference/authority-matrix/put-base-authority-matrix
/swagger.json put /base/{baseId}/authority-matrix
Update authority matrix
# Put project authority matrix role
Source: https://help.teable.ai/en/api-reference/authority-matrix/put-base-authority-matrix-role
/swagger.json put /base/{baseId}/authority-matrix-role/{authorityMatrixRoleId}
Update authority matrix role
# Permanently delete workflow
Source: https://help.teable.ai/en/api-reference/automation/permanently-delete-workflow
/swagger.json delete /base/{baseId}/workflow/{workflowId}/permanent
Permanently delete a workflow and all its data. This action cannot be undone.
Required token scopes: `automation|delete`
# Post project workflow duplicate
Source: https://help.teable.ai/en/api-reference/automation/post-base-workflow-duplicate
/swagger.json post /base/{baseId}/workflow/{workflowId}/duplicate
duplicate a automation workflow
# Post project workflow filter link records
Source: https://help.teable.ai/en/api-reference/automation/post-base-workflow-filter-link-records
/swagger.json post /base/{baseId}/workflow/{tableId}/filter-link-records
get automation workflow list in project
# Post project workflow test
Source: https://help.teable.ai/en/api-reference/automation/post-base-workflow-test
/swagger.json post /base/{baseId}/workflow/{workflowId}/test/{nodeId}
test a automation workflow node
# Post project workflow test all
Source: https://help.teable.ai/en/api-reference/automation/post-base-workflow-test-all
/swagger.json post /base/{baseId}/workflow/{workflowId}/test-all
test a automation workflow all
# Put project workflow order
Source: https://help.teable.ai/en/api-reference/automation/put-base-workflow-order
/swagger.json put /base/{baseId}/workflow/{workflowId}/order
Update workflow order
# Post project chatcreate
Source: https://help.teable.ai/en/api-reference/chat/post-base-chatcreate
/swagger.json post /base/{baseId}/chat/create
Create chat
# Delete enterprise authentication
Source: https://help.teable.ai/en/api-reference/enterprise/delete-enterprise-authentication
/swagger.json delete /enterprise/{organizationId}/authentication/{id}
Delete a authentication
Required token scopes: `enterprise|update`
# Delete enterprise domain verification
Source: https://help.teable.ai/en/api-reference/enterprise/delete-enterprise-domain-verification
/swagger.json delete /enterprise/{organizationId}/domain-verification
Delete a domain verification
Required token scopes: `enterprise|update`
# Get enterprise authentication
Source: https://help.teable.ai/en/api-reference/enterprise/get-enterprise-authentication
/swagger.json get /enterprise/{organizationId}/authentication/{id}
Get a authentication
Required token scopes: `enterprise|read`
# Get enterprise authentication 1
Source: https://help.teable.ai/en/api-reference/enterprise/get-enterprise-authentication-1
/swagger.json get /enterprise/{organizationId}/authentication
Get a authentication list
Required token scopes: `enterprise|read`
# Get enterprise authenticationproviders
Source: https://help.teable.ai/en/api-reference/enterprise/get-enterprise-authenticationproviders
/swagger.json get /enterprise/{organizationId}/authentication/providers
Get providers
# Get enterprise domain verification
Source: https://help.teable.ai/en/api-reference/enterprise/get-enterprise-domain-verification
/swagger.json get /enterprise/{organizationId}/domain-verification
Get a domain verification
Required token scopes: `enterprise|read`
# Post enterprise authentication
Source: https://help.teable.ai/en/api-reference/enterprise/post-enterprise-authentication
/swagger.json post /enterprise/{organizationId}/authentication
Create a authentication
Required token scopes: `enterprise|update`
# Post enterprise domain verification
Source: https://help.teable.ai/en/api-reference/enterprise/post-enterprise-domain-verification
/swagger.json post /enterprise/{organizationId}/domain-verification
Create a domain verification
Required token scopes: `enterprise|update`
# Post enterprise domain verificationsend verification email
Source: https://help.teable.ai/en/api-reference/enterprise/post-enterprise-domain-verificationsend-verification-email
/swagger.json post /enterprise/{organizationId}/domain-verification/send-verification-email
Send email verification
Required token scopes: `enterprise|update`
# Put enterprise authentication
Source: https://help.teable.ai/en/api-reference/enterprise/put-enterprise-authentication
/swagger.json put /enterprise/{organizationId}/authentication/{id}
Update a authentication
Required token scopes: `enterprise|update`
# Delete organization department
Source: https://help.teable.ai/en/api-reference/organization/delete-organization-department
/swagger.json delete /organization/{organizationId}/department/{departmentId}
Required token scopes: `enterprise|update`
# Delete organization department user
Source: https://help.teable.ai/en/api-reference/organization/delete-organization-department-user
/swagger.json delete /organization/{organizationId}/department-user
Required token scopes: `enterprise|update`
# Delete organization user
Source: https://help.teable.ai/en/api-reference/organization/delete-organization-user
/swagger.json delete /organization/{organizationId}/user
Delete organization user
Required token scopes: `enterprise|update`
# Get instanceorganization
Source: https://help.teable.ai/en/api-reference/organization/get-instanceorganization
/swagger.json get /instance/organization
Get instance organization, only for enterprise edition
# Get organization
Source: https://help.teable.ai/en/api-reference/organization/get-organization
/swagger.json get /organization/{organizationId}
Get organization
Required token scopes: `enterprise|read`
# Get organization department
Source: https://help.teable.ai/en/api-reference/organization/get-organization-department
/swagger.json get /organization/{organizationId}/department/{departmentId}
Required token scopes: `enterprise|read`
# Get organization department 1
Source: https://help.teable.ai/en/api-reference/organization/get-organization-department-1
/swagger.json get /organization/{organizationId}/department
Required token scopes: `enterprise|read`
# Get organization department user
Source: https://help.teable.ai/en/api-reference/organization/get-organization-department-user
/swagger.json get /organization/{organizationId}/department-user
Required token scopes: `enterprise|read`
# Get organization setting
Source: https://help.teable.ai/en/api-reference/organization/get-organization-setting
/swagger.json get /organization/{organizationId}/setting
Get organization setting
Required token scopes: `enterprise|read`
# Get organization space
Source: https://help.teable.ai/en/api-reference/organization/get-organization-space
/swagger.json get /organization/{organizationId}/space
Get organization space
Required token scopes: `enterprise|read`
# Get organization user
Source: https://help.teable.ai/en/api-reference/organization/get-organization-user
/swagger.json get /organization/{organizationId}/user/{userId}
Required token scopes: `enterprise|read`
# Get organization user exists
Source: https://help.teable.ai/en/api-reference/organization/get-organization-user-exists
/swagger.json get /organization/{organizationId}/user-exists
Required token scopes: `enterprise|read`
# Get organization users
Source: https://help.teable.ai/en/api-reference/organization/get-organization-users
/swagger.json get /organization/{organizationId}/users
Get organization users
Required token scopes: `enterprise|read`
# Patch organization department move
Source: https://help.teable.ai/en/api-reference/organization/patch-organization-department-move
/swagger.json patch /organization/{organizationId}/department/{departmentId}/move
Required token scopes: `enterprise|update`
# Patch organization department rename
Source: https://help.teable.ai/en/api-reference/organization/patch-organization-department-rename
/swagger.json patch /organization/{organizationId}/department/{departmentId}/rename
Required token scopes: `enterprise|update`
# Patch organization department userdepartment
Source: https://help.teable.ai/en/api-reference/organization/patch-organization-department-userdepartment
/swagger.json patch /organization/{organizationId}/department-user/department
Required token scopes: `enterprise|update`
# Patch organization department usermove
Source: https://help.teable.ai/en/api-reference/organization/patch-organization-department-usermove
/swagger.json patch /organization/{organizationId}/department-user/move
Required token scopes: `enterprise|update`
# Patch organization user
Source: https://help.teable.ai/en/api-reference/organization/patch-organization-user
/swagger.json patch /organization/{organizationId}/user/{userId}
Update organization user
Required token scopes: `enterprise|update`
# Post organization department
Source: https://help.teable.ai/en/api-reference/organization/post-organization-department
/swagger.json post /organization/{organizationId}/department
Required token scopes: `enterprise|update`
# Post organization department user
Source: https://help.teable.ai/en/api-reference/organization/post-organization-department-user
/swagger.json post /organization/{organizationId}/department-user
Required token scopes: `enterprise|update`
# Post organization user
Source: https://help.teable.ai/en/api-reference/organization/post-organization-user
/swagger.json post /organization/{organizationId}/user
Add organization user
Required token scopes: `enterprise|update`
# Post organization user activate
Source: https://help.teable.ai/en/api-reference/organization/post-organization-user-activate
/swagger.json post /organization/{organizationId}/user/{userId}/activate
Activate organization user
Required token scopes: `enterprise|update`
# Post organization user deactivate
Source: https://help.teable.ai/en/api-reference/organization/post-organization-user-deactivate
/swagger.json post /organization/{organizationId}/user/{userId}/deactivate
Deactivate organization user
Required token scopes: `enterprise|update`
# Post organization users
Source: https://help.teable.ai/en/api-reference/organization/post-organization-users
/swagger.json post /organization/{organizationId}/users
Required token scopes: `enterprise|update`
# Put organization department scope
Source: https://help.teable.ai/en/api-reference/organization/put-organization-department-scope
/swagger.json put /organization/{organizationId}/department-scope
Update department scope
Required token scopes: `enterprise|update`
# Put organization rename
Source: https://help.teable.ai/en/api-reference/organization/put-organization-rename
/swagger.json put /organization/{organizationId}/rename
Rename organization
Required token scopes: `enterprise|update`
# Put organization update auto space
Source: https://help.teable.ai/en/api-reference/organization/put-organization-update-auto-space
/swagger.json put /organization/{organizationId}/update-auto-space
Update auto space
Required token scopes: `enterprise|update`
# Activate routine
Source: https://help.teable.ai/en/api-reference/routine/activate-routine
/swagger.json post /base/{baseId}/routine/{routineId}/activate
Moves a draft/paused/ended routine to active. Requires a saved config snapshot.
Required token scopes: `routine|update`
# Create routine
Source: https://help.teable.ai/en/api-reference/routine/create-routine
/swagger.json post /base/{baseId}/routine
Create a routine in draft status. Provisions a dedicated bot user (system user, base collaborator) and, when a config is supplied, the first immutable config snapshot.
Required token scopes: `routine|create`
# Discard routine draft
Source: https://help.teable.ai/en/api-reference/routine/discard-routine-draft
/swagger.json delete /base/{baseId}/routine/{routineId}/draft
Throws the unpublished edits away; the published snapshot is untouched.
Required token scopes: `routine|update`
# Get a single run of a routine
Source: https://help.teable.ai/en/api-reference/routine/get-a-single-run-of-a-routine
/swagger.json get /base/{baseId}/routine/{routineId}/run/{runId}
Required token scopes: `routine|update`
# Get base routine runsummary
Source: https://help.teable.ai/en/api-reference/routine/get-base-routine-runsummary
/swagger.json get /base/{baseId}/routine/{routineId}/run/summary
Run counts per status and the mean execution time, under the same filters as the run list
Required token scopes: `routine|update`
# Get routine
Source: https://help.teable.ai/en/api-reference/routine/get-routine
/swagger.json get /base/{baseId}/routine/{routineId}
Required token scopes: `routine|read`
# List routines of a base
Source: https://help.teable.ai/en/api-reference/routine/list-routines-of-a-base
/swagger.json get /base/{baseId}/routine
Required token scopes: `routine|read`
# List runs of a routine
Source: https://help.teable.ai/en/api-reference/routine/list-runs-of-a-routine
/swagger.json get /base/{baseId}/routine/{routineId}/run
Run history, newest first.
Required token scopes: `routine|update`
# Pause routine
Source: https://help.teable.ai/en/api-reference/routine/pause-routine
/swagger.json post /base/{baseId}/routine/{routineId}/deactivate
Moves an active routine to paused; config is kept, no further planned runs.
Required token scopes: `routine|update`
# Permanently delete routine
Source: https://help.teable.ai/en/api-reference/routine/permanently-delete-routine
/swagger.json delete /base/{baseId}/routine/{routineId}/permanent
Hard delete: the routine, its config snapshots, run history, chats and bot user are removed together with any trash entry. This action cannot be undone.
Required token scopes: `routine|delete`
# Publish routine draft
Source: https://help.teable.ai/en/api-reference/routine/publish-routine-draft
/swagger.json post /base/{baseId}/routine/{routineId}/draft/publish
Promotes the draft to a new snapshot, so later runs use it, and re-registers the schedule. A no-op when there is no draft.
Required token scopes: `routine|update`
# Run routine now
Source: https://help.teable.ai/en/api-reference/routine/run-routine-now
/swagger.json post /base/{baseId}/routine/{routineId}/run-now
Manually trigger one run. Fails when another run of the routine is still in flight or the space is out of credits.
Required token scopes: `routine|update`
# Save routine draft
Source: https://help.teable.ai/en/api-reference/routine/save-routine-draft
/swagger.json put /base/{baseId}/routine/{routineId}/draft
Stores edits without changing what runs. Scheduled runs keep using the published snapshot until the draft is published. A draft matching the published config is cleared instead of stored.
Required token scopes: `routine|update`
# Soft-delete routine
Source: https://help.teable.ai/en/api-reference/routine/soft-delete-routine
/swagger.json delete /base/{baseId}/routine/{routineId}
Soft delete: run history and chats stay readable, the bot user is deactivated and removed from the base collaborators.
Required token scopes: `routine|delete`
# Update routine
Source: https://help.teable.ai/en/api-reference/routine/update-routine
/swagger.json put /base/{baseId}/routine/{routineId}
Renaming only touches the routine row (and the bot user name). A changed config inserts a new immutable snapshot and swaps the current pointer; saving an identical config inserts nothing.
Required token scopes: `routine|update`
# Delete artifact
Source: https://help.teable.ai/en/api-reference/artifact/delete-artifact
/swagger.json delete /artifact/{artifactId}
Soft delete an artifact; render and shares stop resolving
# Get artifact
Source: https://help.teable.ai/en/api-reference/artifact/get-artifact
/swagger.json get /artifact/{artifactId}
Get artifact metadata
# Get artifact 1
Source: https://help.teable.ai/en/api-reference/artifact/get-artifact-1
/swagger.json get /artifact
List the current user artifacts (gallery)
# Get artifact versions
Source: https://help.teable.ai/en/api-reference/artifact/get-artifact-versions
/swagger.json get /artifact/{artifactId}/versions
List artifact versions (newest first)
# Get artifact versions render
Source: https://help.teable.ai/en/api-reference/artifact/get-artifact-versions-render
/swagger.json get /artifact/{artifactId}/versions/{version}/render
Render an artifact version as a sandboxed HTML document. Requires a render token minted via the render-token endpoint.
# Post artifact render token
Source: https://help.teable.ai/en/api-reference/artifact/post-artifact-render-token
/swagger.json post /artifact/{artifactId}/render-token
Mint a short-lived render token for loading the artifact into a sandboxed iframe. Render auth never uses cookies.
# Post artifact versions
Source: https://help.teable.ai/en/api-reference/artifact/post-artifact-versions
/swagger.json post /artifact/{artifactId}/versions
Append a new immutable version to an artifact
# Post artifact versions restore
Source: https://help.teable.ai/en/api-reference/artifact/post-artifact-versions-restore
/swagger.json post /artifact/{artifactId}/versions/{version}/restore
Restore a historical version by copying it as the new head version
# Post base artifact
Source: https://help.teable.ai/en/api-reference/artifact/post-base-artifact
/swagger.json post /base/{baseId}/artifact
Create an artifact with its first version
Required token scopes: `base|read`
# Delete project chat delete
Source: https://help.teable.ai/en/api-reference/chat/delete-base-chat-delete
/swagger.json delete /base/{baseId}/chat/{chatId}/delete
Required token scopes: `base|read`
# Delete project chat messages
Source: https://help.teable.ai/en/api-reference/chat/delete-base-chat-messages
/swagger.json delete /base/{baseId}/chat/{chatId}/messages
Clear all messages in a chat
# Delete base chat queue
Source: https://help.teable.ai/en/api-reference/chat/delete-base-chat-queue
/swagger.json delete /base/{baseId}/chat/{chatId}/queue/{messageId}
Remove a still-queued message.
Required token scopes: `base|read`
# Get base chat generationstatus
Source: https://help.teable.ai/en/api-reference/chat/get-base-chat-generationstatus
/swagger.json get /base/{baseId}/chat/{chatId}/generation/status
Get durable chat generation status
Required token scopes: `base|read`
# Get project chat messages
Source: https://help.teable.ai/en/api-reference/chat/get-base-chat-messages
/swagger.json get /base/{baseId}/chat/{chatId}/messages
Get chat messages
# Get base chat messages metadata
Source: https://help.teable.ai/en/api-reference/chat/get-base-chat-messages-metadata
/swagger.json get /base/{baseId}/chat/{chatId}/messages/{messageId}/metadata
Get message metadata (usage, credit, context window)
Required token scopes: `base|read`
# Get base chat sandboxfilesgrant
Source: https://help.teable.ai/en/api-reference/chat/get-base-chat-sandboxfilesgrant
/swagger.json get /base/{baseId}/chat/{chatId}/sandbox/files/grant
Issue a scoped grant (base URL + token) for direct access to the chat sandbox files
Required token scopes: `base|read`
# Get base chat sandboxfilesstorage usage
Source: https://help.teable.ai/en/api-reference/chat/get-base-chat-sandboxfilesstorage-usage
/swagger.json get /base/{baseId}/chat/{chatId}/sandbox/files/storage-usage
Get whole-sandbox storage usage (uploads + outputs) for the chat sandbox meter
Required token scopes: `base|read`
# Get project chathistory
Source: https://help.teable.ai/en/api-reference/chat/get-base-chathistory
/swagger.json get /base/{baseId}/chat/history
Get chat history
# Get chatonboardingscenarios
Source: https://help.teable.ai/en/api-reference/chat/get-chatonboardingscenarios
/swagger.json get /chat/onboarding/scenarios
Get onboarding scenarios with presigned URLs for attachments
# Patch base chat archive
Source: https://help.teable.ai/en/api-reference/chat/patch-base-chat-archive
/swagger.json patch /base/{baseId}/chat/{chatId}/archive
Archive or restore a chat you own. Archived chats leave the base history and show up under the user-level archived list. Chats bound to a resource (App Builder `appGen` chats and the like) cannot be archived.
Required token scopes: `base|read`
# Patch base chat messages feedback
Source: https://help.teable.ai/en/api-reference/chat/patch-base-chat-messages-feedback
/swagger.json patch /base/{baseId}/chat/{chatId}/messages/{messageId}/feedback
Set, update, or clear feedback (thumbs up/down) on an assistant message
Required token scopes: `base|read`
# Patch project chat rename
Source: https://help.teable.ai/en/api-reference/chat/patch-base-chat-rename
/swagger.json patch /base/{baseId}/chat/{chatId}/rename
Required token scopes: `base|read`
# Patch base chat tool output
Source: https://help.teable.ai/en/api-reference/chat/patch-base-chat-tool-output
/swagger.json patch /base/{baseId}/chat/{chatId}/tool-output
Update a tool part output within a chat message
Required token scopes: `base|read`
# Post base chat queueresume
Source: https://help.teable.ai/en/api-reference/chat/post-base-chat-queueresume
/swagger.json post /base/{baseId}/chat/{chatId}/queue/resume
Resume auto-dispatch after a stop paused the send queue.
Required token scopes: `base|read`
# Post base chat read
Source: https://help.teable.ai/en/api-reference/chat/post-base-chat-read
/swagger.json post /base/{baseId}/chat/{chatId}/read
Mark a chat you own as read: assistant messages that settled before now no longer count as unread. A no-op for chats you do not own.
Required token scopes: `base|read`
# Post project chat stop
Source: https://help.teable.ai/en/api-reference/chat/post-base-chat-stop
/swagger.json post /base/{baseId}/chat/{chatId}/stop
Stop an active chat stream and prevent resume
# Post base chat warmup
Source: https://help.teable.ai/en/api-reference/chat/post-base-chat-warmup
/swagger.json post /base/{baseId}/chat/{chatId}/warmup
Warmup chat
Required token scopes: `base|read`
# Post project chatexecute script
Source: https://help.teable.ai/en/api-reference/chat/post-base-chatexecute-script
/swagger.json post /base/{baseId}/chat/execute-script
Execute TypeScript code in sandbox for chat tools
# Post project chatresolve attachments
Source: https://help.teable.ai/en/api-reference/chat/post-base-chatresolve-attachments
/swagger.json post /base/{baseId}/chat/resolve-attachments
Resolve attachment tokens to presigned URLs
# Post project chattext extract
Source: https://help.teable.ai/en/api-reference/chat/post-base-chattext-extract
/swagger.json post /base/{baseId}/chat/text-extract
Extract text content from attachments
# Post chatonboardingattachments
Source: https://help.teable.ai/en/api-reference/chat/post-chatonboardingattachments
/swagger.json post /chat/onboarding/attachments
Get attachment info by tokens. Used for landing page onboarding flow.
# Put base chat order
Source: https://help.teable.ai/en/api-reference/chat/put-base-chat-order
/swagger.json put /base/{baseId}/chat/{chatId}/order
Place a chat you own next to another one in the base's chat list. The list is per owner: chats never placed by hand lead it newest first, placed ones follow in their hand-made order. The first placement in a base freezes the current order for every chat there.
Required token scopes: `base|read`
# Create a personal secret
Source: https://help.teable.ai/en/api-reference/credential/create-a-personal-secret
/swagger.json post /credential/secret
Store a secret under the caller (write-only) and optionally grant it to a resource in the same call. The value never leaves the server afterwards.
# Exchange a granted connection for an access token
Source: https://help.teable.ai/en/api-reference/credential/exchange-a-granted-connection-for-an-access-token
/swagger.json post /credential/resource/{resourceType}/{resourceId}/connection-token
For code running as the resource only (the app’s own token, or the automation runtime token). The connection must be granted to the resource.
# Grant one of my credentials to a resource
Source: https://help.teable.ai/en/api-reference/credential/grant-one-of-my-credentials-to-a-resource
/swagger.json post /credential/grant
Only the credential owner can grant it, and only to resources they can edit. An alias already bound on the resource is replaced only with `replace: true`.
# List credentials bound to a resource
Source: https://help.teable.ai/en/api-reference/credential/list-credentials-bound-to-a-resource
/swagger.json get /credential/resource/{resourceType}/{resourceId}
Grants on an automation / app (with owner and whether the owner is still in the space) plus the unbound placeholders it still needs.
# List my credentials
Source: https://help.teable.ai/en/api-reference/credential/list-my-credentials
/swagger.json get /credential
The caller's personal secrets and OAuth connections, each with the resources it is granted to. Values are never returned.
# Revoke a grant
Source: https://help.teable.ai/en/api-reference/credential/revoke-a-grant
/swagger.json delete /credential/grant/{grantId}
Allowed for the credential owner and for anyone who can edit the resource. By default a placeholder is left so editors see the gap; pass keepSlot=false when the resource no longer needs it.
# Delete space claw
Source: https://help.teable.ai/en/api-reference/cuppyclaw/delete-space-claw
/swagger.json delete /space/{spaceId}/claw/{botId}
Delete a bot
Required token scopes: `space|read`
# Delete space claw bases
Source: https://help.teable.ai/en/api-reference/cuppyclaw/delete-space-claw-bases
/swagger.json delete /space/{spaceId}/claw/{botId}/bases/{baseId}
Revoke a bot's access to a project
Required token scopes: `space|read`
# Delete space claw im link
Source: https://help.teable.ai/en/api-reference/cuppyclaw/delete-space-claw-im-link
/swagger.json delete /space/{spaceId}/claw/{botId}/im-link
Unbind a bot from its IM channel
Required token scopes: `space|read`
# Get space claw
Source: https://help.teable.ai/en/api-reference/cuppyclaw/get-space-claw
/swagger.json get /space/{spaceId}/claw
List bots in a space
Required token scopes: `space|read`
# Get space claw bases
Source: https://help.teable.ai/en/api-reference/cuppyclaw/get-space-claw-bases
/swagger.json get /space/{spaceId}/claw/{botId}/bases
List projects a bot can access
Required token scopes: `space|read`
# Get space claw im link
Source: https://help.teable.ai/en/api-reference/cuppyclaw/get-space-claw-im-link
/swagger.json get /space/{spaceId}/claw/{botId}/im-link
Get the current IM binding of a bot
Required token scopes: `space|read`
# Get space claw im linkstatus
Source: https://help.teable.ai/en/api-reference/cuppyclaw/get-space-claw-im-linkstatus
/swagger.json get /space/{spaceId}/claw/{botId}/im-link/status
Get the status of an IM link token
Required token scopes: `space|read`
# Get space claw sandboxfilesgrant
Source: https://help.teable.ai/en/api-reference/cuppyclaw/get-space-claw-sandboxfilesgrant
/swagger.json get /space/{spaceId}/claw/{botId}/sandbox/files/grant
Issue a scoped grant (base URL + token) for direct access to the bot's sandbox files
Required token scopes: `space|read`
# Get space claw sandboxfilesstorage usage
Source: https://help.teable.ai/en/api-reference/cuppyclaw/get-space-claw-sandboxfilesstorage-usage
/swagger.json get /space/{spaceId}/claw/{botId}/sandbox/files/storage-usage
Get whole-sandbox storage usage (uploads + outputs) for the bot's sandbox meter
Required token scopes: `space|read`
# Get space claw slackchannels
Source: https://help.teable.ai/en/api-reference/cuppyclaw/get-space-claw-slackchannels
/swagger.json get /space/{spaceId}/claw/{botId}/slack/channels
List Slack channels visible to the user with bot-join and binding status
Required token scopes: `space|read`
# Get space clawim platforms
Source: https://help.teable.ai/en/api-reference/cuppyclaw/get-space-clawim-platforms
/swagger.json get /space/{spaceId}/claw/im-platforms
List IM platforms a bot can be bound to in this space
Required token scopes: `space|read`
# Get space clawpreset avatars
Source: https://help.teable.ai/en/api-reference/cuppyclaw/get-space-clawpreset-avatars
/swagger.json get /space/{spaceId}/claw/preset-avatars
List preset avatars available for bots
Required token scopes: `space|read`
# Patch space claw
Source: https://help.teable.ai/en/api-reference/cuppyclaw/patch-space-claw
/swagger.json patch /space/{spaceId}/claw/{botId}
Update a bot
Required token scopes: `space|read`
# Patch space claw avatar
Source: https://help.teable.ai/en/api-reference/cuppyclaw/patch-space-claw-avatar
/swagger.json patch /space/{spaceId}/claw/{botId}/avatar
Select a preset avatar for a bot
Required token scopes: `space|read`
# Post space claw
Source: https://help.teable.ai/en/api-reference/cuppyclaw/post-space-claw
/swagger.json post /space/{spaceId}/claw
Create a bot in a space
Required token scopes: `space|read`
# Post space claw avatar
Source: https://help.teable.ai/en/api-reference/cuppyclaw/post-space-claw-avatar
/swagger.json post /space/{spaceId}/claw/{botId}/avatar
Upload a custom avatar for a bot
Required token scopes: `space|read`
# Post space claw bases
Source: https://help.teable.ai/en/api-reference/cuppyclaw/post-space-claw-bases
/swagger.json post /space/{spaceId}/claw/{botId}/bases
Grant a bot access to a project (or update its role there)
Required token scopes: `space|read`
# Post space claw im linkbind direct
Source: https://help.teable.ai/en/api-reference/cuppyclaw/post-space-claw-im-linkbind-direct
/swagger.json post /space/{spaceId}/claw/{botId}/im-link/bind-direct
Bind a bot directly to an IM channel or DM
Required token scopes: `space|read`
# Post space claw im linkgenerate
Source: https://help.teable.ai/en/api-reference/cuppyclaw/post-space-claw-im-linkgenerate
/swagger.json post /space/{spaceId}/claw/{botId}/im-link/generate
Generate a link token to bind a bot to an IM channel
Required token scopes: `space|read`
# Delete env variable
Source: https://help.teable.ai/en/api-reference/env-variable/delete-env-variable
/swagger.json delete /env-variable/{id}
# List env variables
Source: https://help.teable.ai/en/api-reference/env-variable/list-env-variables
/swagger.json get /env-variable
List env variables by scope. scopeId is required for app and automation scope; omit for user scope.
# Update env variable
Source: https://help.teable.ai/en/api-reference/env-variable/update-env-variable
/swagger.json patch /env-variable/{id}
Partial update of value / description by id.
# Upsert env variable
Source: https://help.teable.ai/en/api-reference/env-variable/upsert-env-variable
/swagger.json post /env-variable
Create or update env variable by scope + key. scopeId is required for app and automation scope.
# Get reward credit list
Source: https://help.teable.ai/en/api-reference/reward/get-reward-credit-list
/swagger.json get /space/{spaceId}/reward/credit-list
Get reward credit list for a space
Required token scopes: `space|read`
# Get base scrapedatasets
Source: https://help.teable.ai/en/api-reference/scrape/get-base-scrapedatasets
/swagger.json get /base/{baseId}/scrape/datasets
Search the full scraper catalog (beyond the curated list) by platform name
Required token scopes: `base|read`
# Get base scrapesnapshot
Source: https://help.teable.ai/en/api-reference/scrape/get-base-scrapesnapshot
/swagger.json get /base/{baseId}/scrape/snapshot/{snapshotId}
Poll for scrape result by snapshot ID
Required token scopes: `base|read`
# Post base scrapetrigger
Source: https://help.teable.ai/en/api-reference/scrape/post-base-scrapetrigger
/swagger.json post /base/{baseId}/scrape/trigger
Trigger a web scrape job and return a snapshot ID for polling
Required token scopes: `base|read`
# Copy skill to another scope
Source: https://help.teable.ai/en/api-reference/skill/copy-skill-to-another-scope
/swagger.json post /skill/{id}/copy
Copy a skill between user and project (base) scope. The source skill is kept; a same-slug skill in the target scope is overwritten.
# Delete skill
Source: https://help.teable.ai/en/api-reference/skill/delete-skill
/swagger.json delete /skill/{id}
Delete a skill by its ID.
# Download skill as ZIP
Source: https://help.teable.ai/en/api-reference/skill/download-skill-as-zip
/swagger.json get /skill/{id}/download
Download a skill bundle as a ZIP file.
# Import skill from file
Source: https://help.teable.ai/en/api-reference/skill/import-skill-from-file
/swagger.json post /skill
Import a skill from a .zip or .skill file upload. Both extensions are accepted; the file content must be a valid ZIP archive (a .skill file is a renamed .zip).
# Import skill from GitHub
Source: https://help.teable.ai/en/api-reference/skill/import-skill-from-github
/swagger.json post /skill/github
Import a skill from a GitHub repository URL.
# List available skills
Source: https://help.teable.ai/en/api-reference/skill/list-available-skills
/swagger.json get /skill/available
List enabled skills for chat slash-command suggestions.
# List managed skills
Source: https://help.teable.ai/en/api-reference/skill/list-managed-skills
/swagger.json get /skill/managed
List all installed skills for the settings UI.
# Sync skill from source
Source: https://help.teable.ai/en/api-reference/skill/sync-skill-from-source
/swagger.json post /skill/{id}/sync
Re-sync a GitHub-sourced skill with its upstream repository.
# Update skill metadata
Source: https://help.teable.ai/en/api-reference/skill/update-skill-metadata
/swagger.json patch /skill/{id}
Update icon or enabled state of a skill.
# Security
Source: https://help.teable.ai/en/basic/security
Learn about Teable's security architecture, data protection, and compliance measures
AES-256 & TLS
Certified
US-West Oregon
OIDC Protocol
Teable is committed to maintaining the security and privacy of your data. Our security practices are designed to protect your information while giving you full control over your workspace.
## Data Encryption
### Encryption in Transit
All data transmitted between your browser and Teable servers is protected using **256-bit SSL/TLS encryption**. We enforce HTTPS for all connections with automatic HTTP to HTTPS redirection.
### Encryption at Rest
All data stored in our databases is encrypted using **AES-256 encryption** through AWS infrastructure. This includes:
* Database storage (PostgreSQL on AWS RDS)
* File attachments
* Backups
You have full control over your encryption configuration based on your infrastructure requirements. We recommend:
* Enabling database-level encryption
* Using encrypted storage volumes
* Implementing backup encryption
## Infrastructure Security
Teable Cloud is hosted on **Amazon Web Services (AWS)** in the US-West (Oregon) region, leveraging AWS's enterprise-grade security infrastructure.
Implementation of Helmet and Content Security Policy (CSP) to prevent common web vulnerabilities like XSS and clickjacking.
Cloudflare Turnstile integration to prevent automated attacks and spam registrations.
Protection against brute-force attacks on login attempts with account lockout, and rate limiting on email verification and password reset operations.
All passwords are hashed using bcrypt algorithm with unique salts, making them resistant to rainbow table attacks.
## Access Controls
### Role-Based Permissions
Teable provides granular role-based access control with five permission levels:
| Role | Capabilities |
| - | - |
| **Owner** | Full control over the workspace, including billing and deletion |
| **Creator** | Can create tables, views, and manage workspace structure |
| **Editor** | Can edit records and field values |
| **Commenter** | Can view content and add comments |
| **Viewer** | Read-only access to content |
### Authority Matrix
Authority Matrix allows fine-grained permission control at the field, record, and view level, enabling you to precisely define what each user or role can see and modify.
This feature is particularly useful for:
* Restricting sensitive fields (e.g., salary, personal information)
* Limiting record access based on ownership or department
* Creating custom views with different permission sets
### Share Link Protection
Protect your shared views, projects, or artifacts with a password. When enabled, recipients must enter the correct password before accessing the shared content.
When you turn on password protection, Teable generates a random password that takes effect immediately. Click **Copy link and password** next to the password to copy the link and password together as one line of text, ready to send to visitors. To change it, click the edit button and enter a new password, or click **Generate random password** for a new one.
The password is shown in plain text only in the share panel right after it is set. When you reopen the share settings, it is hidden; to copy it again, set a new password.
## Account and Sign-in
### Devices
Open your avatar at the bottom left → **Settings** → **Devices** to see which devices your account is signed in on, along with the **Login history** for the last 30 days. Each device shows the browser or mobile app, operating system, sign-in method, IP address, and last active time.
If you see a device you don't recognize, click **Sign out** on that device, then change your password. Click **Sign out all other devices** to sign out every device except the current one. Signed-out devices must sign in again to continue.
### Failed Sign-in Lockout
After 5 incorrect password attempts in a row for the same email, the account is locked for 15 minutes. Further incorrect attempts during that time are rejected.
## Data Management
### Record History
Track all changes made to your records with a comprehensive revision history:
* See who made changes and when
* View previous values before modifications
* Understand the complete lifecycle of your data
### Trash & Recovery
Deleted items are moved to trash and can be recovered within the retention period, providing protection against accidental data loss.
### Data Backup & Export
Teable provides multiple options for backing up your data:
| Method | Description | Use Case |
| - | - | - |
| **[Project Export](/en/basic/base#export-base-backup-&-migration)** | Download entire Project as `.tea` file (structure, data, automations) | Full backup, migration |
| **[Project Duplicate](/en/basic/base#duplicate-a-base-to-another-space)** | Create a copy of Project within Teable | Quick snapshot |
| **[CSV Export](/en/basic/table/export)** | Export individual table data | Data portability |
| **[API Export](/en/api-doc/record/get)** | Programmatically export records via REST API | Automated backups |
You can manually back up your projects by exporting the entire Project as a `.tea` file, exporting individual tables as CSV files, or retrieving your data via the Teable API.
## Single Sign-On (SSO)
Teable supports enterprise SSO through the **OIDC (OpenID Connect)** protocol, compatible with major identity providers:
## Compliance
Teable Cloud has achieved ISO 27001 certification, demonstrating our commitment to information security management best practices.
## Self-Hosted Deployment
For organizations with strict security or compliance requirements, Teable offers self-hosted deployment options:
Keep all data within your own infrastructure and geographic boundaries
Deploy within your VPC with custom firewall rules and network policies
Integrate with your existing security stack, SIEM, and monitoring tools
Implement your own backup and disaster recovery procedures
## Security Best Practices
We recommend the following practices to maximize your workspace security:
Create passwords with a mix of uppercase, lowercase, numbers, and symbols. Consider using a password manager.
Single Sign-On provides centralized authentication management and additional security controls.
Audit your workspace members and their permission levels periodically to ensure least-privilege access.
When sharing views externally, always enable password protection for sensitive data.
## Contact
For security-related inquiries or to report a vulnerability, please contact us at **[support@teable.ai](mailto:support@teable.ai)**
# Changelog 2026
Source: https://help.teable.ai/en/changelog
# Data Export, Community Feedback, and Stability Updates
## Feature Updates
* **Added community feedback**: Web and mobile **Contact Support** now opens Teable Community forms for public or private requests and issue reports.
* **Added pre-deletion data exports**: Users and administrators can request emailed exports of CSV data, app packages, and attachments before deleting accounts or trashed spaces.
## Bug Fixes & Improvements
* **Improved data export completeness and reliability**: Account exports include owned trashed spaces, clearer folders, missing-attachment notices, and automatic retries for failed app package downloads.
* **Improved data export notifications**: Emails match recipient languages; confirmations follow accepted requests, and self-service quotas show five exports per 24 hours.
* **Improved execution record loading**: Fixed retries after offline loading failures; loading resumes after reconnection without duplicate records or repeated retries.
* **Improved login and publishing stability**: Improved status recovery during startup and after network interruptions, reducing incorrect login or publishing states.
* **Improved conditional lookup accuracy**: Fixed unrelated results for empty fields and aligned single-value and multi-value comparisons; empty-value-dependent filters may change.
* **Improved Base copy success rates**: Fixed Base copying failures involving link fields with specific reference relationships, improving reliability.
* **Improved link field consistency**: Duplicate links are deduplicated during record changes and imports, fixing link, lookup, and rollup updates and stabilizing sorting.
* **Optimized calculated field storage**: Reduced database storage from frequent calculated field updates, improving long-term resource efficiency.
# OAuth Notifications, Sharing, and Sync Upgrades
## Feature Updates
* **Added OAuth app notifications**: Authorized apps can send in-app notifications. Users can mute individual apps; revoking authorization stops notifications.
* **Artifact sharing passwords**: Passwords auto-generate; owners edit, regenerate, or copy links with passwords. Reopening hides them, requiring changes before recopying.
* **Added App Builder GitHub repository detection**: Detects linked repositories without personal authorization; conflicts offer “Merge on GitHub” for resolution.
* **Scrape quota reservations**: Validates balance, reserves estimated usage, and releases quota after failures. Update integrations, CLI, and Agent: `limit` → `limitPerInput`.
## Fixes & Improvements
* **Improved OAuth authorization flow**: Shows progress and closes after success; failures or denials display reasons and a close button.
* **Improved OAuth popup accessibility**: Supports dark mode and reduced-motion preferences for a more comfortable experience.
* **Improved AI field prompt editing**: Blank lines, Backspace, and arrow keys no longer convert field-reference tags into plain text.
# AI Tasks, Security, and Stability Updates
## Feature Updates
* **Agent Computer maintenance controls added**: Admins can pause new sessions, notify users before submission, and optionally let existing conversations finish.
* **Model tiers added for daily tasks**: Agents can select a persistent model tier to balance quality, speed, and cost.
* **Event-triggered task titles and reasons added**: Chats receive event-based titles and display launch reasons without overwriting user-edited titles.
* **Welcome credits added for free workspaces**: Free workspaces now receive 200 one-time credits instead of 200 monthly credits.
* **Custom domain grace period added**: Business plan domains remain active for one week, with expiration notifications and uninterrupted access upon renewal.
## Fixes & Improvements
* **Strengthened sign-in security**: Account lockout is now enabled by default; administrators can disable it with `SIGNIN_ACCOUNT_LOCKOUT_ENABLED=false`.
* **Fixed chained formula calculations**: Blank text remains blank in numeric calculations instead of becoming `0`, preventing incorrect results.
* **Improved deleted record cleanup**: Comments on deleted records are inaccessible and permanently removed with related subscriptions.
* **Fixed incomplete shared view fields**: Shared grids and expanded records now show all visible fields, including unscrolled columns.
* **Improved multi-role permissions**: Editing, record visibility, and field permissions now remain consistent across combined space, department, and Base roles.
* **Improved permission-aware search**: Searches respect filters and row permissions; unsafe large-table searches pause until searchable fields are configured.
* **Fixed inconsistent large-number display**: Large numbers now remain consistent across cells, record details, copied values, and API responses.
* **Improved rollup refresh reliability**: Relationship changes recalculate rollups for previous and new linked records, including dependencies after relationship conversion.
* **Improved manual sorting in large grids**: Row order remains stable during concurrent edits, recovery, and view or table duplication.
* **Fixed table deletion failures**: Tables no longer become hidden without deletion, and recovery is more reliable after interruptions.
* **Fixed sidebar table ordering**: Table positions persist after refresh; failed tables are hidden while import errors remain accessible.
* **Fixed nested grouping freezes**: Group statistics with date formulas are more stable, and unrelated results no longer flicker.
* **Fixed temporary linked-record titles**: Titled linked records no longer briefly display “Untitled” after bulk updates.
* **Improved large-file imports**: Large CSV and Excel imports now fail less often and produce fewer temporary request errors.
* **Fixed blank SVG thumbnails**: SVG attachments now display thumbnails correctly in grid views.
* **Improved AI chat queues and recovery**: Queued messages show status, rejected messages disappear, and ordering and reconnection recovery are clearer.
* **Improved AI conversations and page loading**: Streaming responses are smoother, while Base and space pages load previews only when needed.
* **Improved AI field autofill performance**: Bulk processing is faster, and existing fields now support workspace-level custom providers correctly.
* **Improved App Builder recovery**: App Builder recovers more reliably from preview failures and temporary workspace outages.
* **Restricted organization department API results**: The organization user API returns only users’ departments; integrations can use the dedicated department list API.
* **Strengthened account and integration security**: Improved security across accounts, licenses, integrations, and sign-ins, while eliminating invalid organization-linking errors.
# GPT-6 Sol and Luna Are Now in Teable
**GPT-6 Sol and Luna** replace GPT-5.6 Sol and Luna, bringing stronger coding skills, more reliable answers, and better performance on complex business tasks. In OpenAI's factuality evaluation, GPT-6 Sol made **about 50% fewer factual errors** than its predecessor. Both models also communicate more clearly, with less jargon and fewer unnecessary details.
These improvements help Teable AI handle work from **analyzing business data and summarizing documents to building apps and running multi-step workflows**. As part of this model upgrade, **GPT-5.6 Terra is being retired**.
You can try GPT-6 Sol and Luna now in **AI Chat, App Builder, AI Fields, and automation** in Teable.
# Automation, Billing, and Stability Updates
## Feature Updates
* **Added custom domain renewal grace period**: Domains remain active seven days after Business expiration; owners receive expiration and deactivation notices.
* **Added connected-app event triggers**: Automations and Routines can use event data; copied workflows support reconnection during credential setup.
* **Added third-party app tool billing**: Calls use provider-priced credits shown in credit history; failures, searches, and blocked calls are free.
## Fixes & Improvements
* **Improved connector stability**: Expired, deleted, or replaced connections show disconnected, notify editors, and retain enabled status for reconnection.
* **Improved connector events and Routines**: Fixed event discovery, delayed runs, template installation, expired subscriptions, credit checks, and trigger test results.
* **Improved lookup and rollup display**: Lookup-based rollups show text and preserve numeric and Boolean types in standard and conditional rollups.
* **Improved connected app credential stability**: Fixed imports failing despite valid authorization and streamlined credential replacement and disconnection.
* **Improved billing accuracy for long-running jobs**: Prevented completed jobs from being charged repeatedly.
* **Improved numeric lookup sorting and grouping**: Values now sort numerically, with corrected grouping order for referenced linked records.
* **Improved AI session stability**: Enhanced model switching and recovery, especially for long-running Routines using non-default models.
* **Improved real-time linked record titles**: After bulk updates, many-to-one and one-to-one fields show saved titles without refreshing.
* **Improved application security and reliability**: Strengthened system protection and runtime stability for a more reliable experience.
# Connect 1,500+ apps to Teable AI
A major update is here: Teable now connects to over 1,500 apps, including YouTube, X, LinkedIn, Attio, Gmail, n8n, and Zapier. Bring your business data into Teable and let AI take action across your connected apps—all through conversation.
Here are a few examples of how this update can transform the way you work.
## 1. Turn Gmail Inquiries into Sales Leads
Ask: "Find this week's customer inquiry emails in Gmail. Add the sender's name, email address, company, and requirements to this table, and suggest a follow-up for each."
## 2. Bring Attio contacts into Teable
Ask: "Import this week's new contacts from Attio into this table, including name, company, email, lead source, and lead status. Summarize the number of contacts by source and lead status."
## 3. Draft, publish, and track LinkedIn posts
Ask: "Draft a LinkedIn post from this table. After I approve, publish it and save the post link and status back to the table."
# X integrations, calculations, and performance optimization
## Feature Updates
* **Added X OAuth integration support**: Connect services like X that require the deployment's own OAuth app; configure API key integrations through credential forms.
## Fixes & Improvements
* **Improved chat card interactions**: Pending authorization, connection, selection, credential, and question cards no longer block new messages; layouts and actions are clearer.
* **Improved cross-table calculation consistency**: Chained formulas, lookups, inventory, and allocations now update promptly when linked records change.
* **Fixed unexpected scrolling when selecting an Assignee**: The field being edited stays visible in record details.
* **Improved integration connections**: Clearer loading indicators and empty states, plus better mobile controls, make connections easier to understand.
* **Improved table operation stability**: Reduced false “Table not found” errors during field changes and improved pending or failed imports.
* **Improved linked-record deletion performance**: Faster, more reliable link removal across required, self-referencing, one-way, two-way, calculated, and recycled relationships.
* **Fixed App Builder message queue failures**: Queued messages now enter the generation process; previously affected messages must be resent.
* **Fixed grid view misalignment during fast scrolling**: Previously viewed records no longer briefly appear in the wrong position.
* **Improved reconnection for idle tables**: Recovery progress is shown, avoiding premature “table unavailable” messages.
- **Adjusted Sheet feature availability**: Due to compatibility limitations, the Sheet form designer, preview, and sharing panel are unavailable in this release.
- **Fixed personal view loading**: Personal views no longer occasionally remain blank with a loading placeholder; content appears without refreshing.
- **Improved public template redirects**: Outdated public template links now redirect to the Teable template page instead of returning a 404 error.
- **Improved data operation performance**: Faster table, record, field, and SQL query operations improve responsiveness with large datasets.
- **Fixed expandable content**: Recently measured expandable content now opens properly, improving page interaction stability.
- **Improved real-time collaboration performance**: Fewer unnecessary refreshes and polling requests during view configuration changes make collaboration smoother.
- **Improved table list consistency**: The table list reflects structural changes, including field updates, more promptly and accurately.
- **Fixed member dropdown scrolling**: Member lists in expanded records scroll again, making it easier to find and select members.
# Continuous operation, performance, and stability upgrades
## Feature Updates
* **App Builder save failure guidance**: Offers cleanup tips and sends failure details to AI when oversized versions cannot be saved.
* **Continuous Routine execution**: Routines run until completion, failure, or manual termination; histories now show start and end times.
## Fixes & Improvements
* **Improved template preview workflow**: Creates a new copy and opens settings, matching Template Center; fixes grid record loading.
* **Improved App Builder chat startup**: Chats open in preview mode by default, with clearer environment clipboard labels.
* **More reliable shared Base saving**: Fixes failures when linked tables or fields are missing.
* **More accurate Date field sorting**: Sorts by full timestamps despite hidden times; date groups still follow display formatting.
* **Improved bulk collaborator assignment notifications**: Reduces duplicate emails, summarizes multiple records, and adds clearer wording and table links.
* **Improved account deletion flow**: Clearly lists owned spaces and required actions; fixes cleared desktop confirmations and broken mobile links.
* **Improved shared chat unread notifications**: Unread markers and reply alerts follow the latest questioner, preventing uncleared states for other viewers.
* **Better complex Base performance**: Speeds up Bases with complex linked records and Lookup calculations for smoother browsing and operations.
* **Improved Secret rotation**: Preserves existing credential bindings to avoid reconfiguration; new access permissions still require approval.
* **Safer email verification code login**: Adds security checks before sending or resending codes; related integrations must verify when enabled.
* **More reliable app publishing**: Optimizes publishing for projects with many bound Secrets, improving speed and success rates.
* **Safer Formula saving and calculations**: Checks edits before saving; failures remain drafts, preserving valid definitions and values without overwriting results.
* **Fixed blank Record History panels**: History now displays after changes to Formula, Rollup, and Conditional Rollup fields.
* **More accurate audit logs**: Distinguishes user-created personal access tokens from automatic token refreshes, helping administrators track actions accurately.
* **Reliable external app connections**: Fixes Gmail and API Key connections, prevents canceled connections reusing unrelated accounts, and ensures Agent access.
# Collect data from 800+ websites with Teable AI
> Describe the data you need. Teable Agent scrapes it from 800+ public websites and platforms—including LinkedIn, Amazon, Google Maps, Instagram, TikTok, X (Twitter), and YouTube—all in one place.
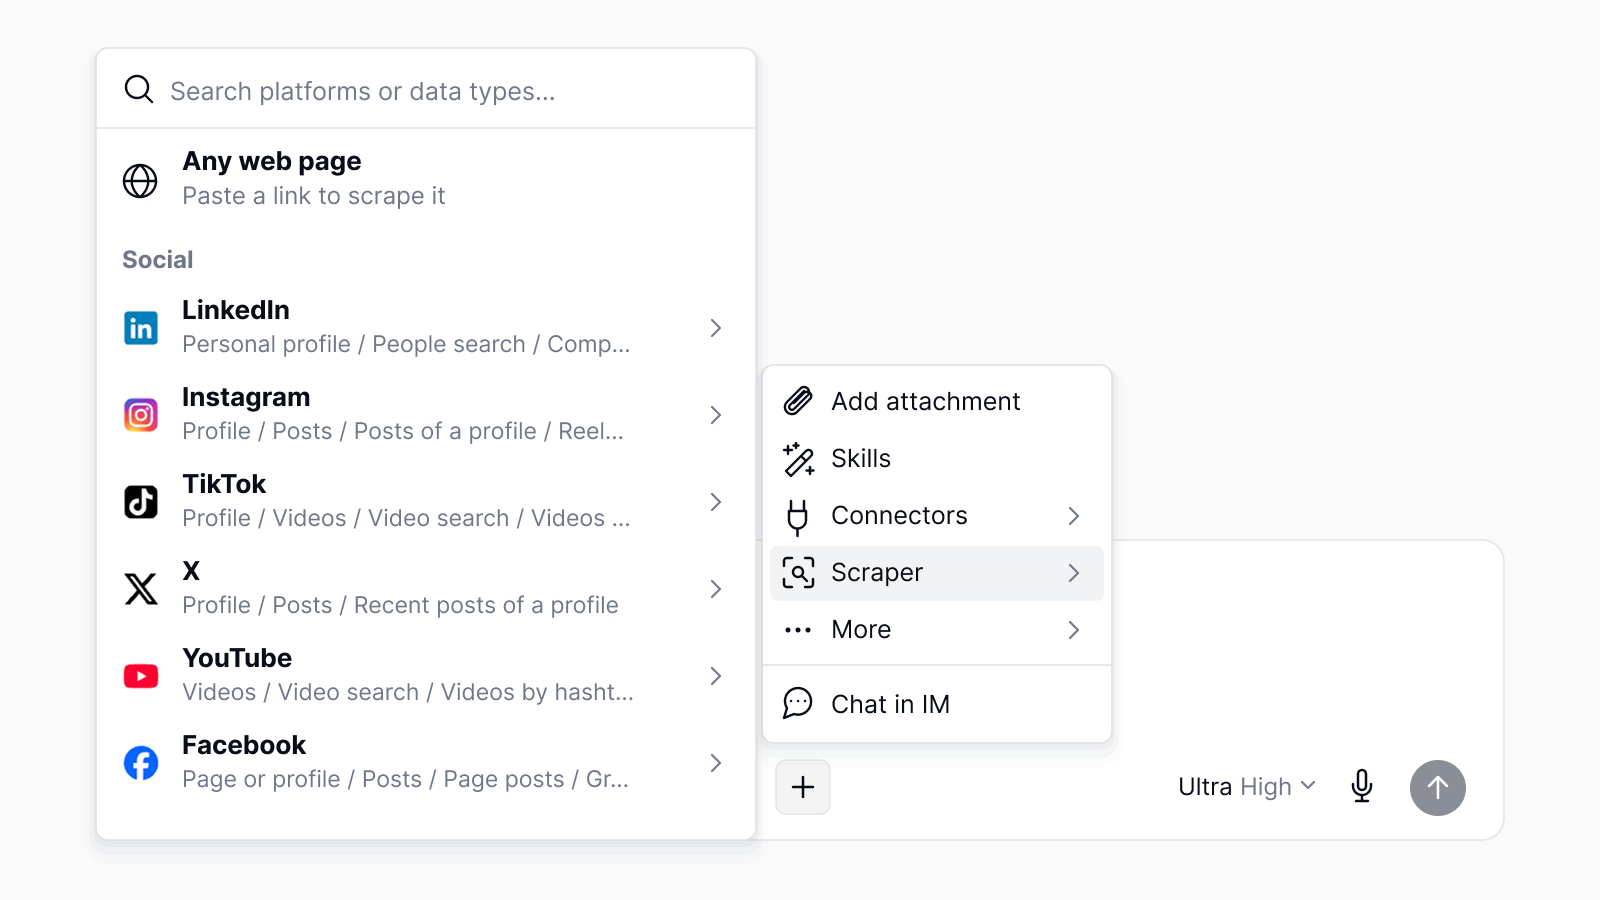
## 1. Find Beauty & Skincare Influencers on YouTube
Ask: “Find 50 YouTube beauty and skincare influencers in the US with 100K–1M subscribers. Add their channel name, subscriber count, channel URL, and contact email to this table.”
## 2. Find Local Businesses on Google Maps
Ask: “Find 50 top-rated coffee shops in New York City. Add their name, rating, review count, address, phone number, website, and Google Maps URL to this table.”
## 3. Compare Products on Amazon
Ask: “Find 100 popular wireless headphones on Amazon. Add the product name, price, rating, review count, and product URL to this table.”
# Image Generation, Account and Experience Upgrades
## Feature Updates
* **Added queued image generation**: Track, cancel, select models, and deliver images to galleries across chat, CLI, App Builder, and routines; pay only for delivered images.
## Fixes & Improvements
* **Improved account deletion**: Unified web flows guide space transfers or trashing; no trash emptying or manual exits required. Subscription safeguards remain.
* **Improved** **`.tea`** **project imports**: Preserve integration and secret placeholders without credentials for easy authorization; legacy exports remain supported.
* **Improved integration and automation management**: Manage authorization in the Integrations dialog and enable automation per workflow.
* **Improved App Builder previews**: Show last-saved previews on startup, preserve usable previews after setup failures, and reduce incorrect stopped/failed statuses.
* **Updated media generation APIs**: Create, retrieve, and cancel one task per request; batch, continuation, and retry flows are no longer supported.
* **Improved image generation reliability**: Better handling of failures, rejected requests, stalled tasks, and duplicate results improves output and billing reliability.
* **Improved chat readability**: Clearer attachments and mentions, contained long content, and collapsed tool/image rows reduce layout shifts; failures remain expandable.
* **Improved routine status displays**: More accurate execution statuses reduce transient error indicators during loading.
* **Improved restricted view visibility**: Inaccessible views no longer appear in table views or recently visited lists.
* **Improved account and shared-link security**: Strengthened account, authentication, and shared-link protections; existing password-protected links may require password re-entry.
* **Improved login experience**: Returning signed-out users reach the login page; switching authentication tabs preserves entered email addresses and passwords.
* **Improved permanent deletion**: Permanently deleting tables or bases also removes related comments and comment subscriptions, preventing orphaned content.
* **Fixed import entry visibility**: The import entry now displays and opens correctly when importing is the only available action.
* **Fixed attachment access**: Restored Aliyun OSS attachment links while preserving downloads through other supported storage services.
* **Fixed imported field references**: AI classification and generation fields no longer reference source projects, preventing misleading circular-reference errors when copying/publishing templates.
* **Improved favicon clarity**: Sharper favicons in browser tabs, link previews, and high-density displays.
* **Fixed field-level permissions**: Applying permissions no longer incorrectly hides/locks fields or unexpectedly restricts records without field restrictions.
# Login, Automation, and Performance Optimization
## Feature Updates
* **Added email verification code sign-in**: After email setup, registered users can sign in with a code for easier access.
* **Added Sign in with Apple**: Once configured, web sign-in supports Apple alongside Google, GitHub, and OIDC.
* **Added Routine authorization scopes**: Personal access tokens and OAuth apps can authorize Routine access for easier automation integration.
* **Added Routine CLI management**: Use the CLI to update, enable, disable, or start Routines within existing permissions.
* **Added Routine result display**: Run details show the assistant’s final response when available for quick result review.
## Fixes & Improvements
* **Optimized image uploads**: Upload support now matches the selected AI model tier’s capabilities, ensuring compatible image features.
* **Fixed App Builder file handling**: Resolved file link and download issues, ensuring generated files open in the appropriate previewer.
* **Improved automation script editing**: Edits persist after closing dialogs, and workflow tests use the latest saved configuration for consistent results.
* **Improved notification display**: Stacked notifications now remain clearly visible when multiple messages appear simultaneously.
* **Fixed AI chat button display**: Prevented the send button from being compressed in constrained layouts, improving chat usability.
* **Improved Routine’s Chinese experience**: Refined Simplified Chinese terminology, editor styling, and form consistency for easier configuration.
* **Improved product and API documentation**: Replaced “Base” with “Project” and refined API route titles and authentication examples.
* **Strengthened app and automation permission isolation**: Prevents cross-project, space, integration, or tenant access; workflows using broad inherited permissions require review.
* **Improved record query stability**: Supports timeouts for slow record, count, and aggregation queries, with clearer errors to prevent resource overuse.
* **Optimized record query performance**: Skips unnecessary total counts by default while retaining them when required, reducing database load.
* **Improved record pagination reliability**: Deleting cursor records no longer causes missing or truncated results; invalid or mismatched cursors show errors.
* **Fixed multi-value filtering**: “Contains” and “does not contain” now work when JSON or multi-value field content includes apostrophes.
* **Improved calculated field stability**: Enhances calculation reliability and efficiency, clearing calculation warnings only after related fields finish recalculating.
* **Optimized view updates**: Views restored through undo, redo, or trash appear immediately, with fewer unnecessary table and view refreshes.
# Improved right-to-left support
Teable now supports **Hebrew as an interface language**, alongside comprehensive improvements to the **right-to-left (RTL) experience for Arabic and Hebrew**. From page layouts and navigation to how content is displayed, these refinements make the interface feel more natural and intuitive for users who read and work in these languages.
We believe localization should extend to every interaction, so people across languages and cultures can turn their ideas into reality in ways that feel familiar.
* **Layouts that follow your language.** Sidebars, menus, and dialogs adapt to right-to-left use.
* **Better typing in AI Chat and App Builder.** Chat inputs follow your interface language’s text direction.
* **Clearer mixed-language content.** Cell values and record names automatically detect text direction, making Arabic or Hebrew easier to read alongside English.
# AI imaging, performance, and experience optimization
## Fixes & Improvements
* **More accurate Routine status**: Routines show completed promptly after chat generation, reducing service-switching delays during deployment.
* **Improved email automation trigger validation**: Required-field errors appear only after editing connection fields, reducing premature warnings.
* **Improved CLI help**: Clarified Skill scope options and environment defaults for easier, more accurate command usage.
* **Improved chat tool call display**: Tool calls remain visually grouped across steps and subsequent reasoning, improving clarity and traceability.
* **Expanded AI image support**: Added tailored options and image-to-image capabilities for GPT Image, Gemini, Seedream, Recraft, Muse, Grok Imagine, and Arrow.
* **Improved Scrape Data menu**: Redesigned icons and layout prevent truncation and enable in-panel configuration for clearer, easier setup.
* **Improved Grid loading performance**: Reduced unnecessary requests when opening Grids, smoothing status updates during formula, lookup, and rollup calculations.
* **Improved form validation**: Errors remain in-form instead of appearing unhandled; missing fields consistently show “Required” for quicker resolution.
* **Improved AI image generation stability**: Enhanced validation, result handling, Arrow SVG output, and preservation of uploaded file types and extensions.
* **Email trigger connection changes**: “When a new email is received” blocks Gmail/Outlook setup or reauthorization; existing records and IMAP remain.
# Automation tasks, chat, and stability upgrades
## Feature Updates
* **Added Scheduled Routines**: Create, schedule, run, pause, and monitor Agent tasks with templates, run history, sidebar navigation, Agent, and CLI tools.
## Bug Fixes & Improvements
* **Improved Routine scheduling**: Refined time zones, daylight saving time, recurrence rules, one-time schedules, and synchronization for reliable execution.
* **Improved Routine quota handling**: Routines automatically pause after five consecutive quota failures and cancel future runs to prevent waste.
* **Improved Routine reliability**: Enhanced recovery, deletion cleanup, manual runs, and navigation to activity and run history.
* **Enhanced chat management**: Web and mobile now support pinning, renaming, archiving, deleting, activity indicators, and manual user sorting.
* **Improved chat consistency**: Refined message history, tool output, feedback, queued messages, retries, and streaming recovery.
* **Improved long-message rendering**: Increased streaming response efficiency, especially for mobile reading.
* **Improved chat permissions and read status**: Unauthorized actions show clear messages; background replies remain unread after switching conversations.
* **Improved chat change summaries**: Deleted resources now appear unavailable instead of linking to invalid destinations.
* **Fixed duplicate image attachments**: Resolved duplicate images when pasting content into the upload area.
* **Improved attachment editing and recovery**: Fixed stuck image replacement and failed-upload recovery, ensuring attachments can be edited, removed, and sent.
* **Improved expanded-record interactions**: Fixed Single-select dropdown scrolling and prevented accidental closure when pressing Escape.
* **Improved field adjustment stability**: Deleting or reordering fields while resizing columns no longer crashes the grid or misapplies widths.
* **Improved global search results**: Search now respects field visibility, excluding hidden-field content from matches and result counts.
* **Improved Hosted Connection authorization**: Added smoother retries for denied, canceled, blocked, or failed authorization; existing Hosted Gmail authorizations remain supported.
* **Improved linked-field cleanup**: Deleting linked fields or stored link data now cleans up related links more completely.
* **Improved Schema integrity checks**: Restored missing tables when valid schema data remains and safely handled partially deleted linked fields.
* **Improved performance for high-traffic tables**: Reduced duplicate operations and improved concurrent viewing while preserving permissions and fresh-data requirements.
* **Improved mobile login and navigation stability**: Added system-browser login with PKCE, consent, reusable sessions, shared authentication, and smoother account switching and embedded experiences.
* **Improved mobile embedded pages**: Simplified table headers, highlighted Settings, and displayed plan, usage, billing, limits, and self-hosted license information read-only.
* **Improved calculation issue summaries**: Added clearer errors, database context, affected-field counts, occurrence counts, and complete field identifiers.
* **Updated Public API reference documentation**: Show only endpoints supporting access-token authentication, helping developers find available APIs faster.
* **Unified help and plugin documentation links**: Standardized links on `help.teable.ai` while preserving supported deep links.
# Security, performance, and stability updates
## Feature Updates
* **Added secure credential support for Email automations**: Email triggers can use authorized credentials, avoiding stored passwords and diagnostic exposure.
* **Added Chat resource change summaries**: After each conversation, Chat summarizes resources created or modified by the Agent.
## Bug Fixes & Improvements
* **Improved large-table performance and stability**: Reduced lag, timeouts, and failures when editing, inserting, pasting, or reordering records in older views.
* **Improved comment count reliability**: Comment counts now update more promptly and accurately when records are edited.
* **Improved calculation activity refresh stability**: Enhanced refreshes during reconnections and high activity while enforcing access permissions.
* **Optimized table search**: Shows only published, available indexes; correctly falls back when none exist and improves large-table response times.
* **Fixed Number field display settings**: Bar or ring chart settings are now cleared when switching back to standard number display.
* **Fixed Agent operation progress**: Progress cards now display correctly when creating an app and performing other actions simultaneously.
* **Improved Chat navigation stability**: Prevents resources created in other Bases from causing unexpected redirects or persistent processing states.
* **Fixed user field mode switching**: Grid views load correctly and existing assignments remain when switching between single-select and multi-select.
* **Improved App Builder export security**: Copies and downloads exclude authorized credentials and connection secrets; owners must provide them separately.
# Scraper Expansion and Stability Improvements
## Feature Updates
* **Expanded Scraper capabilities**: Added discovery for X profiles, Facebook content, Amazon sellers, Walmart reviews, and Crunchbase people, with localized labels.
## Bug Fixes & Improvements
* **Improved long-tail Scraper dataset access**: Search shows discovery modes and supports raw dataset IDs with `discoverBy`.
* **Improved Scraper CLI workflow**: `teable scrape run` returns snapshot IDs immediately; use `teable scrape status --wait` to await completion.
* **Improved Scraper safety and billing accuracy**: Refined limits and pending-request reuse to prevent duplicate charges during concurrent status queries.
* **Improved large-workspace table analysis stability**: Reduced database stalls and temporary 503 errors, making analysis more reliable.
* **Improved computation task tracking**: Ensured consistent batch reruns within stages and clarified serial retries for easier troubleshooting.
* **Clarified complexity metric naming**: Renamed “Dirty Records” to “Estimated Complexity,” making computation workload easier to assess.
* **Improved app and automation credential wording**: Renamed secret “Rotate” to “Edit” without changing how updates work.
* **Fixed user avatars in credentials and configurations**: Owner avatars display correctly, with initials shown when no avatar exists.
* **Improved credential usage lists**: Shows only additional resources, truncates long names with tooltips, preserves actions, and displays access grant times.
* **Improved computed field updates under high concurrency**: Enhanced data processing to reduce timeouts and update failures.
* **Fixed Lookup and Rollup field inconsistencies**: Unified handling of saved and transformed options, cross-Base references, and version changes.
* **Improved table loading and connection stability**: Reduced unnecessary requests during initial loads, reconnections, and frequent operations for smoother use.
* **Fixed computation activity notifications**: Prevented subscription errors from triggering unrelated global notifications.
* **Fixed User field filters after type changes**: Preserves filters and values across selection modes, preventing failures and Grid loading issues.
* **Fixed empty-search loading issues**: Opening search with `Cmd+F` no longer loops Grid row loading or resets filters, sorting, and grouping.
* **Improved shared view loading reliability**: More consistent field and record loading reduces missing or out-of-sync data.
# URL recognition, credentials, and search optimization
## Feature Updates
* **Automatic URL detection**: Clickable links work across text fields, including Formula, Rollup, and Long Text, with CJK and touch support.
* **Automatic links for AI-created URL fields**: New website and URL columns use auto-linking plain text fields; existing configurations remain supported.
* **Centralized credential management**: Manage reusable personal API keys and third-party connections in Settings › Integrations, with resource permissions and usage tracking.
* **Secure credential binding**: Apps, automations, and transferred resources retain placeholders; collaborators bind credentials and use aliases for multiple users.
* **AI credential confirmation**: AI-assisted building requests confirmation before using credentials and masks keys in test output.
* **Scraper data access**: The chat “+” menu adds a Scraper option for curated datasets, localized prompts, and permission-based access.
* **Natural-language Scraper discovery**: Find datasets beyond the curated catalog and view required inputs more clearly for faster data collection.
## Fixes & Improvements
* **Improved all-field search scope**: Uses configured indexes, includes newly added fields, and limits unindexed ILIKE searches to 20 eligible fields.
* **Improved text search compatibility**: Records with inconsistent or unsupported date values are no longer skipped or cause failures.
* **Clearer calculation timelines**: Improved status labels and task relationships show progress from source updates through processing to completion.
* **Fixed idle table calculation status**: Idle tables no longer remain on “Checking calculation status” when other tables have queued tasks.
* **Improved credential usage display**: Summaries now count only hidden resources, with better truncation for long resource names and aliases.
* **Improved Scraper reliability**: Unavailable posts no longer appear as verification failures, and LinkedIn scraping avoids premature timeouts.
* **Improved table query reliability**: Applies sensible defaults when query options are omitted, preventing parameter-related errors.
* **Faster Table Query Ops overview**: Shows only recent data by default, improving page load times and administrative responsiveness.
* **Faster calculations and conditional aggregations**: Improves high-load processing for quicker data updates and statistical results.
* **More stable real-time table activity**: Better handles load spikes and delayed calculation activity, reducing connection errors and repeated retries.
* **Improved sharing and batch requests**: Ignores inaccessible private activity data, preventing one permission issue from failing the entire request.
* **Fixed OAuth authorization**: App Builder integrations always show authorization prompts, and Google Sheets proceeds beyond selection after authorization.
* **Consistent OAuth service support**: Aligned App Builder Chat, General Chat, App Builder Agent Computer, and related CLI commands.
* **Improved resilience during brief database outages**: Reduces intermittent errors across tables, records, comments, sharing, and chat during connection recovery.
* **Fixed date-grouped summaries**: Group-level values now match visible daily and monthly groups instead of appearing incorrect or empty.
* **Fixed filtered comment counts**: Corrected legacy single-value date lookup fields while preserving permissions, pagination, collapsed groups, and substring search.
# Calculation, Search, and Stability Optimization
## Fixes & Improvements
* **Improved calculated field stability**: Fixed idle tables remaining stuck on “Checking calculation status” after Lookup or linked record updates.
* **Improved multi-level calculation accuracy**: Fixed missing or delayed downstream formula updates during multi-step Lookup and calculated field recalculation.
* **Optimized calculated field performance**: Reduced unnecessary calculations, Lookup, and Rollup updates when no records or results changed.
* **Improved calculation status messaging**: Prevented false warnings, clarified empty tasks, and retained unresolved errors for accurate progress tracking.
* **Improved calculation activity reliability**: Displayed errors clearly and preserved existing status after check failures or timeouts.
* **Prevented redundant invalid tasks**: Stopped retries for tasks tied to deleted or missing Bases, improving stability.
* **Improved shared document stability**: Enhanced error handling for collaboration, loading, and activity replay failures, with clearer permission messages.
* **Improved AI settings**: Fixed crashes when provider data is missing and allowed administrators to save empty custom provider configurations.
* **Improved full-field search performance**: Optimized large-table searches across lists, counts, groups, and aggregations, including numbers, rounded values, and short keywords.
* **Improved search task responsiveness**: Statistical queries now stop when users change or cancel searches, reducing wasted time and resources.
* **Improved restricted-user access**: Fixed false permission errors for readable calculated fields and improved reliability after permission changes or reconnection.
# GPT-6 Is Now in Teable
GPT-6 Astra brings a major leap in tackling complex business tasks. Compared with GPT-5.6 Sol, it completes **2.3x as many multistep business workflows** on AutomationBench, with scores roughly **34% higher on data science tasks** and **50% higher on database migration tasks** in OpenAI’s evaluations.
For Teable users, this means more capable AI for analyzing data, building apps, and creating workflows. It understands your requirements better, stays on track through longer tasks, and produces results that more closely match your business needs.
You can try it in Teable now.
# Query Deduplication and AI Import Optimization
## Feature Updates
* **Added Lookup field deduplication**: Removes duplicate values from multiple linked records for cleaner, more readable results.
* **Added AI import recommendations**: Prioritizes AI import when creating tables from existing content for faster, more accurate organization.
## Bug Fixes & Improvements
* **Improved Cuppy context window indicator**: Uses a neutral gray progress ring to clarify automatic context compression.
* **Improved filter layout**: Value inputs use available row width, with better Current User and statistical field filtering.
* **Improved public automation Webhook stability**: Fixed persistent 429 errors below documented rate limits, ensuring throttling states recover and reset properly.
* **Improved AI import reliability**: Better handles quota-related rejections and edge cases for more stable, consistent results.
* **Optimized large-table search**: Improved full-field search across lists, counts, groups, aggregations, shared views, and concurrent queries.
* **Optimized statistical query cancellation**: Reduces unnecessary processing when search criteria change or queries are canceled, improving responsiveness.
* **Improved Rollup conversion stability**: Fixed switching from “Unique Array” to “Count All” and validates formats against new result types.
* **Improved nested formula stability and performance**: Optimized repeated empty checks for Attachment, User, or Lookup fields, reducing computed-field update timeouts.
* **Fixed Lookup field filtering**: “Contains any → Current User” now correctly filters referenced User fields.
# New Pricing: More AI Credits. Save 44% Yearly.
> More AI Credits, a deeper yearly discount: yearly billing saves approximately **44%** compared with monthly billing, while delivering **50% more AI Credits per dollar** than before—making team growth more cost-effective and predictable.
## 1. What’s Changed
We are introducing new pricing for Cloud and Self-hosted plans, with more AI Credits included. Yearly billing saves approximately **44%** compared with monthly billing:
* **Pro (Cloud)**
* Monthly: \$12 → \$24
* Yearly: \$120 → \$160 (\$10 → \$13.33/month)
* AI Credits: 1,000 → 2,000 per seat/month
* **Business (Cloud and Self-hosted)**
* Monthly: \$24 → \$36
* Yearly: unchanged at \$240 (\$20/month)
* AI Credits (Cloud only): 2,000 → 3,000 per seat/month
For yearly Pro customers, included AI Credits increase by **100%**, while the monthly-equivalent price increases by only **\$3.33, or 33%**. For yearly Business customers, pricing remains unchanged across Cloud and Self-hosted, while Cloud customers receive **50% more Credits**.
## 2. How Seats and Credits Work
A Teable Cloud subscription is now based on two things: the number of paid seats your team needs and the amount of AI Credits included with each seat. All Credits are combined into one shared monthly pool:
**Purchased seats × Credits per seat = your team’s shared monthly Credits**
For example, five Pro seats include a shared pool of **10,000 Credits per month**. Owner, Creator, and Editor roles occupy paid seats, while Viewers and Commenters remain free.
If your team needs more AI capacity, you can select a higher Credit level directly within your plan. Larger Business Credit levels also include volume pricing. For new subscriptions, this replaces the previous model of purchasing recurring Credit add-ons separately.
## 3. Why We’re Making This Change
Since the beginning of the year, Teable’s paid user base has grown more than 60×. Teams are increasingly relying on Teable AI for important workflows, applications, and day-to-day operations, raising expectations for product quality, reliability, and model capability.
This update enables us to keep investing in a faster and more reliable product, continued access to leading AI models, and better support for production and business-critical workflows.
At the same time, the larger yearly discount gives long-term customers a substantially lower and more predictable cost, helping us invest consistently in the product they depend on.
## 4. Existing Customers Get More at the Same Price
Existing customers keep their current price and automatically receive more AI Credits (for Cloud customers)—no action required.
For example, existing Pro yearly customers remain at the equivalent of **\$10 per seat/month**, while included Credits double from **1,000 to 2,000 per seat/month**.
Seat changes keep the legacy price. Switching plans, billing cycles, or Credit levels moves the subscription to current pricing.
We’re grateful to the customers who have grown with Teable. We’ll continue honoring that trust by bringing long-term customers more value with every meaningful product and AI upgrade.
# Automation, attachments, and intelligent collaboration
## Feature Updates
* **Webhook synchronous responses**: Automation triggers support custom responses for Feishu/Lark, Slack, WeCom, and DingTalk URL verification; existing defaults remain unchanged.
* **Attachment deletion in previews**: Delete files while previewing; automatically switch to adjacent attachments for smoother review and organization.
* **Multi-Base Chat agents**: Discover and use accessible Bases in the current Space, or specify a target Base per command.
## Bug Fixes & Improvements
* **Improved computed-field pausing**: Allows safe writes during pauses; blocked writes return clear conflict messages and recommended retry times.
* **Standardized Secrets Manager terminology**: All languages use “Name” for Secret identifiers and “Secret” for values, reducing configuration confusion.
* **Stable table and schema updates**: Better handles timeouts, missing columns, and rollbacks, reducing failures, misleading messages, and manual recovery.
* **Reliable calculations and backfills**: Fixed multi-value Lookup, linked-record Rollup, and `max`/`min`/`and`/`or` failures; timed-out calculations retry automatically.
* **Fixed formula field creation**: Failed creation no longer makes related tables temporarily unavailable, allowing continued data access and operations.
* **Improved Webhook testing and configuration**: Tests show received requests; editing some settings preserves authorization and response configurations.
* **Linked-record Rollup results**: Compressed results show readable titles, preserve duplicates, and match UI/API behavior; integrations using legacy structures may need updates.
* **Improved conditional Rollup filters**: Preserves nested groups after reopening, works in narrow panels, and aligns Lookup-number results with API filters.
* **Attachment preview compatibility**: Displays file icons in thumbnails and previews when images fail to render, preventing blank or broken content.
* **Chat agent Base detection**: Improves discovery for Base-level users and prevents Base context leaking into shared or restored sessions.
* **Fixed API Access page**: Opening tables from the app sidebar no longer hangs; Advanced now uses the selected table.
* **Fixed long text field actions**: Referenced fields now open record context menus while preserving native browser menus for selected read-only text.
* **Improved Field AI errors**: Clarifies cancellation reasons for billing, quotas, authentication, account issues, and image-generation failures.
* **Reliable CLI Artifact operations**: Fixed operations using personal access or OAuth tokens; permissions and Space/Base restrictions are always enforced.
* **Consistent Artifact permissions after moves**: Artifacts follow their Base across Spaces and retain applicable access and sharing rules.
* **More stable App Builder chat**: Improves recovery after interruptions, prevents persistent “Recovering” states, and enhances rich-content display stability and security.
* **Improved mobile settings**: Refined layouts and navigation for smoother browsing and operation on mobile devices.
* **Faster wide-table queries**: Requests for limited fields load less unnecessary data, reducing resource usage and accelerating record queries.
# Artifact and stability upgrades
## Feature Updates
* **Cross-session Artifact updates**: Agents update existing Artifacts, preserve history, and see names in tabs; Artifact API/CLI dropped legacy chat parameters.
* **HEIC attachment thumbnails**: Generates PNG previews when supported; otherwise shows placeholders to prevent display issues.
* **App Builder publishing guidance**: Preview/Live switching is smoother and remembered per app; apps without Live versions receive clear publishing guidance.
* **AI field concurrency settings**: Space admins can configure concurrency; above-limit values are retained while the effective limit is displayed.
## Bug Fixes & Improvements
* **Updated API table creation defaults**: Tables created without records via API are empty; UI-created tables retain three blank records.
* **Faster large-table browsing**: Lists and grids load less via cursor pagination; API clients must request totals or use the count endpoint.
* **Refined substring search**: Prioritizes text and text-returning Formula/Lookup fields; wide-table or unsupported-field results may change.
* **Improved record-query performance and stability**: High-traffic reads use fewer resources while preserving existing query behavior and improving access efficiency.
* **Fixed recent Base ordering and duplicate collaborators**: New copies appear first; duplicates merge under the highest available role.
* **Improved conditional Rollup configuration**: Fixes nested OR and dynamic-match saving/calculation issues and improves narrow-screen controls.
* **Improved Rollup validation**: APIs enforce UI source-field and aggregation rules with clear errors; invalid legacy configurations require client updates.
* **More reliable computed-field updates**: Formula, Lookup, Rollup, and summary fields recalculate reliably after linked or dependent data changes.
* **Faster conditional Rollup calculations**: Multiple Rollups sharing linked records recalculate more efficiently, reducing timeout risks.
* **Improved Computed Outbox diagnostics**: Reliable task and error links, shared links, and Copy for Agent output accelerate troubleshooting.
* **Fixed linked-record selection state**: Selections and checkboxes remain synchronized across tab switches, reopened pickers, and asynchronous loading.
* **Streamlined Agent Computer browser tasks**: AI tasks use built-in browser tools, eliminating downloads and path setup for faster, consistent execution.
* **Fixed AI chat external-link dialog layout**: Controls no longer overlap, improving readability and usability.
* **Improved short-link redirects**: Links now redirect directly to canonical targets, reducing intermediate loading and wait time.
* **Fixed Auto Number filtering**: “Greater than” no longer breaks loading or row counts; saved values display correctly when reopened.
* **Secured editable shared views**: Record and field changes, including range paste, clear, and delete, are restricted to authorized views.
* **Fixed cross-Base Lookup/Rollup configuration**: Linked tables remain available when reopened; empty external Base references follow current-Base handling.
* **More accurate selected-row summaries**: Aggregations reliably honor filters, sorting, search, row ranges, and collapsed groups, with improved Timestamp support.
* **Fixed Single Select Rollups**: Unique values retain first-seen order; Count includes only unique non-empty values, potentially reducing results.
* **Improved linked-field failure resilience**: Record creation and schema updates remain stable when imports or deletions create inconsistent references.
* **Faster AI-assisted workflows**: Reduced redundant refreshes and requests across script editing, publishing, chat, and automations for smoother interactions.
* **Fixed record comment permissions**: Authorized collaborators can comment; read-only users only view discussions, and shared links hide comment controls.
* **Improved comment deletion and image uploads**: Deleted comments stay removed; uploads show clearer progress and errors, with sending blocked until completion.
* **Improved App Builder workspace recovery**: Temporary connection issues preserve workspaces and drafts; corrected version-history alignment prevents publishing failures.
* **Improved permission matrix usability**: Clearer status icons, tooltips, and better narrow-screen sidebar usability.
* **Fixed record archiving and export permissions**: Authorized collaborators archive without delete rights; archive exports respect permissions, and views update promptly.
* **Unified Skill and Teable CLI instance configuration**: Instructions, commands, authentication, settings, and errors now use the current instance address.
# Introducing Artifacts: Share Data Reports Anywhere
> Turn your Teable data into visual reports with AI, refine them through conversation, and share them with a link.
## 1. Create Artifacts with AI
Ask Teable AI to create a report, chart, summary, or comparison from your data. It generates an Artifact that you can open directly from the chat.
## 2. Keep Refining the Same Artifact
Continue chatting to update the same Artifact instead of starting over. Every update is saved as a new version, so you can review or restore earlier results. You can also find all your Artifacts in **Manage artifacts**.
## 3. Share Artifacts Anywhere
Create a link and share your Artifact outside Teable. Allow anyone with the link to view it, limit access to members of your space, or add password protection.
# Hebrew Support and Multilingual Experience Optimization
## Feature Updates
* **Added Hebrew interface support**: Community and Enterprise now localize settings, preferences, calendars, announcements, static pages, and SDK.
## Bug Fixes & Improvements
* **Improved right-to-left interfaces**: Enhanced icons, fields, panels, forms, menus, selectors, gradients, and keyboard navigation in Arabic and Hebrew.
* **Improved multilingual text editing**: Input direction follows Arabic and Hebrew interfaces while content direction remains automatically detected.
* **Completed Arabic translations**: Added missing Arabic text across pages and controls, reducing mixed English content for fuller localization.
* **Optimized self-hosted license mobile layout**: Improved small-screen display for easier credential viewing and management.
* **Improved relationship graph accuracy**: Shows only context-relevant relationships and excludes unrelated parent trees, clarifying data associations for administrators.
# Agent queue, compute, and stability optimizations
## Feature Updates
* **Added Agent queues**: Queue or guide 30 messages across tabs and reconnects; App Builder and Agent-to-Agent show status, senders, and controls.
## Bug Fixes & Improvements
* **Improved Rollup filter accuracy**: Fixed OR filters including unrelated linked records, ensuring expected Rollup results.
* **Improved Workflow stability**: Optimized snapshots and run lists at scale, reducing loading and archived-data calculation errors.
* **Improved copied-table sharing settings**: Copied views are unshared by default, preventing accidental exposure while preserving source-table links.
* **Improved Chat reliability**: Removed invalid Bot Chat records to reduce errors.
* **Improved table schema update stability**: Enhanced transaction failure recovery to prevent updates from getting stuck.
* **Improved view access for restricted collaborators**: Views remain accessible despite unauthorized filter fields, which stay hidden; operations use masked data.
* **Optimized deleted-table navigation**: Prevented hangs when reopening deleted tables; inaccessible tables now redirect to an available Base table.
* **Improved hybrid-mode calculation accuracy**: Lookup and Formula fields now refresh after large insertions, preventing blank or stale values.
* **Improved bulk-write data consistency**: Incomplete calculated-field updates now retry under high concurrency, improving imports and API bulk writes.
* **Improved calculated field dependency accuracy**: Fixed Lookup fields incorrectly appearing as final write nodes in calculation lineage graphs.
* **Improved complex-formula table stability**: Fixed hangs or timeouts when creating records with nested array formulas containing multiple user fields.
* **Optimized Workflow trigger table selector**: New tables now appear faster in Workflow trigger table lists.
* **Improved bulk update performance**: Skips unnecessary recalculation when Number fields have no dependent calculated fields.
* **Improved permission-based view operations**: Fixed blank grids and validation errors; group titles no longer expose restricted data.
# Content Creation, Table Import, and Optimization
## Feature Updates
* **New Artifacts**: Create, preview, revise, version, protect, and share HTML or Markdown from chats with short links and revocable permissions.
* **Native Google Sheets import**: Securely import public or private worksheets via onboarding, AI chat, or CLI, with type detection, progress, and failure reports.
## Bug Fixes & Improvements
* **Improved member selector**: Shared forms, kanban, plugins, and editable links can search members with access through nested or parent departments.
* **Improved computed field and bulk update stability**: Large recalculations recover safely after interruptions, reducing operational impact and resuming incomplete updates.
* **Improved calculation progress and errors**: Restored progress accurately and prevented misleading “Internal server error” messages during Airtable imports or recalculation.
* **Fixed SWITCH formula errors**: SWITCH now returns mixed types, including strings, numbers, booleans, datetimes, link fields, and lookup fields.
* **Improved Base duplication reliability**: Fixed naming conflicts and improved consistency when duplicating or deleting records and linked data.
* **Improved view loading and sorting**: Fixed personal view loading and stabilized sorting in masked views for smoother browsing.
* **Improved record history**: Deleted linked records now show “Record deleted” instead of outdated titles, clarifying historical changes.
* **Improved computed field dependency view**: Lookup fields are no longer omitted, providing a more complete picture of calculation dependencies.
* **Improved share-to-earn points claims**: Strengthened eligibility and weekly quota checks, with clearer failure feedback.
* **Optimized Google Sheets imports**: Improved narrow-screen and multilingual usability; handled blanks, problematic headers, empty sheets, authorization issues, and partial imports.
* **Improved CLI documentation and validation**: Clarified aliases, scopes, paths, deletion, skills, Agent Computer availability, providers, and configuration errors.
# Mobile experience, computing, and stability optimizations
## Bug Fixes & Improvements
* **Optimized calculation lineage view**: Shows only fields affecting downstream updates and clarifies status when no tasks are pending.
* **Improved calculated field update stability**: Makes formulas using numeric columns and text operations more reliable and accurate.
* **Fixed lost field settings**: Field updates and conversions now preserve options, including Markdown display settings for Long Text fields.
* **Improved mobile plan purchasing**: Fixed incomplete scrolling in plan dialogs on small screens, enabling full plan access and checkout.
* **Improved deleted-table consistency**: Deleted tables are now reliably logged and immediately searchable for quick status confirmation.
* **Optimized mobile view toolbar**: View options now use touch-friendly bottom drawers, with improved narrow-screen selectors and filters.
* **Improved locked-view feedback**: Clearer touch prompts explain why unavailable toolbar actions are restricted.
* **Optimized onboarding**: Clarified exit and skip flows, highlighted “I’ll write it myself,” refined recommendations, and updated all translations.
* **Streamlined post-onboarding flow**: Blank Bases open full-screen AI chat; existing Bases open their first table or mobile chat drawer.
* **Improved mobile onboarding stability**: Prevented blank resource pages and interrupted chats after AI-generated content redirects.
* **Fixed linked record responses**: Many-to-one links now return a single linked record instead of an array.
* **Improved conditional lookup accuracy**: Corrected field reference direction parsing for lookups within the current table.
* **Optimized archived data loading**: Stops unnecessary scans after enough results and prevents timeouts on large archive pages.
* **Fixed linked lookups in shared views**: Lookup fields now correctly identify tables referenced by linked record fields, preventing load failures.
* **Improved grouped views for restricted users**: Loads accessible records and skips or degrades grouping when fields are unreadable or hidden.
* **Optimized mobile plans and pricing**: Improved tabs, plan cards, billing details, and side menus for easier plan and billing management.
* **Improved multilingual labels**: Fixed localization for sorting, grouping, and search labels, with correct singular and plural forms.
* **Optimized calculated field lineage graph**: Corrected dependencies and connections, with automatic layouts for clearer field relationships.
* **Improved query recommendations and Deep Analysis**: Shows IDs beside Space, Base, and table names, and includes saved table views.
* **Fixed linked record field filtering**: Keeps selected records readable and supports switching from “is” to “contains” without filtering errors.
* **Improved table deletion and recovery**: Redirects collaborators to valid pages and provides recovery options, preventing broken links and repeated errors.
# CLI, Import, and Stability Updates
## Feature Updates
* **Added CLI import location selection**: Use `--folder-id` to import data into a target folder for flexible automation and archiving.
* **Added CLI device-code login**: Securely authenticate with `teable auth login --device-code` in SSH, containers, cloud IDEs, CI, private deployments, and custom domains.
* **Added persistent Agent Computer configurations**: Preserve, list, restore, update, and remove tool configurations and runtime states across environment rebuilds.
- **Added folder imports**: Import CSV, Excel, and Airtable data directly into a selected folder from its Add menu.
## Fixes & Improvements
* **Improved import location stability**: Imports now reliably target specified folders when folders and tables update simultaneously.
* **Improved large Excel imports**: Added real-time row progress, fewer timeouts, persistent results, and per-sheet row-limit summaries.
- **Improved record links**: Links copied from Kanban, Gallery, and Calendar now open correctly, including shared-view and linked-record scenarios.
- **Improved Lookup and Rollup field reliability**: Fixed linked-record-title “Contains” filters, stale conversion metadata, and failures from missing or inconsistent dependencies.
- **Improved AI image-generation compatibility**: Prevented aspect ratios from producing resolutions unsupported by GPT Image 2, increasing success rates.
- **Improved record deletion reliability**: Records can still be deleted when undo history cannot be fully saved.
- **Optimized record-copy notifications**: Copying records with assigned users no longer triggers incorrect new-assignment notifications.
- **Improved post-deletion view states**: Automatically switch to another view, or show a clear empty state when none remain.
- **Improved calculated field update compatibility**: Fixed table-update failures when recalculating formulas combining date or time values with text.
- **Improved multi-field search accuracy**: Results now follow active view filters, with consistent pagination, grouping, and summaries.
- **Fixed tracking-field sorting**: “Last modified time” and “Last modified by” now sort by their displayed tracking values.
- **Improved calculation task stability**: Strengthened Worker recovery and retries; Airtable imports now wait for table configuration before calculations resume.
- **Improved Table API compatibility and permissions**: Optimized copy/paste, export, calendar, search, comments, history, archiving, undo/redo, trash, and related operations.
# Teable Now Supports Arabic, Italian, and Spanish
> More languages for more teams worldwide.
Teable now supports Arabic, Italian, and Spanish, bringing the total to 11 languages. To change your language, click your avatar in the bottom-left corner and open **Preferences**.
# Multilingual, performance, and stability upgrades
## Feature Updates
* **Added Arabic support**: Added Arabic UI translations; the interface currently remains left-to-right.
* **Added Spanish and Italian support**: Enterprise Edition now includes complete translations in both languages.
## Fixes & Optimizations
* **Improved multilingual experience**: Refined all translations, reducing mixed-language content and English fallbacks for greater consistency and readability.
* **Improved localization and messaging**: Refined plurals, validation messages, dates, calendars, relative times, and errors for greater accuracy and local relevance.
* **Improved grouped view performance**: Accelerated loading and operations when grouping large tables by low-cardinality fields for smoother browsing.
* **Improved link field pasting**: Fixed blocked text pasting while the link picker is open.
* **Improved record list, grouping, and aggregation sorting**: Accelerated numeric, date, user, and formatted-date fields without changing order or null placement.
* **Fixed Cuppy permissions in permission-matrix databases**: Collaborators can use granted CRUD permissions, while unauthorized actions remain blocked with clearer errors.
* **Improved post-onboarding page loading**: Added a skeleton screen to reduce perceived waiting.
* **Fixed mobile Airtable import database selection**: Users can scroll normally to browse and select the complete database list.
* **Improved post-signup routing**: Template and AI generation destinations continue correctly instead of mistakenly entering onboarding.
* **Improved onboarding continuity**: Prompts and attachments persist through refreshes and signup redirects, preventing duplicate chats and enabling seamless continuation.
* **Improved new-user Base generation**: Free users retain prompts and attachments; failures show a blank space instead of indefinite loading.
* **Improved field search**: Results, counts, pagination, sorting, grouping, and aggregation respect filters and permissions, refreshing after changes.
* **Improved AI Agent output stability**: Streaming recovers from network or gateway interruptions without duplicated or corrupted text.
* **Strengthened AI Agent credential protection**: User-provided task credentials are more secure and immediately usable after submission.
* **Improved app and Base links**: Generated links use better formatting, reducing invalid or inaccessible links.
* **Improved SQL query API**: Standardized successful-status responses and added compressed responses for large results, improving reliability and efficiency.
* **Fixed attachment downloads**: Safari preserves original files, and compatible object storage services return correct file types.
* **Improved Grid View stability**: Fixed crashes when rapidly modifying fields or inserting fields from the column menu.
* **Improved linked-table deletion reliability**: Deletion completes when display columns are unavailable, reducing schema-update failures and manual recovery.
* **Improved large-table performance**: Accelerated record-list reading, filtering, and sorting for smoother large-scale data handling.
* **Clarified “Copy records” permission**: Distinguishes copying selected data to the clipboard from creating record duplicates.
* **Improved Ask User stability**: Submissions immediately end waiting, timeout handling is consistent, and malformed formatting no longer crashes pages.
* **Improved linked-record reliability**: Fixed deletion in copied or imported Bases, with cleanup and messaging for cross-Base, trashed-table, and deleted-field links.
* **Improved Excel import compatibility**: Supports title banners, leading blank rows, non-first-row headers, and duplicate or similar column names.
* **Fixed date grouping display**: Records group correctly when field and server time zones differ, preventing misplacement or hiding.
# Calculations, Relationships, and Performance Optimization
## Bug Fixes and Experience Improvements
* **Improve Formula and Lookup field update stability**: Ensure reliable backfilling despite storage type mismatches, reducing failures and stalls.
* **Optimize mobile Space page layout**: Keep navigation clear and usable when the header contains extensive information.
* **Improve desktop Base access**: Make the Base entry more prominent for faster access.
* **Improve numeric Lookup field update stability**: Prevent invalid values from causing update or conversion failures.
* **Optimize Lookup field configuration updates**: Improve stability when adjusting display settings, reducing unnecessary failures.
* **Optimize Lookup and Rollup performance for large tables**: Accelerate conditional processing, reducing timeouts and update failures.
* **Fix numeric Lookup field display errors**: Apply default number formatting when absent, preventing page crashes.
* **Improve linked table update stability**: Skip trashed referenced tables while continuing updates for other active tables.
* **Fix usage period display**: Correct billing period and timezone handling across usage dialogs, charts, and history for all plans.
* **Optimize App Builder preview guidance**: Reopen chat after selection and guide users to accessible Preview instead of unavailable local URLs.
* **Improve Excel import stability**: Handle duplicate or similar column names to prevent table creation failures in complex files.
* **Fix Link field recalculation**: Required single-record Link fields recalculate when records are empty but display values remain, refreshing dependent fields.
* **Improve browser translation stability**: Reduce errors from rewritten page content and stabilize onboarding in unsupported-language regions.
* **Optimize table operations with many fields**: Speed up record creation, duplication, and form submission for smoother data entry.
* **Improve table creation recovery**: Reliably resume creation when retrying after an invalid state, reducing repeated failures.
* **Fix app publication status syncing**: After unpublishing, promptly update the sidebar badge and share icon across collaborators and page refreshes.
* **Fix automation percentage copying**: Direct percentage field mapping now preserves original values instead of reducing them 100-fold.
* **Optimize bulk deletion and redo performance**: Accelerate large operations while preserving Recycle Bin restoration and clearing capabilities.
* **Optimize Formula field loading and calculation**: Reduce unnecessary requests and improve progress visibility and stability during large cascading calculations.
* **Improve invalid Formula value handling**: Avoid pointless retries and provide clearer failure messages for easier troubleshooting.
* **Fix shared app saving**: Saved apps appear immediately; duplicates no longer fail; copied folders are ordered last with conflict-free names.
* **Improve real-time table loading errors**: Show centered, localized notifications with clearer explanations for missing tables or restricted access.
# Onboarding, performance, and stability improvements
## Feature Updates
* **Added missing options when creating linked records**: Add missing options directly without leaving the current workflow.
- **Added first-time guidance for new Cloud users**: Step-by-step profile setup, data imports, AI-recommended automations and apps, and team invitations.
## Bug Fixes & Improvements
* **Improved mobile record comments**: Comments now fill the drawer, respect safe areas, and hide record navigation when opened.
* **Improved Markdown readability**: Refined spacing, list styles, and heading hierarchy for clearer structure and easier reading.
* **Improved field schema safety**: Protected system-managed columns can no longer be deleted, reducing accidental data loss.
* **Fixed bidirectional one-to-one Link deletion**: Removing Link fields no longer damages shared table schemas or record access, keeping data stable.
* **Improved multi-row pasting**: Reliably paste over 17 rows; stops if target records are missing or inaccessible, preventing incorrect writes.
* **Improved field type conversion performance**: Accelerated conversions that preserve values, such as converting Single Select fields to Text.
* **Improved invalid record link handling**: Removes invalid parameters and loads tables when records are invalid or inaccessible, preventing server errors.
* **Fixed App Builder task statuses**: Completed generation tasks now update correctly instead of remaining “Running.”
* **Improved cross-base Lookup and Rollup performance**: Optimized conditional calculations and refreshes results promptly after source record changes.
* **Improved App Builder GitHub integration**: Added repository validation, clearer errors, sensitive-file protection, and automatic cleanup of stale merged branches.
* **Fixed date sorting in grouped views**: Dates spanning multiple years now sort correctly, ensuring accurate grouping.
* **Improved calculated field update reliability**: Preserved value types for Lookup, Formula, Link, and Rollup during schema and data changes.
* **Improved inline table creation from records**: Required fields are validated before saving, preventing unusable tables from incomplete records.
* **Improved field deletion in large tables**: Faster deletion retains undo support for smoother high-volume operations.
* **Improved wide-table view duplication**: Reduced unnecessary data processing to accelerate copying views with many fields.
* **Fixed duplicate-value messages for unique fields**: APIs now return the conflicting field and localized guidance for faster resolution.
* **Improved automation date condition stability**: Fixed crashes and made date filters more reliable in triggers and condition editors.
* **Improved sign-up and login experience**: New users land on sign-up, with clearer switching between account creation and login.
- **Improved large-table duplication performance**: Duplication is approximately 48% faster for tables with 50,000 records and 20 fields.
- **Improved performance for bases with many fields**: Accelerated form submissions and record duplication for smoother operations.
- **Optimized calculated and Rollup field creation and duplication**: Reduced processing delays in large tables for faster configuration and copying.
- **Fixed column configuration in collapsed groups**: Double-click or right-click columns when all groups in a grouped grid view are collapsed.
- **Improved Lookup field reliability**: Fixed update triggers for legacy Lookup fields and streamlined conversion to basic fields for stable updates.
# Build AI Features in App Builder
> Apps built with App Builder can now use AI directly, without requiring your own AI API key.
## 1. Add AI Directly to Your App
Describe the AI feature you want, such as AI chat, summaries, or text generation. App Builder will build it directly into your app.
## 2. No AI API Key Setup
Teable connects your app to AI and manages the key. AI features work in both preview and published apps. Using Teable-provided models consumes Credits from the Space where the App is located.
# Shared Skills and Performance Upgrades
## Feature Updates
* **Added shared Skills management:** Install Skills in a Space, Base, or personal account, with configurable access permissions.
* **Added asynchronous compute task processing:** Enable on demand to maintain stability during task surges or bulk writes.
* **Upgraded context usage display:** A ring indicator below the input shows usage percentage and progress when clicked.
## Fixes & Improvements
* **Improved high-write-volume table stability:** Enhanced bulk-write handling to reduce timeouts and service outages during peak loads.
* **Fixed context compression status display:** The divider persists after refresh, usage updates promptly, and compression failures display accurately.
* **Optimized mobile top bar layout:** Resized and repositioned the top bar and chat button to prevent overlap with the statistics bar.
* **Fixed mobile dark mode display:** Corrected the chat button color for a clearer, more consistent interface.
* **Improved shared Skills experience:** Accelerated discovery and enhanced runtime isolation between Skills for greater efficiency and stability.
* **Optimized field change performance:** Faster field conversions and deletions reduce wait times when restructuring complex tables.
* **Optimized computed field updates:** Reduced duplicate calculations during cascading updates, improving performance for tables with extensive linked data.
* **Improved multi-field text search:** Accelerated searches across multiple fields while maintaining accurate filters and matches.
# Multi-app generation, bulk downloads, and stability improvements
## Feature Updates
* **Tab selection added**: Composer shows hints and accepts highlighted Skills or Slash Commands with Tab, preserving focus and mobile selection.
* **Multi-app generation progress added**: Chat now shows separate progress for each app generated from one prompt.
* **Batch file downloads by chat added**: Displayed files are grouped by chat and can be downloaded in batches.
## Bug Fixes & Optimizations
* **Calculations stabilized**: Large cells no longer block unrelated Formula, Lookup, or Rollup updates; Compute Activity retains errors until successful refresh.
* **Record creation near table limits optimized**: Safe writes are preserved, while operations that cannot complete safely are rejected.
* **Date-time field backfill fixed**: Schema updates no longer fail when calculated backfill values involve date-time fields.
* **Record writing and related calculation performance optimized**: Accelerated inserts, Upserts, and cascading Lookup or Formula calculations in highly linked tables.
* **Personal access token permissions strengthened**: Scoped tokens now strictly enforce configured action and resource permissions, preventing unauthorized access.
* **Calculation field processing reliability improved**: Improved frequent updates and stale dependencies, reducing failures and repeated retries.
* **Search results optimized**: Private or functional pages such as login, settings, developer, and Base appear less often.
* **Question card option display fixed**: Fixed mismatches between highlighted and submitted options, ensuring the final choice displays correctly.
* **Attachment and avatar loading stability improved**: Improved caching for public images, private previews, and updated avatars, ensuring more reliable loading.
* **CSV import failure messages optimized**: Failures now show the original cause instead of remaining in progress or displaying unrelated errors.
* **Table opening and statistics fixed**: Resolved inaccessible tables and restored statistics and aggregation features.
* **AI text and image automation errors improved**: More accurate feedback now covers input, capability, attachment, response, rate-limit, and timeout failures.
* **Linked record write validation strengthened**: Required links are validated during writes, and display values remain intact when titles refresh.
* **Record copying fixed**: Records containing linked or Lookup fields with date-time comparisons can now be copied successfully.
- **Lookup and calculated field updates stabilized**: Large Lookup groups and broad cascades no longer trigger server errors during bulk updates.
# Enhanced performance, real-time responsiveness, and stability
## Feature Updates
* **Set minimum scheduled task interval**: New or updated automations and email polling require 10-minute intervals; existing schedules remain unchanged.
## Bug Fixes & Improvements
* **Improve bulk selection performance**: Deleting, clearing, copying, and pasting tens of thousands of selected records is now faster and smoother.
* **Reduce duplicate member notifications**: Merge duplicates across undo, redo, bulk moves, imports, and table copies while preserving valid assignment alerts.
* **Optimize field type conversion**: Convert Single Select fields to Text faster in large tables, with undo and redo support.
* **Accelerate view duplication in large tables**: Improved performance reduces waiting time.
* **Improve view stability with field permissions**: Ignore inaccessible fields in saved filters or sorts, preventing errors while enforcing permissions.
* **Fix statistics after archiving**: Statistics, counts, and rollups now update promptly, with more reliable archiving, undo, and redo.
* **Improve calculated field cascading**: More reliably generate chained lookup values while improving overall calculation performance.
* **Optimize member field operations**: Copying, pasting, or filling clears unmatched former base or space collaborators instead of failing.
* **Improve record search**: Faster searches and more accurate highlighting align with records and fields on the current page.
* **Fix email trigger configuration**: Settings now save and update correctly when input values are cleared.
* **Improve real-time view updates**: View creation, duplication, restoration, updates, deletion, filtering, grouping, and sorting now appear without refreshing.
* **Stabilize operations during table loading**: Field edits, AI assistance, and schema changes avoid repeated connection and “Table not found” errors.
* **Fix occasional table creation freezes**: Tables with initial records now create reliably without blocking later imports or table creation.
# Brand customization and stability improvements
## Feature Updates
* **App Builder branding**: Published apps support custom favicons, titles, and descriptions for tabs, metadata, and previews; default: Teable Build favicon.
* **Extended Automation Script runtime**: Nodes can now run up to 180 seconds, supporting more complex, time-consuming automation tasks.
## Bug Fixes & Improvements
* **Improved Grid grouping and sorting reliability**: Changes sync instantly across view settings, pages, and collaborators, including rapid consecutive edits.
* **Improved sidebar after AI table creation failures**: Inaccessible entries are removed on refresh, preventing confusion and disruption.
* **Improved Grid linked-record labels**: Truncated labels no longer overflow adjacent cells, and ellipsis styling is now consistent.
* **Fixed records grouped by user**: Eliminated duplicate “Add record” rows, renumbering, and misplacement; collaborator and multi-user fields now group consistently.
* **Improved user-name display**: Last Modified By and Editor show names instead of IDs across record view, API, and collaborator fields.
* **Improved AI Chat reconnection**: Responses recover more reliably after brief network interruptions, reducing unexpected streaming failures.
* **Improved multi-level Lookup updates**: Chained Lookup fields now synchronize latest values accurately during concurrent linked-record updates.
* **Improved user field parsing and validation**: Recognizes restricted collaborators, phone numbers, and Enterprise department members; rejects unrelated or deleted users.
* **Improved calculation performance under high load**: Better handles busy databases, reducing slow or stalled writes during large linked-record updates.
* **Fixed AI Chat duplicates**: Prevents duplicate assistant rows when sending after stopping; message state remains consistent during resending and recovery.
# Announcing Data Archiving: Unlimited Rows, Now Possible
> Don’t need some records right now, but don’t want to delete them? Archive them. They remain available and no longer count toward your Row Limit.
## 1. Archive Records Instead of Deleting Them
Select the records, right-click, and choose **Archive**. This is useful for old sales leads, student records from courses completed over 90 days ago, API logs older than 90 days, and other data you may need later.
## 2. View Archived Records Anytime
Open the table menu in the upper-right corner, then go to **History → Archive** to view your archived records.
## 3. Archived Records Don’t Count Toward Your Row Limit
If your space uses 500,000 rows and you archive 100,000, only 400,000 rows count toward your usage.
You can keep adding new records while preserving your historical data.
# Base Migration and Stability Improvements
## Bug Fixes & Improvements
* **Expanded Base import support**: Import Bases without tables and with only Webhooks, enabling more automation migration scenarios.
* **Improved Base import/export reliability**: Preserve field descriptions and AI configurations during export and re-import, reducing repeated setup after migration.
* **Improved record creation stability**: Optimized workspace row counting and refresh, reducing delays/failures; unlinked tables no longer consume row quotas.
* **Fixed calculation status updates**: Errors now update after permanent Base/table deletion or storage migration, keeping administrators’ attention counts accurate.
* **Improved high-load write stability**: Optimized writes during busy periods, preventing long waits or stalls and smoothing record creation and updates.
* **Optimized Lookup and cascading updates**: Improved multi-level Lookup and external-link query/update efficiency, accelerating complex relational data processing.
# Computational Stability and Performance Optimization
## Fixes & Improvements
* **Improved task stability in read-only mode**: Pauses calculations during write conflicts and automatically resumes after database recovery.
* **Fixed computed field updates in migrated Bases**: Legacy records now recalculate correctly after imports or migrations.
* **Optimized record operation performance**: Improved query and processing efficiency for smoother large-scale record operations.
* **Improved Outbox failure statistics**: Fixed inaccurate counts for missing tasks while preserving failure history for troubleshooting.
* **Improved field operation stability**: Optimized conflict handling during creation, duplication, and deletion to prevent calculation interruptions.
* **Improved computed field stability**: Deleted tables no longer cause repeated failures, while restored tables automatically resume updates.
* **Optimized computed Lookup performance**: Accelerated backfills on large tables, reduced timeouts, and enabled resuming interrupted updates.
* **Optimized computed and lookup field updates**: Accelerated small-scale and multi-link changes while maintaining stability for large data tasks.
* **Improved computed field processing stability**: Optimized calculations during database load, reducing unnecessary retries and increasing update reliability.
* **Optimized record operation performance**: Accelerated reading, creation, and deletion, especially for large tables and bulk operations.
# Failure Record Management and Stability Improvement
## Feature Updates
* **Added recovered delivery failure management**: Hides recovered failures by default, with counts and a visibility toggle for easier troubleshooting.
## Bug Fixes & Improvements
* **Improved conditional rollup editor stability**: Fixed crashes after hard refresh when calculating date field minimums or maximums.
* **Optimized conditional rollup loading and format compatibility**: Prevented errors while link fields load or saved settings mismatch.
* **Improved link field cleanup reliability**: Optimized cleanup of invalid link fields and missing database objects, reducing deletion failures and inconsistencies.
* **Improved SMTP error messages**: Shows clearer causes and provider rejection details after delivery failures, accelerating email troubleshooting.
* **Improved generation task stability**: Prevented tasks from stalling when linked bases are missing or deleted.
* **Fixed image loading on shared pages**: Cover images, logos, and plugin logos now load correctly from absolute URLs.
* **Optimized mobile login experience**: Supports device safe areas and keeps login/registration switching controls visible and accessible.
- **Improved table filter stability**: Fixed filters not saving or applying in new views or views without existing conditions.
- **Optimized calculated field refresh failure handling**: Reduces redundant retries and reports failures sooner for faster troubleshooting.
- **Fixed incorrect prompts when editing Long Text fields**: Prevented batch confirmation dialogs without AI use when editing or toggling Markdown.
# Brand Customization and Performance Optimization
## Feature Updates
* **Expanded calculation activity access**: View details via Teable API Keys or personal access tokens, respecting existing space and table permissions.
- **Custom app branding**: Teable Build and App Builder support custom favicons up to 5 MB, browser titles, and page descriptions.
## Bug Fixes & Improvements
* **Improved large-table read performance**: Faster sorting, grouping, searching, and paginated views, with accurate pagination for smoother, reliable browsing.
* **Improved legacy column compatibility**: Views with legacy column metadata now open normally without manual cleanup.
* **Fixed number field creation**: Number fields now create successfully and display correctly in grid view, even with incomplete field information.
* **Fixed filter view notifications**: Prevented false alerts when opening table filter views containing Lookup fields referencing Link fields.
* **Improved automation reliability**: Dependency changes from Lookup, Rollup, or Link fields trigger automations reliably; same-table calculation changes still do not.
- **Improved calculation field stability**: Fixed update interruptions and repeated calculation failures involving conditional Rollup, Lookup, and field-reference filter configurations.
# Deployment, AI, and Stability Improvements
## Bug Fixes & Improvements
* **Simplified self-hosted deployment**: Docker starts without preconfigured keys while existing encrypted data remains accessible. Production deployments should use dedicated keys.
- **Improved Pro upgrade guidance**: All roles see upgrade options; non-owners selecting “Upgrade to Pro” are prompted to contact space owners.
- **Improved view filter stability**: Incomplete filter conditions no longer disappear during setup, making filter editing more reliable.
- **Fixed linked record search in shared views**: Searches follow Link field settings and table permissions for accurate, authorized results.
- **Improved unavailable table handling**: Better handling of unavailable related tables reduces errors and improves reliability.
- **Improved conditional update performance**: More efficient processing makes related operations respond faster.
* **Unified calculated field statuses**: Single-field and field-list APIs consistently return pending statuses for Formula, Lookup, Rollup, and other calculated fields.
* **Improved conditional Lookup recovery**: Restore fields from Trash with matching conditions and resolved results intact, preventing configuration or data loss.
* **Improved AI Chat stability**: Queued messages resume after stopped responses; better temporary-failure and busy-state handling reduces interruptions.
* **Improved usage limits**: APIs, bulk editing, imports, exports, and streaming now share localized notices and accurately enforce row quotas.
* **Faster AI Chat image uploads**: Attachments complete independently, so slow or failed uploads no longer block others or subsequent conversations.
* **Improved cache configuration detection**: Configuring a Redis URI automatically enables Redis; select other services through the cache provider configuration.
* **Fixed incomplete linked record display**: The linked record picker shows more available records, improving accuracy especially for cross-Base links.
* **Improved conditional Lookup and Rollup compatibility**: Unsupported field-reference comparisons no longer disrupt reading or updating unrelated records.
* **Fixed empty table duplication**: Tables without records can now be duplicated reliably for quick structure reuse.
* **Improved saved view loading**: Fixed occasional “Socket Error” failures when loading records in saved views with scalar Lookup filters.
# Announcements, Archiving, and Performance Upgrades
## Feature Updates
* **Targeted in-app announcements**: Schedule, localize, and withdraw multilingual announcements for specific users via banners, Toasts, modals, or sidebar cards.
* **Recycle Bin snapshots**: View complete deleted-record snapshots and filter by resource type, operator, deletion time, creator, or creation time.
* **Business record archiving**: Browse, restore, permanently delete, or export archived records to CSV, with longer retention and lower active-table load.
* **Improved published app management**: Adds prominent quick access, clearer unpublished-change alerts, and better version history and rollback.
## Bug Fixes & Improvements
* **More stable table filtering**: Fixes errors when deleting the last filter, clearing filters, or opening views with incomplete date filters.
* **Improved filter synchronization**: Toolbar summaries update immediately, and filter changes sync more reliably across connected clients.
* **Improved AI generation cancellation**: Stopping chat, App Builder, or Agent generation is handled normally, preventing errors in other windows.
* **More reliable checkpoint generation**: Improves checkpoint reliability under high load, reducing state-save failures on busy databases.
* **Faster large-table calculations**: Improves calculated field processing in highly linked tables, reducing write stalls, memory pressure, and 503 errors.
* **More accurate calculated fields**: Fixes dependency propagation across comparisons, linked records, Lookup, Rollup, circular dependencies, and partial recalculations.
* **Faster Lookup updates**: Shortens Lookup propagation after single-record updates, displaying linked data sooner.
* **Optimized conditional Rollup calculations**: Avoids unnecessary large-scale recalculations in complex dependencies, improving responsiveness and reducing resource usage.
* **More stable field type conversion**: Fixes prolonged freezes when changing field types in tables containing calculated fields.
* **Consistent time handling**: Fixes time offsets in scheduled tasks, metadata updates, and database workflows across non-UTC deployments.
* **Improved AI workflow creation**: Places generated nodes near source nodes and lets creation commands specify folders.
* **Stronger sharing permission controls**: Sharing controls honor user and access token permissions, disabling unavailable options with explanations.
* **Improved field creation auditing**: Field creation logs now include field names, types, and options for clearer schema auditing.
* **Fixed orphaned linked field deletion**: Linked fields can now be deleted after their referenced tables are removed.
* **Broader core data compatibility**: Improves formulas, Lookup, Rollup, filtering, sorting, grouping, search, aggregation, link validation, field lifecycles, and Base duplication.
* **Consistent null writes**: Cleared text, checkbox, attachment, user, link, and multi-value fields save as null, with reliable required-field validation.
* **Improved linked-record writes**: Link updates accept single-link and multi-link inputs, supporting integrations, imports, and cardinality changes.
* **Stricter date validation**: Strict writes reject invalid dates; conversions save them as null instead of silently changing them.
* **Improved date field conversion**: Text-to-date and formula-to-date conversions skip invalid dates, preventing isolated errors from blocking entire conversions.
* **Fixed Rating field conversion**: Prevents invalid stray values and standardizes decimal rounding for consistent ratings.
* **Stronger record and field permissions**: Enforces table, row, and field permissions for record operations, including masked fields and disabled grants.
* **Fixed user avatar compatibility**: Updating records for users without custom avatars no longer fails; initial-based default avatars remain available.
* **Fixed grouped view loading**: Adds required grouping field data, preventing some grouped views from failing to open.
* **Improved view stability**: Improves reliability for creation, updates, sharing, imports, duplication, real-time updates, plugin views, and concurrent editing.
* **Improved self-hosted registration**: New users reliably join eligible auto-join Spaces as Viewers, including Spaces with SSO enrollment.
* **Improved unsubscribe page usability**: Pages remain usable after preferences update successfully, even if a later refresh fails.
* **Fixed duplicate automation runs**: Prevents repeated action chains and duplicate messages, Webhooks, or emails.
* **Improved Formula automation triggers**: Source-field changes updating Formula results now trigger automations correctly without duplicates or loops.
* **More reliable bulk deletion undo and redo**: Reliably restores or repeats large deletions, reducing recovery errors and unexpected timeouts.
* **Optimized large imports and table duplication**: Reduces unnecessary initial history and database load without affecting routine edit history.
* **Improved mobile attachment previews**: Widens spreadsheet viewing, improves horizontal scrolling, prevents navigation overlap, and correctly fits rotated images.
* **Faster Base loading and navigation**: Reduces duplicate requests and safely opens previously visited, pinned, or eligible default Bases.
* **Fixed invalid Base links**: Invalid direct links return to the standard entry flow, avoiding redirect loops and unnecessary errors.
* **Improved field validation messages**: Improves localized required and unique-field errors, identifying duplicate fields in bulk and selection-based operations.
* **Stronger secret management**: Improves secret handling and secure credential rotation, reducing risks from long-lived credentials.
* **Improved real-time grid loading and updates**: Reduces synchronization bandwidth and improves loading and responsiveness on slower networks.
# App Builder Now Supports Visual Editing
> App Builder now lets you refine your app directly in the preview, making small changes faster and helping reduce Credits used during optimization.
## 1. Edit Page Text Directly
Edit supported text directly in the app preview, then save the changes to your app without going back to the source code.
## 2. Select an Element and Tell AI What to Change
Select an element directly in the app preview, then describe what you want to change. AI can use the selected element as context, so you can make more precise updates without explaining where it is in the app.
# GPT Price Cuts, Automatically Passed on to Teable Users 🚀
OpenAI has reduced the price of GPT-5.6 Luna by **80%** and Terra by **20%**. Since Teable’s AI stack is powered by GPT models, these savings are automatically reflected in Teable—no action required.
The latest update enables Terra delivers quality comparable to GPT-5.5 at **half the cost** and with **60% shorter completion times**. In agent workloads, Luna significantly improves cache reuse, reduces output tokens, and cuts costs by **up to 87%**.
This makes everyday AI tasks and large-scale AI Field workflows in Teable faster, more affordable, and easier to scale, including use cases such as generating personalized emails and marketing copy.
# Permission Management, Performance and Experience Optimization
## Feature Updates
* **New permission matrix configuration tool**: Export, edit, preview, compare, validate, and apply permissions via CLI with anti-lockout protection.
## Bug Fixes & Improvements
* **Improved mobile shared-page actions**: Key options like sign-in are easier to find and use on small screens.
* **Restore default icons**: Remove custom emoji icons from tables and Bases to quickly restore defaults.
* **Improved initial table loading**: Tables open faster, with blank rows fixed in some loading scenarios.
* **Improved automation reruns**: Rerunning workflows preserves the current tab and task context for continued review and processing.
* **More stable bulk cell clearing**: Clearing many cells is smoother and more responsive, reducing freezes and failures.
* **Unified Base content loading states**: Consistent feedback appears when opening, refreshing, or switching tables, automations, apps, and dashboards.
* **Fixed Grid view loading on scroll**: Records beyond the first 100 display correctly when many fields are visible.
* **Improved desktop Chat expansion**: Content selection restores the sidebar without losing context; folder interactions retain the expanded layout.
* **Faster Base opening from spaces**: Reduced initial load times and improved access in data-saving mode and on extremely slow networks.
* **Optimized question and confirmation cards**: Faster display, simpler options, better unanswered-prompt handling, and reduced spacing and page shifts.
* **Synced Agent Computer resources**: New AI Chat and App Builder Agent Computers use System Administration’s CPU, memory, and temporary-disk limits.
* **Fixed selection field conversion**: Option values no longer temporarily disappear after switching between Single Select and Multiple Select fields.
* **Improved grouped Grid view interactions**: Expanding or collapsing groups refreshes only affected areas and preserves scroll position for smoother layouts.
* **Improved complex Base stability**: Reduced redundant calculations and resource usage during frequent updates with many computed fields and conditional rollups.
* **Fixed automation variable selection**: Conditions after scheduled triggers now select the correct variables, ensuring workflows evaluate and run properly.
* **Improved AI Chat responsiveness and recovery**: Answers complete faster, with stronger error recovery for more stable conversations.
# Teable Skill for AI Agents
Connect Claude Code, Codex, Cursor, and other AI agents directly to your Teable directly — create tables, query data, build automations and apps all through conversation. No browser switching needed.
Just tell it what you need. For example:
### Simple Starter Prompts
* Create a simple CRM table in this base.
### Local Files → Teable
* Upload all invoices in this local folder to `` `{paste table URL}` and extract key fields.
### Cross-Platform Data → Teable
* Import new GitHub issues into `` `{paste table URL}`.
### Clean or Organize Teable Data
* Check `` `{paste table URL}` and mark overdue tasks.
Go to **Personal Settings → Teable Skill** to install it and try the starter prompts.
# Collaboration, auditing, and stability improvements
## Bug Fixes & Improvements
* **Standardize IM terminology**: Rename the chat entry to “Chat in IM” and consistently use “IM bot” for clearer access and usage.
* **Improve read-only template previews**: Remove irrelevant calculation states and unnecessary checks, reducing 403 errors and smoothing template viewing.
* **Improve record query reliability**: Fix unstable sorting, filtering, and searching for records missing creation or modification data.
* **Optimize button field change warnings**: Warn only when updates may affect calculations or overwrite data, avoiding warnings for display-only changes.
* **Fix grouped grid view loading**: Restore access when grouped fields are hidden and footer summaries are enabled for restricted users.
* **Improve Agent Computer generation stability**: Better handle runtime and notification failures, reducing retries, task interference, and lost final results.
* **Improve enterprise SSO login reliability**: Generated apps now show clear authorization errors instead of loading indefinitely, enabling faster troubleshooting.
* **Standardize collaborator invitation notifications**: Send invitations via email and in-app messages, with pop-ups for unread requests.
* **Improve Self-hosted audit logs**: Deletions retain record IDs and sources; Space and Base creations, updates, and deletions are fully logged.
* **Improve Self-hosted audit log stability**: Optimize logging to reduce errors without affecting completed user actions.
* **Optimize the light-mode favicon**: Improve browser-tab visibility and recognition, helping users quickly find the correct page.
# Synchronization, navigation, and stability improvements
## Feature Updates
* **Added space AI concurrency limits**: Admins set per-space limits; five tasks run concurrently by default, and excess requests queue fairly.
* **Added admin-initiated password resets**: Authorized admins generate expiring one-time links, emailed via SMTP; unavailable when password login is disabled.
* **Improved grid view column reordering**: Changes apply instantly; failed saves restore the original order and display an error.
## Bug Fixes & Improvements
* **Improved Lookup field synchronization**: Values recalculate reliably after source changes, including filtered and conditional Lookups, with faster bulk updates.
* **Improved Claw bot chat stability**: Chats migrate to accessible Bases after removal, while completed replies are delivered more reliably.
* **Improved AI task execution**: Enhanced scheduling, cancellation, recovery, progress accuracy, and exception handling for deleted Bases or stalled generation tasks.
* **Improved Base navigation and loading**: Persistent, cancellable loading indicators prevent duplicate navigation while preserving native new-tab behavior.
* **Improved SSO callback handling**: Expired callbacks now return authenticated users to the app and unauthenticated users to login.
* **Improved view switching**: Prevents stale rows, settings, controls, or permissions from flashing and restores recent layouts smoothly during loading.
* **Improved quota billing stability and performance**: Ensures accurate charges, refunds, limit checks, and quota allocation across billing periods and add-ons.
# Invitation notifications, performance, and stability
## Feature Updates
* **Added Space and Base invitation notifications**: Receive in-app invitations and quickly open the relevant Space or Base.
- **Added Audit Log refresh**: Manually refresh logs and view full actor, Space, and Base names.
## Bug Fixes & Improvements
* **Improved app publishing consistency**: Synchronizes concurrent editing, generation, and publishing so published apps match the latest preview.
* **Optimized invitation limits**: Prevents subscribed organizations from being disabled during batch invitations; Community Edition is exempt from hourly auto-disable.
* **Fixed “Record History” opening issues**: Prevents sidebar crashes and clarifies labels for “Record History” and “Recycle Bin.”
* **Improved Kanban “Stack by” dialog closing**: Close it with Esc, by clicking outside, or by selecting “Done.”
* **Improved date field batch updates**: Accelerates batch updates for records containing date fields, making large-scale operations smoother.
* **Improved concurrent request stability**: Enhances query reliability when multiple requests run simultaneously, reducing failures and errors.
* **Improved table switching**: Provides smoother loading, faster data display, safer caching, and accurate row-count loading states.
* **Fixed tables with search indexes failing to open**: Ensures stable access to tables with search indexes enabled.
* **Improved member invitation interactions**: Click anywhere in the email input area to focus and start typing.
- **Improved table navigation stability**: Prevents loading freezes and opens the last-used or default view when none is specified.
- **Improved invitation notification accuracy**: Prevents duplicate or incorrect notifications when email or batch invitations fail.
- **Improved calculated field performance**: Increases speed and stability under high concurrency for lookup, linked-record, repoint, and fanout updates.
# Introducing Teable 3.0: The AI Spreadsheet for Business
Teable 3.0 is a major step forward for real business work with AI. You can build 100% business-fit AI workflows and custom apps, creating a true AI business data hub. With Teable, you can also connect any system or migrate data into one place.
Whether you’re a small business or an enterprise, Teable helps your team become truly AI-native.
## What’s new in Teable 3.0
* **Connect & Migrate Anything** — Move from Airtable, spreadsheets, files, and other systems into Teable. Data, table structures, attachments, and linked records can be migrated into one AI-ready workspace.
* **Complex Task Capabilities** — Teable can now handle long-running tasks, such as handling dozens of Excel or CSV files at once, or processing PDF documents of up to 100 pages.
* **Super Automation** — Automate custom workflows that fit your business, from contract expiration reminders to weekly sales reports, Slack updates, approvals, and operational processes.
* **Custom Apps That Fit Your Business** — Build dashboards, booking pages, portals, internal tools, and business apps directly on top of your data.
* **Business-Aware Email Agents** — Generate and send personalized follow-up emails in bulk using your customer data and business context. Personal inboxes and unsubscribe links are supported.
## 🙌 Support Our Product Hunt Launch
If you like what we’re building, your upvote would mean a lot to us: **[Teable 3.0 on Product Hunt](https://www.producthunt.com/products/teable-4)**
# AI Context, Short Links, and Performance Optimization
## Feature Updates
* **Added Teable Chat App context**: Uses authorized, @mentioned Apps’ code, structure, and configuration for accurate AI help while excluding sensitive settings.
* **Added short links for sharing and templates**: Simpler links make content easier to share and use.
## Bug Fixes & Optimizations
* **Improved Recycle Bin stability**: Fixed errors with bulk-deleted records and improved reliability when loading or restoring large batches.
* **Improved cross-Base calculated field updates**: Prevented updates from blocking or failing, ensuring timely, accurate data.
* **Improved view switching performance**: Reduced duplicate loading and unnecessary refreshes for smoother view switching.
* **Improved field calculation status**: Clarified progress and changes, simplified the activity panel, and added translations.
* **Improved Recycle Bin previews for bulk deletions**: Shows sample deleted records and the remaining count for easier review.
* **Improved large table performance**: Accelerated loading for tables with many columns, making complex tables smoother to browse and edit.
- **Fixed manual sorting**: Record order now remains consistent after real-time updates or page reloads.
- **Improved self-link record picker**: Shows only fields visible in the current link and returns complete records.
- **Improved table description layout**: Reduced maximum width to avoid covering view tabs, clarifying headers and simplifying navigation.
- **Unified link field visibility**: API visibility changes preserve linked tables’ primary fields in link fields and shared link settings.
- **Improved attachment and data import stability**: Improved trusted-source attachment access and import request reliability, reducing runtime configuration failures.
- **Fixed shared Base copy failures**: Copies succeed despite out-of-scope plugin panels, including only shared content and skipping invalid items.
- **Fixed views stuck on “Calculating”**: Improved Formula and Lookup field recovery to prevent prolonged calculation states.
- **Improved formula-based Lookup fields**: Enabled editing and conversion, with more reliable loading, saving, display settings, and error handling.
# Enhanced Airtable import experience
## Feature Updates
* **Added Airtable import feedback**: Importing into the current Base opens the imported table; other Bases return access links for quick review.
* **Added Airtable imports via Personal Access Token**: Import with valid target permissions and integration Scope, enabling flexible, secure migration.
## Bug Fixes & Optimizations
* **Improved Airtable migration stability**: Enhanced transfers, downloads, record reading, and error handling; interruptions and timeouts now retry or stop safely.
* **Fixed OAuth login failures**: Prevented “Failed to create user record” errors for first-time users with domain or open login enabled.
* **Optimized app login and user creation**: Unified new-user creation while preserving existing App Token writing capabilities for better compatibility.
* **Optimized project documentation**: Updated the README cover image and community layout for a clearer, more browsable project overview.
- **Improved column sorting**: Reordering or moving columns no longer fully refreshes records, reducing loading states, flicker, and duplicate requests.
- **Improved table responsiveness**: Records remain visible when only column settings change, avoiding unnecessary skeleton screens and ensuring uninterrupted data browsing.
- **Improved question summary statuses**: Accurately distinguishes answered, pending, skipped, unselected, timed out, and canceled states for quick progress checks.
- **Improved attachment summaries**: Displays sizes in clearer units like MB and GB, with better spacing in narrow columns.
* **Improved AI message handling stability**: Consecutive AI messages are processed in sending order, reducing context confusion and unintended task execution.
* **Fixed AI interaction issues**: Resolved skipped publishing confirmations, disappearing question cards, and apparently stalled agents for smoother, more stable workflows.
* **Optimized guided interactions**: Improved attachment handling and alignment in interactive dialogs for consistency and readability beside standard chat messages.
* **Improved Trash cleanup reliability**: Optimized large workflow history cleanup and handling of non-retryable failures and temporary database connection errors.
* **Improved URL import security**: Restricted local, private-network, internally redirected, and untrusted storage resources, reducing external content import risks.
* **Improved field management stability**: Fixed recurring errors when creating, updating, or deleting fields for more reliable configuration and maintenance.
# Performance, search, and stability improvements
## Bug Fixes & Improvements
* **Improve large-scale operation performance**: Optimize rollup field copying, inline table creation, and bulk deletion for smoother workflows.
* **Optimize rollup field updates**: Accelerate backfilling and on-demand reads for calculated field updates while ensuring accuracy.
* **Optimize bulk deletion**: Eliminate redundant processing while preserving batch controls, undo/redo, real-time updates, audits, automations, and trash.
* **Fix referenced field deletion crashes**: Confirmation dialogs now open reliably, with stable confirm and cancel actions.
* **Fix first OAuth login for generated apps**: New domain/open-login users can create accounts without the “Failed to create user record” message.
* **Fix hidden fields in expanded records**: Authorized users can view them when enabled, with content loaded only when needed.
* **Preserve hidden field preferences**: Existing “Show hidden fields” settings, including legacy preferences, remain after updates.
* **Optimize hidden field loading in shared views**: Access follows shared-table scope, preventing failures when expanding linked records from other tables.
* **Fix access tracking for new Bases**: New Bases are correctly marked as visited, ensuring consistent subsequent workflows.
* **Improve embed configuration**: Add bottom spacing and prevent settings popovers from being obscured or unusable.
* **Correct OAuth scopes**: Access tokens now include only explicitly approved permissions, preventing unauthorized additional access.
* **Optimize large workspace integrity checks**: Reduce repeated linked-field metadata scans, improving reliability and lowering database load.
* **Improve table search on large datasets**: Increase speed and result reliability under high traffic for a more stable experience.
* **Improve automated email reliability**: Recover automatically from mailbox connection failures and skip invalid email results, reducing workflow interruptions.
# Calculated fields and stability optimization
## Feature Updates
* Added visible calculation status for computed fields, including formulas, lookups, and rollups.
## Fixes & Improvements
* **Improved table selection with search highlights**: Selected rows or cells are easier to distinguish from search results.
* **Improved summary display in narrow columns**: Key values like percentages are prioritized to reduce misleading truncation.
* **Fixed group field values for new records in grouped views**: New records inherit the correct group value even when hidden.
* **Improved computed result updates after linking records**: Lookup and formula fields update faster after user info changes.
* **Fixed save failures when only editing field names or descriptions**: Edits no longer trigger unnecessary computed field backfills.
* **Improved editing stability for rollup and computed field settings**: Reduced errors when editing related field configurations.
* **Fixed configuration loss after renaming nested lookup fields**: Single-select options and displayed record values are preserved.
* **Improved Cookie handling stability**: Enhanced compatibility and stability across deployment environments, reducing related issues.
# Stability and Performance Optimization
## Fixes & Improvements
* **Fixed select option editing**: Clicking existing **Single select** or **Multiple select** options now opens the dropdown reliably.
* **Improved formula field stability**: Fixed failures in nested **Lookup** and **IF** formulas with certain numeric results.
* **Improved many-to-many link stability**: Fixed reverse link fields not updating promptly after large-scale background update failures.
* **Improved high-volume link field handling**: High-cardinality Link fields now calculate and display more reliably.
* **Improved formula and lookup update speed**: Multi-stage linked record updates now refresh calculations and cascades faster.
* **Improved calculation task stability**: Paused calculation tasks are no longer repeatedly awakened, reducing invalid scheduling.
* **Fixed table recycle bin menu issues**: Recycled tables now only show relevant actions like restore and delete.
* **Fixed deleted table restoration issues**: Restoring a table now only restores fields and views from that deletion.
* **Improved AI response performance**: AI Proxy SSE and streaming responses now reduce unnecessary caching and parsing.
* **Improved high-frequency background paths**: Settings reads, tracking, data cleanup, and session lookups are now lighter.
* **Enhanced session file matching checks**: Session file lookups now use stricter ID validation to reduce mismatches.
# Security and stability optimization
## Fixes & Improvements
* **Improved shared access experience**: Anonymous visitors now see node descriptions when first opening shared content.
- **Improved cross-database migration reliability**: Moving a Base now better preserves data, schemas, fields, relations, and permissions.
- **Improved Agent task progress display**: Each new task shows independent progress, avoiding interference from previous task status.
- **Fixed Lookup field configuration errors**: Switching target fields after selecting a date field no longer causes page errors.
- **Improved Lookup field configuration updates**: Existing Lookup configurations are handled more reliably when switching target fields.
- **Improved AI field batch generation performance**: Reduced database load from linked updates during large-scale AI content generation.
- **Improved complex field dependency calculations**: Dependency handling is more efficient, making large Base recalculations more stable.
- **Fixed calendar view color panel display**: Color options now display correctly.
- **Unified calendar view color experience**: Calendar colors now match single-select and multi-select field colors.
- **Strengthened Base access permission checks**: Prevents accessing other Base resources through incorrect Base paths.
- **Fixed workflow permission issues**: Strengthened checks for viewing, running, testing, copying, enabling, disabling, and deleting workflows.
- **Fixed table permanent deletion permissions**: Tables can only be permanently deleted by authorized users in their Base.
* **Improved Self-hosted audit log loading speed**: Grouped audit log browsing is faster and smoother.
* **Improved long-running Agent task status sync**: Task status is more consistent across page recovery, snapshots, and real-time updates.
* **Fixed Lookup field display issues**: Lookup fields based on select fields no longer show empty UI while APIs return data.
* **Improved view filter stability**: Views no longer crash when filtering by affected Lookup fields with missing options.
* **Improved Lookup field option sync**: Lookup fields better preserve and display options after source field option changes.
# AI Memory and File Downloads
> Teable AI can now remember what you ask it to remember across conversations and let you download generated files.
## 1. Remember Instructions Across Conversations
Ask AI to remember recurring instructions, such as formatting or processing rules. It will remember them in the same Base, even after you clear the conversation or start a new one.
## 2. Download AI-Generated Files
You can now download AI-generated files, including PDFs and JPGs, directly from the chat.
# AI, app building, and performance optimization
## Feature Updates
* **New Teable Skill**: AI Agents like Claude Code and ChatGPT can connect to Teable Base and manage data, tables, fields, views, records, automations, and apps.
* **App Builder preview supports direct element selection**: Select page elements on the canvas and attach them to Chat for targeted edits.
* **App Builder supports inline static text editing**: Edit static text directly in preview, with clearer save and discard actions.
## Fixes & Improvements
* **Improved table search experience**: Search options, feedback, hints, and row visibility explanations are clearer.
* **Improved self-hosted license entry points**: License purchase and management are unified for easier access and understanding.
* **Fixed Rollup field filters not applying**: Filters in Rollup field “More options” now save correctly and affect calculations.
* **Improved Lookup and Rollup condition update performance**: Faster recalculation for many linked records, especially in large related tables.
* **Improved email automation sending performance**: Resource reuse is more efficient for bulk emails, reducing execution time and improving stability.
* **Improved App Builder inspector stability**: Element selection and text editing are more reliable after navigation, saves, syncs, or regeneration.
* **Improved cross-database Base move stability**: Base data, fields, relationships, permissions, and metadata migrate more reliably across databases.
* **Improved AI Agent execution efficiency**: Reduces unnecessary command lookups, repeated validation, and context usage for faster Teable operations.
* **Improved bulk record creation guidance**: Clearer JSON and `jq` validation suggestions reduce retries and errors for complex imports.
* **Fixed inconsistent streaming tool parameters**: Tool parameters stay consistent across live events, saved snapshots, and restored UI sessions.
* **Improved Lookup and linked calculation field update latency**: Calculation fields update more promptly with many linked records.
* **Fixed record history cleanup boundary issue**: Histories for same-day created or updated, then permanently deleted tables are cleaned more accurately.
* **Improved AI response speed and automation stability**: Faster first AI responses and more stable scheduled automations under heavy load.
* **Fixed hidden App Builder mobile AI chat entry**: Users can now open AI chat normally on mobile.
* **Improved chat panel dragging**: The divider no longer gets stuck when releasing the mouse over the preview area.
* **Fixed record history filter dropdown scrolling**: Field and user filters in dialogs can now scroll and select all options.
* **Fixed mobile photo thumbnail orientation**: New or regenerated thumbnails now respect EXIF orientation in Gallery and Grid views.
* **Improved image metadata handling**: Image dimension information is normalized more consistently during upload.
* **Improved self-hosted license page dark mode styling**: The page now better matches the overall product style.
# Copy and calculation performance optimizations
## Bug Fixes & Improvements
* **Preserved external link field data**: Keep linked record values when copying tables with external link fields.
* **Improved table copy performance**: Faster copying for tables with self-links or external link fields.
* **Improved Base copy experience**: Large Base copies are processed more efficiently with faster progress updates.
* **Improved self-link record copy stability**: Self-link relationships are preserved more reliably during copying.
* **Expanded copy performance coverage**: Added safeguards for external link field copy performance to prevent regressions.
* **Fixed public shared form submission errors**: Reduced 500 errors caused by route detection issues.
* **Optimized conditional Rollup performance**: Faster `count`, `sum`, and `average` calculations with field-reference conditions.
* **Improved complex Rollup stability**: Optimized calculations with filters, grouped records, `array_join` sorting, limits, and Lookup sorting.
* **Faster copying for tables without links**: Copy tables without Link fields faster and preserve record IDs reliably.
* **Ensured correct linked table copy results**: Link, Lookup, Rollup, and cross-table references remain isolated and correct.
* **Fixed FIND / SEARCH formula issues**: Improved stability for JSON fields like multiple select and linked records.
* **Improved large-scale formula recalculation reliability**: More stable cascading recalculations for text search formulas.
# Template, field, and stability updates
## Feature Updates
* **Improved template date timezone adaptation**: Templates now adjust date timezones based on the user environment.
* **Added manual attachment storage refresh**: Admins can manually refresh attachment storage usage when billing data is delayed.
## Fixes & Improvements
* **Fixed record creation failure in legacy tables**: Legacy tables no longer fail when “Created by” is empty or database-generated.
* **Fixed linked record paste display**: Pasted linked records now show titles immediately instead of temporarily showing “Untitled”.
* **Improved formula field calculation**: User names from creator or editor fields are more reliably treated as text.
* **Fixed isolated link field deletion**: Link fields can now be deleted after the linked table is removed.
* **Improved conditional lookup field performance**: Reduced timeout and temporary table unavailability risks when adding certain conditional lookup fields.
* **Fixed clearing field default values**: Defaults can now be cleared for Single Select, Multiple Select, Number, Member, Checkbox, and Date fields.
* **Improved new records after clearing defaults**: New records no longer reuse previously configured default values.
* **Fixed new option display in Grid view**: New Single Select or Multiple Select options no longer disappear until refresh.
* **Improved select field editing**: Newly added options stay visible, matching the display after refresh.
* **Improved template publishing stability**: Fixed occasional page unresponsiveness after publishing templates.
* **Improved CLI automation trigger updates**: CLI updates now only change trigger configuration without adding extra script actions.
* **Improved file and attachment reading stability**: Reduced slow responses, oversized messages, and failures from large files or images.
* **Improved formula field performance**: Optimized formulas like `CONCATENATE` to reduce slowdowns in specific filtered views.
* **Fixed Lookup date grouping display**: Existing Lookup date/time values no longer appear as “Empty” when grouped.
* **Improved multi-value Lookup date grouping**: Date/time values in multi-value Lookup fields now display correctly in group titles.
* **Fixed linked record clicks in Grid view**: In edit mode, clicking linked record tags now opens record details.
* **Improved record history stability**: Large legacy history cells load and clean up more reliably; oversized content shows a **truncation marker**.
* **Improved computed field error handling**: Known deterministic computed SQL generation failures now skip retries and enter error handling.
# GPT-5.6 Is Now in Teable
GPT-5.6 replaces GPT-5.5 as Teable’s default model, bringing stronger performance to complex app-building and agentic tasks. When working with large tables, documents, and unfamiliar data, it can better understand relationships, plan steps, and complete the same work with fewer actions: app-building steps are reduced by roughly **25%**, tool actions by **35–48%**, and stuck runs by **15%**; million-context reasoning improves by about **70%**, while abstract reasoning on unfamiliar tasks scores about **18x higher**.
Teable now supports **GPT-5.6 Sol and Terra**. This gives Teable AI a stronger model foundation across **AI Chat, App Builder, AI Fields, and automation**, with different model tiers available for different levels of task complexity.
You can try it in Teable now.
# History, AI, and Stability Optimization
## Fixes & Improvements
* **Improved history stability for large tables**: History archiving, cleanup, and compression now run automatically in the background.
* **Improved record history pagination and reading**: Fixed pagination and timeout issues for more stable history viewing.
* **Improved history handling for deletion and import**: Fixed history issues during permanent deletion and imported record creation.
* **Fixed App Builder public app login redirect**: Public apps no longer redirect to Teable login when login is disabled.
* **Improved billing stability**: Charges and refunds are more reliable under high concurrency, reducing duplicates and failures.
* **Fixed Date field display issue**: Date-only fields no longer include time values in formulas or copied results.
* **Fixed date filtering issue**: Date conditions like “after or equal” are more stable, preventing automation script failures.
* **Fixed attachment preview issue**: Onboarding attachments can be previewed more reliably after entering the app.
* **Improved AI streaming responses**: AI-generated content now streams more smoothly, reducing frontend waiting and lag.
* **Improved AI content saving reliability**: Generated content is better preserved even if streaming is interrupted or fails.
* **Fixed linked record display issue**: Linked records in the first column no longer temporarily show as “Untitled” after Number field updates.
* **Improved required field setup prompts**: Failed required field saves now show clearer messages about missing configuration.
* **Added localized error prompts**: Required field validation messages now follow the user’s language.
* **Fixed App Builder public access issue**: Published App Builder apps no longer redirect to Teable login when login is disabled.
* **Improved billing stability**: Charges and refunds are more reliable, reducing delays, duplicates, and refund errors.
* **Fixed date field display issue**: Date-only fields no longer unexpectedly include time values in formulas or copied results.
* **Fixed date filtering issue**: Automation scripts no longer fail when using date conditions like “equal or after.”
* **Fixed onboarding attachment preview issue**: Onboarding attachments now preview more reliably in apps, reducing expired-link loading failures.
* **Improved AI app creation**: AI now turns user needs into clearer, structured prompts for more accurate App Builder generation.
* **Improved Agent Computer startup speed**: Reduced unnecessary startup checks so AI Agent returns the first response faster.
* **Improved connector menu display**: The “Connect everything” entry is clearer and less likely to be confused with integrations.
* **Improved Agent file reading**: Large files are read more reliably, reducing failures caused by excessive content length.
* **Fixed workflow record retrieval issue**: Missing or invalid `create time` no longer causes workflow record retrieval failures.
* **Standardized workflow node time format**: Node timestamps now use ISO format for more stable validation and service handling.
* **Fixed required single-select field creation issue**: Existing records now receive defaults before required constraints are applied.
* **Fixed Enterprise License validation issue**: Existing self-hosted License Keys remain valid after upgrades, avoiding false “license is invalid” errors.
* **Fixed duplicate website onboarding attachments**: Website-provided attachments no longer appear twice in auto-submitted prompts.
* **Fixed false “unpublished configuration changes” prompt in App Builder**: Published apps no longer require redeployment when configurations are unchanged.
* **Improved environment variable change detection**: Encryption metadata or timestamp-only changes are no longer treated as configuration changes.
* **Fixed Airtable import failures caused by duplicate select options**: Imports are more stable when trimmed option names conflict.
* **Fixed duplicate message sending**: Resolved cases where Teable AI could send duplicate messages.
* **Fixed required single-select record creation issue**: Records can now be created when required single-select fields have defaults.
* **Improved recovery entry for abnormal tables**: Recovery actions remain available when tables enter an error state.
* **Strengthened comment permission controls**: Comment details, reactions, updates, deletion, and references are now strictly scoped.
* **Improved Link field data repair**: Missing linked records are handled more reliably during cleanup or repair.
* **Improved record history processing stability**: Fixed cases where history processing could stop, allowing pending data to continue automatically.
* **Improved large history table processing**: Optimized memory usage when processing large history datasets for long periods.
* **Improved temporary file handling for large tables**: Reduced temporary disk usage for tables containing large JSON content.
* **Improved data writing and refresh reliability**: Better error handling prevents missing data, unreleased resources, and incorrect error attribution.
# Skills Are Now Available
Teable now supports Skills in AI Chat. Type `/` to call a skill and let Teable AI handle specific tasks with more focused instructions.
## 1. Process Files with Built-in Skills
Use XLSX, PDF, DOCX, and PPTX skills to help Teable AI understand and process different file types more accurately.
## 2. Create Your Own Skills
Use Skill Creator to turn repeatable AI workflows into reusable skills. For example, you can turn an email-screenshot-to-lead workflow into a skill and reuse it later with `/`.
# Performance, AI, and stability optimizations
## Bug Fixes & Improvements
* **Improved notification experience**: Toast close buttons no longer cover actions; layout, spacing, and duration are more consistent.
* **Improved Self-hosted audit log performance**: Grouped audit logs load faster with Previous/Next pagination to reduce duplicates and empty pages.
* **Fixed AI table reading issues**: AI no longer reads or references incorrect rows when Command+F search is active.
* **Improved app chat initialization**: Chats are created more reliably when creating, copying, or resetting apps.
* **Fixed app rollback error**: Rolling back after clearing a conversation no longer incorrectly returns 500.
* **Enhanced chat ID validation**: External chat IDs are verified against the current app to prevent incorrect associations.
* **Improved frozen column experience**: Frozen areas adapt to visible space and show clearer warnings when space is insufficient.
- **Improved foreign key repair**: Fixed cases where auto-repair appeared available but remained blocked, improving relationship recovery stability.
- **Enhanced foreign key constraint repair validation**: Added target table metadata checks to reduce post-repair relationship issues.
- **Limited space and username length**: Added maximum length validation to improve data consistency.
# AI, Billing, and Stability Optimization
## Feature Updates
* **Improved AI voice input experience**: Transcription now starts after recording ends, making AI chats start more smoothly.
* **Added manual billing usage calibration**: Manually refresh record counts in billing usage details to ensure 100% accuracy.
* **Added integration authorization entry**: Connect services like Slack directly in chat without copying raw OAuth links.
## Fixes & Improvements
* **Improved switch validation prompts**: Shows clearer blocking reasons when tables lack available fields or primary fields.
* **Fixed linked space detection**: Fixed missing inbound linked spaces when multiple `foreignTableId` values exist in field configuration.
* **Improved skill import and management UI**: Related workflows are clearer and easier to use.
* **Improved select option editing stability**: Fixed misleading “Outbox transaction failed” errors caused by computed field recalculation failures.
* **Improved lookup field usage in formulas**: Single-value lookup fields are handled more reliably as numbers, booleans, or dates.
* **Improved large Grid view duplication**: Fixed timeouts and “operation scope too large” errors when duplicating large Grid views.
- **Fixed Agent Computer file download errors**: Fixed 500 errors when filenames, paths, or URL parameters contain Chinese characters.
- **Improved non-English filename downloads**: Improved response headers and file type handling for files with non-ASCII characters.
# AI, Permissions, and Stability
## Feature Updates
* **Improved Teable Agent resource link recognition**: Agent now better recognizes Teable table, app, automation, and record links.
## Bug Fixes & Optimizations
* **Fixed organization permission inheritance**: Members now correctly receive permissions from departments or user groups, including parent departments.
* **Fixed date formula evaluation issues**: `IS_BEFORE`, `IS_AFTER`, and `IS_SAME` now return correct booleans in logical functions.
* **Improved status/date formula stability**: Time-based process states are now more reliable.
* **Fixed record insertion after attachment upload**: Reduced “Attachment not found” errors when inserting records after uploads.
* **Fixed inaccessible or undeletable error tables**: Tables in error states can now be removed for easier recovery.
* **Improved chat response speed**: Cached information is prioritized to reduce wait time.
* **Improved chat attachment handling**: Files sent through guided input are now preserved, displayed, and passed into chat.
* **Fixed attachment upload blocking in queued chats**: Improved upload stability in queued chat scenarios.
* **Fixed duplicate AI replies**: Reduced duplicate responses after the first instruction.
* **Fixed aggregation result loading failures**: Tables with mixed-case field names now load summary results more reliably.
* **Fixed saving shared Bases as copies**: Users can now save copies when shared links allow “Save as copy”.
* **Improved app card display in AI conversations**: Related app cards now appear below messages with context preserved.
* **Improved CLI help and documentation**: Clarified scope, base parameters, skill import, GitHub skill paths, login config, and SQL table naming.
* **Improved Agent Computer startup experience**: Enhanced app preview prewarming for faster, more stable app opening.
* **Unified SQL query experience**: SQL query permissions are now consistent across UI and CLI.
* **Improved table content display in AI Chat**: “Add to chat” now shows **field names** instead of column positions.
* **Improved AI Chat selection markers**: Row and column selections are clearer, helping AI understand referenced ranges.
# AI, formulas, and workflow optimization
## Feature Updates
* **Restored BYOK AI model support**: Agents now support Anthropic and OpenAI-compatible message models with custom keys.
## Bug Fixes & Optimizations
* **Fixed Personal Access Token permission selection**: The permission scope selector now scrolls properly for all resource permissions.
* **Optimized Agent model selection**: Agents now select the matching model more accurately based on the configured model key.
* **Improved workflow stability**: Reduced cases where workflows stay `running` due to temporary database connection issues.
* **Optimized workflow recovery**: The system now recovers interrupted or stale workflow runs for more consistent queues and history.
* **Improved workflow failure logging**: Failed steps now retain error details more reliably for easier troubleshooting.
* **Optimized formula and lookup recalculation performance:** Reduced large SQL generation and duplicate calculations to lower database memory pressure.
* **Fixed formula error retention:** Formula error details are now preserved more reliably during updates for easier troubleshooting.
* **Optimized space collaborator list display**: Fixed compressed, stretched, or misaligned collaborator tags for better readability and consistency.
# File management and stability optimization
## Feature Updates
* **Agent Computer file management**: View storage usage, remaining capacity, and file details like name, size, update time, and directory.
* **Cuppy Bot file management**: Manage Bot file resources more easily from the Cuppy Bot admin page.
* **Self-hosted LicenseKey auto-renewal: expired self-hosted LicenseKeys now renew automatically from Teable Cloud, without email-based manual updates.**
## Bug Fixes & Improvements
* **Improved Agent Computer upload experience**: Increased default upload limits and improved validation for attachments, file operations, and storage quotas.
* **Fixed Android text selection**: The system copy/cut toolbar now appears when selecting text in cells on Android browsers.
* **Improved publish progress display**: Fixed possible status bar flickering for more stable publish progress.
* **Improved access after base duplication**: Duplicated bases now appear at the top of Recent for quicker access.
* **Improved automation retry guidance**: Failure recovery now better explains full rerun limits and suggests checking failed node logs first.
* **Improved skill configuration experience**: System skills are clearer, with improved interface copy.
* **Improved App Builder previews**: Mobile and tablet previews better match real devices, with smoother resizing transitions.
* **Fixed record creation failures**: Fixed possible internal server errors when creating records in tables with computed fields.
* **Improved computed field stability**: Optimized same-table computed field references to reduce record creation failures in complex tables.
* **Fixed legacy table update errors**: Fixed failures when updating regular fields in legacy tables containing formula fields.
* **Improved formula field update handling**: Record updates now preserve formula logic, preventing errors like `column can only be updated to DEFAULT`.
# Computing, Recovery, and AI Optimization
## Feature Updates
* **Visible Trash Recovery Progress**: Large table or data restores now show real-time progress and status.
## Fixes & Improvements
* **Improved Formula Field Refresh**: Formula fields recalculate immediately after linked records are updated.
* **Fixed Record Update Consistency**: Updated records now return the latest computed field values.
* **Fixed Record Creation Failures**: Field identifiers conflicting with SQL syntax no longer easily cause internal server errors.
* **Improved View Loading Stability**: Invalid deleted-field columns are ignored to prevent view loading or rendering failures.
* **Improved OAuth Token Revocation**: Revoked tokens expire more reliably, improving account access security.
* **Fixed Grid Paste Range**: Pasting after bottom-up selection now fills the entire selected range correctly.
* **Improved Large Selection Operations**: Selection counts are more accurate and large cell operations are more stable.
* **Fixed Reappearing Deleted Attachments**: Deleted uploaded attachments no longer reappear when creating a new record.
* **Improved AI Chat Recovery Stability**: Reduces duplicate sends, duplicate attachments, and chats stuck in “Processing” after refresh or reconnect.
* **Improved Conditional Lookup Performance**: Cross-linked-table field comparisons are faster and more stable, reducing timeouts.
* **Fixed Table Freezing After Field Deletion**: Tables are less likely to hang or fail refreshing during related calculations.
* **Improved Calculation Stability**: Optimized calculations using row sorting and attachment lookups, reducing refresh failures after schema changes.
* **Improved Record Recovery Stability**: Deleted records now restore with the correct data connection, reducing false “Database connection unavailable” errors.
* **Improved Agent Computer Log Viewing**: Runtime logs are easier to view for real-time monitoring and troubleshooting.
* **Improved Agent Computer Startup Performance**: Runtime components load on demand, reducing unnecessary startup overhead.
* **Improved AppBuilder / Agent Computer Recovery**: Sessions recover more reliably after interruptions, reducing context loss and repeated recovery failures.
# Recycle Bin & Field Recovery Optimization
## Fixes & Improvements
* **Improved table trash recovery**: Fixed cases where tables could not be restored after deleting fields.
* **Enhanced field value recovery stability**: Improved safety and efficiency when restoring field values in bulk.
* **Improved Link field recovery**: Deleted symmetric Link fields are now included in recovery to reduce incomplete related data.
# Table features & performance optimization
## Feature Updates
* **Added “Add to Chat” for cells**: Send a selected cell’s content directly to chat.
* **Added table description editing**: Add purpose notes and usage details to help teams understand tables.
* **Improved node information display**: Node panels now show clearer ID labels by node type.
## Fixes & Improvements
* **Improved complex field calculation performance**: Lookup, Rollup, and Formula fields now respond faster and more reliably.
* **Improved bulk record deletion performance**: Deleting many selected records is faster with less lag.
* **Improved bulk attachment update performance**: Updating many attachment fields at once is more stable.
* **Improved complex text wrapping**: Thai and other complex scripts wrap better in grid cells.
* **Improved Agent Computer startup and execution**: Faster cold starts and quicker responses after commands finish.
* **Improved Agent Computer session stability**: Reduced lost conversations, unexpected new sessions, and “No conversation found” errors.
* **Improved App Builder recovery**: Better restores `.env.local`, source drafts, and in-progress AI chat generation after restarts.
* **Fixed collaborator display after space switching**: Collaborator lists now refresh correctly when switching spaces.
* **Fixed Email field issues in API filters**: Selecting Email fields no longer creates invalid filter conditions.
* **Fixed importing linked titles with Formula primary fields**: Data with Formula primary linked titles now imports correctly.
* **Fixed CSV import without headers**: The first row imports as data when header usage is disabled.
* **Fixed record list loading with permission matrix**: Record lists load more reliably in BYOBD scenarios.
* **Fixed unavailable settings after converting Formula to Text**: Field information now refreshes correctly after type conversion.
* **Fixed calculation tables possibly freezing after field deletion**: Related calculation tables now refresh and load data more reliably.
# AI Build and Import Optimization
## Feature Updates
* **AI Builder supports adding guidance during runs**: Add instructions while an Agent runs without interrupting the task.
* **New file info panel**: View creator, creation time, last modifier, and last modified time from the node context menu.
* **Improved AI Builder publishing**: Preview content is saved before publishing to keep the published app consistent.
## Fixes & Improvements
* **Fixed duplicate input after disabling unique validation**: Fields now allow duplicates correctly after uniqueness is disabled.
* **Fixed linked record deletion failures**: Related data is cleaned more thoroughly to reduce foreign key constraint failures.
* **Improved bulk deletion performance**: Reduced redundant processing for common deletion scenarios of around 1,000 records.
* **Improved Airtable Base selector loading**: Search box and grid layout stay visible to reduce layout shifts.
* **Fixed Airtable connection checks**: OAuth is less likely to close prematurely when adding accounts or reconnecting integrations.
* **Improved Airtable import flow**: Source selection is clearer, share link guidance is friendlier, and multilingual prompts are improved.
* **Improved Airtable OAuth authorization**: Authorization pop-ups close more reliably during import, setup, and reconnection.
* **Improved filter condition selector styles**: Unified font sizes for better visual consistency and readability.
* **Improved automation condition panel styles**: Inputs, dropdowns, buttons, heights, fonts, and colors are more consistent.
* **Improved login configuration preview**: Login method and provider changes apply more reliably with fewer unnecessary iframe refreshes.
* **Fixed login settings issue**: Login can still be disabled after the linked user table is deleted.
* **Improved login settings validation**: Next is disabled when “Allowed email domains” is selected without entering domains.
* **Improved Agent Computer creation and recovery**: New Agent Computers no longer incorrectly reuse tokens from old tasks.
* **Improved projection view record reading performance**: Grouping metadata is reduced by default; integrations can request it explicitly.
# AI Import and Stability Improvements
## Feature Updates
* **New AI external system connection support**: Teable AI now imports data from HTTP-based external systems into Base, including auth, pagination, mapping, tables, and records.
* **New Airtable connection and import support**: Users can connect Airtable in chat and import bases into Teable with the `/airtable` skill, supporting core Airtable data.
- **Personal custom Agent skills now supported**: You can now create, import, enable, and sync skills for easier workflow reuse.
- **Important notices are more prominent**: Critical admin and billing notices are now highlighted more prominently, reducing missed alerts.
- **Agent Computer reminders are timelier**: Browser notifications now alert you sooner when tasks finish or need your attention.
- **Record history is easier to read**: History entries now show clearer timestamps and more natural field names, with change filtering support.
## Fixes & Improvements
* **Improved single-select and multi-select handling**: Deleting options or pasting invalid values no longer clears existing data.
* **Improved CSV import experience**: CSV imports now preserve column mappings more reliably, reducing interruptions and timeouts.
* **Improved shared views**: Shared view results now better match personal views, with safer hidden fields.
* **Improved App Builder preview performance**: App Builder previews now load faster, open smoother, and avoid unnecessary large-file transfers and flashes.
* **Improved App Builder and App import stability**: Import, restore, save, and preview flows are now more stable.
* **Improved Agent Computer and AI generation recovery**: Reloads, network issues, and service restarts now recover in-progress tasks more reliably.
* **Improved AI Agent streaming output**: Streaming output is now more stable for retries, errors, and file display.
* **Improved large-data performance**: Bulk field deletion, record deletion, base duplication, table creation, pagination, and grouped queries are faster.
* **Fixed form and automation updates**: Automated field updates, including dates, now refresh into tables more promptly.
* **Fixed paste and batch operation issues**: Currency formatting, text filtering, and ID-based select, copy, and delete actions are now more accurate.
* **Fixed attachment and file issues**: Attachment uploads, file downloads, and generated-file previews are now more reliable.
* **Fixed collaboration and message display issues**: Chat recovery, notification previews, key prompts, and collaboration refreshes are now more stable.
* **Fixed record creation failures in some tables**: A 'relation already exists' error is now resolved, improving write stability.
* **Improved admin backend display**: Table action buttons on the space management page are now aligned for a cleaner interface.
* **Fixed AI Chat continuation after errors**: After message or tool-call failures, you can continue chatting or retry without starting a new session.
# Agent Computer, Supercharged
We have fully rebuilt Agent Computer, significantly improving Cuppy's processing speed and long-task stability. You will feel a smoother experience in every conversation with AI, across both AI Chat and App Builder:
* **Improved Agent Computer stability**: When Agent Computer is unavailable or abnormal, the system automatically recovers and retries, reducing stuck conversations or failed requests.
* **Improved App Builder stability**: The runtime environment can recover on demand, reducing issues caused by dependency installation and environment errors.
* **Improved App Builder preview stability**: While AI is writing code, you can see app changes in real time instead of seeing only a placeholder.
* **Improved App Chat startup and first-response speed**: In large-table scenarios, repeated loading is reduced, so chat startup and first response are faster.
* **Improved AI task stability**: When the network briefly disconnects or WebSocket reconnects, tasks are less likely to be incorrectly marked as failed, reducing "response interrupted" messages.
* **Reduced false AI Autofix triggers**: Some non-critical preview messages no longer incorrectly trigger autofix cards, making issue diagnosis more accurate.
* **Improved Agent Computer isolation**: Reduced unexpected reuse of old state between runs, making execution results more stable and controllable.
* **Improved project save, export, and rollback reliability**: Reduced errors when handling large projects, and prevented failed reads from being treated as empty projects and overwriting app code.
# Selection Summary in Grid View
Teable now shows Sum, Average, and Filled as soon as you select numeric cells in Grid view, so you can quickly check totals, averages, and filled cells without formulas or extra fields.
Use it for everyday data checks like expenses, sales totals, budgets, ad spend, working hours, inventory counts, project estimates, and reporting reviews.
* Large selections can now be calculated accurately, even when some rows are not loaded yet.
* Small loaded selections still show results instantly.
* Results follow the current Grid order, including personal views.
* Grouped views now calculate selected ranges more accurately.
* Empty or all-null selections now show the correct result instead of staying in loading.
# Import, Privacy, and Stability Improvements
## Feature Updates
* **Improved CSV append import**: Large CSV imports are more stable, reducing failures from adding many records at once.
* **Enhanced privacy for anonymous shared views**: Forms, boards, plugins, and read-only user pickers now show names and avatars instead of emails.
* **Adjusted user search in anonymous shares**: User pickers still work, but search now supports names only, not emails.
# Fixes & Improvements
* **Fixed Formula field error state**: Formula fields now recover after deleted references are replaced with valid expressions.
* **Improved Base duplication**: Reduces gateway timeout messages when copying older Bases that actually succeed.
* **Improved CuppyClaw chat stability**: Reduces incorrect “busy” prompts that prevent users from continuing conversations.
* **Improved Agent Computer stability**: Automatically recovers and retries when unavailable or abnormal, reducing stuck chats and failed requests.
- **Fixed AI Agent chat continuation issues**: Continuing or retrying chats is more stable when chat history is empty or missing.
# App Build and Stability Optimization
## Feature Updates
* **App Builder supports larger preview mode**: Added expanded preview to view apps in a larger interface before publishing.
* **Clearer App Builder buttons**: Added text labels to icon buttons for better readability and accessibility.
* **More reliable App Builder version management**: Improved stability for saving, loading, rollback, export, copy, build, and deployment.
* **More accurate App Builder status messages**: Shows realistic progress states like initializing, thinking, working, and committing.
## Fixes & Improvements
* **Fixed first record creation in empty tables**: Creating the first record no longer triggers generic `ERROR` messages.
* **Improved bulk field deletion performance**: Deleting multiple fields in large tables is faster and less disruptive.
* **Fixed field deletion issues in read-only views**: Improved stability and reduced edge-case errors when deleting fields.
* **Fixed row operation misalignment in personal views**: Paste, clear, and delete now target visible rows more accurately.
* **Improved linked record handling in CSV append imports**: Linked records, Lookup values, and back-references update more reliably.
* **Improved calculation updates after linked record imports**: Related computed fields update more reliably, reducing data inconsistencies.
* **Improved Base copy stability**: Copying Bases with many fields or large structures is more reliable.
* **Faster Base copying**: Optimized batch processing and linked fields to reduce wait time for large Bases.
* **Improved cross-Base link copying**: Cross-Base links and relationship-based linked record behavior are preserved more completely.
* **Fixed chat file downloads**: Generated files now download from the correct location, reducing link and file errors.
* **Improved App Builder stability**: Runtime environments can recover on demand, reducing dependency and environment issues.
* **Optimized Agent Computer isolation**: Reduces unintended reuse of old state, making execution results more stable and controllable.
# App Deployment and Stability Optimization
## Feature Updates
* **Real-time App deployment progress**: App publishing now shows progress, reducing uncertainty while waiting.
* **Enhanced App deployment**: Improved self-hosted deployment, Custom Domain handling, and deployment feedback for smoother publishing.
* **Chat file downloads**: Files in App Builder Chat can now be downloaded.
## Fixes & Improvements
* **Improved bulk record update performance**: Faster Bulk Record Update API responses for large records and mixed field updates.
* **Improved attachment upload panel**: Clearer upload errors, progress, status, and failure reasons.
* **Improved image upload prompts**: Updated icons and text to clarify “clear” and “delete” actions.
* **Fixed copying cells after filtering**: Copying selected cells in filtered views no longer includes hidden records.
* **Improved view data caching**: Copying data and record navigation now better match visible results after view changes.
* **Improved organization member invites**: Unified “add members from organization” button text and adjusted the search icon position.
* **Fixed attachment upload styling in dark mode**: Hover backgrounds now display correctly during bulk attachment uploads.
* **Improved field error colors**: Dark mode validation prompts are softer while remaining clear.
* **Fixed Single Select option limit**: Higher `TABLE_LIMIT_SELECT_CHOICES_MAX` now correctly supports more Single Select and Multiple Select options.
* **Fixed permission filters affecting record creation**: Permission rules based on lookup user fields now support record creation and updates more reliably.
* **Fixed attachment display in formula fields**: Formula fields referencing attachments now show readable filenames instead of blank or invalid content.
* **Improved App Chat startup and first response**: Reduced duplicate loading in large tables for faster startup and first responses.
* **Reduced false AI Autofix triggers**: Some non-critical preview prompts no longer incorrectly trigger Autofix cards.
* **Improved AI task stability**: Temporary network drops or WebSocket reconnects are less likely to falsely fail tasks.
* **Improved App Builder preview stability**: Reduced duplicate dev server starts, port conflicts, and false startup failures.
* **Improved project save, export, and rollback reliability**: Reduced large-project errors and prevented accidental empty-project overwrites.
* **Prevented concurrent save overwrites**: Version conflicts are detected when multiple sessions save or import simultaneously.
* **Fixed adding records before duplicated tables are ready**: Adding records is more stable while copied tables are still preparing.
* **Improved real-time collaboration performance**: Reduced unnecessary data refreshes during collaboration and bulk editing for smoother views.
* **Improved search result consistency**: “Show only matching rows” now respects visible fields in personal views.
* **Fixed SMTP test email permissions**: Workspace Owners can now verify SMTP settings normally.
* **Improved App Builder model selection**: Clearer hover feedback for model options and voice input, with more consistent icons.
* **Fixed unique value validation language**: Validation errors now follow the current interface language.
* **Improved large-option field creation performance**: Creating Single Select fields with many options is faster and more stable.
* **Improved ZIP import rules**: ZIP import **overwrites current project content** after validation, supports 20MB files, ignores build artifacts, and requires root `package.json`.
# Import, audit, and performance optimization
## Feature Updates
* **Self-hosted audit log filtering**: Added permission-related operation categories for quickly finding permission and role matrix changes.
* **Large table pagination**: Added page numbers, ellipses, and jump-to-page for easier browsing of large datasets.
* **New App Builder chat notice**: Shows chat history rules on first entry, clarifying each App Builder has separate conversations.
## Fixes & Improvements
* **Fixed grouped view row order issues**: Filtering and grouping could show inconsistent row order, affecting wrong visible rows.
* **Improved grouped view stability**: Grouped views are more stable and predictable with filtered and sorted data.
* **Improved self-hosted audit log details**: Long JSON or text now stays in a scrollable area for clearer reading.
* **Adjusted self-hosted audit log pagination**: Audit logs now show 50 records per page, with page size selection hidden.
* **Improved CSV import experience**: Table creation and existing-table imports are more consistent, stable, and preserve field definitions better.
* **Enhanced CSV import stability**: Reduced issues in record history, calculated fields, and undo/redo after import.
* **Strengthened table API permission checks**: Users without base or table permissions cannot read schemas or modify records.
* **Improved system field metadata consistency**: User snapshot data in system fields is preserved more reliably after API operations.
- **Fixed** **`.tea`** **import issues**: Older `.tea` files could restore only the first table, leaving later tables empty.
- **Improved** **`.tea`** **import stability**: Old CSV columns from deleted or renamed fields are ignored to reduce import failures.
- **Improved large base import performance**: Reduced unnecessary processing when restoring large bases, speeding up imports.
- **Improved bulk update performance**: API updates of up to 1,000 records with multiple fields now process faster.
# AI Reading, Auditing, and Publishing Optimization
## Feature Updates
* **Improved AI file reading**: Image results appear in chat, with preview, zoom, rotate, and download.
* **Self-hosted admin audit logs**: Search user actions by date, operator, space, Base, and action type.
* **Improved published page display**: Published URLs and custom domain status are clearer; custom domains appear first.
* **Edit `teable.app` subdomain prefix**: Change the subdomain prefix on the publish page and bind domains smoothly.
## Fixes & Improvements
* **Improved AI file reading UI**: Removed invalid collapsed sections to reduce misclicks and page jitter.
* **Improved copy success feedback**: Success prompts now use a standalone black checkmark for cleaner visual feedback.
* **Fixed record document view memory leak**: Improved stability during long sessions and frequent table switching.
* **Optimized table scrolling and selection cleanup**: Reduced residual data after closing views and unnecessary memory growth.
* **Improved Base copy stability**: Complex Bases copy more reliably, especially with linked record fields.
* **Fixed some Base copy failures**: Copying is more stable when target fields are created during the process.
* **Optimized linked field copy flow**: Linked fields copy after target records are created, reducing timeouts and inconsistencies.
* **Enhanced sensitive information protection**: Self-hosted audit logs no longer store Access Token secrets or sharing passwords.
* **Improved published page status and link refresh**: Enhanced status display, localized text, and access link refresh experience.
* **Optimized conditional Lookup fields performance**: Improved record reading and grouping in large order tables and advanced-permission views.
* **Optimized Lookup value reading**: Record queries prefer saved Lookup values, reducing extra processing and improving reliability.
* **Fixed duplicate metadata cleanup**: Prevented duplicate cleanup of “last modified” metadata for more consistent record updates.
# Import fixes and stability improvements
## Fixes & Improvements
* **Improved** **`.tea`** **file import**: Ensures apps are restored correctly when importing a Base.
* **Improved app linking accuracy**: Links apps to the newly imported Base instead of the original Base.
* **Fixed Base copy and export failures**: Resolves failures caused by specific Lookup fields and Link fields.
* **Improved Base schema migration**: Makes Base schema copy and export more stable for migration and sharing.
* **Fixed import and schema repair errors**: Handles deleted linked fields more reliably during import and repair.
* **Improved integrity checks**: Avoids unnecessary repair failures caused by deleted fields or tables.
* **Optimized field default value updates**: Reduces recalculation and improves field setting stability.
* **Fixed User field value issues**: Prevents values from being cleared or appearing empty after switching from single-select to multi-select.
* **Fixed formula field refresh issues**: Ensures formulas depending on User fields refresh after User field configuration changes.
* **Fixed linked record display issues**: Prevents linked records from appearing as empty rows in record details when limited by a specified view.
* **Improved linked record visibility**: Shows visible field values while applying view filters only when selecting new linked records.
* **Fixed renewal target errors**: Returns clearer not-found messages when renewal targets are invalid or missing.
* **Improved Base repair flow**: Better handles deleted source tables and invalid field references during repair.
* **Fixed incomplete repairs**: Prevents outdated repair plans or field metadata from blocking repair progress.
* **Improved repair stability**: Automatically refreshes outdated information to reduce unresolvable field-related errors.
# Sharing permissions and stability improvements
## Feature Updates
* AI Chat sent messages now have clearer actions, supporting **copy message content** and **copy to input**.
## Fixes & Improvements
* Fixed **Link to records** possibly failing to load in shared views with advanced permissions enabled.
* Improved shared view access control for lists, counts, groups, calendars, and aggregation results.
* Fixed possible failures when deleting records or selecting data in tables with many fields.
* Improved stability for delete, clear, paste, copy, and duplicate record actions, reducing unnecessary requests.
* Improved chat message action button styles and tooltips for a clearer, more consistent experience.
* Fixed unexpected horizontal scrolling when hovering over message action tooltips in the chat panel.
* Added multilingual text for new chat message actions.
* Fixed related apps possibly being lost when copying or saving a shared Base.
- Improved **Link to records** search for more accurate keyword and filter matching.
- Improved **environment variables** change detection: description-only edits no longer trigger unnecessary restarts or redeploy prompts.
- Fixed false **configuration changed** prompts after upgrading some legacy apps.
# Shared editing, security, and AI upgrades
## Feature Updates
* **Shared views support editing**: When “Allow editing” is enabled, signed-in visitors can add, edit, and delete records within the shared view.
* **Shared forms support login-only submission**: Restored “Require login to submit” in advanced form sharing settings.
* **Unified Secrets management**: AI Chat, App Builder, and Automation now centrally manage encrypted, scoped, write-only credentials.
* **CuppyClaw bot management upgraded**: Create and manage bots in Space Settings, bind Bases, and use preset or custom avatars.
* **AI Chat messages are easier to reuse**: Copy full user messages and assistant summaries; react and comment on assistant messages.
* **Chat input supports full copy and paste**: Paste messages with mentions, tables, attachments, and more as rich-text chips.
* **Edit previous user messages**: Restore sent user messages to the input box for editing and resending.
* **Shared view info includes share links**: AI workflows can directly get the shared view URL without manual construction.
* **Audit log enhancements**: Track key Base actions and filter by time, actor, Space, Base, and operation type.
* **Self-hosted admins can remove enterprise licenses**: Instances revert to Community edition with enterprise features disabled.
## Fixes & Improvements
* Fixed a V2 issue where the “Nothing to undo” message could remain visible.
* Improved the bulk attachment download dialog layout and layering for clearer options.
* Fixed UI jumping caused by inconsistent control widths when switching prefix options.
* Improved table/view sharing panels to clarify current target, status, and permission scope.
* Strengthened shared view edit limits across editing, paste, attachments, forms, AI fill, undo, and redo.
* Fixed editable records being misclassified as read-only with lookup User fields and “Me” permission rules.
* Improved AskUserQuestion summary display so completed selections no longer appear as “Skipped.”
* Moved CuppyClaw / Chat in IM desktop entries to the chat box “+” menu.
* Fixed record cards closing unexpectedly when using select field popovers in expanded records.
* Fixed shared pages potentially crashing after refresh due to Google Analytics initialization.
* Improved Cuppy state handling during fast or concurrent tool calls, reducing stuck busy or unlocked states.
* Improved Agent run recovery, making it easier to continue after repeated sends or interruptions.
* Improved tool response retention in chat streams, reducing executable database commands treated as attachments.
* Fixed an extra corner artifact in the bottom-right of record detail comment panels.
* Improved rounded corners in comment panels and dialogs for a more consistent interface.
* Unified rename input styles in Automation and tables, including corner radius.
* Improved Secrets and environment variable handling, reducing false “unpublished changes” and workflow disruptions.
* Copying Apps, Workflows, or Bases now more reliably copies related environment variables without exposing plaintext.
* Improved inline code display in Markdown and text previews across themes.
* Fixed nearly invisible text in file previews in light mode.
* Improved large table view performance, reducing memory pressure and page freezes with high data volumes.
# Links, permissions, and stability
## Feature Updates
* **Link fields** now paste as readable text into text fields, improving cross-field copy and paste.
* The **Share menu** is clearer, making table and view sharing statuses easier to distinguish.
* The linked record picker now follows configured **visible fields** settings, hiding fields when selecting or viewing linked records.
* Chat can now recover from “no conversation” errors by rebuilding sessions from recent conversation history.
## Fixes & Improvements
* Fixed an issue where “Select all” after searching in the linked record picker could link incorrect records.
* Fixed v2 permissions where edit access via lookup or conditional lookup rules might still block record updates.
* Improved lookup-related permission checks so editable fields and update scopes better match configuration.
* Fixed some base copy failures, improving stability when creating development or testing copies.
* In record details, clicking linked records under **Selected** no longer unlinks them, preventing accidental changes.
* In **Selected**, unlinking is now done only via the left checkbox for clearer actions.
* The **All** tab interaction remains unchanged.
# Calculation and lookup performance optimization
## Feature Updates
* App Builder now manages resources and updates app login settings more reliably, reducing unnecessary preview restarts.
## Fixes & Improvements
* Fixed an issue where some users could not purchase add-ons such as **Credits**.
* Fixed an issue where tables could appear empty or become inaccessible after updating **Select options** referenced by many computed fields.
* Optimized updates for large **computed fields** to reduce the risk of bulk calculations affecting table availability.
* Improved **Lookup field** performance with large datasets, reducing wait times for matching and recalculation.
- Optimized field reference queries in bulk Lookup scenarios for smoother operations in large linked tables.
* Fixed a potential crash when editing some **Lookup fields** in the interface.
* Improved stability for computed field updates, reducing errors caused by temporarily unavailable tables.
# Automation, CLI, and Stability Updates
## Feature Updates
* **Automation Run History** now uses tabs for easier detail viewing, filtering, and troubleshooting.
* Automation errors can now be sent to **AI Chat** for failure insights and next-step suggestions.
* **Teable CLI** now supports custom Base URLs for private Teable deployments.
* **Teable CLI** adds **Base management commands** to create, view, list, update, and delete Bases, with Space filtering.
* Cloud free Space rules updated: each user can own up to **2 free Spaces**.
* Copying statistics now shows **“Copied”** to clarify copy status.
* **Added cross-Space reference restrictions:** new cross-Space references are no longer supported for link, lookup, rollup, conditional lookup, or conditional rollup fields.
* When copying fields, tables, Bases, or moving Bases, cross-Space references are detected and readable values preserved where possible.
* **More stable Base copying** for Bases with many tables, records, and complex field configurations.
* **More reliable Base export** for large or structurally complex Bases.
## Fixes & Improvements
* Fixed occasional permission errors in cross-Base automation actions, even when users have access to both Bases.
* Improved automation Token handling for more reliable cross-Base workflows while preserving permission checks.
* Improved AI Agent input and secret instructions for clearer API Key and Token handling.
* Fixed grouped-view cell copy-paste sometimes targeting the wrong record or row.
* Fixed AI-created public forms appearing fillable but returning **403** on submission.
* Form submission permission now depends on view type; **Form view** remains submittable. `shareMeta.submit.allow` is deprecated.
* Improved toolbar layout on narrow screens to prevent grouping controls from being hidden.
* Improved grouped-view refresh consistency after data changes, reducing abnormal row positions after edits.
* Improved refresh logic for calculated fields like conditional rollup after record deletion.
* Improved AI Chat stability across multiple windows, reducing interruptions from concurrent messages or streaming replies.
* Fixed forced queued chat messages not appearing immediately; no page refresh is now required.
* Improved attachment cache loading to reduce failures during browser revalidation.
* Improved recovery for long AI replies after offline status, page switches, or device sleep.
* Improved Automation Run History permissions, i18n, deep links, and detail panel experience.
* Fixed undo failures when converting a **text field** to a **single select field** in large tables.
* Improved repair accuracy for relationship-related fields, reducing manual fixes after migration.
* Improved App chat recovery after context import failures, preventing incomplete **Agent Computer** creation.
* Context import failures now surface earlier, preventing entry into incomplete environments.
# Teable Credits Up 10x!
With OpenAI's latest update, **GPT 5.5 exceeded our expectations** across the board, marking a major leap in capability. After hundreds of internal task tests, we found GPT 5.5 delivers **the best results we've seen so far**, so we're switching Teable to GPT 5.5 in this latest update.
But the bigger breakthrough is **efficiency**:
1. Every Credit now goes **10x further** with GPT 5.5.
2. Failed AI runs **no longer consume Credits**.
This is a major and exciting update. With these optimizations, users can **forget Credits** even exist in Teable, and no longer worry about failed AI runs consuming extra Credits.
Data management, workflow building, automation and app builder become **affordable for everyone**: **essential like air, powerful at scale, and always within reach**.
On April 10, we improved credit efficiency by **5–30x**. Today, we are increasing it by another **10x**. In just over one month, Teable has made every Credit go **50–300x further**.
Teable has always been built around users. We are committed to delivering the most user-friendly, high-quality product experience, and to making every Credit go further: **more use, more power, more gain**.
**Try GPT 5.5 in Teable now.**

# AI experience and stability updates
## Feature Updates
* **AI Chat supports adding field names**: Add field names from column headers to specify target fields.
* **AI Chat supports table context**: Add selected rows, columns, or cells from Grid view for better data understanding.
* **AI Chat selections are clearer**: Single rows or columns show labels like “Row 1”; click to highlight them.
* **Improved mobile model selection**: AI model selection now uses a clearer, easier-to-tap bottom sheet on mobile.
* **AI Chat saves drafts per session**: Unsent content is restored after refresh, with drafts kept separate by session.
* **AI Chat input persists across pages**: Unsent content remains when switching between App Builder, table chat, and node pages.
* **AI Chat automatically refunds failed usage**: Credits are refunded for system errors or empty replies, with records shown in usage logs.
* **Clearer long-chat compression prompts**: Context compression prompts appear in the response stream, then generation continues after compression.
* **AI field abnormal usage detection**: Potentially excessive Credits usage in AI fields or automation tasks is intercepted for confirmation.
* **More controllable AI field batch autofill**: Added batch limits and concurrency controls to reduce abnormal Credits usage risks.
* **Improved AI image generation reliability**: Enhanced retry handling and support for multimodal image generation attachments.
* **Notification Center adds “All” category**: View all messages by default to avoid missing notifications from previous category filters.
* **Important notifications stay visible**: High-priority billing and usage alerts require manual dismissal to prevent missing key information.
* **Admins can send in-app notifications**: Instance admins can send custom in-app notifications with longer, multi-line content.
* **Longer Single select / Multi select option names**: V2 supports option names up to **1,000 characters**.
* **New table data safety limits**: Configurable limits for fields, views, formulas, records, options, and bulk writes improve stability.
## Fixes & Improvements
* **Improved login authentication config dialog**: Adjusted spacing, colors, and layout for a clearer configuration process.
* **Ask AI prompt dialog no longer blocks chat**: AI responses are easier to view while asking questions.
* **Fixed Markdown editing in feedback forms**: Changes in the expanded editor save correctly, and deleted content stays deleted.
* **More stable Linked record updates**: Updating with only `id` no longer clears the existing display `title`.
* **Fixed nested filter result counts**: Fixed views showing correct records but 0 in UI or incorrect footer counts.
* **Fixed drag fill in empty tables**: Drag fill and value clearing work more reliably even with no table data.
* **AI field auto-update deduplication**: Simultaneous dependency changes merge into one generation, reducing duplicate tasks and Credits usage.
* **More reliable AI field chained dependencies**: Downstream fields wait for upstream results, reducing stale reads and duplicate generation.
* **Fixed AI field auto-update after table duplication**: Auto update AI fields still respond to dependency changes after copying tables.
* **Fixed user avatar display in V2 cards**: Creator and last editor avatars now display correctly in edit cards.
* **Fixed empty values in number formulas**: New records no longer fail when number formulas return empty values.
* **Fixed** **`SWITCH()`** **number matching**: Numeric fields now match equal numeric case values without requiring `ROUND()`.
* **Fixed validation when deleting tables**: V2 tables can move to trash even with duplicate linked field names.
* **Fixed some unusable AI-generated tables**: Missing physical columns from failed schema updates are automatically repaired when possible.
* **Expanded record cards can close on outside click**: In Grid view, click outside an open record card to close it.
* **More consistent table safety limit validation**: Table creation, view updates, CSV import, duplication, and schema import follow configured limits.
* **Clearer validation for overlong option names**: Imports, field conversions, and API typecast writes return clear errors when option names exceed limits.
* **Improved session security**: Sensitive session-authenticated operations now validate origins to reduce malicious webpage risks.
* **Overall performance and stability improvements**: Optimized high-frequency data access paths to reduce slow requests and high-load timeouts.
# AI Voice and Markdown Optimization
## Feature Updates
* AI text boxes now support **real-time voice input**, converting speech to text instantly.
* Chat now supports **reasoning effort**, letting users control response depth in the model selector.
* References in the Chat queue now appear as **tags**, making them easier to read.
* Editing queued Chat messages now returns focus to the input box for easier changes and sending.
* Selection statistics can now be copied directly for reuse.
## Fixes & Improvements
* Regenerating AI responses now uses the currently selected **model and reasoning effort**.
* Multiple-choice Q\&A cards now include a clear **Next** button for easier flow continuation.
* Fixed missing in-app and email notifications after adding members to **collaborator fields** in v2.
* Improved Markdown collaborative editing so others’ updates no longer interrupt or overwrite current input.
* Fixed possible overwrites of remote Markdown content when opening and closing cells without changes.
* Fixed Markdown editor state syncing when switching between multiple long text fields in the same record.
* Fixed content briefly disappearing when reopening edited Markdown long text fields.
* Fixed inability to delete fully selected rows with Delete or Backspace in Markdown mode.
* Improved theme card loading in personal settings to prevent layout shifts during preview loading.
* Improved Ask User Question options wrapping for better readability in narrow layouts.
* Fixed inconsistent Ask User Question animations for smoother transitions.
* Fixed layout issues caused by abnormal Ask User Question height in specific scenarios.
* Improved AI Chat input flow to reduce draft-state editing and sending issues.
* Improved AI input stability during voice input, allowing continued editing or direct submission.
# AI Chat experience and stability optimization
## Feature Updates
* **AI Chat now supports queued messages**: Send new messages while a reply is generating; messages send in order for smoother interaction.
* **AI Chat now auto-converts long text to attachments**: Pasted long text or Markdown is handled as a file to keep the input clean.
* **Text and Markdown attachments now support preview**: Open and inspect content directly in the file viewer.
* **Added a Space limit**: Each account can own up to 10 Spaces, with an in-product notice when reached.
## Fixes & Improvements
* Improved billing transparency with clearer add-on quota details, clearer messaging, and more accurate add-on amounts.
* Optimized automation usage stats in run history to better align with billing calculations.
* Adjusted new Space initialization to create the default AI integration after Space creation for better stability.
* Refined AI Chat terminology: “Workflows” is now “Automations,” and “Context” is now “Nodes.”
* Clarified AI Chat sending states: easier to tell whether messages are queued, sending, or waiting for a reply.
* Fixed queued AI Chat messages briefly disappearing or being lost after refresh, chat switching, or auto-send.
* Improved AI recognition of table data, cell content, and references in chats.
* Fixed conflicts between chat attachments with identical filenames to keep labels, processing, and downloads consistent.
* Restored attachment preview in the admin-side session viewer so uploaded files can be opened again.
* Fixed selected AI models in Chat sometimes not taking effect when sending messages.
* Fixed manually entered content not submitting correctly in card-style AI Chat.
* Improved readability of AI Chat context tags in dark message bubbles.
# @ Any Node in AI Chat
> You can now @ any node in AI Chat and describe what you need. Let AI edit your tables, workflows, apps, or folders to complete complex tasks.
## 1. Work with Any Node, or Multiple Nodes at Once
Mention any table, workflow, or app you want AI to work on, then describe the result you need. You can also @ multiple nodes in the same message to complete complex requests in one conversation.
## 2. Find Nodes as You Type
After typing @, enter a few letters to quickly find the node you need.
## 3. Paste a Teable URL for Cross-Base Work
For cross-base data or automation tasks, paste the related Teable URL into AI Chat and describe what you want to do.
* Rebuilt the AI Chat input with inline chips for tables, views, apps, workflows, folders, attachments, and selected rows.
* Table mentions now support a hover view picker, so you can mention a specific view from the related table.
* Added parent paths for mentioned tables, apps, workflows, and folders, making similarly named nodes easier to distinguish.
* Added inline file chips with upload progress and attachment previews directly inside the chat input.
* Added rotating input hints, including clearer guidance for @ context, pasted files, and dropped files.
* Improved the mobile mention picker so @ node selection works better on smaller screens.
* Past messages now render @ mentions, attachments, and row selections as inline chips instead of plain text markers.
* Fixed duplicate context chips when messages already include inline @ mentions.
* Improved chat history round-tripping so mentioned nodes and attachment chips stay readable after reopening a conversation.
* The “Configure with AI” flow can now insert the related workflow step directly into AI Chat as a mention chip.
* Unified chip styling across the editor, past messages, and onboarding prompts for a more consistent experience.
# AI, automation, and stability optimization
## Feature Updates
* **AI model recommendation prompt**: Suggest switching to GPT-5.5 for smarter results and more efficient compute usage.
* **Enhanced table selection statistics**: Selection stats are more stable and stay within the table area.
* **Department search for organization collaborator invites**: Search by department when inviting collaborators; parent paths help distinguish duplicate subdepartment names.
* **Easier automation failure troubleshooting**: Failure emails now link directly to the run record and open failure details automatically.
* **Manual rerun for failed automation runs**: Rerun failed tasks from run history after fixing configurations or actions.
* **CLI record creation supports more field value formats**: Supports more formats like user, link, and attachment, with clearer validation errors.
## Bug Fixes and Improvements
* **Improved chat content display**: Fixed premature text truncation in chats and lists for better readability.
* **Optimized formula field numeric comparisons**: Improved stability and efficiency, reducing slow updates, locks, and timeouts in complex tables.
* **More consistent numeric comparisons across related field types**: Improved comparisons for formula, rollup, lookup, rating, and auto-number fields.
* **Fixed formula field issues**: Resolved empty formula values after record creation and failures creating formula fields in v2.
* **Optimized cross-Base reference validation**: Reduced false field errors and prevented related formulas from incorrectly returning `NULL`.
* **Fixed incorrect field error labels**: Safely restored 35 affected fields with confirmed status in impacted Bases.
* **Improved selection statistics accuracy**: Stats remain accurate even when selections include records not loaded locally.
* **Fixed selection statistics in grouped views**: Stats now follow grouped and collapsed views, counting only visible records.
* **Fixed loading issue for empty-value selection stats**: All-empty or all-`NULL` selections no longer appear stuck loading.
* **Improved Grid drag-selection calculation accuracy**: Reduced errors in decimal and large-number calculations.
* **Fixed App Builder login issues**: Improved OAuth callback stability, reducing login failures after environment restarts.
* **Improved App Builder access speed**: Reduced unnecessary requests for smoother app access.
* **Improved Agent Computer creation stability in App Builder**: Fixed dependency installation issues to reduce startup failures.
* **Fixed App preview not refreshing after code import**: Preview now updates immediately after importing changes.
* **One login user table can now link to multiple Apps**: Improved related selection and display experience.
* **Improved tab readability in App Builder dark mode**: Enhanced contrast and state distinction.
* **Fixed HTML preview tab height issues**: Made preview layouts more stable.
* **Improved table mention experience**: Reduced unnecessary loading in dialogs to minimize UI lag.
* **Improved field description tooltips**: Added a maximum width so long descriptions no longer stretch across the screen.
* **Fixed template preview permission issues**: Dashboards in shared or template previews now open normally with fewer unexpected 403 errors.
* **Fixed** **`.tea`** **file import issues**: Simple `.tea` files with required linked fields now import more reliably.
* **Improved filter condition editing**: Clicking outside a field dropdown closes only the dropdown, not the whole filter.
* **Improved admin settings saving**: Increased reliability of configuration updates.
* **Fixed v2 Trash restore issues**: Records deleted in v2 can now be restored normally from Trash.
* **Improved attachment image preview stability**: Fixed preview data loss after attachment cell updates during real-time collaboration.
* **Fixed attachment preview issues after real-time sync**: Attachment images now open more reliably after real-time sync.
* **Fixed Created time field saving issues**: 24-hour Created time fields with time zones now save correctly.
* **Improved Created time field time handling**: Reduced issues from timestamp and time zone type mismatches.
* **Fixed AI feature restriction issues in self-hosted environments**: Some existing Spaces are no longer wrongly restricted from AI features.
* **Improved email verification flow and authentication copy**: Account access prompts are now clearer.
* **Improved clickable area in the Automations list**: Card shadow areas are now clickable, reducing misclicks.
* **Improved automation run history experience**: Better filters and list display make failed runs easier to find and retry.
* **Improved bulk delete confirmation dialog style**: Made the deletion confirmation flow clearer.
* **Fixed Button field conversion issues**: reset count now applies correctly when converting Button fields.
* **Improved API debugging error responses**: Backend now returns more accurate errors for easier troubleshooting.
# Built-in Login for App Builder
> Teable App Builder now lets you add login to your app directly, without building it yourself.
## 1. Enable Login in One Click
Support email registration, Teable login, and Google login.
## 2. Control Who Can Access Your App
For example, allow only invited users to sign in. This is useful for internal tools, client portals, private dashboards, and similar scenarios.
## 3. Manage Logged-in Users with an Existing Table
If you already have a user table, you can use it directly to manage logged-in users.
> Next, we will launch logged-in user roles, so different users can see different interfaces and have different permissions after signing in.
* Redesigned login method cards with clearer descriptions.
* Improved the user table setup dialog.
* Made it easier to use an existing table for sign-in records.
* Improved login configuration interactions.
* Updated the default Teable logo on generated login pages.
* Added warnings when deleting fields used by app login.
* Added warnings when changing field types that may affect login email fields.
* Improved validation for missing or invalid email fields.
* Improved OAuth setup and profile handling for more reliable Teable and Google login.
# AI image enhancement and import optimization
## Feature Updates
* **AI Image fields** now support stronger image generation, including GPT Image 2 image-to-image using referenced attachments as visual input.
* **AI image generation** adds more aspect ratios and size options, better for thumbnails and visual assets.
* **Base imports are clearer**, showing each table’s progress and warning about computed fields that cannot be directly restored.
## Fixes & Improvements
* Long Text fields now keep AI autofill settings after switching to Markdown display mode.
* AI autofill now stops or cancels tasks faster at space limits to avoid extra credit usage.
* Improved AI Credits validation to reduce cache delays and make overage protection more reliable.
* Fixed oversized icons in the record details page “More” menu for better visual balance.
* Fixed unstable use of referenced face photos in AI-generated thumbnails.
* Fixed incorrect navigation from remaining Credits to personal settings instead of current Space/Base billing or usage.
* Fixed incomplete Format Date application in workflow HTTP Request JSON Body; time and timezone are now preserved.
* Fixed disappearing content in Markdown preview while AI fields were still updating.
* Improved Long Text display so angle-bracketed text is no longer hidden as HTML in standard views.
* Improved Markdown display in table views for clearer and more consistent content.
* Improved import stability for complex Bases, including formulas, links, Lookup values, folder hierarchy, and legacy references.
* Improved large Base imports to reduce failures in data loading, relation recovery, and computed field backfilling.
# Space settings and stability optimization
## Feature Updates
* Space Owners can access space settings directly from Base Settings, including Plan, Billing, Authentication, and IM Integration.
* Chat history is sorted by latest update time, with the newest conversations at the top.
* After a space reaches its credit limit, AI auto-fill tasks stop earlier to avoid extra credit usage.
## Fixes & Improvements
* After duplicating a field, the new field appears immediately and is visible to collaborators in real time.
* Fixed an issue where **AI field error messages** blocked the attachment upload area in expanded records.
* Improved folder move validation to prevent circular references and overly deep nesting.
* Improved Base folder tree selection and navigation.
* Fixed an issue in self-hosted environments where Slack Bot appeared configured but was unusable.
* Improved **Agent Computer** chat configuration to reduce errors caused by empty reasoning-depth.
* Improved chat history refresh so the sidebar updates faster after conversations end.
* Improved credit checks for AI tasks to enforce over-limit protection sooner.
# App Builder and Stability Optimization
## Feature Updates
* **App Builder** version history now shows each version’s changes, making selection and rollback easier.
* AI sets the app name only on **initial creation** and won’t rename it afterward.
* Added CLI command: `teable app delete --app-id ` to delete an App directly.
## Bug Fixes & Improvements
* AI auto-fix is more stable; error messages no longer disappear or repeat frequently.
* Improved **App Builder** version history, preview checks, and rollback experience.
* After locking **Locked Kanban** and **Calendar**, group fields and values can’t be changed.
* Fixed bidirectional sync issues for linked records in the **v2** Database Engine.
* Pasted data now matches the selected cell range more accurately.
* Optimized linked data updates and paste actions to reduce missed syncs and delayed fixes.
* Improved renaming in the sidebar tree with smoother text selection.
* Improved **App preview** stability, reducing frequent restarts without changes.
# Visual Navigation for Link Fields
> Link Fields now provide clearer cross-table navigation. Jump directly to the linked table from the header, and follow a visual connection line when opening linked records.
## 1. Jump to the Linked Table Instantly
A new header shortcut lets you open the linked table in one click. Moving between related tables is now faster and more direct, without interrupting your workflow.
## 2. See the Link Path Clearly
When you open a linked record, Teable shows a visual connection line to make the navigation path easier to follow. Even across multiple linked records, you can always understand the current context and where it came from.
# Integration setup and AI stability optimization
## Feature Updates
* Improved the **Hidden Fields** panel: clicking a field name now jumps directly to its column for faster review.
* Updated **Field Visibility** interactions: use the existing toggle to show or hide fields. Target columns are now **highlighted** after navigation.
* **Personal Settings** and **Workspace Settings** are now combined into a single settings dialog for easier management.
* Reorganized the settings interface with clearer groups and a two-column layout, making **Account, Preferences, Workspace, Members, Billing** easier to find.
* Added a **No Prefix** option for bulk attachment downloads to keep original filenames.
## Fixes & Improvements
* Fixed credit tracking for AI image generation with **openai/gpt-image-2**: **Field AI generation** now appears correctly in **Credit usage summary**.
* Improved **data integrity checks and repairs**: broken metadata references and invalid rollup references are now handled more safely.
* Improved resource metering for scraping tasks, with more accurate counts for failed or interrupted runs.
* Fixed sidebar folder rename focus behavior: focus now stays on the current folder after renaming.
* Improved attachment display and file size formatting for a clearer, more consistent file experience.
* Improved error messages in **AI Chat** and **AI Field**: invalid model or Provider settings now return clear validation errors.
* Improved stability for abnormal AI configurations, making legacy or manually edited issues easier to identify and handle.
* Fixed an issue where some menus in **Space Settings** displayed raw keys instead of proper labels.
* Fixed failures in Base duplication or `.tea` imports under specific error conditions, with automatic repair for legacy bad data.
* Improved timezone validation compatibility: legacy supported timezones now pass validation correctly.
* Improved date-time filter stability in AI workflows, especially for range conditions like created time.
* Improved AI Assistant understanding of project context and preset skills, plus more accurate table and record search results.
* Optimized **Agent Computer** and field normalization in automations for better stability in filtering, attachments, and search.
* **CuppyClaw** now defaults to a horizontal layout on first launch of a blank page for a more consistent first-use experience.
* Improved record query stability in sharing and collaboration scenarios, reducing inconsistencies caused by expired caches.
* Improved **Agent Computer** stability during shutdown, startup, and recovery, with more reliable cleanup for long-running tasks.
* When reopening past conversations, the model selector now shows the actual model used instead of the current default.
* Fixed incorrect updates to **bidirectional linked records** in v2 database engine environments for more reliable sync and calculations.
* Updated product copy and setup instructions for the IMAP email trigger to reduce missing or inconsistent labels.
# AI chat stability and Run Script guidance optimization
## Feature Updates
* You can now **send a new message while a response is still streaming**, making conversations feel smoother and more natural.
* Multi-select replies now stay in sync more reliably during streaming, and interrupted responses recover more consistently.
* Improved the **Script configuration experience** with clearer input fields and editor states for easier setup and editing.
* Added visual feedback when a script triggers an AI conversation, making the **AI conversation entry point** easier to recognize.
* Refined parts of the interface, localized copy, and code highlighting for a more consistent and polished experience.
## Bug Fixes
* Fixed an issue where external users with edit permission could **not upload images or other attachments** via shared Base links, causing uploads to stall at 0%.
* Fixed a chat input sync issue when switching between nodes, especially after opening Script configuration fields.
* Fixed an issue where the input box still showed a pause action after a response had finished.
* Improved editing stability for external collaborators in shared tables, especially in file collection workflows using personal email accounts.
* Improved stability when switching chat panels so new messages and assistant replies no longer disappear as easily after changing views.
* Fixed an issue in App Builder where some file edits appeared saved in preview but were not actually saved.
* Optimized the Next.js configuration guide in App Builder for a smoother getting-started experience.
* Fixed an issue where attachments added in the Base welcome dialog did not appear.
* Improved file handling in App Builder so uploaded files are now prepared for AI in advance and ready to use immediately.
# New Trigger: When Email Receive (IMAP)
> Introduced a new IMAP email trigger and improved reliability with clearer runtime error feedback.
## 1. Email Receive Trigger (IMAP)
A brand-new automation trigger: **When email received**. Connect any IMAP mailbox and automatically capture incoming emails into Teable — perfect for managing partnerships, customer support, and building a knowledge base.
* Fixed automated emails failing to send when an attachment file was missing, and resolved a scheduling delay where triggers didn't fire at the configured interval.
* Fixed a bug where changing the email-sending code broke multi-recipient delivery in automations.
* Improved the Email Receive trigger with better loop interval input, required-field validation, and a clearer 60-minute limit notice.
* Fixed batch record creation via paste not fully triggering `recordCreated` automation events for all rows.
* Added Gmail SMTP setup guide for sending emails within Automation Script actions.
* Fixed batch automation runs (28,000+ emails) experiencing a 30-minute delay on the first email due to slow pending-job loading.
* Improved the automation enable/disable toggle visibility — previously too subtle, causing users to miss that their automation wasn't active.
* Automation scripts using OAuth integrations no longer fail due to expired access tokens — the system now automatically refreshes them behind the scenes.
* The "Get Records" action in automations now shows clear, actionable error messages when filter conditions are incomplete, instead of cryptic validation errors.
* Added the missing icon for the "When email received" trigger.
# AI Chat Improvements and PDF Preview Support
## Feature Updates
* **PDF previews are more reliable:** Older PDFs now show cover thumbnails more consistently, just like newly uploaded files.
* **AI chat feels smoother:** Responses, loading states, auto-scroll, and reconnecting after brief network drops are now more stable.
* **Follow-up chats work better:** Your latest message is now used correctly in the next AI response, so you do not need to repeat yourself as often.
* **Code and file output is easier to follow:** Streaming output is smoother, stays scrolled to the latest content, and flickers less.
* **Files and errors are clearer:** File names are cleaner, errors are less distracting, and retries respond faster.
* **Mobile app previews are more stable:** App previews load and display better on smaller screens.
* **HTML previews can go full screen:** Dashboards, charts, and other large previews are easier to view in chat.
* **Automation failure alerts are less noisy:** Repeated failures are grouped together, so you can spot ongoing issues without duplicate alerts.
## Bug Fixes
* Fixed overflow in the **Run Script unsubscribe list** when showing 100 records per page.
* Fixed chat messages sometimes appearing in the wrong conversation for newly created apps.
* Fixed **CLI row queries** sometimes ignoring the current view filters.
* Fixed the **CuppyClaw Beta modal** on small screens so action buttons stay visible.
* Fixed publishing failures for apps with large images or videos.
* Fixed unreliable search for **date fields** in v2 global search.
* Fixed occasional v2 page loading errors when opening table views.
* Fixed formula and computed field issues caused by corrupted metadata or schema inconsistencies.
* Improved v2 record creation speed, especially for tables with computed fields.
* Fixed duplicate Stripe trial subscriptions when changing plans.
* Fixed button alignment in **Grid view** with **Compact** row height.
* Fixed automation debugging so script crash errors appear directly in **Execution Result**.
* Fixed automation script files being duplicated instead of updated in place.
* Fixed some formulas showing linked record IDs instead of record names.
* Fixed formulas like `= BLANK()` failing when there was a space after `=`.
* Improved recovery for missing thumbnails on older PDF attachments.
# External Editing with No Extra Cost
> External collaborators can now edit with no extra seats required. Expand collaboration at no additional cost, with clearer table sharing and view sharing.
## 1. Editable Shared Tables
Collaborate externally without extra seats and scale collaboration more easily. Login is required, so every edit stays traceable.
## 2. Share Specific Tables or Views
When sharing, you can control exactly what is exposed through shared tables or views, so collaborators only see the data they need.
## 3. Duplicate & Delete Tables
You can now duplicate an entire table in one click, and delete tables you no longer need — keeping your base clean and organized.
* Unified the share button style in Form views to match other view types.
* Fixed extra white space appearing below the Share settings panel.
* Fixed a permission error when switching between tables while previewing a template.
* Fixed read-only users incorrectly seeing an index repair prompt that required permissions they didn't have.
* Fixed a reflected XSS vulnerability in auth pages where the `redirect` parameter accepted `javascript:` URIs.
* Migrated all public-facing links from `teable.io` to `teable.ai`, including docs, releases, and npm packages.
* Fixed a billing page error that prevented users from viewing their plan details.
* Improved validation and permission checks when Link fields auto-create and establish relationships.
* Fixed copy-paste showing a success message while the cell content remained unchanged.
* Fixed the first-column statistics hover area having a transparent background that caused visual bleed-through.
* Enhanced Link field search with support for table-style views and field selection.
# AI Chat, PDF Preview, and Stability Fixes
## Features
* Improved **Billing details**: all AI Chat tool calls from the same conversation are now grouped into one record with total credits shown. A **Model ID** column was added, and the detail section is now expanded by default.
* You can now open a table in a **new window** with **⌘ + Click** (Ctrl + Click on Windows), making it easier to compare data side by side.
* Attachment fields now show a **PDF preview** (first page) directly in the cell, and file thumbnails have been improved for easier identification.
* Custom domains now support editing a custom subdomain on **teable.app** — you can use `your-name.teable.app` for your published app.
## Bug Fixes
* Fixed an issue where deleting records could cause errors in certain tables and views.
* Improved filter stability — invalid or mismatched filter conditions are now skipped automatically instead of crashing the view. Clearer warnings are shown for problematic rules.
* Added an inline hint in the **Gmail IMAP Password** field to clarify that Gmail requires an **App Password** instead of your regular account password.
* Fixed an issue where **Today** date filters could create unusable rules, especially when generated by AI.
* Fixed an issue where importing a `.tea` file could fail when a Select field contained duplicate options.
* Fixed an issue where automations could get stuck in a pending state; affected tasks are now retried automatically.
* Fixed an issue where trial licenses were not shown in the license list.
* Fixed a mobile issue where the Space list could not be scrolled.
* Fixed in v2 an issue where copying a Lookup field and converting it to a Single Select could clear existing data.
* Fixed in v2 an issue where bulk paste in a filtered view could append new rows instead of updating visible ones.
* Fixed an issue where the `updateRecord` automation trigger could be missing fields, causing scripts to loop unexpectedly.
* Fixed an issue where AI Chat could use the wrong default model; the correct default is now applied consistently.
* Fixed incorrect credit limit prompts for users with custom **Minimax** model configurations.
* Fixed an issue in **App Builder Chat** where switching models did not always take effect.
* Fixed in v2 an issue where filters using **is / is not** with empty values could match unintended records.
* Fixed an issue where error indicators in Apps could remain visible after the error was resolved.
* Fixed an issue where the Space base list was not fully displayed even when there was enough space.
* Unified the styling of share-related icons for a more consistent look.
* Fixed an issue where grouped field default values were not auto-filled correctly on the .cn site.
* Fixed in v2 an issue where linked records could not be selected repeatedly in a relationship field.
* Fixed an issue where AI-generated single-select values did not appear until the page was refreshed.
* Fixed an issue where the value **0** was incorrectly treated as blank in formulas.
* Fixed an issue where deleted Apps could still be accessed via their publish links.
* Fixed an issue where pasting the same value into a cell could still trigger automations and AI recalculation unnecessarily.
* Fixed an issue where dragging items in the sidebar could accidentally trigger a file upload prompt in the AI Chat panel.
* Fixed an issue where the AI API ignored the selected model and always used the default one.
* Fixed an issue where Apps created through General Chat did not inherit your selected model.
* Fixed layout issues on the **Plan** and **Pricing** pages, including dark mode display problems.
* Fixed an issue where the **TEXTBEFORE** formula function was unavailable.
* Fixed an issue where long base names in **Cuppy/Claw** could overflow the dialog boundary.
* Fixed in v2 an issue where date fields did not support search.
* Fixed an issue where downloading invoice attachments by email could return far more files than expected.
* Fixed false-positive error cards in **App Builder preview** caused by recoverable rendering issues.
* Fixed in v2 an issue where converting certain legacy fields could corrupt settings and cause query errors.
* Fixed in v2 an issue where cross-base lookup fields could not be deleted.
* Fixed an issue where AI used the wrong timezone when working with date and time fields, which could lead to incorrect results.
# Formula, Search, and Stability Updates
* Added the `TEXTBEFORE` and `TEXTSPLIT` formula functions for extracting text before a delimiter and splitting text by a delimiter.
* Global search now supports date fields.
* Bulk attachment downloads now respect the current search results and include attachments from matching rows only.
* Improved formula comparisons when numeric values are blank, reducing incorrect matches in edge cases.
* Improved the App Builder preview experience by reducing unnecessary preview errors and improving sync stability after refresh.
* Improved task recovery across the system to reduce cases where workflows get stuck, stay unresponsive for too long, or enter abnormal states.
* Refined parts of the CuppyClaw UI, including modal sizing, tab layout, and spacing consistency.
* Improved undo/redo snapshot consistency for record changes in V2, making recovery more reliable in complex editing scenarios.
* Improved V2 progress handling during large undo/redo replays, with more stable feedback for long-running operations.
* Enhanced V2 schema diagnostics to help identify structure-related issues faster.
# Claude Opus 4.7 is now in Teable
We've found it better at handling complex tasks, with **stronger multi-step reasoning** and **more reliable agent workflows**. It delivers up to 14% better performance on complex workflows, with tool errors reduced to 2/3, and reduces document reasoning errors by 21% when working with source information.
This makes Teable better for real-world work where data needs to be processed, organized, and turned into action. It gives teams **a new top-end model option** for their **most demanding workflows in Teable**.
You can try it in Teable now.
# AI Chat Now Understands Your Views
> Teable's View-Aware AI Chat gives you precise control over every piece of data, every row and column, every table, and every view.
## 1. What You See Is What AI Gets
AI Chat now perceives your active table view — including filters, sorts, and groupings. When you ask it to update data, it operates within your current view context, not the entire table.
## 2. Precise CRUD via Chat
Create, read, update, and delete data using natural language. Ask AI to "mark row 123 as High Value and row 456 as Follow-up," and it updates them instantly.
## 3. Improved AI Field Output
AI-generated field content is now more polished and accurate, with better formatting and fewer edge cases in output quality.
* Fixed the AI settings reset button restoring the last saved model instead of the actual default.
* Fixed AI Chat attachment example upload failing during the onboarding flow.
* Fixed the Trash cleanup processor repeatedly failing due to a 404 error on deleted chat resources.
* Fixed the Created Time column stopped auto-updating for new records.
* Fixed a stack overflow error in V2 computed field polling.
* Fixed database duplication failing with errors whether records were included or excluded.
* Fixed newly created tables not appearing in the sidebar navigation until a manual refresh.
* Optimized V2 computed field recalculation to avoid unnecessary full-table recomputation.
* Added Sentry tags to distinguish V1/V2 environments for faster issue triage.
* Rebuilt Create Table and Restore Table operations under the V2 architecture for improved reliability.
* Fixed Formula fields not displaying values in real-time after creation in V2 — previously required a page refresh.
* Fixed V2 trigger chains not properly propagating updates to dependent AI fields and automations.
* Fixed the API view filter returning all records instead of the filtered subset in V2.
* Integrated the V2 authorization module into the plugin architecture for unified permission handling.
* Introduced a plugin system with Hook and constraint injection for safe, flexible extensibility.
* Enhanced observability for Formula, Rollup, and Lookup computation tasks with better tracing and monitoring.
* Improved monitoring and resource usage for better overall stability.
* Improved real-time update reliability with recoverable and concurrency-safe outbox processing.
* Added a fast-path optimization for conditional aggregation to reduce redundant computation.
# New Teable Agent: Super Intelligent at a Much Lower Cost
> We've made a major upgrade to the Teable Agent engine — dramatically improving AI Chat's ability to handle complex tasks, while reducing credit consumption to just 20% to 3% of previous levels—or even lower.
## What's New
* **Credit consumption drastically reduced** — in our complex task benchmarks, efficiency improved 5–30x, or even higher.
* **Enhanced large file processing** — AI Chat can now handle dozens of Excel/CSV files at once, or PDF documents up to 100 pages.
* **Significantly improved complex task capabilities** — for example, provide your Airtable API key to AI Chat and migrate an entire base to Teable:
> \{Your Airtable Token} Use this Airtable token to read all content and create a migration plan to Teable. If the data volume is large, please use the maximum write throughput available.
*Tip: Remember to delete your token after the migration is complete.*
* **Model switching support** — AI Chat now lets you switch between models, including Opus, Sonnet, Haiku, and MiniMax.
* **Uninterrupted AI Chat sessions** — fixed internal server error disruptions so conversations stay smooth from start to finish.
* **Clear task timing visibility** — each conversation turn now shows execution time at completion.
* **Credit usage visibility** — tap the bottom-right three-dot menu to view credit consumption once a conversation ends.
* **Lean, faster conversation UI** — redesigned interface is more compact, responsive, and focused on high-value information.
* **Parallel sub-task execution** — support for sub-agents enables concurrent workflows and faster completion of complex tasks.
* **CuppyClaw is here** — access the Teable Agent directly in Slack, Telegram, and Feishu.
* **Prompt while running** — you can now send follow-up instructions even while the Agent is still executing.
* **Granular credit transparency** — added a detailed credit usage breakdown in Settings → Billing.
## Our Thoughts
We believe that after this update, Teable Agent has reached a top-tier level in the industry in both credit efficiency and intelligence. You can now use Teable AI Chat with much greater confidence to describe your needs and build what you want.
Combined with our at-cost, zero-markup credit pricing, Teable is built to make every credit go further: More use. More power. More gain.
## What's Next
* Support for skill usage and management.
* CuppyClaw support for WhatsApp.
* V2 database engine upgrade for faster, more powerful data processing at larger scale.
* Login authentication system with support for email, Google, Teable, and more sign-in methods.
* Support in-app AI features in App Builder.
* A series of product capability enhancements.
## Important Notes
* During AI conversations, occasional session interruptions may occur. As a temporary workaround, start a new conversation or click "Clear Chat" in App Builder. This is a known issue and will be fixed within 1–2 weeks.
* During AI conversations, Question Cards may occasionally display incorrectly. This is a known issue and will be fixed within 1–2 weeks.
* The New Agent Engine is currently in **Beta** — there may be rough edges. We're committed to continuous iteration toward a flawless experience. If you encounter any issues, please share your feedback and we'll address them promptly: [New Agent Engine Feedback Form](https://app.teable.ai/share/shrX1qxpciRUj1Jww2b/view)
# Markdown Support in Long Text Field
> Long Text fields now render Markdown natively — write structured content in your cells, and toggle between plain text and Markdown with one click.
## 1. Write Markdown, See It Rendered
Long Text fields support full Markdown rendering. Write headings, lists, code blocks, and more — all visible right inside the cell. Toggle between plain text and Markdown in one click.
## 2. Paste Formatted Text, Get Markdown
Copy content from Notion, Google Docs — Teable automatically converts it to clean Markdown. No manual reformatting needed.
* Fixed an issue where the Long Text editor had extra blank space at the bottom in multi-line mode.
* Fixed Markdown expanded view jumping to the bottom of content and line break rendering issues.
* Fixed an issue where clicking into a text or Long Text field wouldn't register the first character typed.
* Fixed long single/multi-select values not wrapping in the record modification history page.
* Fixed a crash when duplicating a Sum field and converting it to Currency or Percentage format.
* Fixed an issue where copying a Link field and switching it from one-way to two-way created a duplicate field name in the linked table.
* Fixed Multi-Select Rollup returning empty results when using the "Deduplicate array" aggregation.
* Fixed an issue where modifying Link field configuration (dedup or switching one-way to two-way) could silently delete all linked data in the column.
* Fixed the number field config where "Decimal" type label was easily confused with the precision setting below it.
* Fixed Lookup, Rollup, and Formula fields not recalculating after deleting records they depended on.
* Fixed an SSR login crash caused by `window.location.origin` being used in a server-side rendering context.
* Fixed `.tea` export files being downloaded as `.zip`, which prevented them from being re-imported.
* Supports native V2 batch `updateRecords`, enabling more efficient bulk data operations.
* Fixed Link field displaying the primary key as "untitled" instead of the actual value in the V2 environment.
* Fixed converting a Single Select to Multi-Select incorrectly clearing existing values in V2.
* Fixed slow and unreliable search results in the Link field selector under V2.
# New App Builder Engine is Beta
> We've rebuilt the App Builder Engine from the ground up — delivering a smoother, more stable app-building experience with support for more complex applications, while **reducing credit consumption to 30%–50%** of previous levels.
## What's New
* **Interactive Q\&A Flow**: When requirements are unclear or additional environment variables are needed, the AI now asks key questions before generating.
* **Manual Stop**: You can now stop generation mid-process instead of waiting for it to finish.
* **Smart Preview**: The preview area supports auto warm-up, status feedback, and automatic retry on failure.
* **Real-time Dev Logs**: A new log panel shows runtime logs and error messages directly in the builder.
* **Code Generation Awareness**: Watch code being generated in real-time with streaming output.
* **Model Selection**: Choose between Pro and Max tiers for clearer capability levels.
* **Binary File Preview**: Images and other binary files now render correctly in the editor without corruption.
* **Session Recovery**: Refresh or re-enter the page and pick up right where you left off — generation progress and chat history are preserved.
* **Environment Variables**: Configure env vars for third-party integrations, significantly expanding the range of apps you can build.
* **Self-Hosted Ready**: No extra configuration or v0 service purchase needed — full end-to-end experience out of the box.
## Experience Improvements
* **Credit consumption reduced to 30%–50% of previous levels**, effectively a 2–3x efficiency improvement.
* More granular preview loading states (warming up / generating / page loading) to reduce the feeling of being "stuck."
* Chat and preview sync is more stable — fewer blank screens, duplicate messages, and state mismatches.
* Smarter preview refresh with fewer unnecessary full-page reloads and flickers.
* Clearer error messages on publish failure for faster debugging.
* More reliable sync between app name, change description, and generated output.
## Deprecations
* Retired the legacy v0 generation pipeline — all generation now uses the new App Builder Engine.
* Removed the old "page init retry" mechanism in favor of a unified generation and recovery flow.
* Removed legacy "pending app cards" and other transitional UI — merged into the new chat and task views.
## What's Next
* Login authentication system with support for email, Google, Teable, and more sign-in methods.
* Support in-app AI features in App Builder.
## Important Notes
* AI inside App Builder apps is not supported yet. So apps like invoice/receipt recognition, which rely on AI to read images, will currently fail. We're aware of this limitation and plan to improve it in future updates.
* The New App Builder is currently in **Beta** — there may be rough edges. If you encounter any issues, please share your feedback and we'll address them promptly: [App Builder Feedback Form](https://app.teable.ai/share/shrX1qxpciRUj1Jww2b/view)
# App Custom Domain is Live
Now, you can publish your App with your own **branded domain**. Users can recognize it as your product right away and trust it more easily.
In **App Builder**, click **Publish** in the top right. Enter your custom domain, complete the DNS setup, then return to Teable to verify and finish the binding. This feature is available on the **Business Plan** now.
* Significantly reduced AI credit usage. In our test cases, efficiency improved by 5x–20x.
* Significantly improved complex task capability. For example, in AI Chat you can provide an Airtable API key and migrate a Base directly.
* Improved large-file processing in AI Chat, including handling more than a dozen Excel/CSV files or a 100-page PDF in one run.
* Fixed unexpected chat interruptions caused by internal server errors in AI Chat.
* Shows task execution time at the end of each conversation round.
* Introduced a more compact and adaptive conversation UI that highlights high-value information.
* Launched CuppyClaw, enabling Teable Agent in Slack and Telegram.
* Supports parallel sub-tasks (sub agent).
* Supports viewing credit usage at the end of each conversation round.
* Supports skill usage and management.
* Billing now provides more detailed credit usage visibility.
* Fixed App Builder preview issues for a smoother building experience.
* Added environment variable configuration to support third-party integrations, significantly expanding App Builder use cases.
* Enhanced overall stability with a significantly improved building experience.
* Added application runtime logs in App Builder for better debugging.
* Fixed View A's "Hide fields" setting causing newly added fields in View B to auto-show instead of defaulting to hidden.
* Fixed the filter panel not being scrollable — previously required manual dragging.
* Fixed inconsistent button styling for Link and Attachment fields in the record detail view.
* Fixed Single/Multi-Select values that are too long overflowing outside the selector and card boundaries.
* Fixed a frontend error when editing a field that was incorrectly saved as a Lookup type instead of Single Line Text.
* Fixed an issue where typing a value in one cell and then clicking another cell would auto-fill the second cell with the same value, causing data contamination.
* Fixed username changes (e.g., "leo" → "Leo") not updating in Lookup fields that referenced the user.
* Fixed `changeEmail` storing mixed-case email addresses, which caused login failures on case-sensitive lookups.
* Fixed `.tea` file imports failing consistently under certain conditions.
# Bulk Download Attachments Are Live
> Bulk attachment downloads is a deeply user-centric update. Whether it's receipts, images, or PDFs — Teable gives you the flexibility to download and share them with anyone outside the platform.
## 1. Bulk Download from Cell
When you generated images in Teable, for example YouTube thumbnails and they're sitting in a single cell. Now you can download all in one click — no more saving images one by one.
## 2. Bulk Download from Field
For tax filing or reimbursements, share all receipts in seconds. Click "Download all files" to get everything in one ZIP.
## 3. Bulk Download with Prefix
Add a prefix from any field, such as a purchase amount or project name, so each file is instantly recognizable after unzipping.
## 4. Bulk Download into Folders
Enable "Archive into folders" to place each record's files in its own folder for easier local editing, reuse, and file management.
* Fixed an issue where the sidebar collapse icon disappeared when the sidebar was narrowed.
* Fixed an issue where right-clicking a column in read-only mode or shared views didn't show available options.
* Fixed a misaligned loading state for AI field generation under grouped conditions.
* Fixed an issue where bulk-selecting multiple members in the permission/role management page only saved one — the rest were silently dropped.
* Improved API query builder compatibility with different `fieldKeyType` values (e.g., `name`, `id`), ensuring queries work correctly across all scenarios.
* Fixed an issue where changes to a dependent text field didn't trigger AI attachment image generation in custom mode.
* Fixed a critical data loss issue where modifying the timezone of a formula field referencing a date column could incorrectly clear the database field value.
* Fixed excessive inner padding in filters that caused English dropdown condition text to be truncated too early.
* Added support for downloading and importing code within Apps.
* Fixed a request failure when initializing an App conversation with more than 20 files — now uses zip packaging for initialization.
# Claude Opus 4.6 + 171 Models Launched
> Claude Opus 4.6 is now in Teable, along with 154 language models and 17 image models in AI Fields. Let’s choose the model you want and scale any AI workflow.
## Teable Default Model: Claude Opus 4.6
Claude Opus 4.6 is now the default model in Teable AI Chat. You'll get the best performance across all conversations.
**Use Case 1: GitHub Project Scraper**
Create a workflow to scrape the top 20 fastest-growing GitHub projects by new stars every day at 9am, and collect owner emails (API key required).
**Use Case 2: Opus 4.6 Legal Intelligence**
**More possibilities:**
* Scrape Reddit data
* Collect publicly available information from the web
* Read work materials from your database
* And more
## AI Fields: Model Selection Upgrade
* New model picker with **Recommended models** + **More models** sections
* **17 Image Models** launched
* **154 Language Models** for your choice
Now you can customize AI Fields for your specific use cases:
* Image generation: Choose Nano Banada
* General purpose: Choose ChatGPT 5.2 Chat
* Cost-effective + efficient: Choose Grok Fast Reasoning
* And more
- **AI Gateway configurable in Admin**: One API key can cover Claude Opus 4.6 and 180+ models
- **Guided setup flow**: Clearer steps, lower configuration complexity
- **One-click Recommended models**: Models checked in Admin will automatically appear in:
* AI Fields model dropdown
* Automations AI node model dropdown
* **Better compatibility (Self-host)**: More stable AI Gateway model adaptation, fewer deployment edge cases
* **Conversation caching**: Significantly reduces chat credit consumption
* **Billing optimization (SaaS only)**: Improved pricing strategy across AI Gateway models
* **Attachment limit update**: AI Chat no longer enforces attachment size limits in the UI — the Agent decides how to process it
# Automation Webhook Triggers Are Live
> Introduced When Webhook Received — a new incoming webhook trigger that lets you connect more data to Teable.
## Highlight 1: Setup in seconds
## Highlight 2: Test fast. See everything
## Highlight 3: One prompt. Data written
Now you can connect more data sources to Teable, like:
* **Form submissions (Typeform, Tally)** → create a new record per submission, then auto-assign + notify
* **Payments (Stripe)** → log payment/subscription events, update status, trigger follow-ups
* **Ecommerce events (Shopify)** → capture order/customer events into Teable and kick off ops workflows
* **Affiliate tracking (Rewardful)** → sync affiliates/referrals/commissions into tables and automate payouts/reviews
* **CI/CD (GitHub Actions, GitLab CI, Jenkins)** → POST build/deploy results to Teable and trigger post-release workflows
* **Zapier / Make / n8n** → connect almost any app to Teable by sending an HTTP request to this webhook URL
- Standardized the styling of the Automation step selector for a more consistent UI.
- Added consistent Action descriptions within the selector to improve clarity and guidance.
- Fixed an issue where deleting a view used by one automation could cause all automations listening to the same table’s recordUpdated trigger to fail; now only the misconfigured automation is skipped and the others run normally.
* Fixed an issue where the AI could incorrectly populate all example values into the first single-select field during table updates, causing repeated failures.
* Fixed an issue where text in the AI field custom prompt box could be hidden or cut off after resizing.
* Redesigned the Permission Matrix for better readability and scalability with large user lists.
* Fixed an issue where sections in authorization groups didn’t expand when adding many users, causing content to be clipped; sections now auto-expand based on user count.
* Fixed a reversed credit progress bar in the space dropdown.
* Consolidated Self-hosted License into Avatar menu → Settings:
* The original menu entry remains, but now redirects to the license section within Settings.
* Renamed “Purchase License” to “Buy Self-hosted License.”
# Free AI & Unlimited Free Invites
> We've removed the two biggest blockers to adoption: AI is unlocked on the Free plan, and you can invite unlimited Viewers & Commenters at no extra cost.
## AI for Everyone. Free.
Industrial-grade AI is now unlocked on the Free Plan. Previous Business-tier restrictions have been removed—making "AI for Everyone" real.
* App Builder: Business → Free
* AI Chat: Pro → Free
* AI Fields: Pro → Free
## Viewers & Commenters Are Now Free
Paid seats now apply only to Editor-level and above (Owner / Creator / Editor).
Viewers and Commenters are completely free, so you can invite unlimited collaborators at no extra cost. (See the FAQ at the bottom of the pricing page: [teable.ai/pricing](https://teable.ai/pricing))
## AI Credits Now Scale with Seats
AI credits are now allocated per paid seat, so your monthly credits grow proportionally as your team scales. **So feel free to use it more. More use, more power.**
Plans have been simplified and renamed for clearer tier selection:
* Plus → Pro
* Pro → Business
* Business now includes SSO (previously Enterprise-only)
This helps professionals, small teams, and scaling businesses quickly choose the right plan.
The ring-style usage view has been replaced with progress bars, making usage easier to understand at a glance. For deeper insights, click Credit Details to see a breakdown of your credit consumption.
Billing visibility is now crystal clear: it's easy to see exactly who counts as a billable user and which members occupy paid seats—so costs stay fully under control.
Low on credits? Share on X or LinkedIn and get 1,000 free credits instantly — every week. Join from the bottom-left in Teable.
Conversion is now 1:100 (was 1:2000), making costs easier to predict. Example: \$5 = 500 add-on credits.
# Introducing Teable App Builder 2.0
We’ve rebuilt the App Builder engine to significantly improve stability, accuracy, and build performance. Here’s what’s new:
> **Note:** This update applies only to apps created after December 17, 2025. Older apps should be recreated to benefit from the improvements.
> **Migration:** The standalone Dashboard feature has been replaced by App Builder. You can now build more powerful, customizable dashboards directly within App Builder.
## 1. Auto Fix Button
When your app encounters a runtime error during preview, click the **Auto Fix** button to let AI automatically diagnose and fix the issue.
## 2. Live Code Editing
Gain full control with **live code editing capabilities**. Watch the code generate in real-time and intervene instantly to fine-tune the logic.
## 3. App Builder Vision
Image recognition is now precise and production-ready. You can now confidently upload screenshots for accurate UI editing or design mockups for 1:1 pixel-perfect replication. *(File limits: images ≤50MB, other files ≤3MB)*
## 4. Stability & Reliability
* **Generation Stability**: Optimized the core code generation engine to **drastically reduce the probability of producing unusable code**, ensuring higher-quality outputs every time.
* **Preview Stability**: Fixed a critical bug where **preview would fail when switching between apps**. Multi-tasking across projects is now seamless.
* **Chat Stability**: Resolved **rendering crash issues** within the App Builder's chat interface for a smoother, uninterrupted experience.
* **State Isolation**: Each app's workspace is now **fully isolated by appId**, preventing data conflicts when managing multiple projects simultaneously.
* **Error Self-Repair**: Built-in error self-repair mechanisms that automatically detect and resolve generation issues, drastically reducing build failures.
## 5. Building Experience
* **Real-Time Previews**: New streaming generation engine provides **instant previews** as the app is being built, eliminating wait time and giving you immediate feedback.
* **Rollback Optimizations**: Safely experiment and instantly revert changes without losing your progress.
## 6. Performance
* Various under-the-hood performance optimizations to make the entire App Builder experience faster and more responsive.
## 7. Template Center
Explore the all-new [Template Center](https://teable.ai/templates) — a curated collection of ready-to-use templates. Install any template instantly to experience the power of App Builder, AI Agents, and Automation firsthand.
# Changelog 2024
Source: https://help.teable.ai/en/changelog-2024
## 1. New Calendar View
We've launched a new calendar view feature that allows you to manage and view schedules more intuitively.
### How to Add Calendar View
1. Navigate to the view bar
2. Click the "+" icon on the right
3. Select "Calendar View" from the options
4. The calendar view will be added to your view list
## 2. Global Search and Keyword Highlighting
Search functionality has been greatly improved. You can now perform global searches across fields and optionally filter out non-matching rows.
* Support for global search across multiple fields
* Highlighted search result keywords
* Flexible search result filtering options
## 3. Lookup and Rollup Field Optimization
* Support for precise record filtering
* Enhanced rollup calculation capabilities
* Extended data analysis and processing capabilities
## 4. Form Enhancement
### Login Verification
* New form login requirement option
* Automatic submission tracking with creator information visible in the creator field
## 5. Single/Multiple Select Field Settings
Users can now disable the option to add new choices when editing single or multiple select fields to prevent accidental additions.
* Option to restrict new choice additions
* Prevention of accidental invalid choice entries
## 6. Performance Optimization and Other Improvements
### Data Processing Speed
Copying loaded data requires no network requests, resulting in 10x faster performance.
### Enhanced User Information Display
Support for displaying anonymous users and automation bot identifiers in creator and last modified by fields.
* Anonymous user identifier display
* Automation bot user identifier display
## 1. New Gallery View
We're excited to announce the new Gallery View feature in Teable, offering a more intuitive and visually appealing way to display your data.
### How to Add Gallery View
1. Click the "+" icon in the view bar
2. Select "Gallery View" from the options
## 2. Enhanced Attachment Preview
We've optimized the attachment preview functionality to support more file types, improving your workflow efficiency.
### Supported File Types
* PDF files
* Word documents
* Excel spreadsheets
### How to Use Attachment Preview
1. Locate the file you want to preview in the attachment field
2. Click directly on the file
3. The preview will open automatically without downloading
**Note**: Preview is intended for quick content review; download the original file for editing.
## 3. Record Duplication Optimization
We've simplified the record duplication process with multiple shortcuts.
### Method 1: Using Right-click Menu
1. Right-click on the record you want to duplicate
2. Select "Duplicate Record" from the popup menu
### Method 2: Through Edit Form
1. Open the edit form of the record you want to duplicate
2. Click the "More" button in the form
3. Select "Duplicate Record" from the dropdown menu
**Tip**: The record duplication feature helps you quickly create similar records, significantly improving data entry efficiency.
***
We hope these new features and optimizations enhance your experience. If you have any questions or feedback, please don't hesitate to contact our support team. We'll continue working to provide you with better products and services.
## 1. Dashboard
### 1.1 Comprehensive Chart Types
* Support for Bar/Line/Pie/Area/Table charts
### 1.2 Flexible Data Queries
* Support for selection/filtering/joining/sorting/grouping/aggregation query configurations
## 2. Plugin View - Sheet Form
## 3. [Record Comments](https://help.teable.ai/basic/record/comment#key-features)
* Real-time conversations
* @mention support
* Rich text editing
* Image and link support
## 4. Group Statistics
* Statistics for each group
## 5. Linked Fields
### 5.1 Cross-base Field Linking
* Now you can freely link with any base!
* Edit field
* Link from other bases
* Select base and table
* Example: Link from **Project Management** base to Product Task Management
### 5.2 Filter Records from Views
* Comprehensive permission control prevents accidental data exposure through links! Control which view to link records from; control which filtered records can be linked; control which fields are visible in the linking selection list.
* Edit field
* More configurations
* Select view/configure filter conditions
## 6. Field Default Values
* Default values can be set for most field types
## 7. Kanban View Supports All Field Types for Grouping
## 8. Experience Improvements
* Attachment field image preview speed greatly improved
* Formula date time result now matches timezone
* Formula can correctly handle escape characters, such as "\n"
* Directly paste attachments in cells with selected attachment column
## 1. Trash
You can now restore deleted spaces, bases, and tables from the trash!
## 2. Drag and Drop Attachment Order to Reorder
You can now change the order of attachments by dragging them! Click and hold on an attachment, then drag it to a new position, and release it to reorder.
## 1. Undo and Redo
All operations in the table can be undone and redone.
## 2. Base collaborator
You can now invite collaborators to enter the base for collaboration without entering the space.
## 1. Record Modification History
View the record modification history of the entire table in the upper right corner of the table.
View the edit history of the current record in the upper right corner of the record edit interface.
## 2. Creator and Last Modified User Fields
Added two fields. Creator and last modified user fields are used to track data changes.
## 3. Language/Internationalization Switch
* Switch system language
1. My settings
2. Language
3. Please select the language you want to use.
## 1. Share View Embedding and Custom Sharing
Teable has added view embedding functionality and optimized sharing settings:
1. View embedding: Now you can embed views into other webpages.
2. Enhanced sharing settings
1. Theme display control
2. Toolbar hiding control
Operation steps:
1. Open the target table, click the "Share" button in the upper right corner
2. Confirm the sharing settings in the pop-up window
3. Adjust the following parameters according to your needs:
1. Theme selection
2. Toolbar display
3. Embedding code
Through the new feature, you can more flexibly control the display of shared content, improving collaboration efficiency
## 1. Field Value Verification Rule Enhancement
* **Unique Value Verification Constraint:** Added field unique value verification function to ensure that the field value is unique in the entire table.
* **Non-empty Verification:** Added field non-empty verification function to prevent missing key information.
## 2. API Query Builder
Introduced visual API query builder to greatly simplify API request building process:
1. Click the "API - RestfulAPI" button in the upper right corner of the table to enter the builder interface
2. Build query requests through intuitive user interface
3. Copy directly runnable code generated by one click
## 3. User Experience Optimization
3.1 Record Creation Process Optimization
* Allow users to fill in complete row information before creating records to improve data completeness
### 3.2 Date Picker Upgrade
* Date picker now supports direct selection of year and month to improve selection efficiency
### 3.3 Number Field Editing Optimization
* Display unformatted original values of number fields for precise modification during editing
### 3.4 Sharing Function Enhancement
* Added QR code sharing option when sharing view link, convenient for mobile users to quickly access
## 4. Data Import Function Enhancement
### 4.1 Import Notification
* System will send email notification to user after successful data import
### 4.2 Performance Optimization
* CSV import speed increased by 100%, significantly shortening data import time
### 4.3 API Import Enhancement
* Enabled API type conversion, user field supports filling in user name, ID, or email for writing
## 5. System Integration
* Attachment function added S3 integration support to provide more reliable file storage solution
## 6. Problem Fix
Fixed the following issues:
1. Unable to filter when searching for users
2. File name lost when downloading attachments
3. New row unable to copy and paste
4. Attachments unable to display normally in some cases
# Changelog 2025
Source: https://help.teable.ai/en/changelog-2025
# Launch Teable 2.0 —— The AI Database Agent
This release brings **6 big revolutions**, rewriting how we work with data.
1. **Talk to Build Databases:** Say goodbye to disorganized leads. Teable can automatically tag sentiment and draft replies from your CRM data.
2. **Talk to Build Apps on Data:** Generate apps directly from your database (e.g., turn a leads table into a landing page in minutes). Unlike vibe-coding tools that leave you with a dead app, Teable builds apps that actually run on live data
3. **Talk to Automate Workflow:** Create automations in plain language (e.g., “email your customer or teammate when a form is submitted”). Customers and teammates get notified instantly.
4. **Talk to Data for Analysis:** Conversational query, visualize, and get instant insights on your data. No SQL, no code.
5. **Talk to Process Data at Scale:** Batch-handle files and auto-extract key fields. (e.g., just drop in your invoices, then hit the share button and send it straight to your accountant)
6. **Batch Image & Copy Generation:** Batch-generate product images, copy, and video scripts to become a super marketer
## Teable Updates (Core)
### **New Core Features**
* **Notification Toast System**: New notification system for better user feedback
* **Mail Settings**: Enhanced email configuration and verification system
* **Collaboration Messaging**: Constantly sending collaboration messages for real-time updates
### **Performance Improvements**
* **Performance Cache**: Added caching to aggregation and record doc-ids APIs for better performance
### **Infrastructure & Developer Experience**
* **S3 Upload Fixes**: Multiple improvements to S3 streaming uploads and avatar handling
* **Import Improvements**: Enhanced Excel import with better error handling and caching
### **User Experience**
* **System Setting Guide**: Added guidance for admins on first entry
* **UI Improvements**: Fixed dropdown scroll bars, sheet-form errors, and various UI polish
* **Permanent Delete**: Added permanent delete functionality for bases and tables
# Button Field
The Button field is a powerful interactive tool that transforms static rows of data into actionable units. With a single click, users can trigger pre-configured automations to handle internal data flows—like updating a record’s status or syncing data across tables—and even perform external actions, such as sending custom notifications or calling an external API. It also supports custom labels and colors, limits on clicks and resets, and allows read-only users to trigger actions.
* **One-Click Actions**: Effortlessly manage status changes, sync data, send notifications, and more.
* **Precise Control**: Set a "Max clicks" and a "Allow reset" for each button to prevent accidental clicks or duplicate actions.
## AI Features
* **Base Chat System**: You can chat with your base and generate reports
* **AI Field Configuration**: Comprehensive AI configuration support for attachment, numeric, and other field types with improved interaction experience
## Permission & Access Control
* **Cell-level Permission Control**: Granular permission management at the cell level with enhanced authority matrix and record history permissions
* **Advanced Access Management**: Full access control with hasFullAccess field and improved user validation systems
## Enterprise Management
* **Custom Branding**: Complete custom branding solution for enterprise deployments
* **Department Management**: Advanced department creation with custom IDs and enhanced member management capabilities
* **Audit & Monitoring**: Comprehensive audit log functionality for tracking system activities
## Automation & Workflow
* **Enhanced Automation System**: Improved automation with nested conditions, better date comparisons, and deadlock prevention in automation actions
* **Advanced Workflow Actions**: Enhanced HTTP actions with proper encoding, JSON parsing, and error handling
# Teable Updates (Core)
## Core Platform Features
* **Base & Workspace Management**: Support for moving bases between spaces and enhanced workspace organization
* **Template System**: Complete template functionality with markdown descriptions, mobile UI optimization, and advanced duplication capabilities
* **Field Management**: Support for field duplication and improved field conversion with undo/redo functionality
## Data Management & Performance
* **Enhanced Import/Export**: Optimized import queue with worker system, improved Excel handling with precision fixes, and better export functionality
* **Database Performance**: Deadlock retry mechanisms, Prisma migration for better performance, and search index time limitations
* **Data Integrity**: Enhanced unique constraint management and improved data validation systems
## User Experience Improvements
* **Enhanced Editors**: Improved formula editor performance and date editor with manual input support and European format compatibility
* **Navigation & Discovery**: Recent base list functionality and quick page navigation with last visited page memory
* **Mobile Experience**: Comprehensive mobile optimization across all components and interfaces
## UI & Interaction
* **Advanced Filtering**: Support for filtering by formatted date and improved filter management
* **Copy/Paste Enhancement**: HTML parsing support for better data transfer between applications
* **Multi-line Support**: Field names with multi-line support and batch collapse functionality for better organization
## Template Management
Navigate to **Admin Panel** > **Template Admin** to create a new template.
You can select a base from any space, customize it with a cover image, and add a detailed description.
Users can create new bases from any available template.
## Base Import/Export
Export your base to a `.tea` file (which can be extracted as a ZIP archive)
Import an existing base from a `.tea` file
## Field Duplication
Easily duplicate any field with a single click
## Custom LLM Integration Support
* You can custom LLM integration in space setting
## Table Duplication
* Support for duplicating tables, including proper handling of linked fields and relationships
## Quick navigation
* Added memory of last visited page for quick navigation
## Plugin Enhancements
* Added floating element plugin
* Added table plugin support
* Plugin support for getting temporary tokens
* Added getSelectionRecords plugin bridge method
## Performance Improvements
* page load speed improved (50%)
## New Language Support
* Added support for five new languages:
* Turkish (tr) by @volkantasci
* Ukrainian (uk) by @yope-dev
* German (de) by @vmario89
* Italian (it) by @adrianoamalfi
* Spanish (Latin American) (es-419) by @sosamilton
## 1. Table Trash
* Allows users to restore deleted records, views, and fields.
## 2. View Duplication
* Added support for copying views, allowing users to quickly create duplicates of existing views.
## 3. Personal Views and Locked Views
* Introduced **Personal Views** for local modifications and **Locked Views** to prevent direct modifications by collaborators.
## 4. AI Integration
* Added support for custom Large Language Model APIs, enabling AI-generated formulas.
Admin Panel/Settings/AI Settings
## 5. Search Index Optimization
* Implemented search indexing, significantly improving search speed in large tables.
## 6. Email Verification at Registration
* Added email verification support during registration to enhance security.
Admin Panel/Settings/General Settings
## 7. Drag and Drop File Upload
* Users can now directly drag files into cells for quick attachment uploads.
## 8. Forced OAuth2/OIDC Login
* Introduced an environment variable to enforce OAuth2/OIDC login, enhancing authentication control.
`PASSWORD_LOGIN_DISABLED=true`
## 9. Quick API Token Permission Selection
* Simplified API token permission configuration with quick selection options.
## 10. Custom Physical Field Names
* Allows specifying custom physical field names (`dbFieldName`) when creating new fields.
## 11. Quick Filter, Sort, and Group via Field Name Right-click
## 12. Enhanced System User Display
* Improved display of system users, such as "Anonymous" roles.
## 13. HTTPS Not Strictly Required
* Copy-paste functionality is not restricted by HTTPS, except when copying large amounts of data (over 300 rows).